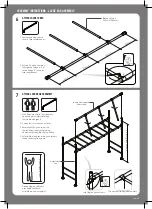
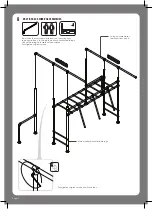
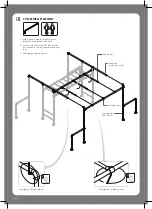
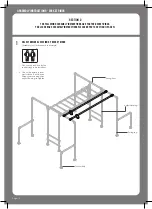
FUNKY MONKEY BARS LACHE BARS Скачать руководство пользователя страница 2

CONTENTS

Warnings

   .   .   .   .   .   .   .   .   .   .   .   .   .   .   .   .   .   .   .   .   .   .   .   .   .   .   .   .   .   .   .   .   .   .   .   .   .   .   .   .   .   .   .   .   .    Page 1

Assembly Tips

  .   .   .   .   .   .   .   .   .   .   .   .   .   .   .   .   .   .   .   .   .   .   .   .   .   .   .   .   .   .   .   .   .   .   .   .   .   .   .   .   .   .   .    Page 3                    

Inventory

   .   .   .   .   .   .   .   .   .   .   .   .   .   .   .   .   .   .   .   .   .   .   .   .   .   .   .   .   .   .   .   .   .   .   .   .   .   .   .   .   .   .   .   .   .    Page 4

Assembly Instructions

   .   .   .   .   .   .   .   .   .   .   .   .   .   .   .   .   .   .   .   .   .   .   .   .   .   .   .   .   .   .   .   .   .   .   .   .   .   .   .    Page 5


Section 1

 - Lache Bars

.   .   .   .   .   .   .   .   .   .   .   .   .   .   .   .   .   .   .   .   .   .   .   .   .   .   .   .   .   .   .   .   .   .   .   .   Page 5


Frame Preparation

   .   .   .   .   .   .   .   .   .   .   .   .   .   .   .   .   .   .   .   .   .   .   .   .   .   .   .   .   .   .   .   .   .   .   .   .   .   Page 6


Lache Bar Assembly  

.   .   .   .   . 

  .   .   .   .   .   .   .   .   .   .   .   .   .   .   .   .   .   .   .   .   .   .   .   .   .   .   .   .   .   .   .   .   Page 8


Swing Leg Assembly

.   .   .   .   .   .   .   .   .   .   .   .   .   .   .   .   .   .   .   .   .   .   .   .   .   .   .   .   .   .   .   .   .   .   .   .   .   Page 10


Section 2

 - Rocket Rings

 .   .   .   .   .   .   .   .   .   .   .   .   .   .   .   .   .   .   .   .   .   .   .   .   .   .   .   .   .   .   .   .   .   .   .   Page 13


Frame Preparation

  .   .   .   .   .   .   .   .   .   .   .   .   .   .   .   .   .   .   .   .   .   .   .   .   .   .   .   .   .   .   .   .   .   .   .   .   .   Page 14


Accessories Bar Assembly

  .   . 

  .   .   .   .   .   .   .   .   .   .   .   .   .   .   .   .   .   .   .   .   .   .   .   .   .   .   .   .   .   .   .   .   Page 15

 
Maintenance

   .   .   .   .   .   .   .   .   .   .   .   .   .   .   .   .   .   .   .   .   .   .   .   .   .   .   .   .   .   .   .   .   .   .   .   .   .   .   .   .   .   .   .   Page 18       

Page 1

SAFETY NOTICE

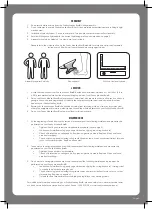
1.  Any person handling or using the Funky Monkey Bars® products must follow the instructions as described  
 

in this document. The person in charge of assembling and using the equipment must ensure that the  


recommendations for use given in this document are seen by all users.

2.  Only use the Funky Monkey Bars® after they have been fully assembled and after checking that the  
 

fittings are tightened properly (

refer to page 3 - Correct Tightening Method

).

3.  DO NOT install your Funky Monkey Bars® over concrete, asphalt, packed earth, wood decking or any  
 

other hard surface. A fall onto a hard surface can result in serious injury or death.

4.  Inspect all grub screws, bolts and nuts at the beginning of each play session to ensure your Funky Monkey  
 Bars® are tight and secure.
5.  Ensure all tubes are fully inserted into fittings until you hear the magic “CLUNK” sound.
6.  Ensure your Funky Monkey Bars® are properly secure at ALL times. Pegs are in place and inserted fully into  
 

the ground.

7.  DO NOT exceed the maximum load/weight limit as recommended by Funky Monkey Bars®.
8.  Children should be supervised by an adult at all times.
9.  Installing a gym/crash mat under the fall zone area of your Funky Monkey Bars® would be recommended  
 

for children learning this new skill. This will reduce the chance of injury and build the child’s confidence  


while they build strength and master the skill.

10.  Ensure you have thoroughly read your assembly and installation instructions and viewed our on-line   
 

installation videos at 

https://www.funkymonkeybars.com/blogs/installation-maintenance-videos

11.  DO NOT climb, sit or stand on top of the monkey bar (horizontal ladder) section.
12.  DO NOT jump from the top of any section of the monkey bar.
13.  DO NOT use your Funky Monkey Bars® when wet as the steel will be slippery.
14.  DO NOT attach items to your frame that are not designed specifically to be used with Funky Monkey  
 Bars®, especially lower quality products that have not been approved by Funky Monkey Bars®.
15.  Ensure the height of your Funky Monkey Bars® (horizontal ladder) are set at a level that is age appropriate.
16.  DO NOT install your Funky Monkey Bars® over or near objects that could interfere with users in an unsafe  
 

way. Maintain a clear area around your Funky Monkey Bars®.

17.  DO NOT use your Funky Monkey Bars® while under the influence of drugs and alcohol.
18.  Wear clothing free of drawstrings, hooks, loops or anything that could get caught while using your Funky  
 

Monkey Bars® and result in entanglement and/or strangulation.

WARNING

PLEASE CAREFULLY READ ALL INFORMATION CONTAINED IN THIS ASSEMBLY MANUAL BEFORE 

YOU INSTALL AND USE YOUR FUNKY MONKEY BARS®.

WARNINGS

Содержание LACHE BARS

Страница 1: ...ROCKET RINGS OR LACHE BARS ADD ON ASSEMBLY INSTRUCTIONS ROCKET RINGS Section 2 LACHE BARS Section 1 ...

Страница 2: ... 8 Children should be supervised by an adult at all times 9 Installing a gym crash mat under the fall zone area of your Funky Monkey Bars would be recommended for children learning this new skill This will reduce the chance of injury and build the child s confidence while they build strength and master the skill 10 Ensure you have thoroughly read your assembly and installation instructions and vie...

Страница 3: ...ocesses be performed on your Funky Monkey Bars Tighten all connections and hardware Check all protective coverings on bolts pipes edges and corners Replace if they are loose cracked or missing 3 Once a month during play season we would recommend the following maintenance processes be performed on your Funky Monkey Bars Lubricate all metallic moving parts as per instructions flying fox swing hooks ...

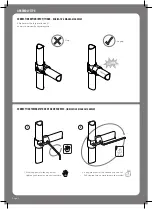
Страница 4: ...TO FITTINGS indicative diagram shown CORRECT TIGHTENING METHOD OF GRUB SCREWS indicative diagram shown Gap No gap CLUNK 1 With long end of allen key hand tighten grub screw as much as possible 2 Using other end of the allen key do one full 360 degree turn as a minimum use muscles ASSEMBLY TIPS 1 2 o 360 ...

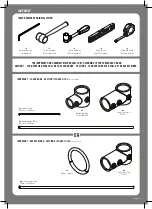
Страница 5: ...le THE INVENTORY AND ASSEMBLY METHOD WILL VARY ACCORDING TO THE PURCHASED ADD ON SECTION 1 YOUR SUPPLIED PACK WILL BE THE LACHE BARS SECTION 2 YOUR SUPPLIED PACK WILL BE THE ROCKET RINGS OR INVENTORY ROCKET RINGS SECTION 2 PAGES 13 18 Not to scale 2x Accessories Tube 50Dia x 2950mm 2x Accessories Tube 50Dia x 2950mm 4x Long Short Tee D 101L 4x Long Short Tee D 101L 3x Lache Tube 33Dia x 1040mm 6x ...

Страница 6: ...able leg are separated by 1040mm both ends If not remove pegs on A B C D loosen all short tees on swing bars and slide the frame evenly into position Adjust until correct Check level and square then re peg 1040mm Swing leg Adjustable leg A B C D Swing bars and short tees SECTION 1 THE FOLLOWING ASSEMBLY INSTRUCTIONS ARE FOR THE LACHE BARS FOR ROCKET RINGS ASSEMBLY INSTRUCTIONS PLEASE REFER TO SECT...

Страница 7: ...er legs and twirly whirlys to the ground 2 Remove elbows from swing legs 3 Twirly whirly Swing bar 1 On the selected install side remove base plate pegs 2 Loosen all grub screws on elbows connecting swing bars to swing legs on the install side A and B 2 Swing bar Swing leg A B ASSEMBLY INSTRUCTIONS FRAME PREPARATION ...

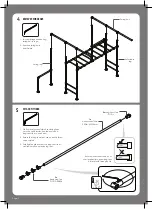
Страница 8: ...l ground slide 3 reducing tees onto the accessories bar then attach a long short tee to each end 2 Ensure the long short tees are correctly fitted as per detail 3 Fully tighten grub screws on long short tees and leave loose on reducing tees 360 o 3x Reducing Tee D 101 D48 B34 Page 7 4 1 Loosen fittings connecting swing bar to legs 2 Remove swing bars from frame REMOVE SWING BARS Swing bar Swing le...

Страница 9: ... lache bars height 360 o choose height value X Fully tighten grub screws Grub screws facing downwards Adjustable leg Lache bar assembly from step 6 7 ATTACH LACHE BAR ASSEMBLY 1 With 2 people rotate the assembly and slide onto adjustable legs to a desired height X 2 Check that it is square and level 3 Ensure that the grub screws on the reducing tees will be facing downwards when lifted into positi...

Страница 10: ...p 2 to the main monkey bar adjustable legs Check the swing bars are level and square Fully tighten all grub screws 8 RE ATTACH 2x SWING BAR ASSEMBLIES Fully tighten all grub screws on all short tees 360 o Swing bar assemblies removed from step 4 Main monkey bar adjustable legs ...

Страница 11: ...ase plates on the legs 2 Position long short tee A and B at selected height X from step 7 2 Fit accessories bar into long short tees replace elbows removed in step 3 then fully tighten all grub screws 2x Legs from step 3 B A Height X 2x Long Short Tee D 101L Accessories Tube 50Dia x 2950mm 3x Reducing Tee D 101 D48 B34 650mm 875mm 875mm 360 o Fully tighten grub screws Reducing tee grub screws faci...

Страница 12: ...g bar ends lache tube side 2 At the same time swivel the lache tubes into position in the leg assembly reducing tees 3 Fully tighten all grub screws Swing bar lache tube side Leg assembly from step 9 10 ATTACH SWING LEG ASSEMBLY Lache tube Reducing tees 360 o Fully tighten all grub screws ...

Страница 13: ...whirlys if there is movement in your frame refer to frame assembly instructions or to video section of website http www funkymonkeybars com pages videos 5 Read maintenance section on page 18 of this booklet 1 Check frame is level and square 2 Ensure all grub screws are firmly tightened 3 Hammer in pegs x4 11 4x Pegs SECURE TO GROUND Page 12 12 ...

Страница 14: ...location for the rocket rings to be installed 2 Check the frame is level and square If not loosen fittings remove pegs and adjust Re peg re tighten Swing leg Adjustable leg Swing bars SECTION 2 THE FOLLOWING ASSEMBLY INSTRUCTIONS ARE FOR THE ROCKET RINGS FOR LACHE BARS ASSEMBLY INSTRUCTIONS PLEASE REFER TO SECTION 1 PAGE 5 Twirly whirly ...

Страница 15: ... x4 Swing leg Lower legs and twirly whirlys to the ground 3 Twirly whirly 1 On the selected install side remove base plate pegs 2 Loosen top grub screws on elbows connecting swing bars to swing legs on the install side A and B 2 Swing bar Swing leg A B ASSEMBLY INSTRUCTIONS FRAME PREPARATION ...

Страница 16: ...Check it is square and level then tighten all grub screws Variable 350 500mm 180º 180º 360 o 1 On flat level ground slide on 4 long short tees Fit rocket rings onto bar 2 Correctly fit the long short tees as shown then firmly tighten all grub screws 4 ASSEMBLE ACCESSORIES BARS x2 1 2 2x Accessories Tube 50Dia x 2950mm 2x Rocket Rings 2x Long Short Tee D 101L 2x Long Short Tee D 101L Ensure accesso...

Страница 17: ... 7 RE ATTACH SWING BAR LEGS 1 Lift legs and twirly whirly bars back into position 2 Fully tighten grub screws on swing leg elbows Swing bar Swing leg removed in step 3 Fully tighten all elbow grub screws 360 o ...

Страница 18: ... whirlys if there is movement in your frame refer to frame assembly instructions or to video section of website http www funkymonkeybars com pages videos 5 Read maintenance section on page 18 of this booklet 1 Check frame is level and square 2 Ensure all grub screws are firmly tightened 3 Hammer in pegs x4 8 4x Pegs SECURE TO GROUND Page 17 9 ...

Страница 19: ...At the beginning of each heavy play session especially a party and twice a month during play season ensure 1 Tighten all hardware grub screws nuts and bolts 2 Pegs are in place and fully secure 3 Lubricate all metallic moving parts with WD40 or Vasaline trolley and swing hooks 4 Ensure your frame is level and square FAILURE TO DO SO COULD RESULT IN SERIOUS INJURY OR DEATH ...

Страница 20: ... funkymonkeybars com www funkymonkeybars com 9 Cutting Way Yangebup WA 6164 we are social monkeys AUSTRALIAN MADE AND OWNED ABN IP Australia All Funky Monkey Bars designs are registered and protected under IP Australian certification ...

Отзывы: