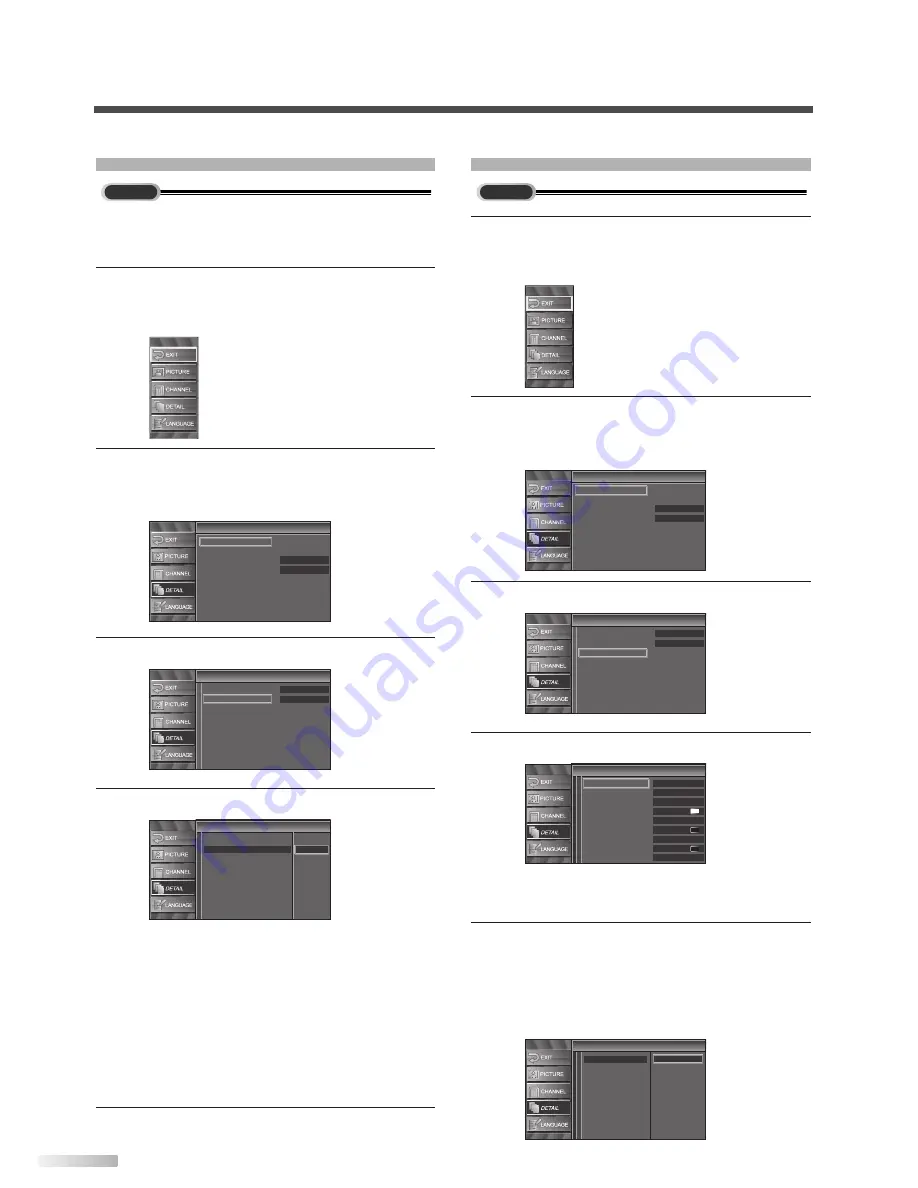
background image

26

EN

DTV CLOSED CAPTION

Apart from closed captions, DTV has its own closed
captions called DTV CC. Use this menu to change
the settings for DTV CC.

1

Display the setup screen.

• Press 

[SETUP]

.

The following setup screen appears.

2

Select “DETAIL” and press 

[ENTER]

to confirm.

• Using 

[

/

L

]

, select “Closed Caption” and press

[ENTER]

to confirm.

3

Select “DTV CC” and press 

[ENTER]

to confirm.

4

Switch the DTV Closed Caption mode.

• Using 

[

/

L

]

, select the desired DTV Closed

Caption, then press 

[ENTER]

.

Off:

Select if you do not want DTV CC. This is the
default.

Service 1 to Service 6:

Select one of these before changing any other
item in the Closed Caption menu. Choose
Service 1 under normal circumstances.

5

To exit the setup, press 

[SETUP]

.

Closed Caption

Closed Caption

Conventional CC

CC Style

DTV CC

Off

Service1

Service2

Service3

Service4

Service5

Service6

Closed Caption

Closed Caption

Off

Off

Conventional CC

DTV CC

CC Style

Detail

Detail

Closed Caption

V–chip

HDMI Audio

Panel Saver

Auto

Off

DTV

CLOSED CAPTION STYLE

1

Display the setup screen.

• Press 

[SETUP]

.

The following setup screen appears.

2

Select “DETAIL” and press 

[ENTER]

to confirm.

• Using 

[

/

L

]

, select “Closed Caption” and press

[ENTER]

to confirm.

3

Select “CC Style” and press  

[ENTER]

to confirm.

4

Switch the Closed Caption Style.

• Using 

[

/

L

]

, select the desired Closed Caption

Style.

5

Use “User Setting”.

• The “User Setting” function lets you change CC

style.

• Using 

[

/

L

]

, select “User Setting”.

• Press 

[ENTER]

and set “User Setting” to “On”.

CC Style

CC Style

Off

On

Font Style

Font Size

Font Color

Font Opacity

Back Color

Back Opacity

Edge Color

Edge Type

User Setting

CC Style

CC Style

Off

Font0

Middle

White

Solid

Black

Black

None

Solid

User Setting

Font Style

Font Size

Font Color

Font Opacity

Back Color

Back Opacity

Edge Color

Edge Type

Closed Caption

Closed Caption

Conventional CC

DTV CC

CC Style

Off

Off

Detail

Detail

Closed Caption

V–chip

HDMI Audio

Panel Saver

Auto

Off

DTV

Содержание iLO CIWP4206 A

Страница 1: ...MUST CONNECT ANTENNA By changing the screen display mode from time to time you can reduce burn in on screen Refer to CHANGING THE SCREEN DISPLAY MODE on page 21 IF YOU NEED ADDITIONAL ASSISTANCE WITH...

Страница 2: ...two blades and a third grounding prong The wide blade or the third prong are provided for your safety If the provid ed plug does not fit into your outlet consult an electrician for replacement of the...

Страница 3: ...e user could lose the authority to operate this equipment if an unauthorized change or modification is made Model No Serial No Dealer Purchase from Date of Purchase Dealer Phone No Dealer Address A NO...

Страница 4: ...ess to inappropriate programs Closed Caption Decoder This TV contains the built in Closed Caption Decoder that displays text across the screen It allows you to read the dialogue of a TV program or oth...

Страница 5: ...ANTENNA CONFIRMATION 16 LANGUAGE SELECTION 17 SETTING THE PANEL SAVER 17 WATCHING TV 18 CHANNEL SELECTION 18 VOLUME ADJUSTMENT 18 STILL MODE 19 SELECTING AUDIO CHANNELS 19 ACCESSING EXTERNAL DEVICES 2...

Страница 6: ...f setting when the menu is dis played POWER button p13 To turn TV on off Infrared Sensor Window Receives infrared rays transmit ted from the remote control NOTE With buttons VOL X Y or MUTE you can on...

Страница 7: ...r external audio equipment Use AUDIO IN jacks of external equipment HDMI IN jack HDMI cable connection for external video equipment i e DVD recorder COMPONENT2 and AUDIO jacks Component cable connecti...

Страница 8: ...ffer depending on the CABLE SATELLITE box For more informa tion please contact your cable satellite provider ANT IN Coaxial cable not included Coaxial cable not included Cable box or Satellite box Sat...

Страница 9: ...above DVI does not show image if the 480i does not accept EIA CEA 861 861B ANT IN AUDIO OUT AUDIO HDMI IN L R L R DIGITAL AUDIO OUT COAXIAL HDMI DVI OUT AUDIO OUT R L To DVI output jack To audio outpu...

Страница 10: ...o your TV s S VIDEO2 input jack connect audio cables to the AUDIO L R jacks of VIDEO2 NOTE If you connect to the S VIDEO jack and the VIDEO jack at the same time the S Video connection will have prior...

Страница 11: ...Dolby and the double D symbol are trademarks of Dolby Laboratories ANT IN AUDIO OUT AUDIO HDMI IN L R L R DIGITAL AUDIO OUT COAXIAL HDMI COAXIAL Rear of this TV MD deck DAT deck etc Dolby Digital dec...

Страница 12: ...S VIDEO1 COMPONENT1 HDMI IN L R L R DIGITAL AUDIO OUT COAXIAL 1 2 A C I N 1 Connect the power cable to this TV first 2 Connect the power cable to an AC outlet CAUTION Do not connect the power cable t...

Страница 13: ...ate your TV for more than 45 seconds dur ing the initial setup the message boxes start to move to the lower left hand corner of the screen to prevent burn in This is to save your screen from burn in P...

Страница 14: ...screen once scanning stops Now the system is scanning for channels please wait Exit SETUP 72 Analog channels 10ch Digital channels 6ch Autoscan Autoscan Autoscan will rescan all channels This may tak...

Страница 15: ...Channel Autoscan Channel List Manual Register Antenna ENTER STILL SETUP BACK SCREEN MODE INFO CH RETURN 0 ENTER SETUP MANUAL REGISTER This function lets you manually add channels not memorized due to...

Страница 16: ...want to check signal strength Antenna Antenna Back Ch Change 11 CH Now 70 Peak 80 Channel Channel Autoscan Channel List Manual Register Antenna ENTER POWER SLEEP AUDIO STILL SETUP BACK SCREEN MODE INF...

Страница 17: ...play from being etched by an unchanging image You can specify a setting for it 1 Display the setup screen Press SETUP The following setup screen appears 2 Select DETAIL and press ENTER to confirm Usin...

Страница 18: ...the air time In this case the main channel is called major channel and the minor channel is called minor channel ENTER 1 1 2 ENTER 1 2 ENTER POWER SLEEP AUDIO STILL SETUP BACK SCREEN MODE INFO CH RETU...

Страница 19: ...UDIO NOTE Press any key except POWER to cancel still mode Still AUDIO STILL SETUP SCREEN MODE 1 2 3 4 5 6 7 8 9 0 STILL Press AUDIO to cycle through available audio channels When the broadcasting has...

Страница 20: ...the HDMI IN jack on the TV select HDMI TV DTV channel Video1 Video2 Component1 Component2 HDMI ENTER POWER SLEEP AUDIO STILL SETUP BACK SCREEN MODE INFO CH RETURN MUTE VOL CH 1 2 3 4 5 6 7 8 9 0 INPU...

Страница 21: ...re at a 16 9 size with horizontal elongation necessary to fill the screen Cinema Cinema displays a 4 3 picture at a 16 9 size with less horizontal elongation necessary to fill the screen because a lit...

Страница 22: ...reen The following information is displayed 1 Program title 2 Broadcast station 3 Program guide max 4 lines displayed 4 Channel number 5 Audio language Other is displayed when the audio language canno...

Страница 23: ...GUAGE SELECTION on page 17 NOTES To cancel the setup screen press SETUP If you do not operate this TV for more than 45 seconds dur ing initial setup the message boxes start to move to the lower left h...

Страница 24: ...tings Color Temp Dynamic 30 Neutral 60 36 0 0 0 ENTER SETUP BACK SCREEN MODE INFO ENTER SETUP Contrast Using s B adjust to increase or decrease contrast s To decrease contrast B To increase contrast C...

Страница 25: ...often a secondary lan guage translation simplified English or displayed at a slower rate CC2 CC4 Text2 and Text4 are rarely available and broadcasters use them only in special conditions such as when...

Страница 26: ...Closed Caption Off Off Conventional CC DTV CC CC Style Detail Detail Closed Caption V chip HDMI Audio Panel Saver Auto Off DTV CLOSED CAPTION STYLE 1 Display the setup screen Press SETUP The followin...

Страница 27: ...and Edge Type Font Opacity Font opacity of the displayed caption can be switched as below Back Color Background color of the displayed caption can be switched as below Back Opacity Background opacity...

Страница 28: ...MODE INFO 1 2 3 4 5 6 7 8 9 0 INPUT SELECT ENTER SETUP 1 2 3 4 5 6 7 8 9 0 3 Enter the password Use the Number buttons and enter the 4 digit number When you have not set up your password enter 0000 W...

Страница 29: ...k BACK ENTER X NC 17 R PG 13 PG G NR 5 Set TV Rating Using K L select the rating Press ENTER and set to View or Block for the rating without sub categories For the rating with sub categories press K L...

Страница 30: ...ating New Password C New Password HDMI AUDIO Set the method of sound input for HDMI jack 1 Display the setup screen Press SETUP The following setup screen is displayed 2 Select DETAIL and press ENTER...

Страница 31: ...nual included with the wall mount kit ANT IN AUDIO OUT AUDIO HDMI COMPONENT2 Y Pb Pr L R AUDIO Y Pb Pr L R AUDIO L R AUDIO VIDEO1 AC IN S VIDEO1 COMPONENT1 HDMI IN L R L R DIGITAL AUDIO OUT COAXIAL 2...

Страница 32: ...setup screen Check the antenna or cable connection to the main unit When the outside antenna is used check the wire condition and connection Electrical interference from nearby appliances may affect p...

Страница 33: ...from nearby appliances may affect picture quality View other TV channels The problem might be limited to the broadcasting station Electrical interference from nearby appliances may affect picture qual...

Страница 34: ...y cause captioning to be incomplete Broadcasting station may shorten the program to insert adver tisement The closed caption decoder cannot read the informa tion of the shortened program The videotape...

Страница 35: ...prove the picture Snowing occurring when the TV is connected to a cable TV system may indicate a bad cable wire or loose connection Confirm that the cable wire is properly connected The plasma display...

Страница 36: ...ly from main audio chan nel This audio channel is used as an alternate in bilingual broad casting Standard Definition TV SDTV Standard digital format that is sim ilar to the NTSC picture quality S Vid...

Страница 37: ...p 4 pin jacks Pb Pr 700mVpp 4 RCA jacks L R HDMI Audio Input HDMI jack 2 RCA jacks L R Coaxial Digital Audio Output 1 pin jack 500mVpp Analog Audio Output 2 RCA jacks L R Stereo Sound System Speaker E...

Страница 38: ...ts from fire flood lightning or other acts of God THIS WARRANTY DOES NOT COVER PACKING MATERIALS ANY ACCESSORIES EXCEPT REMOTE CONTROL ANY COSMETIC PARTS COMPLETE ASSEMBLY PARTS DEMO OR FLOOR MODELS F...

Страница 39: ...onnection CONEXION DE SORTIE AUDIO NUM RIQUE Stereo system Cha ne st r o Dolby Digital decoder D codeur Dolby Digital Le cordon d alimentation est fourni Power cord is included ANT IN AUDIO OUT AUDIO...

Страница 40: ...ONENT VIDEO OUT L R Y Cb Pb Cr Pr OR OU 1 Owner s Manual Mode d emploi 2 http www funai corp com 3 1 800 474 0045 FOR MORE INFORMATION POUR PLUS D INFORMATIONS 1EMN22015A L0703CD L0701CB Printed in Ma...

Отзывы: