background image

15

English

Playback Mode

This unit can play JPEG picture, MP3 music and video 
files from USB flash drive.

Setup for playback

You must connect the USB flash memory to USB 
terminal of this unit (shown below).

1

Press 

INPUT

 to display the input mode and use 

Ÿ

 / 

ź

 to select 

[Media]

, and then press 

OK

.

[PHOTO]

2

Use 

Ż

 / 

Ź

 to select 

[PHOTO]

 and press 

OK

 to 

enter.

3

Use 

Ż

 / 

Ź

 to select 

[C]

 and press 

OK

 to enter 

your file.

4

Use 

Ÿ

 / 

ź

 / 

Ż

 / 

Ź

 to select the desired file, then 

press 

OK

.

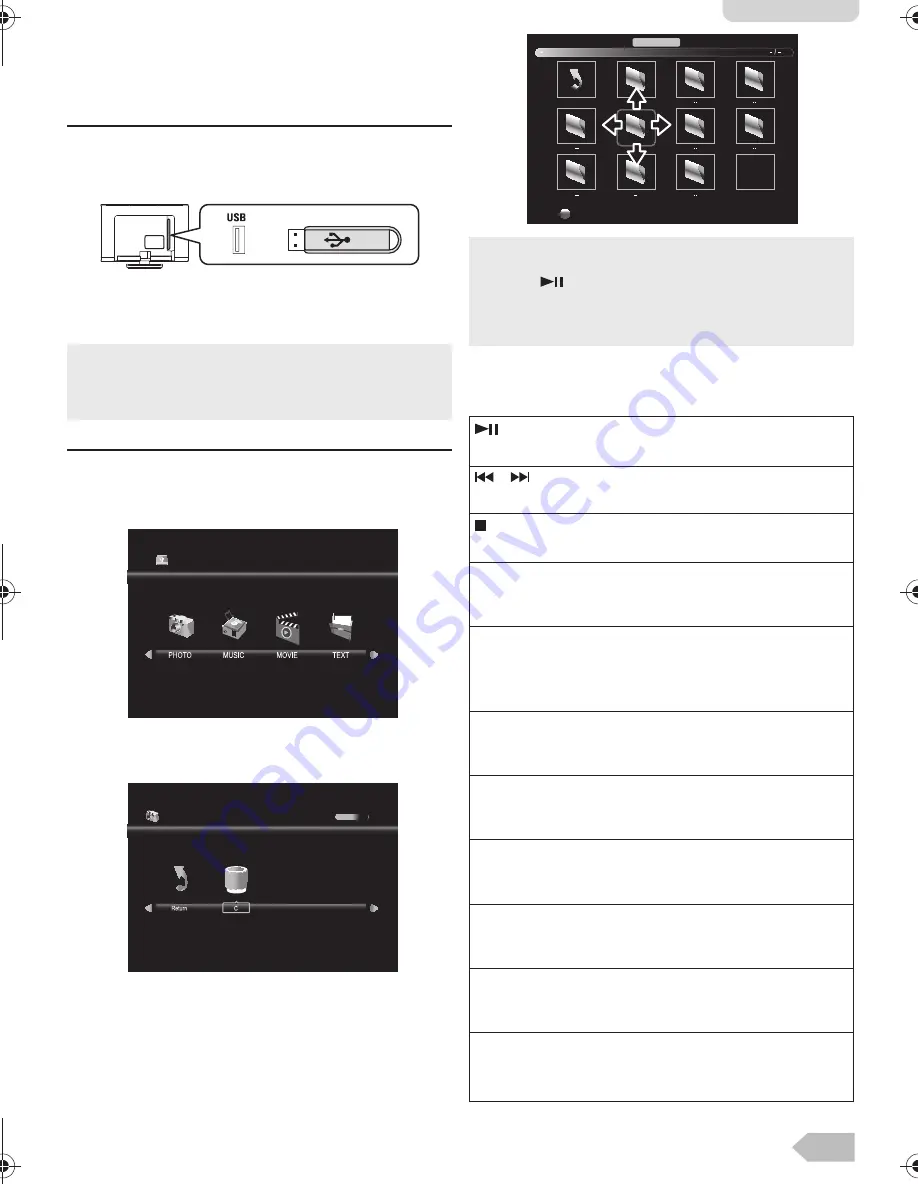
Operation in Slideshow

Press 

OK

 or 

DISPLAY

 to display the menu.

If you want to exit this mode, select any other input mode. 
Refer to “Switching the Input Mode” (p. 14).

You can check Multimedia Specification. Refer to 
“MULTIMEDIA FORMAT” (p. 27)

USB2.0

1 / 1

PHOTO

The check box is displayed at the right bottom by pressing 
the 

OK

. The files having the check box are played by 

pressing 

. If they are not selected, then all playable files 

in the folder are played.

If you put audio files into same folder of picture files, you can 
play music during the slideshow.

 :

Press to play or pause the slideshow.

 / 

  :

Press to skip the file backward or forward.

 :

Press to stop the slideshow.

[Repeat] :

Use 

Ż

 / 

Ź

 and press 

OK

 to select the repeat mode; 

[Repeat None]

[Repeat 1]

 or 

[Repeat All]

 in order.

[Music] :

Use 

Ż

 / 

Ź

 to select 

[Music]

 and press 

OK

 to play, 

then the music file in the same folder play 
automatically.

[Playlist] :

Use 

Ż

 / 

Ź


and press 

OK

 to select 

[Playlist] 

to show 

the playlist.

[Info.] :

Use 

Ż

 / 

Ź

 and press 

OK

 to select 

[Info.] 

to show the 

details.

[Rotate] :

Use 

Ż

 / 

Ź

 to select right-handed or left-handed rotate 

and press 

OK 

to turn the picture by 90 degrees.

[Zoom In] :

Use 

Ż

 / 

Ź

 to select 

[Zoom In]

 and press 

OK

 to zoom 

in the display.

[Zoom Out] :

Use 

Ż

 / 

Ź

 to select 

[Zoom Out]

 and press 

OK

 to 

zoom out the display.

[Move View]:

Use 

Ż

 / 

Ź

 and press 

OK

 to select 

[Move View]

 to 

move viewing location during zoom in the display.

Delete

Return

PHOTO

#76#26A'0HO2CIG/QPFC[1EVQDGT#/

Содержание 39FW702

Страница 1: ...OOK UP FOR YPbPr 10 HOOK UP FOR COMPOSITE 10 HOOK UP FOR COAXIAL 11 HOOK UP FOR HEADPHONE 11 UNIT INFORMATION 12 OPERATIONS 14 Watching a TV Programme 14 Favorite 14 Sleep Timer 14 Switching the Input...

Страница 2: ...e device Do not mix different types of batteries together e g Alkaline and Carbon Zinc or rechargeable batteries like ni cad ni mh etc or old batteries with fresh ones If the device is not to be used...

Страница 3: ...ided along with the Wall Mount Kit When wall mounting the product please contact qualified personnel If users choose to install the TV on their own the producer is not responsible for any damages caus...

Страница 4: ...lish ATTACHING THE BASE MOUNTING THE UNIT ON YOUR FURNITURE Screw this unit on your furniture tightly using wood screw not supplied in the hole at the back of the base as shown Screw dimension 5 1 x 2...

Страница 5: ...6 SET UP FOR ANTENNA SET UP FOR AC PLUG HDMI D SUB VGA VGA AUDIO YPbPr Pr Pb Y USB COAXIAL OUT R L AV IN VIDEO ANTENNA IN PHONES ANTENNA input jack...

Страница 6: ...hannels to watch TV 1 Press MENU to display the setup menu 2 Use to select CHANNEL in the setup menu 3 Use to select Auto Tuning in the Channel menu and press OK to start tuning to setup channels For...

Страница 7: ...8 SELECTING A CHANNEL ADJUSTING THE VOLUME Volume 31 P...

Страница 8: ...PC USB COAXIAL OUT R L AV IN VIDEO ANTENNA IN PHONES HDMI D SUB VGA VGA AUDIO YPbPr Pr Pb Y HDMI input jack USB COAXIAL OUT R L AV IN VIDEO ANTENNA IN PHONES HDMI D SUB VGA VGA AUDIO YPbPr Pr Pb Y VGA...

Страница 9: ...AV IN VIDEO ANTENNA IN PHONES HDMI D SUB VGA VGA AUDIO YPbPr Pr Pb Y YPbPr Component video input jacks Audio L R input jacks USB COAXIAL OUT R L AV IN VIDEO ANTENNA IN PHONES HDMI D SUB VGA VGA AUDIO...

Страница 10: ...DPHONE USB COAXIAL OUT R L AV IN VIDEO ANTENNA IN PHONES HDMI D SUB VGA VGA AUDIO YPbPr Pr Pb Y Coaxial digital audio output jack USB COAXIAL OUT R L AV IN VIDEO ANTENNA IN PHONES HDMI D SUB VGA VGA A...

Страница 11: ...p 14 Exit the menu 11 MENU p 19 12 INPUT p 14 13 SLEEP p 14 14 ASPECT p 14 15 Play Pause Skip backward Skip forward Stop Rewind Fast forward 16 FAV 17 p 14 To browse a channel 18 DISPLAY Display the c...

Страница 12: ...Receives the infrared rays transmitted from the remote control 21 25 22 26 31 28 29 27 32 33 30 24 23 Data input from USB flash memory only User should not connect any devices to the USB terminal suc...

Страница 13: ...Press ASPECT button repeatedly to switch the TV screen display mode Available options are as mentioned below OPERATIONS Read this first These operations are accessible by remote control Some may also...

Страница 14: ...e played by pressing If they are not selected then all playable files in the folder are played If you put audio files into same folder of picture files you can play music during the slideshow Press to...

Страница 15: ...es in the folder are played USB2 0 1 1 MUSIC Delete MUSIC Press to play or pause the music playback Press to rewind or fast forward the music playback Press to skip backward or forward a music file Pr...

Страница 16: ...e video playback Press to rewind or fast forward the video playback Press to skip backward or forward a video file Press to stop the video playback Repeat Use and press OK to select the repeat mode Re...

Страница 17: ...FUNAI cannot be held responsible if your USB flash memory is not supported nor will FUNAI accept any liability for damage or loss of stored data A USB flash memory that required its own driver or the...

Страница 18: ...ttings You can edit the screen settings in PC mode 1 Use to select SCREEN Auto Adjust You can change the screen settings automatically 2 Use to select Auto Adjust then press OK DETAIL SETTINGS Read th...

Страница 19: ...elect Dynamic Contrast then press OK 3 Use to select On or Off then press OK Sound Adjustment You can adjust the sound settings according to your personal preferences 1 Use to select SOUND Sound Mode...

Страница 20: ...ct Sleep Timer then press OK 3 Use to select the time you want then press OK Auto Standby You can set the time to turn off the display power automatically In spite of this setting the unit goes into s...

Страница 21: ...f using Key Lock If you set to On you cannot use the buttons on the unit 2 Use to select Key Lock then select On or Off using Reset You can restore the all settings 2 Use to select Reset then press OK...

Страница 22: ...a soft cloth Never use a solvent or alcohol Do not spray insecticide liquid near the unit Such chemicals may cause damage and discoloration to the exposed surfaces Panel Cleaning If the LCD panel shou...

Страница 23: ...antenna is being used check for broken wire Adjust Contrast and Brightness control Surrounding temperature is too low Lines or Streaks in Picture Try another channel if that s OK then possibly due to...

Страница 24: ...Zoom1 Zoom2 Just Scan Audio output 2 x 10W Bass adjustment Yes Treble adjustment Yes Sound mode 5 modes RF input x 1 AV IN Composite x 1 Component IN x 1 HDMI x 1 USB x 1 VGA IN x 1 Audio IN VGA 3 5m...

Страница 25: ...ds Up to Full HD 1920 x1080 OSD Language English Thai Built in tuner Yes Power supply AC 100 240V 50 60Hz 10 10 Power consumption 135 W standby less than 1 W Remote control unit x 1 Table top stand x...

Страница 26: ...on 9600 x 6400 Interlaced Max Resolution 1200 x 800 File Ext AUDIO Codec Remark mp3 MP3 Sample rate 32k 48kHz Bit rate 32k 320kbps Channel Mono Stereo File Ext VIDEO Codec AUDIO Codec Remark avi Xvid...

Страница 27: ...28...

Страница 28: ...29 English...

Страница 29: ...Printed in Thailand A2UTAPT 1EMN30399...

Отзывы: