background image

10

KNOW YOUR PRODUCT

Pre-Setup Checks

Examine the machine for signs of transit damage. If there are any signs of damage, please 

contact the Customer Support on:


Australia 

1800 951 371


New Zealand

 0800 647 840

¥   The compressor should be set up near the working area.
¥  Make sure the intake air is dry and dust-free.
¥  Do not set up the compressor in damp or wet areas.
¥   The compressor may only be used in suitable areas (with good ventilation and an 

ambient temperature from 5¼C to +40¼C). There must be no dust, acids, vapours, 

explosive gases or flammable gases in the room. 

Attaching Air Tools

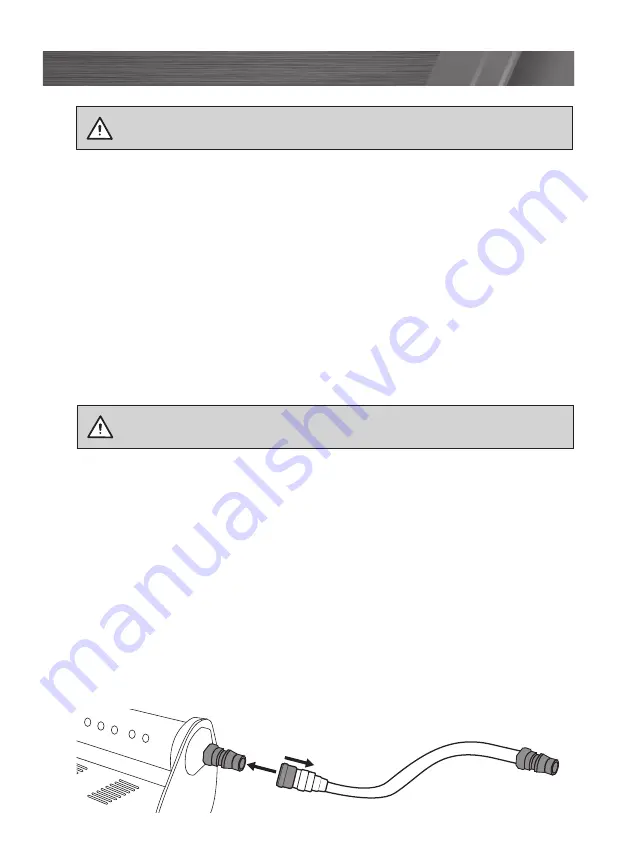
1.  Align the Nitto head on the short 40cm air hose with the pressure outlet on the air 

compressor.

2.  Press the air hose head into the outlet coupling until it clicks into place.

Note:

 If the Nitto coupling is tight and does not click into place, pull the sleeve back on the 

female Nitto head and then press the fittings together until they click into place.

3.    Repeat the same process above to connect the 8m air hose onto the male end of the 

short 40cm air hose. You are now ready to attach your air tools

ASSEMBLY

WARNING!

 Ensure the tool is turned off and disconnected from the power 

supply before performing any of the following operations.

WARNING!

 Ensure the tool is turned off and disconnected from the power 

supply before performing any of the following operations.

Содержание FBAC-12160

Страница 1: ...ITTING LIGHTWEIGHT PORTABLE DESIGN INSTRUCTION MANUAL WARNING Read all safety warnings and all instructions Failure to follow the warnings and instructions may result in electric shock fire and or ser...

Страница 2: ...h 8m Weight 8 75 kg Max Noise 85dB SPECIFICATIONS MODEL NO FBAC 12160 KNOW YOUR PRODUCT 8m Rubber Hose with Gauge 1 Pressure Gauge 2 Tire Inflation Connection Schrader 3 High Pressure Rubber Hose 8m 4...

Страница 3: ...PRODUCT Air Compressor 1 Carry Handle 2 Circuit Breaker Button 3 Regulated Pressure Nitto Outlet 4 On Off Switch 5 12V DC Battery Clips 6 Base 7 Suction Cup Rubber Feet 8 Pressure Release Value 6 2 5...

Страница 4: ...CT Page 02 INTRODUCTION Page 05 SAFETY INSTRUCTIONS Page 05 ASSEMBLY Page 10 CONTROLS Page 12 OPERATION Page 13 MAINTENANCE Page 15 TROUBLE SHOOTING Page 16 DESCRIPTION OF SYMBOLS Page 17 CONTENTS Pag...

Страница 5: ...AL SAFETY Read and understand the manual prior to operating this tool Save these instructions and other documents supplied with this tool for future reference The electric motor has been designed for...

Страница 6: ...tion Protective equipment such as dust mask non skid safety shoes hard hat or hearing protection used for appropriate conditions will reduce personal injuries c Prevent unintentional starting Ensure t...

Страница 7: ...d any other condition that may affect the power tool s operation If damaged have the power tool repaired before use Many accidents are caused by poorly maintained power tools f Keep cutting tools shar...

Страница 8: ...moving parts do not operate the compressor with the safety shield removed Allow hot parts to cool before handling or servicing Be certain to read all the labels on the containers of paint or other ma...

Страница 9: ...breathing mask is not worn Damage to hearing if effective earmuffs are not worn Damage to the eyes if effective safety goggles or shield are not worn WARNING In the event that an air line is cut or b...

Страница 10: ...Tools 1 Align the Nitto head on the short 40cm air hose with the pressure outlet on the air compressor 2 Press the air hose head into the outlet coupling until it clicks into place Note If the Nitto...

Страница 11: ...of wear or damage Replace the part or take it to an authorised repairer WARNING Keep the vehicle running while using the air compressor to prevent the vehicles battery from going flat WARNING Ensure...

Страница 12: ...f position Ensure the compressor is in an upright position 1 Attach the positive battery clamp to Red to the positive terminal of the battery 2 Attach the negative battery clamp to Black to the negati...

Страница 13: ...leave the compressor unattended while the On Off Switch is in the On position In Line Pressure Gauge The in line pressure gauge allows you to conveniently monitor the air pressure in the object durin...

Страница 14: ...The safety relief valve has been set for the highest permitted pressure of the tank It is prohibited to adjust the safety relief valve or to remove its seal The safety relief valve works automatically...

Страница 15: ...re cleaning Do not clean the compressor with water solvents or the like Storage Switch off the compressor and place in soft carry bag along with any additional attachments Store the compressor only in...

Страница 16: ...compressor does not start No power supply Check the power supply the power cord and the battery connections Outside temperature is too low Never operate with an outside temperature of below 5 Battery...

Страница 17: ...ose is attached bar L min Litres Electrical Emissions Conformity EMC No protection against ingress from water lP20 Warning The equipment is remote controlled and may start up without warning DESCRIPTI...

Страница 18: ...vailable to you under law The warranty covers manufacturer defects in materials workmanship and finish under normal use 1 YEAR WARRANTY Your product is guaranteed for a period of 12 months from the or...

Отзывы: