


En-6
4.
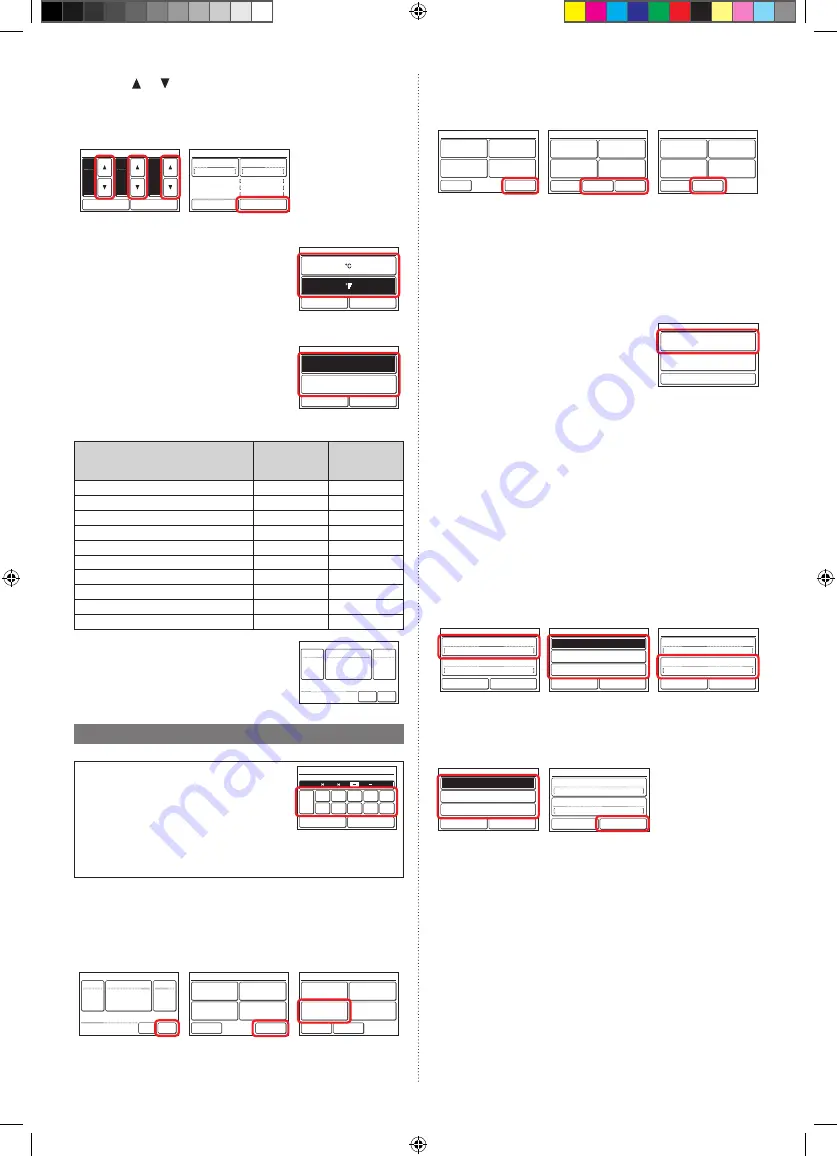
Touch [ ] or [ ] to set hours, minutes, and AM/PM. Touch [OK] to
return to the “Date and Time Setting” screen.
5.
Touch [OK] on the “Date and Time Setting” screen to display the
“Temp. Unit Setting” screen.
4.
5.
12
00
Sun 12:00AM
Time
Cancel
OK
hour
AM
min.
Date and Time Setting
Date
01/ 01/2017
Time
12:00 AM
Sun 12:00AM
Cancel
OK
Date Format
Day/Month/Year
Time Format
12:00-11:59AM/PM
Summer Time Setting
Disable
6.2.5. Temp. Unit Setting
1.
Select and touch [°F] or [°C] and touch
[OK].
°C
°F
Temp. Unit Setting
Cancel
OK
2.
Touch [OK] on the “Temp. Unit Setting”
screen to display the “Password Default
Setting” screen.
6.2.6. Password Default Setting
1.
Select and touch [Enable] or [Disable] and
touch [OK].
The initial value at “Change Setting”
of “6.3.7 Password Setting” is different
depending on the selection of commercial
use or residential use. Refer to the table
below.
Password Default Setting
Cancel
OK
Enable
Disable
(For Commercial Use)
(For Residential Use)
Function
(*: Items that indoor unit does not
support are not displayed.)
Enable
(Commercial)
Disable
(Residential)
Auto Off Timer
On
Off
Weekly Timer
On
Off
Set Temp. Auto Return
On
Off
Set Temp. Range Setting
On
Off
Anti Freeze*
On
Off
Away Setting
On
Off
Human Sensor Setting*
On
Off
Fan Control for Energy Saving*
On
Off
Initial Setting
On
Off
Maintenance
On
Off
2.
When initial start-up setting is complete,
the screen on the right will be displayed.
This screen is the “Monitor mode screen”,
which is the home screen of this unit.
Set Temp.
Mode
Menu
Status
Fan
Fri 10:00AM
Unoccupied
6.3. Initial setting
Configure settings required at the time of installation.
This unit has two kinds of passwords; pass-
word for administrators and password for
installers. Password for administrators cannot
be used for the settings related to the installa-
tion of this unit. Installer password can be used
to configure all of setting for this unit.
0
CL
5
1
6
2
7
3
8
4
9
Cancel
OK
Password Verification
Enter Current Password
When “Password (Installer Password) Verification” screen is displayed,
enter the password (installer password) and touch [OK]. The default
password is “0000” (4 digits).
1.
Touch the [Menu] on the “Monitor Mode screen”. The “Main Menu”
screen is displayed.
2.
The “Main Menu” screen has two pages. Touch [Next Page] or [Pre-
vious Page] to switch between screens. Touch the [Initial Setting].
(Items that indoor unit does not support are not displayed.)
1.
2.
Set Temp.
Mode
Menu
Status
Fan
Fri 10:00AM
Unoccupied
Monitor
Next
Page
Page 1/ 2
Main Manu
Air Flow Direction
Setting
Weekly Timer
Setting
Auto Off Timer
Setting
Special Setting
Monitor
Previous
Page
Page 2/ 2
Main Menu
Summer Time
Setting
Initial Setting
Maintenance
Preference
3.
The “Initial Setting” screen has three pages. Touch [Next Page] or
[Previous Page] to switch between screens. Touch the items you
wish to configure.
(Items that indoor unit does not support are not displayed.)
Back
Next
Page
Page 1/ 3
Initial Setting
Language Setting
Date Setting
R.C.Group
Name Setting
Temp. Unit
Setting
Back
Previous
Page
Page 2/ 3
Initial Setting
R.C. Sensor
Setting
Password Setting
Display Item
Setting
Master Indoor
Unit Setting
Next
Page
Back
Previous
Page
Page 3/ 3
Initial Setting
RC Master/
Slave Setting
I.U. Display
Number Setting
Deadband Setting
Optimum Start
Setting
6.3.1. Language Setting
Touch the [Language Setting] on the “Initial Setting” screen. The “Lan-
guage Setting” screen is displayed.
For the method of setting language, refer to 6.2.2. Language Setting.
Select the language to be used, and touch [OK] on “Language Setting” to
return to the “Initial Setting” screen.
6.3.2. Date Setting
1.
Touch the [Date Setting] on the “Initial Set-
ting” screen. The “Date Setting” screen is
displayed.
Select and touch “Date and Time Setting”
or “Display Format Setting”.
Date Setting
Date and Time Setting
Display Format Setting
Back
When settings for all items are complete, the screen will return to the
home screen. Touch [Back] to return to the “Initial Setting” screen.
• Date and Time Setting
Touch the [Date and Time Setting] on the “Date Setting” screen. The “Date
and Time Setting” screen is displayed.
For the method of configuration, refer to 6.2.4. Date and Time Setting. Set
all required items, and touch [OK] on the “Date and Time Setting” screen
to return to the “Date Setting” screen.
• Display Format Setting
1.
Touch the [Date Format] on the “Display Format Setting” screen.
The “Date Format” screen is displayed.
2.
Select and touch the data display format. Touch [OK] on the “Date
Format” screen to return to the “Display Format Setting” screen.
3.
Touch the [Time Format] on the “Display Format Setting” screen.
The “Time Format” screen is displayed.
1.
2.
3.
Display Format Setting
Cancel
OK
Fri 10:00AM
Date Format
Time Format
Day/Month/Year
12:00–11:59AM/PM
Month/Dat/Year
Year/Month/Day
Date Format
Cancel
OK
Day/Month/Year
Fri 10:00AM
Display Format Setting
Cancel
OK
Fri 10:00AM
Date Format
Time Format
Day/Month/Year
12:00–11:59AM/PM
4.
Select and touch the data display format. Touch [OK] on the “Time
Format” to return to the “Display Format Setting” screen.
5.
Touch [OK] on the “Display Format Setting” screen to return to the
“Date Setting” screen.
4.
5.
00:00–11:59 AM/PM
00:00–23:59
Time Format
Cancel
OK
12:00–11:59 AM/PM
Fri 10:00AM
Display Format Setting
Cancel
OK
Fri 10:00AM
Date Format
Time Format
Day/Month/Year
12:00–11:59AM/PM
6.3.3. Temp. Unit Setting
Touch the [Temp. Unit Setting] on the “Initial Setting” screen. The “Temp.
Unit Setting” screen is displayed.
For how to configure, refer to 6.2.5. Temp. Unit Setting. Set temperature
units and touch [OK] on the “Temp. Unit Setting” to return to the “Initial
Setting” screen.
9373328407-01_IM.indb 6
2/22/2017 11:06:20 AM


