background image

24 

3.3.2. Scanning with a Saved Scan Setting 

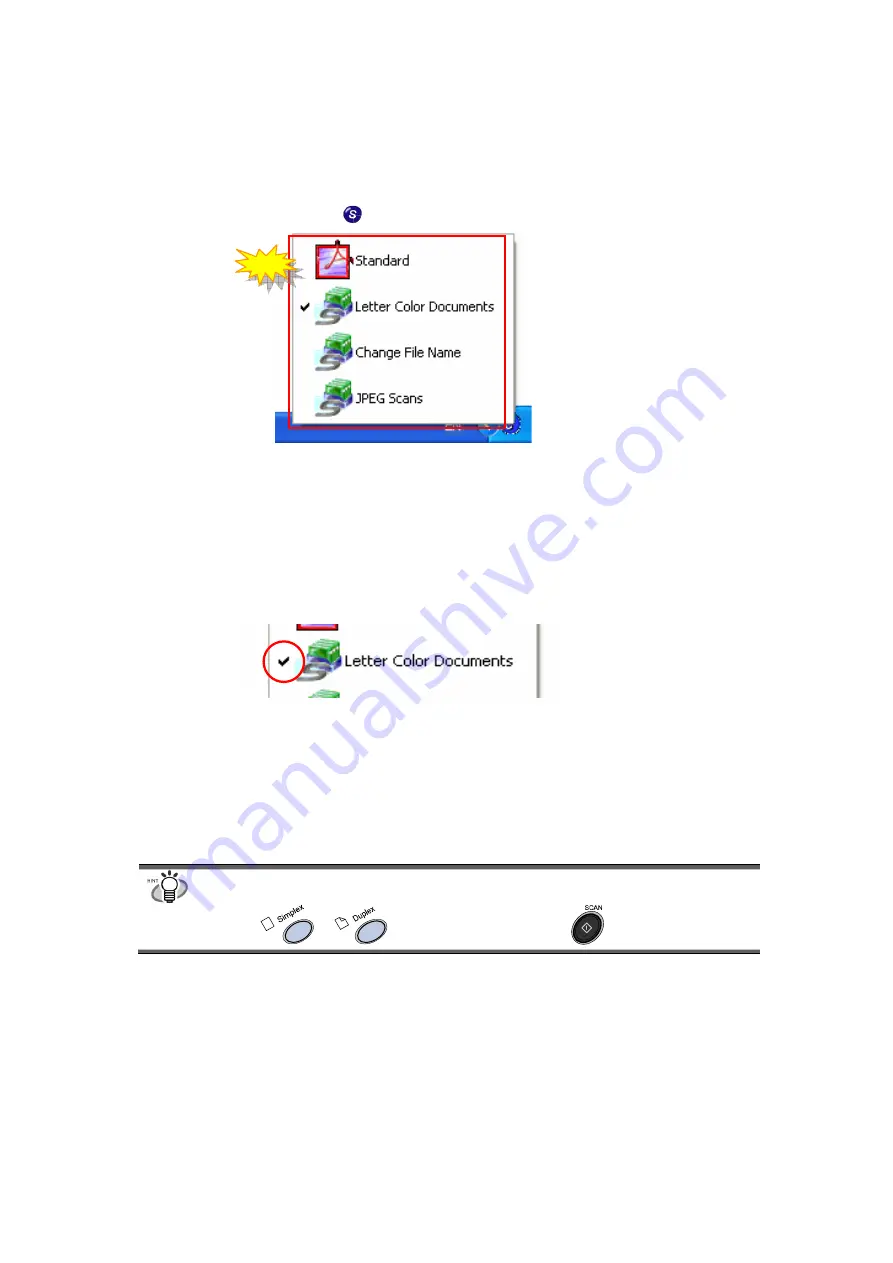
1.  Click the ScanSnap icon 


Ö


The list of saved settings appears. 

(The icon of the program that starts after scanning appears on the left of the setting name.) 

2.  Select the scan setting to use. 

Ö


A check mark appears on the selected setting.   


3.  Load the document on the scanner. 

4.  Click the [SCAN] button on the scanner

.


Ö


Scanning is carried out with the selected scan setting. 


The scan button(s) vary in form and name depending on the scanner models. 

fi-4110EOX2 fi-5110EOX 


or


New 

Содержание ScanSnap Upgrade

Страница 1: ...Upgrade User s Guide P2WW 1860 01EN ...

Страница 2: ......

Страница 3: ...eting Scan Settings 26 3 4 Online Update 28 4 Carrier Sheet 30 4 1 Operation Flow 31 4 2 Scanning Different Document Types 32 4 3 Loading Documents with the Carrier Sheet 33 4 3 1 Create facing pages in one image 34 4 3 2 Create front and back images separately 37 4 4 Changing Carrier Sheet Settings 40 4 5 Cleaning Carrier Sheet 45 4 5 1 Cleaning method 45 4 5 2 Cleaning Materials 45 4 6 Purchasin...

Страница 4: ...ii ...

Страница 5: ...nned by the ScanSnap as a database using OCR technology PDF Thumbnail View Enables you to view PDF files in thumbnails on the Explorer ScanSnap Organizer Enables you to view and organize the scanned documents Depending on the models some of them may have already been installed Confirm it in the manual the Startup Guide or the Operator s Guide come with the purchased product This manual also provid...

Страница 6: ... regular industrial and general purpose applications It has not been designed and manufactured for use in applications simply called high safety applications from here on that directly involve danger to life and health when a high degree of safety is required for example in the control of nuclear reactions at nuclear power facilities automatic flight control of aircraft air traffic control operati...

Страница 7: ...ement If the actual displayed screen differs from the screen examples in this manual operate by following the actual displayed screen 1 1 System Requirements When you install and use ScanSnap Upgrade the following environments are required CPU Intel Pentium processor 600MHz or faster Intel Pentium 4 processor 1 8GHz or faster is recommended Memory 128MB or more 256MB is recommended PC Free disk sp...

Страница 8: ...anSnap Monitor in case of fi 4110EOX2 or ScanSnap Manager in case of fi 5110EOX is installed beforehand When using Windows 2000 or Windows XP log on as a user with Administrator privilege 2 1 Installing ScanSnap Upgrade 1 Insert ScanSnap Upgrade CD ROM in the drive Ö ScanSnap Setup screen appears ...

Страница 9: ...5 2 Click Install Product button in ScanSnap Setup screen 3 Welcome to InstallShield Wizard screen appears Then click Next button ...

Страница 10: ... button To install ScanSnap in the displayed folder click the Next button Normally there is no need to change the folder in the installation directory Change the installation directory if there is not enough free disk space available for the selected drive To change the installation folder for ScanSnap click the Browse button The Select Directory dialog box is displayed Select the folder to instal...

Страница 11: ...anSnap Manager or ScanSnap Monitor ScanSnap Organizer CardMinder PDF Thumbnail View are installed including respective manuals Compact ScanSnap Manager is installed including the manual Custom You can select the software and the manuals to install 7 In the Start Copying Files screen confirm the files that will be installed and click the Next button Ö This starts the installation of the programs ...

Страница 12: ...ograms are also deleted together The programs added by ScanSnap Upgrade cannot be uninstalled independently In order to restore the state before the installation of ScanSnap Upgrade uninstall ScanSnap Monitor or ScanSnap Manager first and then reinstall the programs For uninstalling ScanSnap Monitor ScanSnap Manager select Start menu Control Panel Add or remove Programs Then select ScanSnap Driver...

Страница 13: ...hen it is generated with skew 9 8 Allow documents to be scanned face up through the ADF Scan and Save Settings Scanning tab Option button Can scan the documents keeping the position as you hold them on your hand 9 9 Continue scanning after current scanning is finished Scan and Save Settings Scanning tab Option button Can continuously scan the next document that is set after scanning the previous d...

Страница 14: ...ther changes In case of fi 4110EOX2 it cannot start scanning while the Scan and Save Settings window is displayed on the monitor before the upgrade However after the installation of the upgrade although the Scan and Save Settings is displayed pressing button on the scanner or can automatically close the window and start scanning In this case the documents are scanned with the settings at the point...

Страница 15: ...es the settings for Carrier Sheet It is only for fi 5110EOX It does not appear on fi 4110EOX2 See 4 4 Settings Management The Settings Management window appears Manages the saved scan settings See 3 3 Show scanning result If this item is checked the notification screen showing whether or not the blank page removal and or image rotation were carried out appears Blank page removal Allow automatic bl...

Страница 16: ...configure the save and scanning settings of the ScanSnap with the six tabs The following describes the new setting items of each of the tabs Descriptions on the manual use the windows on the ScanSnap fi 5110EOX for the explanations Therefore the screen appeared may differ depending on the model Tabs ...

Страница 17: ...les are generated with one scan the serial numbers are appended after the file names File name a serial number in the scanning extension Example 1 In PDF File Option page 17 select Generate PDF file per xx pages If documents with pages exceeding the specified pages are scanned they become Scan001 pdf Scan002 pdf Scan003 pdf Example 2 If saving in JPEG they become Scan001 jpg Scan002 jpg Scan003 jp...

Страница 18: ...14 Scanning tab Clicking Option button the following window appears New ...

Страница 19: ...which have many photographs or figures and a few characters Documents which have a background pattern behind characters Documents with characters printed in various directions e g plans etc Documents with long diagonal lines Documents with handwritten characters When you scan such documents clear the check box Allow documents to be scanned face up through the ADF Select the check box if you want t...

Страница 20: ...he Continue scanning button To finish scanning click the Finish Scanning button At the point where scanning ended all the images scanned are consolidated into one file and generated It is possible to continue scanning up to 1000 pages Maximum PDF file size guaranteed is 1 Gbyte Although it is possible to generate a file longer than 1Gbyte viewing it with Adobe Acrobat may show a message that the f...

Страница 21: ...17 File option tab By clicking Option button when PDF pdf format is specified the following window appears New ...

Страница 22: ... a fixed password You can set a fixed password in advance for all the PDF files so that the enter password screen will not appear when you scan If you mark the check box the Password and the Confirm boxes become enabled Enter the same password into the two places You can use the following characters to set your password Maximum number of characters 16 Characters A Z a z 0 9 Symbols _ When a single...

Страница 23: ... function you can register up to five customized document sizes at the Paper size menu Clicking this button displays the following setting window When adding a customized document size 1 Click the Add button 2 The following screen appears New ...

Страница 24: ...to be deleted and click the Remove button 2 The confirmation message appears twice Click Yes button in either case 3 In the Add or Remove Custom sizes window confirm that the selected document size is deleted Click Close to exit from the Add or Remove Custom sizes window When changing the settings 1 In the Add or Remove Custom sizes window select the document size to be changed and click the Chang...

Страница 25: ...parately So using this function on the document which mostly contains text characters the file size becomes smaller while keeping the quality of the characters as they are This function is not appropriate for scanning photographs or figures because such images are recognized as background and compressed as such so the qualities will deteriorate When High Compression is enabled all documents are sc...

Страница 26: ...trieve and use the saved settings easily If you create different types of frequently used scan settings in advance you can scan document easily without changing settings every each time The following explains the operation procedure 3 3 1 Saving Scan Settings 1 Right click ScanSnap icon and select Settings 2 On the Scan and Save Settings change the scan settings New New ...

Страница 27: ...window appears 4 Enter a suitable name and click the OK button Ö The current setting with the entered name is created in Current Setting 5 Click the OK button and the Scan and Save Settings window closes Ö A registration of new setting is completed You can create a maximum of nine scan settings ...

Страница 28: ...ing appears on the left of the setting name 2 Select the scan setting to use Ö A check mark appears on the selected setting 3 Load the document on the scanner 4 Click the SCAN button on the scanner Ö Scanning is carried out with the selected scan setting The scan button s vary in form and name depending on the scanner models fi 4110EOX2 fi 5110EOX or New ...

Страница 29: ...he ScanSnap icon and select Settings Ö The Scan and Save Settings window appears 2 On Current Setting select the name of the setting you want to change 3 Click the Rename button Ö The Save as screen appears 4 Enter a new name and click the OK button ...

Страница 30: ...ement screen appears when you select it Select the name you want to change and click the Rename button 3 3 4 Deleting Scan Settings 1 Right click the ScanSnap icon and select Settings Ö The Scan and Save Settings screen appears 2 On Current Setting select the name of the setting you want to delete 3 Click the Delete button ...

Страница 31: ...he Settings Management screen Right click the ScanSnap icon and the Settings Management screen appears when you select it Select the name you want to delete and click the Delete button 4 The confirmation dialog box appears Click the Yes button ...

Страница 32: ...our program regularly When updating ScanSnap Manager follow the instructions below When updating it is essential that Internet Explorer be installed in a system which can access the Internet For Windows XP or Windows 2000 you must log on as an administrator s privilage 1 Right click ScanSnap icon and select Help Online Update Ö A message window to confirm whether or not to update ScanSnap Manager ...

Страница 33: ...wnloaded and a confirmation message to start installation appears 4 Click the Install button When you click the Info button Internet Explorer opens and information about the latest update for ScanSnap Manager appears Ö Installation starts and the Welcome to InstallShield Wizard for ScanSnap Manager window appears Follow the instructions on the screen to install ...

Страница 34: ...an be scanned by folding it in two inserting it into the Carrier Sheet and scanning it in duplex mode Also using the Carrier Sheet you can scan documents that can be easily scratched such as photographs or irregular shaped documents that are difficult to load directly on the scanner such as clippings of information This chapter explains how to use the ScanSnap Carrier Sheet Carrier Sheet is only f...

Страница 35: ...y one and scan 3 Select Paper size in the Paper size tab in the ScanSnap Manager screen to Automatic detection For how to set the ScanSnap Manager refer to the ScanSnap Operator s Guide in the Setup CD ROM comes with the ScanSnap product 4 Press the SCAN button B The scanning is started The method to set the document and the image to be generated differ according to the Carrier Sheet setup Refer t...

Страница 36: ...nd cannot be folded Also pay attention to the following when you use the Carrier Sheet Use only the Carrier Sheet for ScanSnap Avoid writing coloring staining or cutting the black and white pattern part of the Carrier Sheet Otherwise the scanner cannot recognize the Carrier Sheet correctly Load the Carrier Sheet one by one on the scanner Do not place the Carrier Sheet upside down on the scanner Ot...

Страница 37: ...r sizes such as clippings of information that are difficult to load and scan directly on the scanner Outputs the scanned image in specified sizes When you use the Carrier Sheet select Automatic Detection on the setting of the Paper size tab in ScanSnap Manager Also if scanning is done using Create facing pages in one image select Duplex Scan on the setting of Scanning tab in ScanSnap Manager For d...

Страница 38: ...ck ScanSnap Manager icon on the task bar and select Carrier Sheet 2 On the Carrier Sheet Settings screen select Create facing pages in one image on Mode and click OK 3 Fold the document in half from the center with the page to be scanned facing outwards Please fold it neatly so that the folded portion does not appear puffed If the folded portion is not folded neatly it may cause skewing 4 Open the...

Страница 39: ...er to the ScanSnap Operator s Guide in the Setup CD ROM comes with the ScanSnap product 7 Press the SCAN button Ö The front and back image data are set in a facing page state and generated side by side There may be a gap in the joined portion or a line may appear in the output image Also if you are scanning a thick document the image has a tendency to skew in such a way that the upper portions til...

Страница 40: ...r than the document The smallest size big enough to include all the contents image is selected from among A3 B4 and 11 x 17 Example If content printed as A4 size in the center of an A3 document is scanned B it is generated in B4 size To output an image that is the same size as the document size set the document size in Output image size ...

Страница 41: ...k ScanSnap Manager icon on the task bar and select Carrier Sheet 2 On the Carrier Sheet Settings window select Create front and back images separately on Mode and click the OK button 3 Open the Carrier Sheet and place the document inside Align the top of the document so that it touches the top of the Carrier Sheet Place the document on its width in the center in order not to protrude out of the Ca...

Страница 42: ...uide in the Setup CD ROM comes with the ScanSnap product 6 Press the SCAN button B Scanning starts and the image data is generated in the specified size The output image is generated with the scanned document image placed in the center of the specified size of the output image In the Carrier Sheet Settings window when Automatic Detection in Output image size is selected an appropriate size among t...

Страница 43: ...hite paper behind the document The scanned document cannot be generated in a suitable size when Automatic Detection is selected A shadow appears on the edges of the document Black lines appear around the document that is clipped into a special shape White paper ...

Страница 44: ...he task bar Right click the icon and when the menu appears select Carrier Sheet B Carrier Sheet Settings window appears The following explains the settings that can be changed on the Carrier Sheet Settings Change the Carrier Sheet settings here A brief explanation for Mode appears The image of Mode appears Enables the settings and closes the windows Show Help Cancels the settings and closes the wi...

Страница 45: ...e mode select Duplex Scan on the Scanning settings of ScanSnap Manager Create front and back images separately Outputs a cropped image which fits the size of the scanned document This mode is for scanning documents such as photographs that you do not want to scratch or documents of irregular sizes such as clippings of information that are difficult to load and scan directly on the scanner using in...

Страница 46: ...ned image is generated in the Carrier Sheet size After scanning you can trim the image to your preferred size with applications such as Adobe Acrobat To trim the image using Adobe Acrobat 6 0 from the menu bar select Tools Advanced Editing Crop tool and double click the selected area for the necessary image portion If you specify Automatic Detection on Output image size to scan a document which si...

Страница 47: ...screen appears Enter the document sizes You can set within these ranges Width 50 8 216 mm 2 8 5 in Length 50 8 297 mm 3 11 69 in Enter a name you want to display in Name B The entered name is displayed on Add or Remove Custom sizes 3 When you complete the settings click the OK button B A new custom document size is created 4 Click the Close button and the Add or Remove custom sizes screen closes ...

Страница 48: ...ocument size is deleted and click the Close button To change settings 1 On the Add or Remove custom sizes screen select the setting of the document size you want to change and click the Change button 2 The Additional custom sizes settings screen appears Change the items you want to change 3 When you have completed the settings click the OK button 4 The Add or Remove custom sizes screen appears and...

Страница 49: ...nd dust from the surface and the interior of the Carrier Sheet Never use paint thinner or other organic solvents Do not rub too hard Otherwise the Carrier Sheet may be scratched or be deformed After cleaning the interior of the Carrier Sheet with Cleaner F1 or a mild detergent close the Carrier Sheet after it has completely dried 4 5 2 Cleaning Materials The description of the cleaning material an...

Страница 50: ...replace the Carrier Sheet every 500 scans However it differs according to usage conditions If scratches and dirt are conspicuous please replace the Carrier Sheet accordingly The description of the Carrier Sheet also sold separately and the part number are as follows Description Quantity P N ScanSnap Carrier Sheet 5 pcs FI 511ES WW To purchase the Carrier Sheet contact the FUJITSU scanner dealer wh...

Страница 51: ...ser s Guide come with respective software 5 1 Viewing PDF File Thumbnails PDF Thumbnail View allows you to use the Explorer for viewing thumbnails of the PDF data of scanned documents The following describes how to use the PDF Thumbnail View In order to use PDF Thumbnail View Adobe Acrobat 5 0 or 6 0 must be installed on your PC beforehand Acrobat Reader does not support the PDF Thumbnail View PDF...

Страница 52: ... The confirmation dialog box appears Click the OK button Ö PDF Thumbnail View Function Settings is enabled When uninstalling Adobe Acrobat first disable the PDF Thumbnail View Function Settings 5 1 2 Displaying thumbnails of PDF files To view thumbnails miniature of PDF files follow the procedure below 1 Start the Explorer Right click the Start menu and select the Explore 2 Select a folder where P...

Страница 53: ...ages of the PDF files are temporarily displayed on the upper left side of the screen when refreshing the thumbnails When there is a large quantity of PDF files saved in one folder it may take some time to display the thumbnails The first page of a PDF file document is displayed as a thumbnail The thumbnail of a PDF is not displayed when Adobe Acrobat is starting up ...

Страница 54: ...r effort to provide you with the best support possible we ask you to kindly prepare the following information as many as possible The product name and version number of this product The version of Operating System whether OS has been updated The manufacturer product name and model number of your computer The manufacturer product name and model number of the scanner you use The scanner driver s ver...

Страница 55: ...ubject to change without notice in the interest of product improvement PFU LIMITED assumes no liability for incidental or consequential damages arising from the use of this manual and any claims by a third party Copying of the contents of this manual in whole or in part and copying of the scanner application is forbidden under the copyright law ...

Отзывы: