26
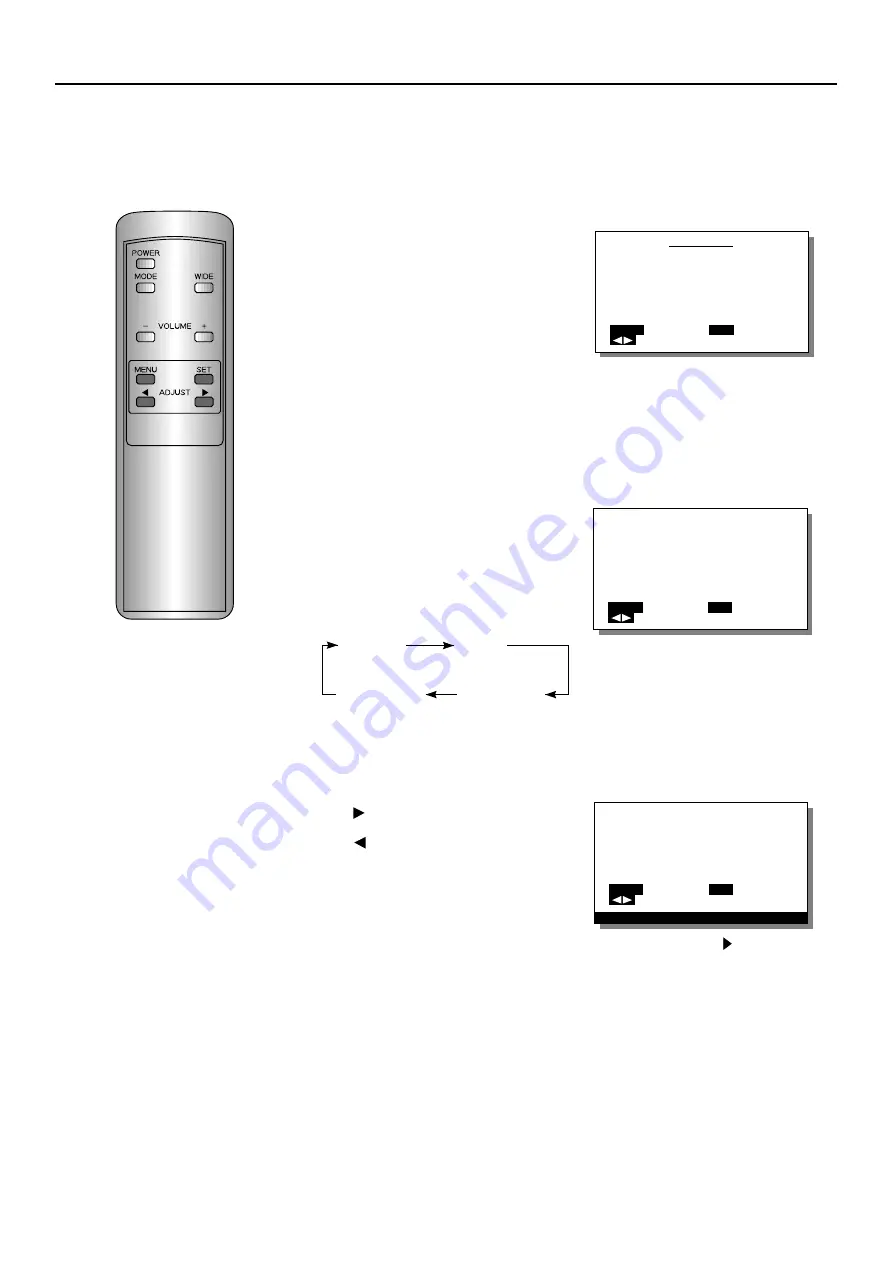
EXAMPLE: ADJUSTING THE SCREEN VERTICAL
POSITION
SCREEN ADJUSTMENT (VIDEO MODE)
1
Select POSITION/SIZE
from the VIDEO MENU
screen.
1) Press the MENU button.
2) With the ADJUST button,
select POSITION/SIZE.
3) Set by pressing the SET
button.
2
Select the adjustment
item.
With the SET button, select VER-
TICAL POSITION.
Pressing the SET button moves
the selection to the next item as
below.
3
Adjust with the ADJUST
button.
button····Moves the screen up.
button····Moves the screen
down.
For the adjustment range, see the
opposite page.
To adjust multiple items, repeat
steps 2 and 3.
Example: When POSITION/SIZE is
selected
Example: When VERTICAL POSITION is
selected
Example: When the button is pressed
VIDEO MENU
COMMON SETTINGS
PICTURE
POSITION/SIZE
SOURCE
OTHERS
MENU
QUIT
SELECT
SET
ENTER
VERTICAL POSITION
0
MENU
RETURN
ADJUST
SET
NEXT
VERTICAL POSITION
2
MENU
RETURN
ADJUST
SET
NEXT
VERTICAL HEIGHT
POSITION
HORIZONTAL HORIZONTAL
WIDTH POSITION
∗
To complete adjustments
Press the MENU button to return to the VIDEO MENU.
Pressing the MENU button returns the display to the previous screen and closes
the adjustment screen.
∗
The adjustments are saved for each video mode (VIDEO mode, S-VIDEO
mode, and COMPONENT VIDEO mode).
∗
This operation can also be done
using the buttons on the Display’s
operation panel.


