Fujitsu LifeBook T901 Series Скачать руководство пользователя страница 45

Working with the notebook

The keyboard has been designed to provide all the functions of an enhanced keyboard.
Some enhanced keyboard functions are mapped with key combinations.

The following description of keys refers to Windows. Additional functions supported by the keys
are described in the relevant manuals supplied with your application programs.
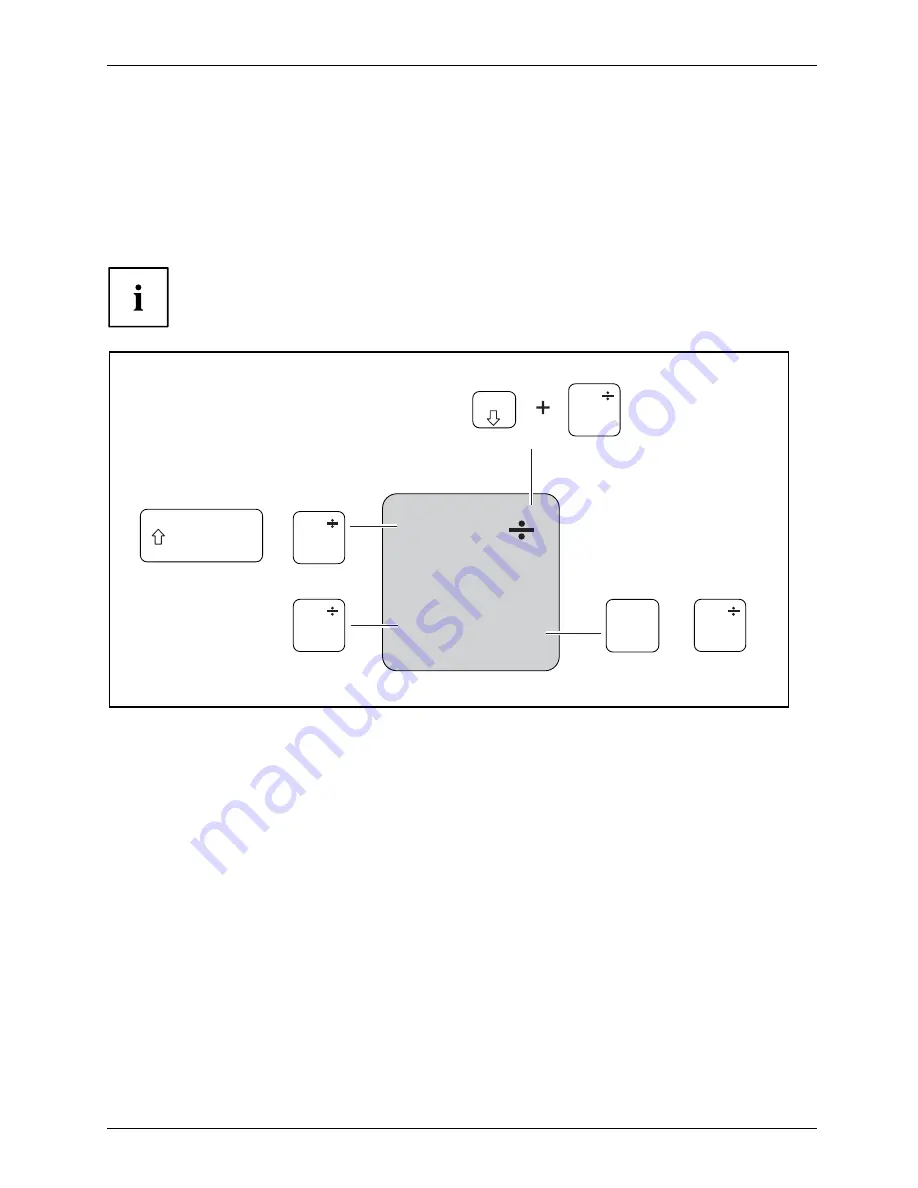
The

fi

gure below shows how to access the different characters on keys with overlaid functions.

The example applies when the Caps Lock key has not been activated.

The illustrations shown below may differ from your actual device.

0

=

}

+

+

Num

Alt Gr


=    

0

}

=    

0

}

=    

0

}

=    

0

}

Fujitsu Technology Solutions

41

Содержание LifeBook T901 Series

Страница 1: ...System Operating manual LIFEBOOK T901 ...

Страница 2: ...ebsite http ts fujitsu com For automatic driver updates go to http support ts fujitsu com com support index html Should you have any technical questions please contact our Hotline Service Desk see Service Desk list or visit http ts fujitsu com support servicedesk html Your sales partner Your sales office We hope you really enjoy using your new Fujitsu system ...

Страница 3: ......

Страница 4: ... to availability No warranty is offered or liability accepted in regard of the completeness correctness or current applicability of any data or illustrations Brand names may be protected trademarks of the respective manufacturer and or protected by copyright Use of these by third parties for their own purposes may constitute an infringement of the holders rights Further information can be found at...

Страница 5: ...13 First time setup of your device 16 Working with the notebook 19 Security functions 76 Connecting external devices 97 Removing and installing components during servicing 105 Settings in BIOS Setup Utility 113 Troubleshooting and tips 115 Technical data 123 Manufacturer s notes 126 Index 133 ...

Страница 6: ...ed are trademarks or registered trademarks of their respective owners whose protected rights are acknowledged Copyright Fujitsu Technology Solutions GmbH 2011 All rights reserved including rights of translation reproduction by printing copying or similar methods in part or in whole In the event of violations perpetrators will be liable to prosecution for damages All rights reserved including right...

Страница 7: ...itch 22 Different ways to use your notebook 23 From notebook to Tablet PC 23 Select display orientation portrait or landscape orientation 25 From Tablet PC to notebook 26 Switching off the notebook 29 Closing the notebook 29 Language selection Windows XP only 30 Selecting the language for menu texts 30 Selecting the language for handwriting recognition and keyboard 30 Handwriting recognition under...

Страница 8: ...hones 63 Integrated 56k modem 64 Connecting notebook modem to telephone wall socket 65 SIM card 65 Inserting the SIM card 66 Removing a SIM card 67 Optional Wireless LAN BlueTooth UMTS wireless components 67 Switching the wireless components on and off 68 Setting up WLAN access 68 Access via UMTS 69 UMTS antenna 69 Ethernet and LAN 70 Your Port Replicator optional 71 Ports on the Port Replicator 7...

Страница 9: ...Disabling TPM 96 Connecting external devices 97 Connecting an external monitor 98 Connecting an external monitor to the DisplayPort 99 HDMI port 100 Connecting USB devices 101 USB port with charging function Anytime USB charge 102 How to remove USB devices correctly 102 Connecting FireWire devices 103 Connecting external audio devices 103 Microphone port Line In 103 Headphone port 104 Removing and...

Страница 10: ...nal monitor is blank or the image is unstable 117 The cursor does not correctly follow the pen movements 118 Pen input not working 118 The notebook cannot be started 118 The notebook stops working 119 The printer does not print 119 The radio connection to a network does not work 119 The battery discharges too quickly 120 SmartCard reader is not recognised 120 SmartCard PIN forgotten 120 SmartCard ...

Страница 11: ... Information on the connections and user components of your notebook can be found in Ports and controls Page 9 Further information The Windows drivers for your device can be found on our Internet site The factory installation of your device does not support any other operating system Fujitsu Technology Solutions accepts no liability whatsoever if any other operating system is used Software oriente...

Страница 12: ...a command used to start a program start exe This font indicates information that is displayed on the screen by a program e g Installation is complete This font indicates terms and texts used in a software interface e g Click on Save names of programs or files e g Windows or setup exe This font indicates cross references to another section e g Safety information cross references to an external sour...

Страница 13: ...art to work with the device Notebook open 13 11 12 10 5 9 6 3 4 8 5 5 7 2 8 1 15 14 17 16 1 LCD screen 2 WebCam 2 mega pixel optional 3 Tablet buttons 4 ON OFF switch 5 Status indicators 6 Loudspeakers 7 Keyboard 8 Microphone 9 ON OFF switch for wireless components 10 Touchpad 11 Touchpad buttons 12 ScrollWheel 13 Ambient light sensor 14 Fingerprint sensor 15 Scroll sensor 16 Microphone jack 17 He...

Страница 14: ...rts and controls Left side 1 2 3 4 5 6 7 1 DC input connector DC IN 2 HDMI port 3 FireWire port 4 USB port USB 3 0 5 SmartCard reader 6 Memory card slot 7 ExpressCard slot 10 Fujitsu Technology Solutions ...

Страница 15: ...B port USB 2 0 4 VGA monitor port 5 LAN port 6 USB port with charging function USB 2 0 Anytime USB charge The SIM card slot and VGA monitor port are protected by covers Right side 2 1 3 4 1 Pen slot 2 Attachment eye for the pen cord 3 Module bay with optical drive 4 Eject lever for module bay Fujitsu Technology Solutions 11 ...

Страница 16: ...Ports and controls Bottom 1 2 3 4 1 Ventilation slot cover 2 Port for port replicator 3 Memory service compartment 4 Rechargeable battery 12 Fujitsu Technology Solutions ...

Страница 17: ...fer to the notes in the chapter Removing and installing components during servicing Page 105 This notebook complies with the relevant safety regulations for data processing equipment If you have questions about using your notebook in a particular area please contact your sales outlet or our Hotline Service Desk Additional safety notes for devices with radio components Radiocomponent WirelessLAN Bl...

Страница 18: ...the radio component for data security reasons With data traffic via a wireless connection it is also possible for unauthorised third parties to receive data Information on activating data encryption is provided in the documentation for your radio component If you wish to use your notebook during a flight first check with the flight attendants if it is OK to do so When travelling in other countries...

Страница 19: ...r computers Normal household cleaners and polishes can damage the markings on the keyboard and the device the paintwork or the notebook itself Ensure that no liquid enters the notebook The LCD screen very sensitive to scratches Only clean the display surface with a very soft slightly damp cloth Switch the notebook off Cleaning Notes Notebook Keyboard Touchpad LCDscreen CrystalViewdisplay In order ...

Страница 20: ...ur device during the first time setup process On delivery the battery can be found in the battery compartment or in the accessories kit The battery must be charged if you want to operate your device using the battery When used on the move the built in battery provides the device with the necessary power You can increase the operating time by using the available energy saving functions For instruct...

Страница 21: ...at the rubber feet of the device may mark certain types of delicate surfaces Keep other objects at least 100 mm away from the device and its mains adapter to ensure adequate ventilation Never cover the ventilation slots of the device Do not expose the device to extreme environmental conditions Protect the device from dust humidity and heat Mains adapter connecting Preparingforoperation Mainsadapte...

Страница 22: ...device to the mains using the mains adapter During the installation process DO NOT restart the device unless you are requested to do so To make it easier to use your device for the first time the operating system is pre installed on the hard disk 1 Slide the ON OFF switch 1 to the right to switch on the notebook The ON OFF switch returns automatically to its original position During installation f...

Страница 23: ...d Connecting external devices Page 97 for instructions on how to connect devices such as a mouse and a printer to the notebook Please refer to the notes in Important notes Page 13 Status indicators Statusindicators Symbols The status indicators provide information about the status of the power supply the drives and the keyboard functions etc Fujitsu Technology Solutions 19 ...

Страница 24: ...icator flashes orange The battery state of charge is being checked for four seconds after battery installation The indicator flashes red The battery is faulty The indicator is not lit There is no battery installed Note if you use batteries with a capacity of 5800 mAh or 6200 mAh you can also check the charge status on the battery itself Num Lock indicator Indicator is lit The Num key has been pres...

Страница 25: ...Working with the notebook Opening the notebook 1 2 Press the release button 1 and unfold the LCD screen upwards 2 Fujitsu Technology Solutions 21 ...

Страница 26: ...tem is switched on Programming the ON OFF switch You can program the ON OFF switch Operating system Menu Windows XP Start Settings Control Panel Performance and Maintenance Power Options Advanced Windows 7 Start Settings Control Panel System and Security Power Options If you have assigned a password you must enter this when requested to do so in order to start the operating system Detailed informa...

Страница 27: ...on of rotation in the following description No guarantee claims can be met for damage caused by turning in the wrong direction You must note that the display cannot be turned completely on its own axis From notebook to Tablet PC 2 1 Press the release button and unfold the LCD screen upwards slightly Rotate the hook from position 1 to position 2 Fujitsu Technology Solutions 23 ...

Страница 28: ...as possible on both sides Turn the screen to the left or right in the direction of the arrow At first you will feel some slight resistance then it will turn easily and without friction Rotate the display further until it has turned 180 and the hinge latches in 24 Fujitsu Technology Solutions ...

Страница 29: ...n the device is used as a Tablet PC and to landscape layout when it is used as a notebook Windows XP You can change these settings in the Fujitsu menu or under Start Settings Control Panel Tablet and Pen Settings Windows 7 You can change these settings in the Fujitsu menu or under Start Settings Control Panel Hardware and Sound Display Settings Profiles for operating with various different screen ...

Страница 30: ...rking with the notebook From Tablet PC to notebook 1 2 Press the release button 1 and unfold the LCD screen upwards 2 Open the display until it is in the vertical position 26 Fujitsu Technology Solutions ...

Страница 31: ...following description No guarantee claims can be met for damage caused by turning in the wrong direction The rotational direction indicator indicates the direction in which the screen must be turned to get back to its initial position Fujitsu Technology Solutions 27 ...

Страница 32: ... in the direction indicated by the rotational direction indicator It will turn easily and without resistance Turn or move the display further until it has turned 180 and the hinge latches in 1 2 To be able to shut the notebook again rotate the hook from position 1 to position 2 28 Fujitsu Technology Solutions ...

Страница 33: ...operating system please see the Operating System Manual Slide the ON OFF switch towards the right The ON OFF switch returns automatically to its original position Closing the notebook Fold the LCD screen down onto the lower part of the notebook until you feel it lock into place Fujitsu Technology Solutions 29 ...

Страница 34: ...nal Options Language and Regional options Select the Languages tab In the Text services and input languages field click on the Details button In the next dialog window select the Settings register card and click the Add button in the Installed Services field In the next dialog window select the desired Input area schema You can now decide which functions keyboard layout handwriting recognition etc...

Страница 35: ...g mix may be defective 1 light subpixel counts as 2 dark subpixels Pixel A pixel consists of 3 subpixels normally red green and blue A pixel is the smallest element that can be generated by complete functionality of the display Subpixel A subpixel is a separately addressable internal structure within a pixel that enhances the pixel function Cluster A cluster contains two or more defective pixels o...

Страница 36: ... Touch the menu option with your finger tip Starting programs double click with the left mouse button Briefly touch the program icon twice with your finger tip Moving objects windows drag while holding the left mouse button pressed Place your finger tip directly on the object window hold it pressed against the screen and move the desired object window Opening a context menu click with the right mo...

Страница 37: ...he fingers together to make the area smaller Spread the fingers to make the area larger Rotating Touch two corners of a picture on the screen then turn the picture clockwise or counter clockwise at the corners by using your fingers Enlarging a view Put two fingers on the touch screen and move them apart Fujitsu Technology Solutions 33 ...

Страница 38: ...n slot This ensures that the pen cannot be lost regardless of whether you use the notebook as a Tablet PC or as a notebook or transport it while travelling Always replace the pen in its slot when you are not using it The notebook is supplied with a pen cord which you can attach to the eyelets on the pen and on the notebook Only use the pen provided with your notebook Do not use substitute pen tips...

Страница 39: ...r quivers or jumps There may be a few areas on the screen where the cursor quivers slightly in spite of pressing the pen down firmly The screen responds to entries made with the tip of the finger or the pen when the tip of the finger or the pen is in direct contact with the screen You can use the pen to perform all the functions for which you would otherwise use a mouse In addition you can conveni...

Страница 40: ...ld also always repeat the calibration if the co ordination between the pen and cursor movement deteriorates Please note There are separate calibration programs available for calibrating the stylus pen and for calibrating finger based operation In each case use the calibration tool described in the supplementary sheet Do not use the calibration tool for the stylus pen to calibrate finger based oper...

Страница 41: ...ool supplied Pinch the two ends of the supplied tool together so that the tip is firmly clasped then pull it from the barrel Replace the tip of the pen with one of the spare tips supplied with your pen Insert the flat end of the tip into the barrel and exerting gentle pressure push it in until it is firmly in place If the tip is worn or damaged discard it Installing a pen cord You should attach th...

Страница 42: ...and execute commands They correspond to the buttons on a conventional mouse You can use a key combination to disable the touchpad to avoid accidentally moving the pointer on the screen see also Key combinations Page 43 Moving the pointer Move your finger on the touchpad Touchpad The pointer will move Selecting an item Move the pointer to the item you wish to select Touchpad Tap the touchpad once o...

Страница 43: ...itch the Touchpad on and off using a key combination see Key combinations Page 43 ScrollWheel The ScrollWheel 1 is an innovative and extremely convenient control The ScrollWheel allows you to scroll up or down in the active window e g on a website or forwards and backwards in a document with a single finger movement It makes it very easy for you to display and read websites documents and the conte...

Страница 44: ...ur finger anticlockwise on the ScrollWheel You will scroll upwards or backwards Back one page in Web browser Tap the centre of the ScrollWheel The Web browser returns to the previous page displayed Keyboard Keyboard Numerickeypad Numerickeypad Buttons The keyboard of your notebook is subject to continuous wear through normal use The key markings are especially prone to wear The key markings are li...

Страница 45: ...fers to Windows Additional functions supported by the keys are described in the relevant manuals supplied with your application programs The figure below shows how to access the different characters on keys with overlaid functions The example applies when the Caps Lock key has not been activated The illustrations shown below may differ from your actual device 0 Num Alt Gr 0 0 0 0 Fujitsu Technolog...

Страница 46: ... of overlay keys the character printed on the upper left of the key will appear when that key is pressed To cancel the Caps Lock function simply press the Caps Lock key again Shiftkey CapsLock Shift key The Shift key causes uppercase characters to appear In the case of overlay keys the character printed on the upper left of the key appears when that key is pressed Shiftkey Shift Fn button The Fn k...

Страница 47: ... Valid characters when the Num is activated Further information about the status indicators can be found in chapter Status indicators Page 19 Country and keyboard settings If you want to change the country and keyboard settings proceed as follows Enter the settings by clicking Start Settings Control Panel Time Regional and Language Options Key combinations The key combinations described below appl...

Страница 48: ...e used for display if an external monitor is connected Screen output is possible only on the notebook s LCD screen only on the external monitor on the notebook s LCD screen and the external monitor at the same time Press the key combination several times to switch through all possible settings It is possible to display video on two screens simultaneously regardless of what type and number of exter...

Страница 49: ...cursor back to the previous tab stop Tablet buttons Your notebook has five multifunction tablet buttons You can navigate on the screen with a simple press of a button call preset applications or ones that you have set yourself A B 1 2 3 4 ENT The tablet buttons have different uses in different modes You can also program each of them individually see Programming the tablet buttons Page 49 Fujitsu T...

Страница 50: ...this tablet button twice in quick succession will bring up the Fujitsu menu on your screen The Fujitsu menu is used to change certain system settings If you press this tablet button when the device is in sleep mode or is switched off the battery charge indicator appears You can check the current battery charge status without starting the operating system The battery LED indicates the battery charg...

Страница 51: ...ecurity functions A 1 Security button 1 to enter the password B 2 Security button 2 to enter the password 3 Security button 3 to enter the password 4 Security button 4 to enter the password ENT Security button 1 to confirm the entered password Detailed information on how to use the security functions is contained in Section Using the security function of the tablet keys Page 95 Fujitsu Technology ...

Страница 52: ... the Tablet PC as an eBook for example you would use the portrait orientation When accessing spreadsheets you would more typically use a landscape orientation 4 Fn key see Key combinations Page 49 ENT Log on to the system or open the Windows Task Manager If you hold this tablet button down for two seconds you can log back on to the system again after system startup after a system lock when returni...

Страница 53: ...ernal LCD screen CRT VGA only HDMI internal LCD screen HDMI back to beginning internal LCD screen Monitor s connected to the Port Replicator internal LCD screen only CRT VGA internal LCD screen CRT VGA only DVI internal LCD screen DVI only DisplayPort internal LCD screen DisplayPort only HDMI internal LCD screen HDMI back to beginning internal LCD screen The tablet button has a practical delay fun...

Страница 54: ... the current light level For this reason the LCD screen may flicker while the light level is adjusted Further information on using the webcam and on the additional settings which are possible for your webcam can be found in the help function of the program which uses the webcam If you wish to carry out a function test with your webcam you can use the corresponding test software available at http t...

Страница 55: ... Start Settings Control panel Power options Windows 7 Start Settings Control panel Mobile PC Power options The indicator is then displayed in the task bar as a battery symbol When you place the mouse pointer on the battery symbol the system displays the battery state of charge Please refer to the Help facility of the operating system for more information Battery storage Battery Battery Self discha...

Страница 56: ...orce when fitting or removing a battery Make sure that no foreign bodies get into the battery connections Never store a battery for longer periods in the discharged state This can make it impossible to recharge Removing a battery 1 1 2 Press in the two catches 1 keep them pressed and lift the battery out of the battery compartment 2 52 Fujitsu Technology Solutions ...

Страница 57: ...king with the notebook Installing a battery 1 2 Position the battery at the edge of the casing 1 Push the battery into the battery compartment until it locks into position 2 Fujitsu Technology Solutions 53 ...

Страница 58: ... see Removing and installing the battery Page 52 a 1 Press the test key 1 The LED a lights up in one of the following colours LED indicator State of charge Green The battery is between 50 and 100 charged Orange The battery is between 13 and 49 charged Red The battery is charged somewhere between 1 and 12 LED not lit The battery is fully discharged 54 Fujitsu Technology Solutions ...

Страница 59: ...orce when installing or removing the module Make sure that no foreign objects enter the module bay You can swap modules during operation This means you do not need to switch off the notebook To replace a module simply click on the corresponding icon in the task bar and then on Exit or Select Exit The module can now be removed without any further actions being necessary Removing a module 2 1 1 Modu...

Страница 60: ...ct your data carriers against dust mechanical vibrations and direct sunlight Avoid storing a data carrier in areas subject to high temperatures or humidity You may use both 8 cm and 12 cm data carriers in the optical drive When using a data carrier of lesser quality vibrations and reading errors may occur CD DVD indicator CD DVDindicator The CD DVD indicator flashes when a data carrier is inserted...

Страница 61: ...ove a data carrier that has been inserted Push in the drive tray until you feel it lock into place Manual removal emergency removal CD DVD Manualremovalofdatacarrier Emergencyremovalofdatacarrier In the event of a power failure or damage to the drive you can remove the data carrier manually 1 2 Switch your notebook off Push a pen or a piece of wire such as a paperclip firmly into the opening 1 The...

Страница 62: ...on slots Do not use any cleaning liquids Ensure that liquid does not enter the device To avoid the device overheating do not remove the ventilation slot cover when the device is switched on Prepare for removal see chapter Preparing to remove components Page 106 1 2 Keep the locking tabs of the ventilation slot cover pressed down 1 Lift the ventilation slot cover out of the bay 2 Clean the dust cha...

Страница 63: ... minutes Hibernate mode S4 After 1 hour After 30 minutes Select the power management functions in your Control Panel Select the Screen Saver in your Control Panel or Right click on the desktop Switch on the screen saver by clicking Personalization Change screen saver If you need further information about an option you can get help with most settings by pressing F1 to open the Microsoft Help When t...

Страница 64: ...supports the following formats Secure Digital SDTM card Memory Stick Memory Stick Pro Inserting the memory card Carefully slide the memory card into the slot The label should be facing upward Do not apply excessive force as otherwise the delicate contact surfaces could be damaged Memorycard Depending on the particular type used the memory card may protrude slightly from the slot 60 Fujitsu Technol...

Страница 65: ...orresponding icon in the task bar Left click on the icon Select the card you want to stop and remove Press the Enter key Wait for the dialogue box which tells you that it is now safe to remove the memory card 1 2 On devices with card locking Press on the storage card 1 Memorycard The storage card is released and can now be removed Pull the storage card out of the slot 2 Fujitsu Technology Solution...

Страница 66: ...reinstall the placeholder This prevents foreign bodies from getting into the slot 1 2 If the eject button 1 is recessed press it once so that it disengages Now press the eject button again so that the placeholder protrudes slightly from the notebook Pull the card placeholder out of the slot 2 Insert the card into the slot guide with the connection contacts first Gently push the card into the slot ...

Страница 67: ...rom the notebook Pull the card out of the slot 2 Insert the card placeholder into the slot guide Carefully slide the placeholder for the card as far as it will go into the slot Do not use excessive force Loudspeakers and microphones Microphone Loudspeakers Bassloudspeaker subwoofer Volumecontrol Information on the exact position of the speakers and microphone can be found in Ports and controls Pag...

Страница 68: ... to 14 400 bit s Simple software based country adaptations The modem complies with the EU Directive 91 263 EEC Telecommunications terminal equipment directive and has been checked in agreement with the guideline TBR 21 The modem can be operated in the following countries Multifrequency MFC dialling Belgium Denmark Germany Finland France Greece Great Britain Holland Ireland Iceland Italy Luxembourg...

Страница 69: ... telephone wall socket Pull the modem cable out of the telephone socket after you have finished your internet session or the fax mode and reconnect the telephone cable 4 3 1 2 Connect the modem cable to the modem port of the notebook 1 Modem Plug the modem cable 2 into the country specific telephone adapter 3 Connect the modem cable to your telephone wall socket 4 SIM card Whether your device has ...

Страница 70: ...direction of the arrow as shown 2 3 1 a Slide the SIM card lock a in the direction of the arrow 1 The clip a controls the power supply for the UMTS module The UMTS module is switched off while the clip is open Slide the SIM card as shown into slot 2 until it engages Slide the SIM card lock a in the direction of the arrow 3 Close the protective rubber cover of the SIM card slot Complete the inserti...

Страница 71: ...t pops out of the slot slightly Pull the SIM card out of the slot in the direction of the arrow 2 Slide the SIM card lock a in the direction of the arrow 3 Close the protective rubber cover of the SIM card slot Complete the removal see chapter Finishing component removal Page 112 Optional Wireless LAN BlueTooth UMTS wireless components The installation of radio components not approved by Fujitsu T...

Страница 72: ...o deactivate the wireless components individually in the BIOS Setup For this to occur you must either not have assigned a supervisor password or if a supervisor password has been assigned you must know this password Pay attention to the additional safety notes for devices with radio components provided in the Safety Regulations manual Details on using Wireless LAN can be found in the online help s...

Страница 73: ...s dealer You will find information on establishing the connection with the UMTS network in the documentation for the hardware used You can connect your device with the Internet via UMTS To do this use one of the following types of connection a USB dongle a USB stick with your mobile phone provider s SIM card UMTS ExpressCard for inserting in the ExpressCard slot of your device mobile end device e ...

Страница 74: ...etwork LAN Local Area Network 2 1 Connect the network cable to the LAN port of the notebook 1 Connect the network cable to your network connection 2 Your network administrator can help you to configure and use the LAN connections The network cable is not included in the delivery scope This type of cable can be obtained from a specialist dealer 70 Fujitsu Technology Solutions ...

Страница 75: ...itor audio mouse and keyboard You need only dock the notebook in order to use your peripheral devices Ports on the Port Replicator PortReplicator Ports 1 2 3 9 11 10 2 4 7 6 5 8 1 DVI port 2 USB ports 3 DisplayPort 4 VGA monitor port 5 LAN port 6 Headphone port 7 Security Lock device 8 DC input connector DC IN 9 Connector on the Port Replicator for the docking port on the bottom of the notebook 10...

Страница 76: ...his can block the air vents of the notebook and cause overheating and damage Place the port replicator on a stable flat and non slip surface Please note that the port replicator s rubber feet may mark certain types of surface Never place the port replicator and the mains adapter on a heat sensitive surface Do not expose the port replicator to extreme environmental conditions Protect the port repli...

Страница 77: ...way that the docking connector on the underside of the notebook is aligned with the docking connector of the port replicator as shown Press down on the notebook s rear corners so that it locks into position Connect the mains adapter cable to the DC jack DC IN of the port replicator 1 Connect the power cable to the mains adapter 2 Plug the power cable into the mains socket 3 Fujitsu Technology Solu...

Страница 78: ...g off notebook via Port Replicator Close all applications and shut down your operating system please refer to the manual for the operating system If the notebook cannot be shut down properly press the ON OFF button on the Port Replicator for approx four seconds The notebook will switch off Any unsaved data may however be lost 74 Fujitsu Technology Solutions ...

Страница 79: ...h off the notebook beforehand or use the Windows function Start Undock Windows Vista Windows 7 Problems may occur if the notebook is removed from the port replicator during operation We recommend that you switch off the notebook beforehand or use the Windows function Start arrow icon Undock 1 2 Pull the release button in the direction of the arrow 1 Pick up the notebook 2 Fujitsu Technology Soluti...

Страница 80: ...e locked out and unable to access your data Therefore please note the following information Make regular backups to external data carriers such as external hard drives CDs DVDs or Blu ray Discs Some security functions need you to choose passwords Make a note of the passwords and keep them in a safe place If you forget your passwords you will need to contact the our Service Desk Deletion or resetti...

Страница 81: ...ssword protection for the operating system and hard disk as desired Boot from removable media Prevents unauthorised booting of an operating system from external media e g USB stick USB CD ROM drive etc In the BIOS Setup go to the Security menu and edit the option Boot from Removable Media Owner Information Overlay service desk or owner information during the boot process In the BIOS Setup go to th...

Страница 82: ... 1 Using the Security Lock Your device comes with a Security Lock device for the Kensington Lock Cable You can use the Kensington Lock Cable a sturdy steel cable to help protect your notebook from theft The Kensington Lock Cable is available as an accessory Fit the Kensington Lock Cable on the device on your notebook UsingtheKensingtonLockCable SecurityLock Mechanicalbackup Anti theftprotection At...

Страница 83: ...e of the functions You can only set a user password if a supervisor password has already been assigned Please refer to the Settings in BIOS Setup Utility Page 113 section for a description of how to call up and operate the BIOS Setup Utility Setting supervisor and user password Start the BIOS Setup Utility and go to the Security menu Select the Set Supervisor Password field and press the Enter key...

Страница 84: ...d removed Removing the supervisor password simultaneously deactivates the user password Password protection for booting of the operating system With the supervisor password you have set in the BIOS Setup Utility see section Setting supervisor and user password Page 79 you can also prevent booting of the operating system Operatingsystem Activating system protection Start the BIOS Setup Utility and ...

Страница 85: ...the first hard disk Drive0 The field Password Entry on Boot is set to Enabled by default You can exit the BIOS Setup once you have finished changing the settings From the Exit menu choose the option Exit Saving Changes Press the Enter key and select Yes The notebook reboots and your hard disk is now protected with a password The system will ask you to enter the password when the notebook is restar...

Страница 86: ...vantage of all the security features of your notebook you will need a CardOS SmartCard from Fujitsu Technology Solutions The SmartCard can only be used with a PIN offering maximum protection even if you lose the SmartCard In order to maximise your security the CardOS SmartCard is disabled if three incorrect attempts are made to enter the PIN When you use the CardOS SmartCard for the first time you...

Страница 87: ...manent installation SmartCard Switchingonthesystem All new SmartCards have a preset PIN Personal Identification Number and PUK Personal Unblocking Key On SICRYPT and CardOS SmartCards the value 12345678 is preset for the PIN and the PUK On Fujitsu cards the value 0000 is preset for the PIN and the value administrator is preset for the PUK For security reasons we recommend that you change both PIN ...

Страница 88: ...rd starting the system changes in BIOS Setup changing the PIN uninstalling SystemLock initialising SmartCards blocking SmartCards The following table shows an overview of the rights granted with each type of SmartCard when a PIN or PUK is entered User SmartCard SuperUser SmartCard Service SmartCard Admin SmartCard PIN PUK PIN PUK PIN PUK PIN PUK Start up system x x x Run BIOS Setup x x x Change ow...

Страница 89: ...you use FSC CardOS SmartCards SystemLock can be administered via the Windows program SystemLock Admin SystemLock Admin allows you to conveniently manage SystemLock at the operating system level create SystemLock Organisation Units and Groups generate SmartCards for these Organisation Units or Groups assign access rights for user cards at various levels and restore access rights using remote access...

Страница 90: ...g up the first system in a user group or a stand alone system for use with SystemLock Usergroups Start the device and call up BIOS Setup From the Security menu choose the option SmartCard SystemLock The following SmartCard SystemLock menu will be displayed Security SmartCard SystemLock Item Specific Help SmartCard SystemLock Not Installed Install Single PC Enter Install Group PC Enter Installs the...

Страница 91: ...8 digits is acceptable for the new PUK For security reasons we recommend that you change the PUK for every SmartCard and use an 8 digit number each time Re enter the new PIN to confirm When the following appears PIN PUK do not match You have confirmed the PIN incorrectly You will be requested to re enter the new PIN and reconfirm Please wait a few seconds after confirming the new PIN SystemLock is...

Страница 92: ...nter the PUK New SmartCards have a preset PUK see above You will need to know the PUK assigned to the SmartCard if you want to re initialise a previously initialised SmartCard Enter the PUK When the following appears ACCESS DENIED You have entered an invalid PUK After six failed attempts the SmartCard will be blocked and can no longer be used Enter the new PUK as follows Enter new PUK Confirm new ...

Страница 93: ...ity SmartCard SystemLock Item Specific Help SmartCard SystemLock Not Installed Install Single PC Enter Install Group PC Enter Installs the security from a SystemLock Admin SmartCard into this PC without modifying any data on the SmartCard A correct SmartCard is required for a permanent installation Enter PIN Insert the Admin SmartCard for the user group Enter PIN Enter the PIN When the following a...

Страница 94: ... Enter BIOS Recovery Allowed SmartCard and Pin Always required SmartCard Initialization Admin SmartCard Enter SuperUser SmartCard Enter User SmartCard Enter Service SmartCard Enter SmartCard Configuration Change PIN Enter Change PUK Enter Unblock SmartCard Enter Allows to deactivate The smartcard security ATTENTION Always check the BIOS password settings after uninstalling SystemLock NOTICE Reinst...

Страница 95: ...Uninstall F5 Normal User SmartCard System access rights Only allows system start up does not allow changes in BIOS Setup F6 Extended User SmartCard System and Setup access rights Allows system start up and changes in BIOS Setup F7 Admin SmartCard Admin access rights Allows generation of further Admin SmartCards F8 Service SmartCard Service access rights Only allows changes in BIOS Setup F9 Re acti...

Страница 96: ... be displayed Remove the SmartCard Always change the PIN and PUK for all further SmartCards The PUK is used to re activate a blocked SmartCard Remove the User SmartCard and label it e g with the name of the user But NEVER write the PIN on the SmartCard under any circumstances 92 Fujitsu Technology Solutions ...

Страница 97: ...er has one time access to the BIOS for service purposes without access to the SystemLock functions Admin access The user has access to the BIOS and the SystemLock functions e g for activating the device when the associated SmartCard has been lost An activation code will be generated that depends on the access rights granted this will be given to the user by the Hotline The user must now press the ...

Страница 98: ...rtCard has the appropriate rights you can F2 functionkey F3 functionkey F2 start BIOS Setup F3 change PIN If you do not select a function the system will boot up Start BIOS Setup F2 A SmartCard with the appropriate rights must be inserted SuperUser Service or Admin Changing PIN It is possible to change the PIN for any initialised SmartCard Press the function key F3 Enter the old PIN Enter the new ...

Страница 99: ...e installing SystemLock Do not switch off the device insert the BIOS Flash diskette instead Perform a BIOS update and try the installation process again The SmartCard is blocked Enter the PUK You have exceeded the maximum allowed number of incorrect PIN entries The SmartCard is blocked Enter the administrator PUK to re activate the SmartCard You must then enter a new User PIN to restart the system...

Страница 100: ...key Select Enabled to activate the TPM Once you have activated the TPM the Clear Security Chip option appears Select Clear Security Chip to delete the holder in the TPM By clicking on Enabled all secret keys e g SRK Storage Root Keys AIK Attestation Identity Keys etc generated by applications are deleted Please note that you will then no longer be able to access the data you have encrypted with th...

Страница 101: ...ore information about whether or not devices need to be switched off please refer to the documentation supplied with the external device Some of the external devices require special drivers see the operating system and external device documentation Connecting devices to the notebook 1 Turn off your notebook and all external devices 2 Unplug your notebook and all devices from the mains sockets 3 Co...

Страница 102: ...section Toggle output screen Monitor VGAconnectionsocket Screenport Monitorport Digital DVI monitor port Analogue VGA monitor port Switch off the notebook and the external monitor Plug the data cable of the external monitor into the monitor port First switch on the external monitor and then the notebook You can also switch back and forth between the external monitor and the notebook s LCD monitor ...

Страница 103: ...Toggle output screen P Digital DisplayPort Switch off the notebook and the external monitor Plug the data cable of the external monitor into the monitor port First switch on the external monitor and then the notebook You can also switch between the external monitor and the LCD monitor of the notebook see chapter Key combinations Page 43 You can display the same picture on the external monitor and ...

Страница 104: ...tebook Some LCD televisions have only two loudspeaker connections and therefore cannot reproduce Dolby digital or DTS In order to reproduce the sound you must go into Windows and adjust the sound settings Proceed as follows Select Startsymbol Settings Control Panel Hardware and Sound Sound Mark Realtek HDMI Output Select Properties Supported formats Deactivate the settings DTS audio and Dolby digi...

Страница 105: ... system is running USB 1 x has a maximum data transfer rate of 12 Mbit s USB 2 0 has a data transfer rate of up to 480 Mbit s USB 3 0 has a data transfer rate of up to 5 Gbit s Additional information can be found in the documentation for the USB devices Connect the data cable to the external device Connect the data cable to a USB port of the notebook Device drivers USB devices will be automaticall...

Страница 106: ...in order to utilise the USB charging function In this case the USB charging function will not work when the notebook is switched off as no drivers are active when the notebook is switched off You can use this USB port to charge or supply power to a USB device e g to charge a PDA or a mobile phone or to connect a USB lamp even if the notebook is switched off How to remove USB devices correctly Alwa...

Страница 107: ...on Additional information is provided in the documentation for the FireWire devices Connect the data cable of the external devices to the FireWire port of the notebook Plug the power cable of the external device into the mains socket Connecting external audio devices Microphone port Line In Audiodevices connecting Audioports Microphone connecting The microphone port Line In allows you to connect a...

Страница 108: ...nect the audio cable to the external device Connect the audio cable to the headphone port of the notebook The internal loudspeakers are disabled If you purchase a cable from a retailer please note the following information The headphone port on your notebook is a 3 5 mm jack socket If you want to connect headphones or a speaker you will need a 3 5 mm jack plug 104 Fujitsu Technology Solutions ...

Страница 109: ...notebook off and pull the power plug out of the mains socket Always remove the battery Take care when you use the locking mechanisms on the battery and any other component Never use sharp objects such as screwdrivers scissors or knives as leverage to remove covers Notes Board ESD Boards with electrostatic sensitive devices ESD are marked with the label shown When handling boards fitted with ESDs y...

Страница 110: ...13 When installing removing memory modules the battery must be removed from the notebook and the notebook must not be connected to the power supply see Preparing to remove components Page 106 Only use memory expansion modules that have been approved for your notebook see Technical data Page 123 Never use force when installing or removing a memory extension Make sure that foreign objects do not fal...

Страница 111: ...he cover from the notebook in the direction of the arrow 2 Removing memory modules 3 2 1 1 Carefully push the two mounting clips outwards 1 Memoryexpansion Memorymodule The memory module snaps upwards 2 Pull the memory module out of its slot in the direction of the arrow 3 Fujitsu Technology Solutions 107 ...

Страница 112: ... module downwards until you feel it click into place 2 Attaching the cover 2 2 1 Place the cover into position following the direction of the arrow 1 Secure the cover with the screws 2 Install the battery again see Removing and installing the battery Page 52 Turn the notebook the right way up again and place it on a flat surface Reconnect the cables that were previously disconnected 108 Fujitsu Te...

Страница 113: ...2 Remove the screw 1 Keep the screws in a safe place If you are removing more than one component at the same time store the screws for the individual components separate from each other If you install the wrong screws components may be damaged Lift the cover off the notebook 2 Fujitsu Technology Solutions 109 ...

Страница 114: ...ervicing Removing a hard disk 1 3 2 Remove the screw 1 use the pulling aid to pull the hard disk in the direction of the arrow 2 until the contacts disengage Remove the hard disk from the hard disk compartment 3 110 Fujitsu Technology Solutions ...

Страница 115: ...servicing Installing a hard disk 3 1 2 Place the hard disk into the hard disk compartment 1 Use the pulling aid to push the hard disk in the direction of the arrow 2 until the contacts engage Tighten the screw 3 Fujitsu Technology Solutions 111 ...

Страница 116: ...omponent removal After you have removed or changed the system components as you required please prepare your device for operation again as follows Install the battery again see Installing a battery Page 53 Turn the notebook the right way up again and place it on a flat surface Reconnect the cables that you disconnected before 112 Fujitsu Technology Solutions ...

Страница 117: ...he BIOS Setup Utility Reboot the notebook switch off on or reboot the operating system BIOSSetupUtility The following or a similar display appears on the screen at start up F2 BIOS Setup F12 Boot Menu Press the function key F2 If a password has been assigned enter the password and press the Enter key If you have forgotten the password contact your system administrator or contact our customer servi...

Страница 118: ...es for all menus of the BIOS Setup Utility choose Load Setup Defaults and Yes Discard Changes Discard changes without exiting the BIOS Setup Utility To discard the changes you have made select Discard Changes and Yes The settings in place when BIOS Setup Utility was called remain effective You can now make additional settings in the BIOS Setup Utility If you want to exitBIOS Setup Utilitywith thes...

Страница 119: ...ract Our notebooks have been designed primarily with mobile applications in mind This means that considerable effort has been made to optimise components and equipment in terms of weight space and energy requirements Depending on the particular configuration you have purchased it is possible that functionality may be slightly reduced compared to a desktop PC if you are running processor intensive ...

Страница 120: ...eck whether the battery is installed correctly in its compartment Switch the notebook on The battery is fully discharged Charge the battery or Install a charged battery or Connect the notebook to a mains outlet using the mains adapter When certain characters are entered on the keyboard only numerals are written Abeepsoundseverysecond Cause Troubleshooting The virtual numeric keypad of your device ...

Страница 121: ...gged properly into the external monitor and into the power socket Check whether the data cable is properly connected to the notebook and the external monitor if it is plugged in with a connector Switch on the external monitor and the notebook The external monitor is blank or the image is unstable Screen Monitor Cause Troubleshooting The wrong external monitor has been selected or the wrong screen ...

Страница 122: ...alled If your device is one which can only be operated using the pen install the driver for the standard model or If your device is one which can be operated using the pen and by finger install the driver for the Dual Digitizer model The notebook cannot be started Notebook Cause Troubleshooting The battery is not installed correctly Check whether the battery is installed correctly in its compartme...

Страница 123: ...r is not connected correctly Check that the data cable connecting the notebook to the printer is properly connected The printer driver is faulty or not correctly installed or it is the wrong printer driver Check that the data cable connecting the notebook to the printer is properly connected Check whether the correct printer driver is loaded refer to the printer documentation The radio connection ...

Страница 124: ...y darker with the key combination for Decreasing the screen brightness in order to reduce the amount of power being drawn SmartCard reader is not recognised Cause Troubleshooting Chip card inserted incorrectly Make sure you have inserted your SmartCard into the SmartCard reader with the chip facing upwards Check whether the SmartCard you are using is supported Your SmartCard must comply with the I...

Страница 125: ... refer you to our service partner who will unlock your device for a charge Acoustic warnings Acousticerrormessages Errors Cause Troubleshooting A beep sounds every few seconds The battery is almost flat Charge the battery Error messages on the screen Errormessagesonthescreen Errormessage This section describes the error messages generated by the BIOS Setup Error messages displayed by the operating...

Страница 126: ... that no key is pressed Operating system not found Check in the BIOS Setup whether your hard disk has been set correctly Make sure that the operating system is installed on the corresponding drive Press F1 to resume F2 to SETUP This error message appears if an error occurs during the self test before starting the operating system Press the F1 function key to start the operating system Press the fu...

Страница 127: ...ting Digitizer and glass panel Active Digitizer with frosted Berlin glass or Dual digitizer with matt touch screen WebCam 2 mega pixel optional with status indicator Graphics card Chip Intel HD Graphics Maximum resolution on external display 2560 x 1600 pixels Ports on the device 1920 x 1200 pixel VGA port 1920 x 1200 pixel HDMI port Ports on the Port Replicator 2560 x 1600 pixel DisplayPort 1920 ...

Страница 128: ...function Anytime USB charge 1 x USB 2 0 Security Lock 1 x Ambient conditions Environment class DIN IEC 721 7K1 Mechanism class DIN IEC 721 7M2 Operating temperature 5 35 Transport temperature 2K2 15 C 60 C Port Replicator optional Electrical data Safety regulations complied with CE Protection class II Ports Monitor port analogue 15 pin Monitor port digital 25 pin DVI D LAN port RJ45 USB Universal ...

Страница 129: ... Wh 41 Wh Nominal power 5 800 mAh 6 200 mAh 3 800 mAh The operating time depends on the device configuration the active applications and the energy saving settings Mains adapter The following technical data applies to the mains adapter supplied with the notebook and to the mains adapter supplied with the port replicator which you can order optionally Primary Rated voltage 100 V to 240 V automatic ...

Страница 130: ...s of inactivity Detailed information about the requirements of the Energy Star environmental mark and the products which satisfy these requirements can be found on the Internet at https www energystar gov Disposal and recycling Notes Information about this subject can be found on your notebook or on our Internet pages Declarations of Conformity Declarationofconformity The Declarations of Conformit...

Страница 131: ...the USA Although it is not explicitly forbidden to travel in the US trading area carrying this device to avoid trouble at customs clearance Fujitsu Technology Solutions GmbH recommends not to bring this device into the US trading area Regulatory information for notebooks without radio device Regulatoryinformation NOTICE Changes or modifications not expressly approved by Fujitsu Technology Solution...

Страница 132: ... to the telephone network your telephone company may discontinue your service temporarily If possible they will notify you in advance If advance notice is not practical they will notify you as soon as possible You will also be advised of your right to file a complaint with the FCC This fax modem also complies with fax branding requirements per FCC Part 68 Your telephone company will probably ask y...

Страница 133: ...ns Repairs to telecommunication equipment should be made by a Canadian authorised maintenance facility Any repairs or alterations not expressly approved by Fujitsu or any equipment failures may give the telecommunication company cause to request the user to disconnect the equipment from the telephone line NOTICE The Ringer Equivalence Number REN for this terminal equipment is 0 0 The REN assigned ...

Страница 134: ...tifs n excède pas 5 AVERTISSEMENT Pour assurer la sécurité les utilisateurs doivent vérifier que la prise de terre du service d électricité les lignes télphoniques et les conduites d eau métalliques sont connectées ensemble Les utilisateurs NE doivent PAS tenter d établir ces connexions eux mêmes mais doivent contacter les services d inspection d installations électriques appropriés ou un électric...

Страница 135: ... Bulletin OET 65C and found compliant with the requirements as set forth in CFR 47 Sections 2 1091 2 1093 and 15 247 b 4 addressing RF Exposure from radio frequency devices The radiated output power of this radio device is far below the FCC radio frequency exposure limits Nevertheless this device shall be used in such a manner that the potential for human contact during normal operation is minimiz...

Страница 136: ...tion substitution or attachment The manufacturer and its authorized resellers or distributors will assume no liability for any damage or violation of government regulations arising from failure to comply with these guidelines Export restrictions This product or software contains encryption code which may not be exported or transferred from the US or Canada without an approved US Department of Comm...

Страница 137: ... capacity battery 51 Cleaning 15 Components installing removing 105 Configuration BIOS Setup Utility 113 Connecting audio devices 103 104 Connecting headphones 104 Crystal View display cleaning 15 Cursor control keys 42 Cursor keys 42 D Date is incorrect 116 Declaration of conformity 126 Device setting up 17 Devices connecting 97 disconnecting 97 Display orientation selecting 25 DOC INDUSTRY CANAD...

Страница 138: ...Life battery 50 Line feed 42 Loudspeakers 63 M Main memory see Adding memory 106 Mains adapter connecting 17 setting up 17 Manual removal of data carrier 57 Mechanical backup 78 Memory card handling 60 inserting 60 removing 61 Memory expansion installing 108 removing 107 Memory module important notes 106 installing 108 removing 107 Microphone 63 Microphone connecting 103 Mobile operation 14 Modem ...

Страница 139: ...ry information notebooks with radio device 130 Notebooks without radio device 127 Removing a data carrier 57 Removing memory see Adding memory 106 Return 42 S Safety notes 13 Screen no screen display 117 Screen port see VGA connection socket 98 Security functions 76 SystemLock 82 Security functions SmartCard 82 Security Lock 78 Select the language for handwriting recognition and keyboard 30 Select...

Страница 140: ...amage 16 Transportation 14 15 Travel notebook 14 Troubleshooting 115 Trusted Platform Module 96 U UMTS 69 Antenna 69 Uninstalling SystemLock 94 USB charging function 102 USB ports 101 User groups installing 86 User password changing 80 entering 79 removing 80 Using the Kensington Lock Cable 78 V VGA connection socket 98 Video devices connecting 103 Virtual numeric keypad 43 Volume control 63 W Web...

Отзывы: