background image

Chapter 

8

 Troubleshooting

136

Index

Appendix

Introduction

Glossary

Contents

TOP

Loading 
Documents

How to Use 
ScandAll PRO

Scan Pa-
rameters

Various 
Documents

Daily Care

Trouble-
shooting

Operational 
Settings

Consumables

Scanner 
Overview

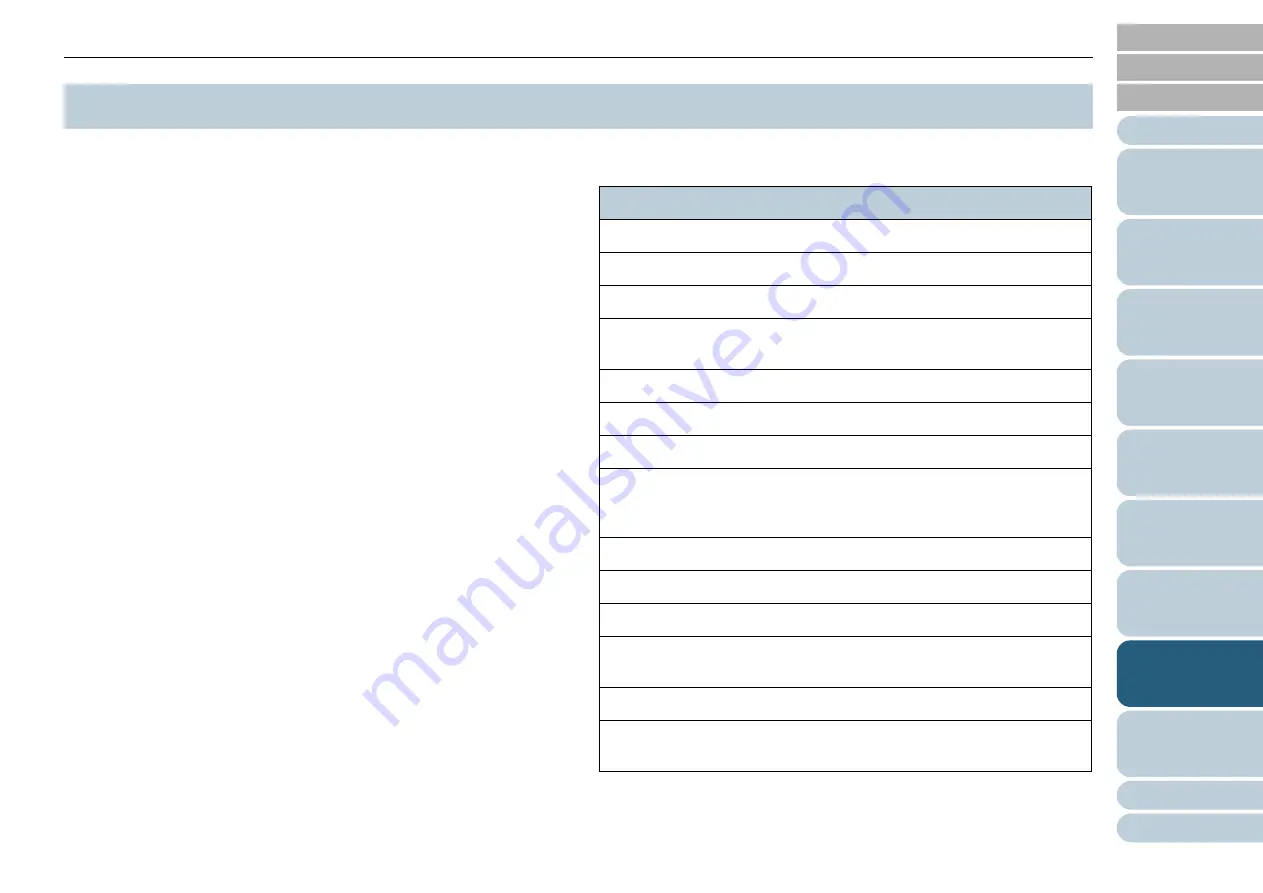
This section describes troubles that may occur during 
scanning and how to remedy them. Before you ask for repair, 
check the following list for possible causes. If the remedies in 
these flowcharts do not solve the problem, check each item in 

"

8

.4 Before Contacting Your Dealer or Scanner Service 

Provider" (on page 152), 

and then contact the dealer where 

you purchased the scanner or an authorized FUJITSU 
scanner service provider.

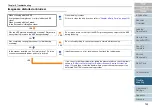
The possible troubles are listed as follows:

8

.3 Troubleshooting

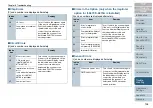
Possible Trouble

Scanner cannot be turned on. (See page 137.)

Indication on Function 

N

umber Display goes out. (See page 13

8

.)

Scanning does not start. (See page 139.)

Quality of scanned pictures or photos is not satisfactory when scanning 
in black and white. (See page 140.)

Quality of scanned text or lines is unsatisfactory. (See page 141.)

Images are distorted or blurred. (See page 142.)

Vertical lines appear in scanned images. (See page 143.)

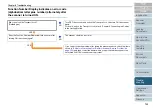
Function 

N

umber Display indicates an error code (alphabetical letter 

plus number) alternately after the scanner is turned O

N

. (See page 

144.)

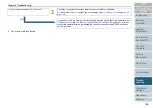
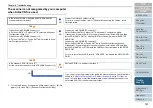
Multifeed errors occur frequently. (See page 145.)

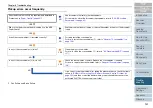
Pickup errors occur frequently. (See page 147.)

Paper jams occur frequently. (See page 14

8

.)

Scanned images are elongated when scanned from the ADF. (See page 
149.)

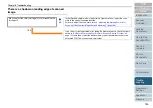
There is a shadow on leading edge of scanned image. (See page 150.)

The scanner is not recognized by your computer when Kofax VRS is 
used. (See page 151.)

Содержание FI-6750S

Страница 1: ...xplains how to troubleshoot scanner problems Explains how to configure scanner settings using the Software Operation Panel Glossary Contents TOP Loading Documents How to Use ScandAll PRO Scan Pa rameters Various Documents Daily Care Trouble shooting Operational Settings Consumables P3PC 2252 02ENZ0 Scanner Overview How to Use This Manual Operator s Guide Thank you for purchasing a fi 6670 A fi 677...

Страница 2: ... Safety Information 10 Chapter 1Scanner Overview 18 1 1 Overview and Features 19 Overview 19 Features 19 1 2 Scanner Parts and Their Functions 20 fi 6670 A ADF Type 20 fi 6770 A fi 6750S FB Type 22 Model Common Parts 25 1 3 Functions of the Operator Panel 26 Operator Panel 26 Indications on the Function Number Display 28 1 4 Turning the Scanner On and Off 29 Turning the Scanner On 29 Turning the S...

Страница 3: ...ard as a standard feature It enables advanced image processing at a high speed when used with Kofax VRS fi 6750S Equipped with an automatic document feeder ADF for automatic document feeding and simplex scanning and a flatbed for scanning documents such as thin paper or thick books The ADF features simplex scanning only Manual Description Package Contents List paper Lists all the items contained i...

Страница 4: ... Inc Other product names are the trademarks or registered trade marks of the respective companies Manufacturer PFU LIMITED International Sales Dept Imaging Business Division Products Group Solid Square East Tower 580 Horikawa cho Saiwai ku Kawasaki shi Kanagawa 212 8563 Japan Phone 81 44 540 4538 All Rights Reserved Copyright PFU LIMITED 2008 Error Recovery Guide HTML help Details the status of th...

Страница 5: ...er is located Consult your dealer or an experienced radio TV technician FCC warning Changes or modifications not expressly approved by the party responsible for compliance could void the user s authority to operate the equipment Canadian DOC Regulations This digital apparatus does not exceed the Class B limit for radio noise emissions from digital apparatus set out in the Radio interference Regula...

Страница 6: ...vices Their standards and logos are uni form among participating nations Use in High Safety Applications This product has been designed and manufactured on the assumption that it will be used in office personal domestic regular industrial and general purpose applications It has not been designed and manufactured for use in applications simply called high safety applications from here on that direc...

Страница 7: ... alerts operators to helpful advice regarding opera tion Model Indication fi 6670 fi 6670A ADF type Scanner fi 6770 fi 6770A fi 6750S Flatbed type Product Indication Microsoft Windows 2000 Professional operating system Windows 2000 Windows 1 Microsoft Windows XP Professional operating system 32 64 bit Microsoft Windows XP Home Edition operating system Windows XP Microsoft Windows Server 2003 Stand...

Страница 8: ...ens actually displayed refer to the Adobe Acrobat Help Arrow Symbols in This Manual Right arrow symbols D are used to separate icons or menu options you should select in succession Example Click Tool D Scan Setting Screen Examples in This Manual The screen examples in this manual are subject to change without notice in the interest of product improvement If the actual displayed screen differs from...

Страница 9: ...e omissions or statements resulting from negligence accidents or any other cause PFU further assumes no liability arising from the application or use of any product or system described herein nor any liability for incidental or consequential damages arising from the use of this manual PFU disclaims all warranties regarding the infor mation contained herein whether expressed implied or statu tory U...

Страница 10: ...ass surface inside the ADF becomes hot during the operation Be careful not to touch glass surfaces inside the ADF To avoid burns never touch around the area indicated by this label Take care not to get your finger s caught in the ADF while turning You must NOT remove this warning label from your scanner When it gets old or unreadable by staining or scratches contact the store where you purchased t...

Страница 11: ... indicates that special care and attention is required The drawing inside the triangle shows the specific caution A CIRCLE with a diagonal line inside shows action which users may not perform The drawing inside or under the circle shows the specific action that is not allowed WARNING CAUTION R Outline characters on a colored background show instructions users should follow It may also include the ...

Страница 12: ...mediately discon nect the power plug from the power outlet Then contact the store where you bought the scanner or an authorized FUJITSU scanner service provider Description Do not put liquids inside the scanner Do not insert or drop any metal objects into the ADF slot or ventilation ports on the scanner Do not scan any wet documents or documents with paper clips or staples attached Do not splash o...

Страница 13: ...make sure that the table is flat and level Place the scanner so that none of its parts extend beyond the edge of the table Also it must be strong enough to support the weights of the scanner and other devices Firmly insert the power plug Firmly insert the power plug into the power outlet as far it can go Do not block the ventilation ports Do not block the ventilation ports Blocking the ventilation...

Страница 14: ...air caught up in any scanner mechanism during scanning since this may cause injuries Disconnect the power plug from the power outlet when the scanner is not in use for a long period of time When the scanner is not going to be used for a long period of time be sure to disconnect the power plug from the power outlet Do not install the scanner in direct sunlight Do not install the scanner under direc...

Страница 15: ...he Scanner ON 31 Turning the Scanner OFF 31 1 5 Power Save Mode 32 Returning from Power Save Mode 32 1 6 Basic Flows of Scanning Documents 33 Chapter 2 Loading Documents 38 2 1 Loading Documents on the ADF 39 2 2 ADF Loaded Documents 42 Sizes 42 Paper Quality 42 Maximum Document Loading Capacity 44 Area Not to be Perforated 44 Loading Documents with Tabs or Non Rectangular Documents 45 Multifeed D...

Страница 16: ...ab 71 Compression Tab 71 Imprinter Tab 72 About Tab 72 Chapter 5 Various Documents 73 5 1 Summary 74 5 2 Scanning Documents of Different Types or Sizes 75 Scanning Both Sides of A Document fi 6670 fi 6670A fi 6770 fi 6770A Only 75 Scanning A Large Size Document or Book Flatbed Type Only 75 Scanning Documents of Different Widths 76 Scanning A Document Longer Than A3 Size 77 5 3 Advanced Scanning 79...

Страница 17: ...4 7 2 Replacing the Pick Rollers 125 7 3 Replacing the Brake Roller 127 Chapter 8 Troubleshooting 129 8 1 Paper Jams 130 8 2 Errors Indicated on the Operator Panel 132 Temporary Errors 133 Device Errors 134 8 3 Troubleshooting 136 Scanner cannot be turned on 137 Indication on Function Number Display goes out 138 Scanning does not start 139 Quality of scanned pictures or photos is not satisfactory ...

Страница 18: ...ervals Pre Pick 173 Cropping the Image Boundary AutoCrop Boundary 174 Configuring the Data Transfer Width SCSI Bus Width 175 Scan Setting for Documents with Tabs or Non Rect angular Documents Scan Setting for Documents with Tab Automatic Paper Size Detection 175 Scan Setting for The Document Whose One Side Is in Dark Background Color Scan Setting for Document in Dark Background Color 176 Adjusting...

Страница 19: ...oduction Glossary Contents TOP Loading Documents How to Use ScandAll PRO Scan Pa rameters Various Documents Daily Care Trouble shooting Operational Settings Consumables Scanner Overview A 5 Uninstalling the Software 196 Glossary 197 ...

Страница 20: ...ples are used to explain the operations The screens and operations may differ slightly if the OS that you are using is other than Windows Vista Take note that when the FUJITSU TWAIN 32 or FUJITSU ISIS scanner driver is updated the screens and operations herein may also be slightly different In such case refer to the relevant manuals or materials which are to be supplied when updating the driver 1 ...

Страница 21: ... of about 45 000 sheets per day Reduces the work loss caused by multifeeds The scanner mounts an ultrasonic multifeed sensor that definitely detects two or more sheets fed simultaneously this is called a multifeed This feature enables multifeed detec tion for documents of different thicknesses sizes color and or color density thus preventing any work loss caused by multi feeds Provides the Intelli...

Страница 22: ... Guide when kept pressed Locks the Side Guide at the position when this button is released Operator Panel Comprises a Function Number Display operating push buttons and LEDs Used to operate the scanner and monitor the status Two panels are mounted one each on each side You can use whichever is convenient for you The panels are of quick open type and can be folded back in place when not used Stacke...

Страница 23: ...r side of the cover to avoid tangling fi 6670 fi 6670A CGA Board fi 6670A only For details of the CGA board refer to A 4 Scanner Options on page 195 SCSI Connector 2 fi 6670A only A connector for a SCSI interface cable ADF Open Button Common Opens the ADF Push the buttons in to open the ADF USB Connector 2 fi 6670A only A connector for a USB interface cable CGA Board Slot fi 6670 only Remove the c...

Страница 24: ...Display operating push buttons and LEDs Stacker Scanned documents are ejected from the ADF onto this stacker You can adjust the height of the stacker at lower or upper position Is removable Stacker Extension Pull out the extension according to the document length Stopper Raise it if the documents loaded are long ADF Open Button Opens the ADF Push the buttons in to open the ADF Flatbed Place them o...

Страница 25: ...the flatbed This option allows you to correct skewed document images after scanned with the flatbed and to recognize the size of document to output at it original size Name Black Document Pad Parts No PA03338 D960 Document Bed Place documents on the glass when scanning through the flatbed Document Holding Pad Holds documents to the Document Bed Document Cover Holds the loaded documents at the scan...

Страница 26: ...ard For details of the CGA board refer to A 4 Scanner Options on page 195 CGA Board fi 6770A only For details of the CGA board refer to A 4 Scanner Options on page 195 USB Connector 2 fi 6770A only A connector for a USB interface cable SCSI Connector 2 fi 6770A only A connector for a SCSI interface cable fi 6770A fi 6770 fi 6750S Main Power Switch Common Used to turn the scanner ON and OFF Power C...

Страница 27: ...aily Care Trouble shooting Operational Settings Consumables Scanner Overview Model Common Parts Brake Roller Holder x1 Feed Roller x4 Plastic Roller x4 Chute Roller x1 usually covered with a hood Ultrasonic Sensor x2 for multifeed detection Sheet Guide x2 Glass x2 Brake Roller x1 consumable Pick Roller 1 x 2 types consumable Pick Roller Cover x1 Pick Arm x1 ...

Страница 28: ...d the section Using the Scanner Buttons to Start A Scan Quickly on page 106 1 3 Functions of the Operator Panels Check Function Send to Scan Stop Power Check LED Lights in orange when an error occurs Function Number Display Indicates the function number and the scanner status Function Button Switches the Function activated by the Send to button Send to Button Launches linked application software f...

Страница 29: ... ROM and the section Using the Scanner Buttons to Start A Scan Quickly on page 106 Check Function Send to Power Scan Stop Check LED Lights in orange when an error occurs Function Number Display Indicates the function number and the scanner status Function Button Switches the Function activated by the Send to button Send to Button Launches linked application software for scanning Resets an error in...

Страница 30: ...ndicates that a recoverable error occurred during scan ning J or U and an error number are displayed alternately For error details refer to Temporary Errors on page 133 After the error has been resolved you can return to the Ready Status see 1 above by pressing the Stan Stop or Send to button E F C H A L Indicates that an abnormality device error occurred in the scanner during its initialization o...

Страница 31: ...he scanner OFF 1 Press the Power button on the Operator Panel for more than 2 seconds The power is turned off and the Power LED goes off 1 4 Turning the Scanner ON and OFF For a SCSI cable connection be sure to turn on your computer AFTER turning on the scanner and making sure number 1 indicates on the Function Number Display Check Function Send to Power Scan Stop Check Function Send to Scan Stop ...

Страница 32: ...o the Power Save mode In the Power Save mode the indication of the Function Number Display on the Operator Panel goes out but the Power LED stays lit in green Returning from Power Save Mode To return from Power Save mode perform one of the following Load some sheet of paper on the ADF Paper Chute Hit any button on the Operator Panel Do not press down the Power button for more than 2 seconds This w...

Страница 33: ...USB Connector 1 1 Turn the scanner ON For how to turn on the scanner refer to 1 4 Turning the Scanner ON and OFF on page 31 2 Load a target document on the scanner For how to load documents on the scanner refer to Chapter 2 Loading Documents on page 38 3 Launch an application you want to use for scanning The following steps show example windows when ScandAll PRO is selected When ScandAll PRO is la...

Страница 34: ...TOP Loading Documents How to Use ScandAll PRO Scan Pa rameters Various Documents Daily Care Trouble shooting Operational Settings Consumables Scanner Overview 4 Select a scanner driver to use 5 Select a scanner to use FUJITSU TWAIN 32 scanner driver FUJITSU ISIS scanner driver ...

Страница 35: ...ers 8 Perform a scan For how to scan using ScandAll PRO refer to 3 7 Scanning with Scan on page 58 and 3 8 Scanning with Batch Scan on page 61 9 Save the scanned document images to a file FUJITSU TWAIN 32 scanner driver FUJITSU ISIS scanner driver The procedures and operation slightly may differ depend ing on the application you use For how to scan documents using ScandAll PRO refer to Chapter 3 H...

Страница 36: ...cuments on the scanner refer to Chapter 2 Loading Documents on page 38 3 Launch an application you want to use for scanning The following steps show example windows when VCDemo is selected When VCDemo is launched For how to launch VCDemo refer to the the VirtualReScan VRS User s Guide VRS User Guide pdf in the folder under the path of VRS HVRS Documents in the SETUP DVD ROM 4 Select a scanner to u...

Страница 37: ...anner Properties dialog box configure scan parameters 7 Perform a scan For how to scan documents using VCDemo refer to the VirtualReS can VRS User s Guide VRS User Guide pdf in the folder under the path of VRS HVRS Documents in the SETUP DVD ROM 8 Save the scanned document images to a file The procedures and operation slightly may differ depend ing on the application you use If you want to use oth...

Страница 38: ... Care Trouble shooting Operational Settings Consumables Scanner Overview Chapter 2 Loading Documents This chapter describes how to load documents on the scanner 2 1 Loading Documents on the ADF 39 2 2 ADF Loaded Documents 42 2 3 Changing the ADF Position Flatbed Type Only 48 2 4 Loading Documents on the Flatbed Flatbed Type Only 50 ...

Страница 39: ...document as follows 1 Hold both ends of the document and bend the document stack into an arch 2 Firmly holding the document with both hands bend it back so that the bent section rises up in the middle of the document as follows 3 Repeat Steps 1 to 2 twice or three times 4 Turn the document stack by 90 degree and then fan it in the differ ent orientation again 5 Align the edge of the document 3 Loa...

Страница 40: ... the following Place one card at a time on the ADF Paper Chute It is recommended that the front side of the card be placed face down in the ADF Place the card in the following orientation portrait Cards to be scanned should satisfy ISO7810 type ID 1 type compliant card Size 86 mm height x 54 mm width 3 39 in x 2 13 in Thickness 0 76 0 08 mm 0 030 0 003 in Material Poly vinyl chloride PVC or Polyvi...

Страница 41: ...scanner to scan the document For how to scan documents using ScandAll PRO refer to Chapter 3 How to Use ScandAll PRO on page 51 Remove paper clips or staples from the document If a multifeed or mis picking occurs reduce the number of the document in the ADF Paper Chute When loading a small document be careful not to touch the hood for the Chute Roller during scanning Doing so may let the hood open...

Страница 42: ...n Type Paper Quality Paper Types The following types of paper are recommended as the scannable documents Woodfree paper Wood containing paper For documents of paper types other than the above check if they can be scanned test with a few dummy sheets of the same paper type before scanning the actual document Paper Thicknesses Paper thickness is expressed by paper weight The paper thicknesses allowa...

Страница 43: ...dirty avoid scanning documents containing large areas written or filled with pencil When using the ADF the leading edge of all document sheets must be evenly aligned Make sure that curling at the leading edge is within the following tolerances Carbonless paper contains chemical substances that may harm the Brake Rollers or paper feeding rollers e g Pick Rollers when documents are fed Pay attention...

Страница 44: ... ing figure When using the flatbed type scanner you should scan such a document through its flatbed Paper thick ness Unit Conversion g m2 paper weight 31 40 52 64 75 80 90 104 127 203 209 lb 8 3 11 14 17 20 21 24 28 34 54 56 1 kg 26 7 35 45 55 64 5 69 77 5 90 110 174 180 The paper weight available for a size larger than A4 Letter ranges from 52 g m2 to 209 g m2 14 0 lb to 56 1 lb The paper weight ...

Страница 45: ...e vertical center line of document Do not glue separate paper within 35 mm 1 38 in of the vertical center line of document Detection By Document Length Load sheets of the same length on the ADF at a time Document length deviation 1 or less Punched holes are not allowed within 35 mm 1 38 in of the vertical center line of document Detection By Document Overlapping and Length Load sheets of the same ...

Страница 46: ...ument contains any text frame or signature in this area disable White Level Follower For details about White Level Follower refer to the FUJITSU TWAIN 32 Scanner Driver Help Multifeed detection by document overlapping will often misde tect very thick paper or media such as plastic cards When scanning documents like this disable Multifeed Detec tion Some document types and or some document conditio...

Страница 47: ... Documents Daily Care Trouble shooting Operational Settings Consumables Scanner Overview Job Separation Sheet The following shows the typical format of the job separation sheet The document width must be A4 Letter 210 mm or 8 27 in or wider 15 15 Reading reference position Feeding direction Center of document T op of paper Bottom of paper Unit mm ...

Страница 48: ...Scanner Overview This section describes how to change the ADF position 1 Raise the Stacker 2 Holding the handle lift up the Document Cover 3 Remove the ADF Lock Screws and fix them to the Lock Screw Storage Holes 4 Gently close the Document Cover 2 3 Changing the ADF Position Flatbed Type Only Make sure that the ADF Lock Screws have been inserted into the Lock Screw Storage Holes Lock Screw Storag...

Страница 49: ...ocked to the installation position The three adjustable positions of the ADF are Traditional Traditional style set by default Standard Space saving type and for right handed operators Slide the ADF to the center of the scanner Reversed Space saving type and for left handed operators Slide the ADF to the center of the scanner and then rotate it counterclockwise by 180 degree 6 Let the Stacker down ...

Страница 50: ... reference point 3 Gently close the Document Cover 4 Start up an application which supports the scanner and scan the document For how to scan documents using ScandAll PRO refer to Chapter 3 How to Use ScandAll PRO on page 51 2 4 Loading Documents on the Flatbed Flatbed Type Only Make sure that no document is left on the ADF Paper Chute or on the Stacker ABC A B C The Document Cover with a black do...

Страница 51: ...e screens and operations may differ slightly if the OS that you are using is other than Windows Vista Take note that when the FUJITSU TWAIN 32 or FUJITSU ISIS scanner driver is updated the screens and operations herein may also be slightly different In such case refer to the relevant manuals or materials which are to be supplied when updating the driver 3 1 Overview of ScandAll PRO 52 3 2 Launchin...

Страница 52: ...Displays multiple files side by side allowing you to browse them at one time for comparison Outputs both color and binary monochrome images simul taneously by one time scan Inputs and outputs files in bitmap JPEG or TIFF format Directly outputs scanned images to PDF files or PDF A files Creates searchable PDF files and high compression PDF files as well Saves scanned image data automatically to a ...

Страница 53: ...Loading Documents How to Use ScandAll PRO Scan Pa rameters Various Documents Daily Care Trouble shooting Operational Settings Consumables Scanner Overview 1 Select the start menu D All Programs D Fujitsu ScandAll PRO D Fujitsu ScandAll PRO ScandAll PRO starts up 3 2 Launching ScandAll PRO ...

Страница 54: ...cording to your preferences This section explains how to switch the scanner driver TWAIN or ISIS to use in ScandAll PRO 1 Select the Tool menu D Preferences The Setup dialog box appears 2 On the Scan tab under Device Driver select either of the drivers 3 Click the OK button to close the Setup dialog box 3 3 Selecting a Scanner Driver In ScandAll PRO TWAIN is selected by default For functional deta...

Страница 55: ...canner 1 Select the Scan menu D Select Scanner The Select Scanner dialog box appears 2 Select a scanner you want to use and click the Select button Select the scanner model name that you connected to your computer Note the indication of the scanner model name depends on the scanner driver selected FUJITSU TWAIN 32 scanner driver FUJITSU ISIS scanner driver 3 4 Selecting a Scanner Model Scanner Mod...

Страница 56: ...e scan parameters are configured in the setting dialog box of the scanner driver 1 Select the Scan menu D Scan Settings The scanner driver s setting dialog box appears FUJITSU TWAIN 32 scanner driver FUJITSU ISIS scanner driver For the configurable parameters in the respective drivers refer to Chapter 4 Scan Parameters on page 63 2 When you have completed the settings click the OK button The scan ...

Страница 57: ...scan documents on a single shot basis For details refer to 3 7 Scanning with Scan on page 58 Scanning with Batch Scan You can create a profile that holds predetermined settings such as the file format and saving destination scan parame ters image processing properties and the application to link with According to the profile selected the scanner automati cally scan documents You can create more th...

Страница 58: ... configure new settings as necessary such as scan and saving parame ters 1 Load a target document on the scanner For how to load documents on the scanner refer to Chapter 2 Loading Documents on page 38 2 Select the Scan menu D Scan Settings The Scan Settings dialog box appears 3 In the Scan Settings dialog box configure various settings such as for saving the scanned document images 3 7 Scanning w...

Страница 59: ...onal Settings Consumables Scanner Overview 4 Click the Scanner Setting button The scanner driver s setting dialog box appears FUJITSU TWAIN 32 scanner driver FUJITSU ISIS scanner driver 5 Configure the scan parameters For the configured parameters refer to Chapter 4 Scan Parameters on page 63 6 When you have completed the settings click the OK button You are returned to the Scan Settings dialog bo...

Страница 60: ...ing the Scan button may display the scanner driver s setting dialog box If so you can also change the settings in the dialog box displayed Click the Scan button to scan the document Click the Close button when you finish scanning If you do not want to display the scanner driver s setting dialog box clear the Show TWAIN dialog before each batch scan process checkbox in the Scan Settings dialog box ...

Страница 61: ...new profile based on an existing profile Select a profile you want to change settings for and click the Copy button The profile you selected from the profile list is displayed as a new profile in the Profile Editor dialog box To change the settings of an existing profile Select a profile you want to change settings for and click the Edit button The selected profile appears in the Profile Editor di...

Страница 62: ...ied profiles by using the Add or Copy button are added to the profile list Scanning Documents 1 Load a target document on the scanner 2 Select a profile from the Select the Batch Profile drop down list on the toolbar 3 Click the Start Batch Scan button The document is scanned with the scanner The scanned image s are displayed on the ScandAll PRO window and then saved to a file For information abou...

Страница 63: ... scanner driver Here Windows Vista screen samples are used to explain the operations The screens and operations may differ slightly if the OS that you are using is other than Windows Vista Take note that when the FUJITSU TWAIN 32 or FUJITSU ISIS scanner driver is updated the screens and operations herein may also be slightly different In such case refer to the relevant manuals or materials which a...

Страница 64: ...ver Help Resolution Specify a resolution for scanning images You can select a value from the predefined standard resolu tions in the drop down list If a desired value is not listed you can select Custom to specify the value in increments of 1 dpi from 50 to 600 dpi By marking the Predefine checkbox you can select one of three predefined settings Best Better and Normal and this allows you to scan d...

Страница 65: ...g box Reset Button This button is used to undo changes to the current settings Help Button Clicking this button opens the FUJITSU TWAIN 32 Scanner Driver Help window You can also open the window by pushing the F1 key About Button Clicking this button views the information about the FUJITSU TWAIN 32 Scanner Driver s version Mode Description Black White Documents are scanned in binary black white mo...

Страница 66: ...ter is installed Generic Tab Select this tab when specifying the unit of scaling measurement in the TWAIN Driver 32 dialog box Select inches millimeters mm or pixel Startup Tab Select this tab when configuring settings on the scanner s Opera tor Panel Filter Tab Select this tab for setting the image processing filter s Compression Tab Select this tab for setting the compression rate of JPEG Transf...

Страница 67: ... application and configure your scanning settings in the scanner driver s setting dialog box Depending on the application settings this setting dialog box may not appear In the FUJITSU ISIS scanner driver you can configure various scan settings in the dialog box above For the major scan parameters see the description below For details refer to the FUJITSU ISIS Scanner Driver Help Main Tab Select t...

Страница 68: ...ooting Operational Settings Consumables Scanner Overview Layout Tab Select this tab when specifying the page orientation of document to scan the binding direction for double sided scanning paper feed direction and paper size Clicking the Scan Area button displays the Scan Area dialog box Scan Area Window You can specify the scan area for the paper size specified for Paper Size ...

Страница 69: ...Select this tab when selecting a common setting pattern for scanning You can also configure settings for scanning documents with non white background or those with punch holes Paper Handling Tab Select this tab when configuring settings for pre picking i e feeding of loaded document at a scanning point beforehand and multifeed detection If using the Flatbed type select a desired paper handling typ...

Страница 70: ...ts Daily Care Trouble shooting Operational Settings Consumables Scanner Overview Gamma Tab Select this tab when selecting a gamma correction pattern You can customize detailed settings such as the gamma value and brightness when scanning documents in color mode Color Dropout Tab Select this tab when selecting color s to drop out when scanning documents ...

Страница 71: ... pages in scanned documents When scanning a document in monochrome mode you can use the dot rate to process the blank page s for the white and black backgrounds separately When scanning a document in grayscale color mode you can use the sensitivity to process blank page s commonly for the white and black backgrounds Compression Tab Select this tab when specifying a compression rate and an image qu...

Страница 72: ...Settings Consumables Scanner Overview Imprinter Tab Select this tab when configuring settings for printing text on scanned documents using the imprinter option to be purchased separately This tab is not displayed unless the imprinter option is installed About Tab Select this tab when viewing the version of the FUJITSU ISIS scanner driver and information on the scanner connected to your computer ...

Страница 73: ...Vista screen samples are used to explain the operations The screens and operations may differ slightly if the OS that you are using is other than Windows Vista Take note that when the FUJITSU TWAIN 32 or FUJITSU ISIS scanner driver is updated the screens and operations herein may also be slightly different In such case refer to the relevant manuals or materials which are to be supplied when updati...

Страница 74: ... on page 81 Removing Punch Holes from A Scanned Image on page 82 Scanning A Document from the ADF in Manual Loading Mode on page 84 Duplex Scanning Using the ADF Virtual Duplex Function fi 6750S Only on page 85 Configuring Post Scan Operations and Handling Automatically Correcting Skewed Document Images on page 87 Setting Auto Correction for Document Page Orientations on page 89 Saving Scanned Ima...

Страница 75: ...32 dialog box refer to Chapter 3 How to Use ScandAll PRO on page 51 3 Select ADF Duplex under Scan Type 4 Specify a desired paper size from Paper Size etc 5 Click the OK button The changes made are applied 6 From ScandAll PRO perform a scan For how to perform a scan refer to Chapter 3 How to Use ScandAll PRO on page 51 Scanning A Large Size Document or Book Flatbed Type Only 1 Holding the handle l...

Страница 76: ...e Detection from the Automatic Size and Skew Detection drop down list For how to configure the settings refer to Automatically Correcting Skewed Document Images on page 87 2 Center all the document sheets as shown in the figure below Never look into the light source directly during scanning Do not move the document during scanning For a document of up to A3 or Double Letter size be sure to close t...

Страница 77: ...ents on the ADF on page 39 2 Start up ScandAll PRO and then open the TWAIN Driver 32 dialog box For how to open the TWAIN Driver 32 dialog box refer to Chapter 3 How to Use ScandAll PRO on page 51 3 Select Long page Front Side or Long page Duplex from Scan Type Select Long page Front Side for single sided scanning Long page Duplex for double sided scanning The Long Page Paper Size Setting dialog b...

Страница 78: ...n click the OK button 5 Click the OK button The changes made are applied 6 From ScandAll PRO perform a scan For how to perform a scan refer to Chapter 3 How to Use ScandAll PRO on page 51 The setting above is not available if any one or both of the following options is enabled Multi Image Output FUJITSU TWAIN 32 scanner driver Auto Color Detection ScandAll PRO If you want to scan a document that i...

Страница 79: ...n the scanner refer to Chapter 2 Loading Documents on page 38 2 Start up ScandAll PRO and then open the TWAIN Driver 32 dialog box For how to open the TWAIN Driver 32 dialog box refer to Chapter 3 How to Use ScandAll PRO on page 51 3 Click the Advance button The Advance dialog box appears 4 Select a color you want to remove from the Dropout Color drop down list under More If you want no color to b...

Страница 80: ...y using the and or buttons Sample color The color specified to be dropped out is shown here Priority Black checkbox Select this checkbox not to drop out text This option prevents low intensity colors such as black which are generally used as text from being dropped out Sensitivity For the color you selected specify the allowable range of colors to be dropped out Specifiable range 15 to 180 degrees...

Страница 81: ...ument on the ADF Paper Chute For how to load documents on the ADF Paper Chute refer to 2 1 Loading Documents on the ADF on page 39 2 Start up ScandAll PRO and then open the TWAIN Driver 32 dialog box For how to open the TWAIN Driver 32 dialog box refer to Chapter 3 How to Use ScandAll PRO on page 51 3 Click the Option button The Option dialog box appears 4 Select the Job Cache tab and then select ...

Страница 82: ...nch Holes from A Scanned Image You can remove or obscure punch holes black dots from the output image of a scanned punched document 1 Load a target document on the scanner Fow how to load documents on the scanner refer to Chapter 2 Loading Documents on page 38 2 Start up ScandAll PRO and then open the TWAIN Driver 32 dialog box For how to open the TWAIN Driver 32 dialog box refer to Chapter 3 How ...

Страница 83: ... or Background color under Hole punch removal When scanning a color document select Background color If you select Fill with white the punch holes will look as if they are filled with white squares 6 Click the OK button You are returned to the TWAIN Driver 32 dialog box 7 In the TWAIN Driver 32 dialog box click the OK button Changes made are saved 8 From ScandAll PRO perform a scan For how to perf...

Страница 84: ...rocedure is as follows 1 Configure settings in the Software Operation Panel to enable manual loading For details of the settings refer to Timeout for Manual Feeding Manual feed timeout on page 186 2 Load the first sheet of a target document on the ADF Paper Chute For how to load documents on the ADF Paper Chute refer to 2 1 Loading Documents on the ADF on page 39 3 Start up ScandAll PRO to perform...

Страница 85: ...on the ADF Paper Chute For how to load documents on the ADF Paper Chute refer to 2 1 Loading Documents on the ADF on page 39 2 In ScandAll PRO specify Duplex Scan mode When selecting the Scan option Select the Perform ADF virtual duplex scanning checkbox in the Scan Settings dialog box When selecting the Batch Scan option Display the profile to be used for scanning in the Profile Editor dialog box...

Страница 86: ...ges the front side pages will not be scanned up side down The ADF Virtual Duplex option is not available once you have selected any of the following To use the option clear the selected item s in ScandAll PRO and or in the scanner driver the Output color and monochrome simultaneously and Automatic Color Monochrome Detection checkboxes on the File format and Name scheme tab of the Profile Editor di...

Страница 87: ...to the ADF 1 Load a target document on the ADF Paper Chute For how to load documents on the ADF Paper Chute refer to 2 1 Loading Documents on the ADF on page 39 2 Start up ScandAll PRO and then open the TWAIN Driver 32 dialog box Fow how to open the TWAIN Driver 32 dialog box refer to Chapter 3 How to Use ScandAll PRO on page 51 3 Click the Option button The Option dialog box appears 4 Select the ...

Страница 88: ... before scanning documents specify a smaller value To give a priority to the detection accuracy specify a larger value When detecting a paper size of documents to which index sheets sticky notes or index stickers are attached specify 2 for the priority When detecting a paper size of documents whose one side front or back is in dark background color specify 3 for the priority Priority Suited Docume...

Страница 89: ...e 51 3 Click the Option button The Option dialog box appears 4 Select the Rotation tab and then select Automatic under Rotation Degree Opqrstu Vwxyz DEF Opqrstu Vwxyz DEF Abcdefg Hijklmn Abcdefg Hijklmn Originals Output images This function determines a document page orientation based on the characters printed on it So it may not work properly for the following kinds of documents Documents with a ...

Страница 90: ...ession rates The file size of color documents increases if scanned by following a general procedure You can drastically reduce the size if you run Acrobat Distiller before saving For details see the HINT box in Step 10 of the Creating with Adobe Acrobat section Documents written in a non supported language The supported languages are Japanese English German French Spanish Italian Korean Tradi tion...

Страница 91: ...mage Settings and set Edge shadow removal to OFF or set Color Grayscale and or Monochrome under Compression to a setting other than Adaptive Solution 2 Adjust the scanning density in the FUJITSU TWAIN 32 scanner driver 2 The option s Color Grayscale and or Monochrome set to Adaptive under Compression in Acrobat and documents scanned at a resolution lower than the recom mended value for Acrobat In ...

Страница 92: ...gnition function to make search able PDF files and enhance the security of created PDF files by adding a password to 4 From ScandAll PRO perform a scan For how to perform a scan refer to Chapter 3 How to Use ScandAll PRO on page 51 Creating with Adobe Acrobat 1 Load a target document on the scanner For how to load document on the scanner refer to Chapter 2 Loading Documents on page 38 2 Select the...

Страница 93: ... face and then click the OK button The Scanner Options dialog box is closed and you are returned to the Acrobat Scan dialog box 7 Click the Scan button The Save Scanned File As dialog box appears If your document is scanned under the default settings the output image s may not be satisfactory It is recom mended the settings be changed following the procedure below 1 Clear the Make Searchable Run O...

Страница 94: ...ables Scanner Overview 8 Type in the name of the file to save at File name and then click the Save button The scanned images are displayed 9 Configure settings such as for Image Mode and Resolu tion and then click the Scan button 10To finish the scanning select Scanning complete and click the OK button The scanned images are displayed For details on the operation of Adobe Acrobat refer to the Adob...

Страница 95: ...any as you need 2 Create a new batch profile in ScandAll PRO and then open the Profile Editor dialog box For how to create profiles refer to 3 8 Scanning with Batch Scan on page 61 If you save the scanned document images in Step 8 above the file size may increase greatly To reduce the size retry saving the images following the procedure below It may take more time than you save as usual 1 Select F...

Страница 96: ...ch profile you created above perform a batch scan For how to perform a batch scan refer to 3 8 Scanning with Batch Scan on page 61 To suppress the scanning of patch code sheet images check the Remove separation sheet checkbox In Duplex Scan mode you can disable the scanning of the back side of patch code sheet by selecting the Remove the next page of a separation sheet check box The following is t...

Страница 97: ...rate files Note not only the document counter but also the recognized barcode text can be used to name the file or folder ScandAll PRO can detect the following types of barcodes The created folder is named under the document counter s title and is used to hold the scanned data files Example of saving files in folders When selecting Create Directories Separately When unselecting Create Directories ...

Страница 98: ...e type that was not defined for this function the image data could be separated wrongly and even some of the scanned images may be deleted depending on how the scan settings have been made To prevent this check the document carefully in advance to see if it has extra barcodes It is recommended that you limit the barcode types to sense and define the area to detect barcodes Using the same barcode s...

Страница 99: ...refer to 3 8 Scanning with Batch Scan on page 61 If scanning performance deteriorates because of the barcodes used limit the barcode types to sense or narrow the barcode area to improve the scanning performance If there are multiple barcodes in the barcode detecting area the one recognized first will be enabled Barcode printed sheet The following procedure shows how to store each of scanned docume...

Страница 100: ...alog box refer to Chapter 3 How to Use ScandAll PRO on page 51 3 Click the Option button The Option dialog box appears The created folder is named with the barcode recognition character string and is used to store the scanned data If the Create Directories Separately checkbox is left unselected the character string of the recognized barcode will be regarded as the file name Example of storing data...

Страница 101: ...nd white image outputs at a single scan this is called the Multi Image Output function 1 Load a target document on the scanner For how to load documents on the scanner refer to Chapter 2 Loading Documents on page 38 2 Start up ScandAll PRO and then open the TWAIN Driver 32 dialog box For how to open the TWAIN Driver 32 dialog box refer to Chapter 3 How to Use ScandAll PRO on page 51 When a documen...

Страница 102: ...the order to output multi images under Order for Multi Image Output Primary Color Grayscale Secondary Binary First a color or grayscale image is output and then a black and white image Primary Binary Secondary Color Grayscale First a black and white image is output and then a color or grayscale image 6 Under Select Current Image Setting select a side if in Duplex Scan mode 7 In the TWAIN Driver 32...

Страница 103: ...e 38 2 Start up ScandAll PRO and then open the TWAIN Driver 32 dialog box For how to open the TWAIN Driver 32 dialog box refer to Chapter 3 How to Use ScandAll PRO on page 51 3 Select the Enable Multi Image checkbox You can use a batch profile to change settings such as the folders to save respective scanned color grayscale and black and white images and their file formats and names The procedure ...

Страница 104: ...t the side s to scan Configure scan settings for both color and black and white documents in the TWAIN Driver 32 dialog box You need to pre configure settings for Color Grayscale detection as well as those for Binary detection 6 In the TWAIN Driver dialog box click the OK button Changes made are saved 7 From ScandAll PRO perform a scan For how to perform a scan refer to Chapter 3 How to Use ScandA...

Страница 105: ...ayscale and black and white images the file formats and the file names The procedure is as follows 1 In the Profile Editor dialog box select the File format and Name scheme tab and then select the Automatic Color Monochrome Detection checkbox 2 Specify the respective folder names to save the files the file formats and the file names for color grayscale and black and white images 3 Click the OK but...

Страница 106: ...e scanner For how to connect the scanner to your computer refer to Chapter 3 Connecting the Cables in the Getting Started 2 Select the start menu D Control Panel The Control Panel window appears 3 Select the Hardware and Sound icon The Hardware and Sound window appears 4 Select the Scanners and Cameras icon The Scanners and Cameras window appears 5 Display the properties of the scanner Double clic...

Страница 107: ...ntinue to configure settings for your scanner 9 Start up ScandAll PRO 10Select the Tool menu D Preferences The Setup dialog box appears 11Select the Event tab 12Select the action for the event you selected in Step 7 and then select a profile from the list you want to use for scanning 13Click the OK button 14Exit ScandAll PRO When you press the linked button ScandAll PRO starts up and a batch scan ...

Страница 108: ...s in the ADF Paper Chute are fed simultaneously into the scanner You can set the scanner so it will detect multifeeds and display an error message To make the scanner to detect multifeeds change the settings in the scanner driver or in the Software Operation Panel For how to configure settings in the Software Operation Panel refer to Multifeed Detection on page 180 1 Load a target document on the ...

Страница 109: ...button You are returned to the TWAIN Driver 32 dialog box 6 In the TWAIN Driver 32 dialog box click the OK button Changes made are saved 7 From ScandAll PRO perform a scan For how to perform a scan refer to Chapter 3 How to Use ScandAll PRO on page 51 Condition Description None Does not detect multifeeds Check Overlap ping and Length Monitors both document overlapping and length to detect multifee...

Страница 110: ...and sizes of the sticky note glued receipt or glued photo beforehand Intelligent Multifeed Function Use this function when you want to continue scanning while checking if any sticky notes are attached to the document each time the multifeed error occurs To select one of the modes above use the Software Operation Panel For details refer to Setting A Non Multifeed Detection Range Intelligent Multife...

Страница 111: ...ion Prior to using this function you need to configure the following settings With FUJITSU TWAIN 32 Scanner Driver 1 Start up ScandAll PRO select the Scan menu D Scan Settings The TWAIN Driver 32 dialog box appears 2 Click the Option button 3 Select the Job Cache tab and select Check overlap ping or Check overlapping and length for Multifeed Detection under ADF Option 4 Select the Startup tab and ...

Страница 112: ...the paper feed path or open the ADF and remove the sheets from there When the sheets are removed the function number displayed changes as follows 2 Return the ejected or removed sheets to the ADF Paper Chute If a multifeed error is detected while no paper has been glued on the sheet press the Scan Stop button or restart the scanning via the computer In this case do not press the Function button If...

Страница 113: ...igured in the Software Operation Panel or in the scanner driver Auto Mode 1 Bypassing by Document Overlapping and Length The scanner remembers the length and location of glued paper overlap pattern that caused a multifeed error and continues scanning When glued paper of a similar pattern is detected the scanner automatically ignores it to suppress multifeed detection 1 2 Auto Mode 2 Bypassing by D...

Страница 114: ...u clean the inside of the scanner turn off its power and unplug the power cable from the power outlet Wait for at least 15 minutes for the ADF glasses to cool down Before you clean the Feed Rollers and Eject Rollers turn off the power and unplug the AC adapter from the power outlet Wait for at least 15 minutes then turn on the power again Do not use any aerosol sprays or alcohol based sprays to cl...

Страница 115: ...n the cloth with this fluid and wipe the scanner clean As it may take long before the cleaner vaporizes if a large quantity is used Dampen a cloth with modest quantities of the cleaner In addition wipe off the cleaner completely with a soft lint free cloth to leave no residue on the surface of the cleaned parts Cleaner F2 PA03950 0353 1 bottle 80 ml Use this cleaner to clean the Plastic Rollers on...

Страница 116: ...Yes No Pick arm No Yes No Pick roller Yes Yes No Brake roller Yes Yes No Feed roller Yes Yes No Plastic roller Yes Yes Yes Sheet guide glass Yes Yes No Ultrasonic sensor Yes Use a soft dry cloth No No Never clean rubber rollers with Cleaner F2 Doing so may deform the rubber CAUTION The actual cleaning cycle depends on the conditions of the documents scanned You must clean the scanner more frequent...

Страница 117: ...ed with Cleaner F1 1 Turn off the scanner and wait for at least 15 minutes For how to turn off the scanner refer to 1 4 Turning the Scanner ON and OFF on page 31 2 Pushing the ADF Open Buttons lift open the ADF 3 Clean the following locations using a cloth moistened with Cleaner F1 6 2 Cleaning the ADF When operating the scanner the glasses inside the ADF become very hot Before you clean the insid...

Страница 118: ...r on page 127 Pick Rollers Lightly clean the Pick Rollers along the grooves on the rollers taking care not to scratch their surface Take particular care when cleaning these rollers as black debris on them adversely affects the pickup perfor mance For how to remove the Pick Rollers refer to 7 2 Replacing the Pick Rollers on page 125 Plastic Rollers Lightly clean the Plastic Rollers taking care not ...

Страница 119: ...e tip of the Pick Arm Chute Roller Lightly wipe off the Chute Roller with its hood open Glasses Sheet Guides Ultrasonic Sensors Lightly wipe off the glasses Sheet Guides and Ultrasonic Sensors 4 Turn on the scanner Then clean the Feed Rollers For how to turn on the scanner refer to 1 4 Turning the Scanner ON and OFF on page 31 If the glass es are dirty vertical streaks may appear in the scanned im...

Страница 120: ...e by a certain angle 3 Hold a soft cloth moistened with Cleaner F1 against the surface of the rotating Feed Rollers and Eject Rollers so that the cloth wipes off the surface of the rollers lightly Take particular care in cleaning these rollers as black debris on them adversely affects the feeding perfor mance As a guideline seven presses of the Send to and Scan Stop buttons together makes the Feed...

Страница 121: ...aily Care Trouble shooting Operational Settings Consumables Scanner Overview 5 Close the ADF Press down on the center of the ADF to return it to its original position until the ADF Open Buttons are locked When the ADF has returned to its original position make sure that it is completely closed Feeding errors may occur if the ADF is not closed completely ...

Страница 122: ...umables Scanner Overview 1 Holding the handle lift up the Document Cover 2 Lightly wipe off the following locations using a cloth moist ened with Cleaner F1 3 Wait for the cleaned parts to dry 4 Gently close the Document Cover 6 3 Cleaning the Flatbed Flatbed Type Only Do not allow moisture to flow into the gap between the Document Bed and the Plastic Cover Plastic Cover Document Bed Document Hold...

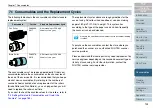
Страница 123: ...es This chapter describes how to replace the scanner consumables 7 1 Consumables and the Replacement Cycles 124 7 2 Replacing the Pick Rollers 125 7 3 Replacing the Brake Roller 127 When operating the scanner the glasses inside the ADF become very hot Before you replace the consumables turn the scanner off and unplug the power cable from the power outlet Wait for at least 15 minutes for the ADF gl...

Страница 124: ...3 Settings Related to Consumables and Useful Life Counters on page 165 The replacement cycles above are rough guidelines for the case of using A4 Letter sized woodfree or wood containing paper of 80 g m2 21 0 lb in weight This cycle varies according to the type of the paper used and how frequently the scanner is used and cleaned To purchase the consumables contact the store where you purchased the...

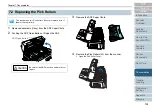
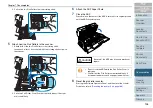
Страница 125: ...es Scanner Overview 1 Remove documents if any from the ADF Paper Chute 2 Pushing the ADF Open Buttons lift open the ADF 3 Remove the ADF Paper Chute 4 Remove the Pick Rollers x2 from the scanner 1 Open the Pick Roller Cover 7 2 Replacing the Pick Rollers The scanner has two Pick Rollers Be sure to replace both of them at the same time Be careful the ADF may close and pinch your fingers ADF Open Bu...

Страница 126: ...ting shaft screw on the scanner 2 Close the Pick Roller Cover Confirm that both sides of the cover are locked firmly 6 Attach the ADF Paper Chute 7 Close the ADF Press down on the center of the ADF to return it to its original position until the ADF clicks into place 8 Reset the pick roller counter Start up the Software Operation Panel and then reset the counter For details refer to Resetting the ...

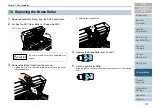
Страница 127: ... Paper Chute 2 Pushing the ADF Open Buttons lift open the ADF 3 Remove the Brake Roller from the scanner 1 Holding the Pick Arm open the Brake Roller Holder in the arrow indicated direction 2 Remove the Brake Roller 4 Remove the Brake Roller from its shaft 5 Attach a new Brake Roller Align the groove of the shaft with the protruding section of the rotating shaft 7 3 Replacing the Brake Roller Be c...

Страница 128: ...t of the Brake Roller Holder 2 Close the Brake Roller Holder 7 Close the ADF Press down on the center of the ADF to return it to its original position until the ADF clicks into place 8 Reset the brake roller counter Start up the Software Operation Panel and then reset the counter For details refer to Resetting the counters on page 166 Be careful the ADF may close and pinch your fingers Do not clos...

Страница 129: ...t jams or troubles shows you what to check before asking your nearest scanner service provider for help and describes how to read the product labels 8 1 Paper Jams 130 8 2 Errors Indicated on the Operator Panel 132 8 3 Troubleshooting 136 8 4 Before Contacting Your Dealer or Scanner Service Provider152 8 5 Checking Labels on the Scanner 154 For details about troubles that are not described here an...

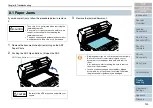
Страница 130: ...jured when removing the jammed document Be careful not to get your necktie necklace etc caught in the scanner when removing the jammed document The glass surfaces and guides may become hot during operation Take care not to get burned Be careful the ADF may close and pinch your fingers CAUTION ADF Open Button CAUTION Staples paper clips etc could cause document jams Be sure to check for small metal...

Страница 131: ...e the ADF Press down on the center of the ADF to return it to its original position until the ADF clicks into place Make sure that the ADF is completely closed Feeding errors may occur if the ADF is not closed completely When scanning is canceled halfway through some sheets of the document might remain inside the ADF even though no error message is displayed Follow the procedure Steps 1 to 4 above...

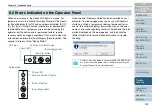
Страница 132: ...The scanner will return to the Ready Status Once the Error Recovery Guide has been installed on your computer its window appears as soon as your Windows is started up When a temporary or device permanent error occurs this software displays information such as the error name or error code regarding that error Write down the infor mation displayed on the message box and then click the More Info butt...

Страница 133: ...t the paper conditions for scanning from the ADF For details refer to 2 2 ADF Loaded Documents on page 42 J9 J2 Multifeed error Pressing the Send to button on the Operator Panel ejects mutifed documents Indica tion Item Remedy U0 Transport lock error Flatbed type only Unlock the Transport Lock For how to unlock the Transport Lock refer to Chapter 3 Connect ing the Cables in the Getting Started U4 ...

Страница 134: ...UJITSU scanner service provider E1 Flatbed optical system malfunction Flatbed type only E2 Optical system error Front side scanning thru the ADF Turn off and on the scanner again If the error is still displayed on the Function Number Display record the indicated error code and contact the store where you purchased the scanner or an authorized FUJITSU scanner service provider E3 Optical system erro...

Страница 135: ...the error is still displayed on the Function Number Display record the indicated error code and contact the store where you purchased the scanner or an authorized FUJITSU scanner service provider H5 CGA board error fi 6670 fi 6670A fi 6770 fi 6770A H6 Imprinter motor circuit error only when the imprinter option for fi 6670 fi 6670A is installed H7 Lamp circuit error Indica tion Item Remedy A0 Erro...

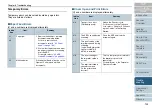
Страница 136: ...shooting Possible Trouble Scanner cannot be turned on See page 137 Indication on Function Number Display goes out See page 138 Scanning does not start See page 139 Quality of scanned pictures or photos is not satisfactory when scanning in black and white See page 140 Quality of scanned text or lines is unsatisfactory See page 141 Images are distorted or blurred See page 142 Vertical lines appear i...

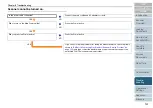
Страница 137: ...r cable connected NO Connect the power cable and AC adapter correctly YES Did you turn on the Main Power switch NO Press the Power button YES Did you press the Power button NO Press the Power button YES If you cannot solve the problem after taking the measures above check the items shown in 8 4 Before Contacting Your Dealer or Scanner Service Provider on page 152 and then contact the dealer where ...

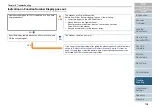
Страница 138: ... doing one of the following Load some paper on the ADF Paper Chute Hit any button on the Operator Panel Do not press down the Power button for more than 2 seconds This will turn off the scanner Execute a command from the scanner driver NO Does the display remain blank even after you have turned ON the scanner again NO The scanner operation is normal YES If you cannot solve the problem after taking...

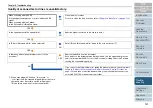
Страница 139: ...nnected correctly NO Connect the interface cable correctly For how to connect the cable refer to Chapter 3 Connecting the Cables in the Getting Started YES Is the connector for the interface cable broken YES Use a new interface cable and correctly connect it NO Is the specified SCSI ID correctly set when a SCSI interface cable is used NO Turn off the scanner and the computer specify a correct SCSI...

Страница 140: ...inals If possible set the image type on the scanner driver to halftoning or grayscale before scanning Did you select halftoning or grayscale NO In the scanner driver select halftoning or grayscale before scanning documents 1 YES Are the upper lower glasses inside the ADF clean NO Clean the dirty locations For how to clean the dirty locations refer to Chapter 6 Daily Care on page 114 YES If you can...

Страница 141: ...Binary black and white mode selected NO Select Binary black and white mode in the scanner driver 1 YES Is there any debris paper powder or dust on the document YES Remove the debris from the document Such debris on the document may be transferred onto the upper lower glasses and or rollers inside the ADF or onto the Document Holding Pad of the Flatbed causing the scanned images dirty NO If you can...

Страница 142: ...g scanning Were some heavy objects placed on the ADF during scanning YES Do not press down on the top of the ADF or place any heavy objects on the ADF during scanning NO Was something causing the scanner to vibrate during scanning YES Do not allow anything to cause the scanner to vibrate while scanning NO Is the scanner installed on a flat level surface Or is the scanner attached with rubber pads ...

Страница 143: ...e the ADF dirty YES Clean the upper lower glasses and rollers inside the ADF For how to clean the glasses and rollers refer to 6 2 Cleaning the ADF on page 117 NO Is there any debris paper powder or dust on the docu ment YES Remove the debris from the document Such debris on the document may be transferred onto the upper lower glasses and rollers inside the ADF or the Document Bed of the Flatbed p...

Страница 144: ...bed type NO Turn OFF the scanner and unlock the Transport Lock then turn ON the scanner again For how to unlock the Transport Lock refer to Chapter 3 Connecting the Cables in the Getting Started YES Does the Function Number Display indicate any error after turning ON the scanner again NO The scanner operation is normal YES If you cannot solve the problem after taking the measures above check the i...

Страница 145: ...ge 45 Specify the multifeed detection range if needed by referring to Detecting Multifeeds page 108 YES Did you scan very thick media such as a plastic card YES When scanning media like this disable Multifeed Detection NO Did you fan the document before loading it on the scanner NO Fan the document before loading YES Has the document just been printed out on a copier or laser printer YES Fan the d...

Страница 146: ... any of the consumables 1 worn out YES Check the consumables counters Replace the consumables if needed For information on how to replace the consumables refer to Chapter 7 Consumables on page 123 NO If you cannot solve the problem after taking the measures above check the items shown in 8 4 Before Contacting Your Dealer or Scanner Service Provider on page 152 and then contact the dealer where you...

Страница 147: ...ding or reduce the number of sheets of the document to load YES Are all the consumables 1 installed correctly NO Correctly install the consumables For how to install the consumables 1 refer to Chapter 7 Consumables on page 123 YES Is any of the consumables 1 dirty YES Clean the dirty consumables For how to clean the consumables 1 refer to 6 2 Cleaning the ADF on page 117 NO Is any of the consumabl...

Страница 148: ... how to clean the inside of the ADF refer to 6 2 Cleaning the ADF on page 117 NO Are all the consumables 1 installed correctly NO Correctly install the consumables 1 For how to install the consumables refer to Chapter 7 Consumables on page 123 YES Is any of the consumables 1 dirty YES Clean the dirty consumables 1 For how to clean the consumables refer to 6 2 Cleaning the ADF on page 117 NO Is any...

Страница 149: ...ocument requirements refer to 2 2 ADF Loaded Documents on page 42 YES Is any of the consumables 1 worn out YES Check the consumables counters Replace the consumables if needed For how to replace the consumables refer to Chapter 7 Consumables on page 123 NO Did you adjust the scan scale NO In the Device Setting menu in the Software Operation Panel adjust the scan scale in the feeding direction For ...

Страница 150: ...the document NO In the Device Setting menu in the Software Operation Panel adjust the scan scale in the vertical scanning direction For how to adjust the scan scale refer to Adjusting the Starting Position for Scanning Offset Vertical Magnification Adjustment page 169 YES If you cannot solve the problem after taking the measures above check the items shown in 8 4 Before Contacting Your Dealer or S...

Страница 151: ...figuration Utility 1 NO Connection via SCSI USB Connector 1 Select Fujitsu fi 6670 or Fujitsu fi 6770 in Scanner Configuration Utility If they are not found in the list of scanners then uninstall Kofax VRS and then install VRS fi 6670 fi 6770 with the INSTALL Custom menu in the SETUP DVD ROM Connection via SCSI USB Connector 2 Select Fujitsu fi 6670A or Fujitsu fi 6770A in Scanner Configuration Ut...

Страница 152: ...r the scanner model names refer to 8 5 Checking Labels on the Scanner on page 154 Serial No Example 000001 For the serial numbers refer to 8 5 Checking Labels on the Scanner on page 154 Production date Example 2008 05 May 2008 For the production date refer to 8 5 Checking Labels on the Scanner on page 154 Date of purchase Symptom Frequency of trouble Do you have warranty for this product Name of o...

Страница 153: ...oubles Other Item Findings Scanner driver and its version Interface controller Example Adaptec s SCSI Card AHA 2940AU OS version Windows Application software Example ScandAll PRO Adobe Acrobat Scan type Example Front Side Back Side Duplex Resolution Example 600 dpi 75 dpi Image mode Example Color Grayscale Binary black white Item Findings Can both the photo graph showing the original document cond...

Страница 154: ... section describes how to check the labels on the scanner Positions of Labels on the Scanner The following shows where the two labels are located on the scanner ADF Type Flatbed Type Label A example Indicates scanner information Label B example Indicates various standards that the scanner conforms with 8 5 Checking Labels on the Scanner Label B Label A Label A Label B MODEL PART NO SER NO DATE Bar...

Страница 155: ...oftware Operation Panel Here Windows Vista screen samples are used to explain the operations The screens and operations may differ slightly if the OS that you are using is other than Windows vista 9 1 Starting Up the Software Operation Panel 156 9 2 Configurable Items 157 9 3 Settings Related to Consumables and Useful Life Counters 165 9 4 Settings Related to Scanning 169 9 5 Settings Related to M...

Страница 156: ...ers TWAIN and ISIS With this application you can configure various settings for operating the scanner and for managing its consumables 1 Confirm if the scanner is connected correctly to your computer then power on the scanner For how to turn on the scanner refer to 1 4 Turning the Scanner ON and OFF on page 31 2 Select the start menu D All Programs D Scanner Utility for Microsoft Windows D Softwar...

Страница 157: ...hooting Operational Settings Consumables Scanner Overview Using the Software Operation Panel you can configure the following settings for the scanner that is connected to a computer Device Setting 1 Start up the Software Operation Panel Refer to 9 1 Starting Up the Software Operation Panel on page 156 2 From the tree listing on the left select Device Setting 9 2 Configurable Items ...

Страница 158: ...n the imprinter option for fi 6670 fi 6670A is installed Shown only when the imprinter option for fi 6670 fi 6670A is installed Power saving Specify the waiting time before entering the Power saving mode Setting range 15 to 55 min in steps of 5 min 15 min Yes Yes Offset Adjust the starting position for the document scanning Unit For connection via SCSI USB Connec tor 1 ADF Front ADF Back fi 6670 f...

Страница 159: ...s Daily Care Trouble shooting Operational Settings Consumables Scanner Overview Device Setting 2 1 Start up the Software Operation Panel Refer to 9 1 Starting Up the Software Operation Panel on page 156 2 From the tree listing on the left select Device Setting 2 Clicking a desired item on the tree listing one the list shows its related parameters on the right ...

Страница 160: ...lectable length to be detected as length difference 10 15 or 20 mm Check Overlapping Ultrasonic Yes Yes Page Edge Filler ADF Page Edge Filler FB Fill the specified width of the end sections on the scanned image with white or black color When the backing background color is white the end sections are filled with white and when the background color is black filled with black Can also be specified fr...

Страница 161: ...r disabled for the specified area Check or do not check Selected range Do not check Yes Yes Enable Disable when Selected range is checked Disable Start Specify the start point of the check area in length mm from the top edge of the document 0 to 510 mm in increments of 2 mm 0 mm End Specify the end point of the check area in length mm from the top edge of the document 0 to 510 mm in increments of ...

Страница 162: ...Do not check Yes Yes Useful life counter When the value of the page counter consumables counter refer to 9 3 Settings Related to Consumables and Useful Life Counters on page 165 exceeds a value specified here the background color of the counter turns yellow and a replacing instruction is displayed from the scanner driver 10 000 to 2 550 000 sheets in incre ments of 10 000 for each consumable 200 0...

Страница 163: ...le power switch Yes Yes Scan Setting for Document with Tab For a document that includes index sheets or a document with index stickers or tabs attached at its bottom edge you can specify whether or not to include the index portion or tab images during scanning with Auto Paper Size Detection setting When Document with tab is selected the tab index image is included in the document page image Scanni...

Страница 164: ...ll be detected correctly Once this option is enabled the settings for scanning documents with tabs will automatically be disabled Disable Enable Density of background color 1 to 5 levels Disable No Yes Overcrop Under crop Adjust the output image scanned by enabling the Automatic Page Size Detection option Overcrop 0 mm to 3 mm in increments of 1 mm Undercrop 3 mm to 0 mm in incre ments of 1 mm 0 m...

Страница 165: ...sting on the left select Device Setting In this dialog box you can confirm the following items 9 3 Settings Related to Consumables and Useful Life Counters Item Description Total Page Count ADF Total sheets scanned using the ADF Total Page Count FB Total sheets scanned using the Flatbed After cleaning Total sheets scanned after last cleaning Brake Roller Number of sheets scanned since last replace...

Страница 166: ...e OK button Replacing and Cleaning Instructions The following may sometimes appear while using the scanner Replacing instruction Cleaning instruction According to the instruction displayed clean the scanner or replace the consumables When you click the Ignore button the cleaning instruction disappears and the scanning continues You may be able to continue the scanning for a while however it is rec...

Страница 167: ...s a value specified here the background color of the counter will turn yellow You can also specify whether or not to receive a cleaning instruction on page 166 1 Start up the Software Operation Panel Refer to 9 1 Starting Up the Software Operation Panel on page 156 2 From the tree listing on the left select Device Setting 2 D Cleaning Cycle 3 Specify a value to determine when to clean the scanner ...

Страница 168: ... If the value of the page counter consumables counter exceeds a value specified here the background color of the counter will turn yellow and a replacing instruction on page 166 will appear 1 Start up the Software Operation Panel Refer to 9 1 Starting Up the Software Operation Panel on page 156 2 From the tree listing on the left select Device Setting 2 D Useful life counter 3 Specify a value for ...

Страница 169: ...are Operation Panel on page 156 2 From the tree listing on the left select Device Setting and then click the Offset button 3 Adjust the offset scan scale as necessary 9 4 Settings Related to Scanning The factory default settings are appropriate so normally there is no need to make any adjustment Offset Setting Description Unit Select ADF front or ADF back fi 6670 fi 6670A fi 6770 fi 6770A only or ...

Страница 170: ...Daily Care Trouble shooting Operational Settings Consumables Scanner Overview Vertical magnification Adjustment Description Unit Select ADF or Flatbed flatbed type only as the target of vertical magnification adjustment Vertical lengthwise magnification adjustment Adjusts the vertical lengthwise magnification The setting range is from 3 1 to 3 1 in steps of 0 1 ...

Страница 171: ...e Filler FB 3 Specify the length for each margin top bottom right and left to fill it The specified area is filled with white when the backing or the background of document is white and with black when the backing is black Note that if the target range of the Page Edge Filler is too wide some characters in the vicinity of the boundary may be cut out Unless otherwise specified the background color ...

Страница 172: ...ining black text with a green background you can output an image of black text only 1 Start up the Software Operation Panel Refer to 9 1 Starting Up the Software Operation Panel on page 156 2 From the tree listing on the left select Device Setting 2 D Dropout color 3 Select a color to drop out Red Green Blue Red green or blue is dropped out White No color is dropped out The Software Operation Pane...

Страница 173: ... Pre Pick the time interval between the scanning of two separate documents can be shortened 1 Start up the Software Operation Panel Refer to 9 1 Starting Up the Software Operation Panel on page 156 2 From the tree listing on the left select Device Setting 2 D Pre Pick 3 Configure settings for pre picking Select Yes to enable Pre pick and select No to disable it While Pre Pick is enabled if you can...

Страница 174: ... Operation Panel Refer to 9 1 Starting Up the Software Operation Panel on page 156 2 From the tree listing on the left select Device Setting 2 D AutoCrop Boundary 3 Select whether to include or exclude the fractional data Select Round Up to prevent any exclusion of fractional data from scanned images and select Round Down to cut it off When scanning a document with text just across its bottom edge...

Страница 175: ... select Device Setting 2 D SCSI Bus Width 3 Select 16 bit Wide or 8 bit Scan Setting for Documents with Tabs or Non Rectangular Documents Scan Setting for Documents with Tab Automatic Paper Size Detection When configuring settings to scan a non rectangular document with a tab index or tab index sticker at the its bottom you can scan and include such a tab or tab sticker in the scanned image when A...

Страница 176: ...tting for Document in Dark Background Color D Enable Item Description Non rectangular document Scan extra 120 mm from the detected bottom edge of the document Document with tab Scan extra 20 mm from the detected bottom edge of the document Document without tab Terminates scanning at the time the bottom edge of the document is detected The scanning speed slows down if Document with tab or Non recta...

Страница 177: ...ge detected with the Automatic Paper Size Detection option 1 Start up the Software Operation Panel Refer to 9 1 Starting Up the Software Operation Panel on page 156 2 From the tree listing on the left select Device Setting 2 D Overcrop Undercrop Increasing the density level may cause incorrect edge detection due to some dust in the paper feeding path You cannot enable this setting together with Sc...

Страница 178: ...Panel Refer to 9 1 Starting Up the Software Operation Panel on page 156 2 From the tree listing on the left select Device Setting 2 D Pick Pressure Item Description Overcrop Crops the scanned document image a little larger than the actual size leaving black background margins outside the image so that the data on the edge of the image will not be lost The specifiable range is from 0 mm to 3 mm in ...

Страница 179: ...h Low may not feed the paper properly just making the Feed Rollers to repeat rotating freely Specifying High strengthens the feeding force of the Feed Rollers feeding hard to feed documents quickly The High option is effective for scanning relatively thick documents Specifying Low can scan even thin delicate paper However if you want to scan such thin document if not recommended you must test scan...

Страница 180: ...portant data while scanning the document This scanner has the Multifeed Detection function to prevent such troubles With the Multifeed Detection enabled the scanner indicates an error message and halts the scanning immediately at a multifeed error Note that the Multifeed Detection is not available for the range about 30 mm from the leading edge of document 1 Start up the Software Operation Panel R...

Страница 181: ...tifeeds by monitoring the differ ence of the document length Check Overlapping and Length Detects multifeeds when both Check Overlapping Ultrasonic and Check Length are selected Length Select 10 15 or 20 mm as the document length difference which is to be considered as a Multifeed when Check Length is selected If the detected document length does not reach the selected length it will be recognized...

Страница 182: ...pecify the detection range Mark this checkbox to enable the settings configured in this dialog box Otherwise let the checkbox unmarked Clearing this check box sets both the starting and ending positions to 0 making the whole range of the document to be checked for multifeeds None Disables the Multifeed Detection for the speci fied range Enable Enables the Multifeed Detection for the speci fied ran...

Страница 183: ...he starting position will be 0 and the ending position be equal to or not smaller than the document length If the starting position is set larger than the document length with Disable the whole range covering the entire document length will be checked with Enable the Multifeed Detection will be disabled To detect multifeeds the detection range should be at least 5 mm in length Configure the settin...

Страница 184: ...eed error will be detected only for the blue shaded area in the figure above Setting Example 3 Bad Example Selected range Enable Start 100 mm End 102 mm Since the detection range length is less than the minimum value 5 mm the Multifeed Detection cannot be performed correctly When Check Overlapping Ultrasonic is selected the multi feed detection ratio may drop if the document sheet s are glued or e...

Страница 185: ...ed function refer to Bypassing Multifeed Detection for a Fixed Format on page 110 Operation Mode Description Manual Mode The scanner stops scanning each time a multi feed error is detected You can resume scanning after reloading the multifed document The scanner does not remember the size and location of paper glued on the document Auto Mode 1 The scanner remembers the size and location of paper g...

Страница 186: ...terminates automat ically canceling manual feeding You can cancel the Manual Feeding mode immediately by pressing the Send to button within the timeout period speci fied 1 Start up the Software Operation Panel Refer to 9 1 Starting Up the Software Operation Panel on page 156 2 From the tree listing on the left select Device Setting 2 D Manual feed timeout 3 Select whether to enable or disable Manu...

Страница 187: ... Power saving This scanner switches to power saving mode automatically to save power when it remains unused for a certain period of time 1 Start up the Software Operation Panel Refer to 9 1 Starting Up the Software Operation Panel on page 156 2 From the tree listing on the left select Device Setting 3 Use the slide control bar to set the waiting time before entering into power saving mode You can ...

Страница 188: ... the scanner You can select whether or not to power the scanner on off by using the Power button When this is disabled use the main power switch 1 Start up the Software Operation Panel Refer to 9 1 Starting Up the Software Operation Panel on page 156 2 From the tree listing on the left select Device Setting 2 D Power SW Control 3 Select to enable or disable power on off using the Power button Sele...

Страница 189: ...eters Various Documents Daily Care Trouble shooting Operational Settings Consumables Scanner Overview Appendix This section provides the following information A 1 Basic Specification 190 A 2 Installation Specification 192 A 3 Outer Dimensions 193 A 4 Scanner Options 195 A 5 Uninstalling the Software 196 ...

Страница 190: ...escent lamp x 2 Front Back White cold cathode fluorescent lamp x 3 Front Back Flatbed White cold cathode fluorescent lamp x 2 Front Flatbed Scanning area Mini mum ADF A8 portrait 1 127 to 209 g m2 34 to 56 1 lb Maxi mum ADF A3 or Double Letter Long page 118 11 in or 3 m 2 Flatbed 12 00 x 180 00 in 304 8 457 2 mm Paper weight A4 Letter or smaller 31 to 209 g m2 8 3 to 56 1 lb Size larger than A4 Le...

Страница 191: ... 1 interfaces at the same time 7 You cannot connect multiple computers to the scanner using each type of interface cables at the same time 8 If you connect the scanner with USB 2 0 it is required that the USB port and the Hub are compliant with USB2 0 The scanning speed may slow down when you connect the scanner with USB1 1 Scanner model fi 6670 fi 6670A fi 6770 fi 6770A fi 6750S Capacity of ADF 2...

Страница 192: ...stallation space width x depth x height 3 1179 x 686 x 390 mm 46 4 x 27 0 x 15 4 in 1030 x 700 x 640 mm 40 6 x 27 6 x 25 2 in Weight 17 kg 37 5 lb 35 kg 77 2 lb Input power Voltage range 100 to 240 Vac 10 Phase Single phase Frequency range 50 60 3 Hz Power consumption Operating 216 W or less Power saving fi 6670 6 W or less fi 6670A 9 1 W or less fi 6770 6 W or less fi 6770A 9 1 W or less fi 6750S...

Страница 193: ... ScandAll PRO Scan Pa rameters Various Documents Daily Care Trouble shooting Operational Settings Consumables Scanner Overview The outer dimensions are as follows ADF type Unit mm inches A 3Outer Dimensions 192 329 641 128 䋨300䋩 7 6 in 25 2 in 13 0 in 5 0 in 11 8 in 17 0 in 1 1 in 䋨432䋩 䋨28䋩 ...

Страница 194: ... TOP Loading Documents How to Use ScandAll PRO Scan Pa rameters Various Documents Daily Care Trouble shooting Operational Settings Consumables Scanner Overview Flatbed type Unit mm inches 690 192 641 128 341 7 6 in 25 2 in 5 0 in 27 2 in 㧔500㧕 19 7 in 13 5 in ...

Страница 195: ...ble for the ADF type scanner model Prints alphanumeric character string onto the back side of scanned document Use of this imprinter prints user s name date and or serial number for file management Black Document Pad FI 575BK PA03338 D960 fi 6770 fi 6770A fi 6750S A quick replacement type document pad useful for scanning documents in black background when loading from the flatbed VRS option FI 677...

Страница 196: ...l select Software Operation Panel Installed automatically when the FUJITSU TWAIN32 and ISIS scanner drivers are installed To remove the Kofax VRS select Kofax VirtualReScan To remove the manuals select fi Scanner manuals fi 6670 A fi 6770 A fi 6750S To remove Quick Scan Pro select Quick Scan To remove Adobe Acrobat select Adobe Acrobat Standard 5 Click the Uninstall or Uninstall Change button 6 Wh...

Страница 197: ... image Dropout color Image processing Moire Patterns Automatic separation Duplex reading mode Interface Multifeed detection Automatic size skew detec tion E Inversion Reverse image reading N Eject rollers Noise removal B Energy Star IPC preset mode O Brake roller Equipment Error ISIS Image Scanner Inter face Specification OCR optical character recognition Brightness Error diffusion C F ISIS Image ...

Страница 198: ...puter System Interface Temporary Error Ultrasonic sensor Photograph mode White level follower OFF Terminator USB Universal Serial Bus SCSI ID Third Party Interface W Pick roller Separation roller Threshold White level follower Pick start time Simplex reading mode TÜV White Reference Stripe Pixel Picture Element Smoothing TWAIN Technology Without Any Interesting Name Numbers Portrait Storage temper...

Страница 199: ...ic Document Feeder A unit that allows the user to scan a number of pages consecutively Fed documents are transported from the ADF paper chute or hopper to the Stacker Actual scanning operation is executed by the mechanism inside of this unit Automatic separation An image processing method in which the scanner automatically detects difference between text and photos and chooses the threshold accord...

Страница 200: ...io noise emissions from digital apparatus CCD Charged Coupling Device Image Sensor A semiconductor device inside the scanner that registers light reflected from the original image and converts it into a digitized electronic form CCD technology is the basis of high quality image acquisition in scanners cameras and other specialized devices Color balance Balance of colors in images D Default setting...

Страница 201: ...ot appear in the read image Duplex reading mode A mode for scanning both sides of the document in one pass E Eject rollers Rollers that transport documents from the ADF onto the Stacker Energy Star ENERGY STAR is an international standard for energy efficient electronic equipment It was created by the US Environment Protection Agency EPA in 1992 The standard program has now been adopted by several...

Страница 202: ...dio communication of radio receivers and other devices which radiate radio frequency energy and provides for the certification of radio receivers It also provides the certification of low power transmitters and the operation of certificated transmitters without a license Feed rollers Rollers that feed documents through the ADF Filtering A correction method that improves the read quality of handwri...

Страница 203: ...me documents the computer recognizes the documents as sets of black and white dots In the Gray scale method each dot contains data regarding density of black The original gradation of the documents is realized as the gradation of the density data B H Halftone processing Any method used to reproduce a photograph which includes a shade as an image composed of dots namely a binary image Dithering and...

Страница 204: ...ices designed on the ISIS standard it is necessary to install the driver software of the same standard J Jaggy images Images that have sharp projections or irregular shape on their edges Job separation sheet A sheet inserted between documents in a batch for separating different jobs L Landscape A document is transported and read with the Short side parallel to the moving direction Landscape orient...

Страница 205: ...areas and voids in black areas is removed to improve image quality Common noise includes toner and fax particles Noise reduction works via an algorithm that removes pixels up to 5 x 5 dots appart A dot is 1 400 inch A particle can be distinguished from a character as it is not connected to another dot within 5 pixels O OCR optical character recognition Devices or technologies for identifying chara...

Страница 206: ...t of rubber Photograph mode White level follower OFF Selecting photograph mode makes brightness and contrast settings effective but prevents the threshold from being set With photograph mode the darkness of image corresponds to the black pixel density making it suitable in scanning images such as photographs having gradations Pick roller Roller s that picks the page from the batch of paper in the ...

Страница 207: ...ted through this interface daisy chain The data transfer rates are different between Fast SCSI Max 10MB sec and Wide SCSI Max 20MB sec SCSI ID Used to specify a particular SCSI device when the initiator selects a target or the target reconnects to the initiator Separation roller A roller that separates the sheets of paper from each other Simplex reading mode A mode for scanning only the front side...

Страница 208: ... pixels are converted to black and which will become white TÜV An institution that controls products for conformity with various standards of security usability and environmental matters TWAIN Technology Without Any Interesting Name A standard for API Application Program Interface or protocol for imaging devices scanners digital cameras etc developed by TWAIN Working Group In order to use devices ...

Страница 209: ...w W White level follower A function to correct the difference between white colors in unbleached paper e g wood containing paper etc and in scanned images White Reference Stripe The white part located in the ADF that defines the lightest area in an image causing all other areas to be adjusted accordingly Numbers 11 x 17 inches A standard paper size used in the U S A and other countries Paper size ...

Страница 210: ...he ADF 116 Cleaning the Flatbed Flatbed Type Only 121 Configurable Items 156 Consumables 122 Consumables and the Replacement Cycles 123 Conventions 7 Customizing the Hardware Settings 105 D Daily Care 113 E Errors Indicated on the Operator Panel 131 F Features 21 FUJITSU ISIS Scanner Driver 67 FUJITSU TWAIN 32 Scanner Driver 64 Functions of the Operator Panels 28 H How to Use ScandAll PRO 51 How t...

Страница 211: ...eir Functions 22 Scanning Approaches 57 Scanning Documents of Different Types or Sizes 75 Scanning with Batch Scan 61 Scanning with Scan 58 Selecting a Scanner Driver 54 Selecting a Scanner Model 55 Setting Post Scan Operations and Handling 87 Settings Related to Consumables and Useful Life Counters 164 Settings Related to Multifeed Detection 179 Settings Related to Power ON OFF Control 187 Settin...

Страница 212: ...perator s Guide P3PC 2252 02ENZ0 Issue Date June 2008 Issued by PFU LIMITED Copying of the contents of this manual in whole or in part and copying of the scanner applications is prohibited under the copyright The contents of this manual are subject to change without notice PFU LIMITED is not liable whatsoever for any damages resulting from use of this scanner and procedures described in this manua...

Отзывы: