background image

Ports and operating elements

Removing and installing the battery

Notes

Battery

Only use batteries approved by Fujitsu PC Asia Paci

fi

c Pte Ltd. for your notebook.

Never use force when inserting or removing a battery.

Make sure that no foreign bodies get into the battery connections.

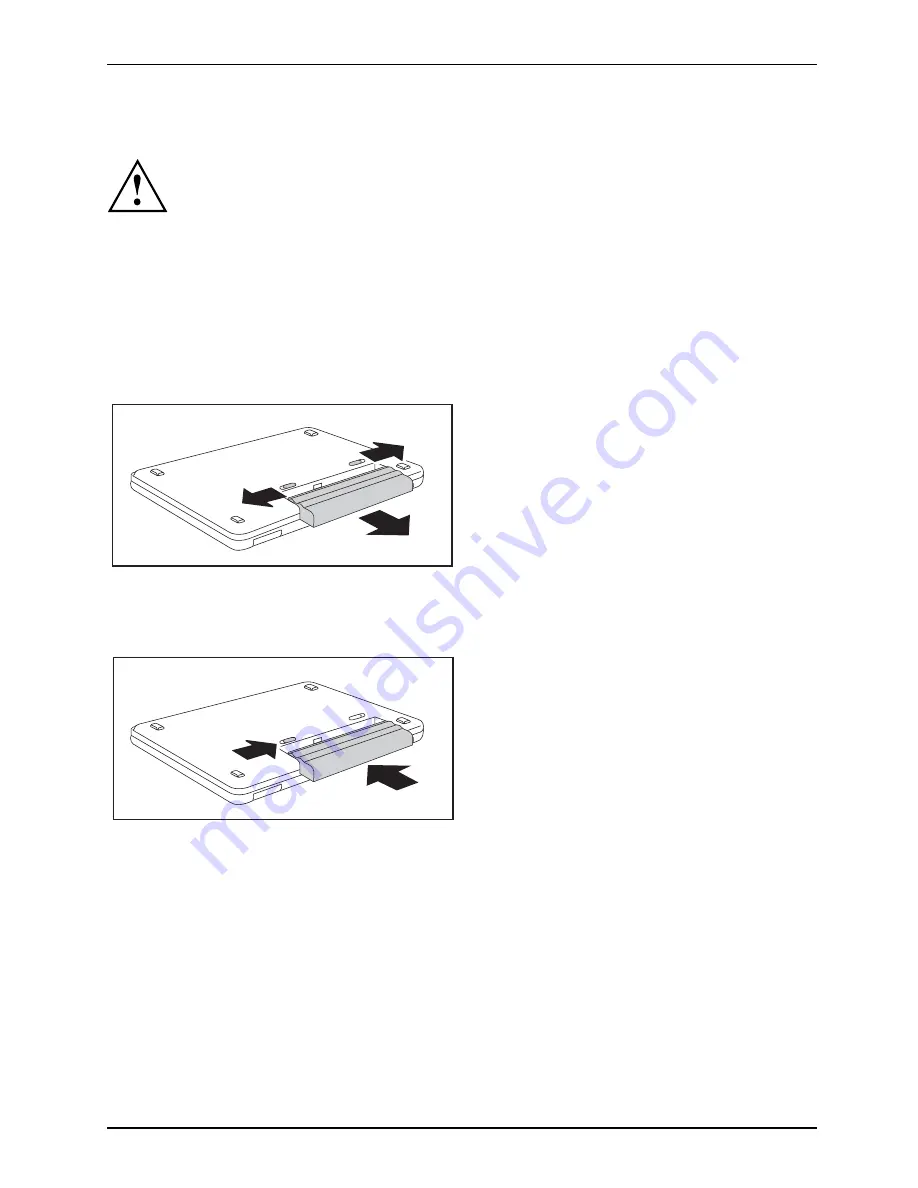
Removing the battery

Switch the notebook off and pull the power plug out of the mains socket.

Battery

Close the LCD screen so that it locks into place.

Disconnect all cables connected to the notebook.

Turn your notebook over and place it on a stable, sturdy,

fl

at surface. If necessary, lay an

anti-slip cloth on this surface to prevent the notebook from being scratched.

2

1

3

Push the battery lock in the direction of
the arrow (1) as far as it will go.

Slide the locking device in the direction of
the arrow (2) and hold it in place.

Pull the battery out of the casing in the
direction of the arrow (3).

Battery: inserting

2

1

Push the battery into the battery
compartment so that the contacts
enter

fi

rst (1).

Battery

Push the battery into the battery
compartment until you feel it click into place.

Push the battery lock in the direction of
the arrow (2) up to the stop.

A26391-K240-Z220-1-7619, edition 1

11

Содержание ESPRIMO Mobile V5505

Страница 1: ...Professional Notebook English EasyGuide ESPRIMO Mobiles V5545 5505 ...

Страница 2: ... or go to www pc ap fujitsu com your sales partner your sales office Additional information is contained in the Help Desk list and the Warranty manual The Warranty manual can be found on the Drivers Utilities CD DVD Latest information on our products tips updates etc can be found on our website at www pc ap fujitsu com ...

Страница 3: ......

Страница 4: ...This manual was produced by Xerox Global Services Published by Fujitsu PC Asia Pacific Pte Ltd AG 12 07 Edition 1 Order no A26391 K240 Z220 1 7619 ...

Страница 5: ...ESPRIMO Mobiles V5545 5505 Your ESPRIMO Mobile V 1 Important notes 3 Ports and operating elements 4 Removing and installing components during servicing 15 Technical data 17 Index 18 EasyGuide ...

Страница 6: ...poration USA Microsoft MS MS DOS Windows and Windows NT are registered trademarks of Microsoft Corporation PS 2 is a registered trademark of International Business Machines Inc All other trademarks referenced are trademarks or registered trademarks of their respective owners whose protected rights are acknowledged Copyright Fujitsu Limited 2007 All rights reserved including rights of translation r...

Страница 7: ...oving the battery 11 Battery inserting 11 SIM card optional 12 Inserting the SIM card 12 Removing a SIM card 13 Radio components Wireless LAN Bluetooth UMTS optional 14 Switching the radio components on and off 14 Removing and installing components during servicing 15 Notes on installing and removing boards and components 15 Hard disk 16 Removing the hard disk 16 Installing the hard disk 16 Techni...

Страница 8: ...Contents A26391 K240 Z220 1 7619 edition 1 ...

Страница 9: ...ies and record your own CDs and DVDs an S Video Out socket for connecting your notebook to your television an integral camera for snapshots and video chat depending on model depending on notebook model a memory card slot for quickly transferring photos music and videos onto your notebook several USB ports which provide easy expansion with webcams game pads printers and more an internal modem for c...

Страница 10: ...password Name123 or a command to launch a program start exe This style refers to information displayed by a program on the screen e g Installation is completed This style is for terms and texts in a software user interface e g ClickSave names of programs or files e g Windows or setup exe This style is for cross references to another section e g Safety information Cross references to an external so...

Страница 11: ...Important notes Important notes Take note of the safety hints provided in the Safety manual in the Professional Notebook operating manual and in this manual A26391 K240 Z220 1 7619 edition 1 3 ...

Страница 12: ... KensingtonLock Opticaldrive Monitorport LANport Modemport Harddisk Battery Batteryreleaselatch Batteryrelease S Videooutsocket 2 16 17 18 21 22 23 24 25 2 3 4 6 9 13 14 15 1 5 7 10 11 12 19 26 8 20 1 Camera 2 Loudspeaker 3 ON OFF switch 4 Touchpad 5 Touchpad keys 6 Status indicators 7 ON OFF switch for radio components 8 Microphone 9 ExpressCard slot 10 Memory card slot 11 Headphones port Line Ou...

Страница 13: ...utton with Start Settings Control Panel Performance and Maintenance Power Options Advanced Windows Vista You can configure the power button with Start Settings Control Panel Mobile PC Power Options If you have assigned a password you must enter this when requested to do so in order to start the operating system Further information can be found in the Professional Notebook operating manual section ...

Страница 14: ...erating system please see operating system manual If the notebook cannot be shut down properly press and hold the ON OFF button for approximately four seconds The notebook will switch off Any unsaved data may be lost Close the LCD screen so that it locks into place 6 A26391 K240 Z220 1 7619 edition 1 ...

Страница 15: ...hts up The system is in power saving mode Drive indicator Drive Drive Indicator lights up One of the drives e g hard disk CD DVD is being accessed Battery indicator Battery Battery Indicator lights up The battery is charging A Caps Lock indicator Indicator lights up The Caps Lock key has been pressed All the characters you type appear in upper case In the case of overlay keys the character printed...

Страница 16: ...o components that have been activated in the BIOS Setup can be switched on and off individually The key combination Fn F1 can only be used if the LaunchManager software is installed on your device Switch loudspeakers ON OFF Fn F3 Loudspeaker This key combination switches your notebook s loudspeakers off and on Decrease volume Fn F4 Volume This key combination reduces the volume of the integrated l...

Страница 17: ...key combination to activate the currently configured energy saving mode Switching between open applications Use this key combination to switch between several open applications Alt Tab Alt Ctrl Del SysRq Perform warm reboot This key combination restarts the notebook First press and hold both the Ctrl and Alt keys then press the Del key First the Task Manager will be displayed You must then press a...

Страница 18: ...Ports and operating elements Camera depending on notebook model Your device is fitted with a VGA camera 1 which can also be used as a webcam 1 10 A26391 K240 Z220 1 7619 edition 1 ...

Страница 19: ...your notebook over and place it on a stable sturdy flat surface If necessary lay an anti slip cloth on this surface to prevent the notebook from being scratched 2 1 3 Push the battery lock in the direction of the arrow 1 as far as it will go Slide the locking device in the direction of the arrow 2 and hold it in place Pull the battery out of the casing in the direction of the arrow 3 Battery inser...

Страница 20: ...surface If necessary lay an anti slip cloth on this surface to prevent the notebook from being scratched Remove the battery see Section Removing the battery Page 11 1 Insert the SIM card into the slot so that the the chip is facing upwards and the angled corner is at the front right facing towards the slot 1 Ensure that you hear the SIM card click into place Reinstall the battery see Battery inser...

Страница 21: ...necessary lay an anti slip cloth on this surface to prevent the notebook from being scratched Remove the battery see Section Removing the battery Page 11 2 1 Push the SIM card inwards slightly to eject it from the slot 1 Pull the SIM card out of the slot in the direction of the arrow 2 Reinstall the battery see Battery inserting Page 11 Turn the notebook the right way up and place it on a flat sur...

Страница 22: ...o be switched off You can enable or disable the radio components individually The BIOS Setup allows you to specify which radio components can be switched on and off using the ON OFF switch for the radio components or the key combination Fn F1 Only those components that have been activated in the BIOS Setup can be switched on and off using the ON OFF switch for the radio components or the key combi...

Страница 23: ...tebook off and pull the power plug out of the mains socket Remove the battery Take care when you use the locking mechanisms on the battery and any other component Never use sharp objects such as screwdrivers scissors or knives as leverage to remove covers Notes Board ESD Boards with electrostatic sensitive devices ESD are marked with the label shown When handling boards fitted with ESDs you must a...

Страница 24: ...nected to the notebook Turn your notebook over and place it on a stable sturdy flat surface If necessary lay an anti slip cloth on this surface to prevent the notebook from being scratched Remove the battery see Removing the battery Page 11 3 2 1 1 Remove the screws 1 Lift off the cover 2 Pull the hard disk out of the bay in the direction of the arrow 3 Installing the hard disk 3 3 1 2 Push the ha...

Страница 25: ...your notebook on our website www pc ap fujitsu com or on the Drivers Utilities CD DVD Battery Technicaldata 3 cell rechargeable battery 6 cell rechargeable battery Rated voltage 10 8 V 11 1 V 10 8 V 11 1 V Rated capacity depends on configuration depends on configuration The operating time depends on the device equipment the active applications and the energy saving settings Mains adapter Technical...

Страница 26: ... 15 ExpressCard slot 4 F Fn F1 8 Fn F10 9 Fn F12 9 Fn F3 8 Fn F4 8 Fn F5 8 Fn F6 8 Fn F7 8 Fn F8 8 Fn F9 9 H Hard disk 4 removing 16 Headphones port Line Out 4 K Kensington Lock 4 L LAN port 4 Loudspeaker 4 switching ON OFF 8 M Memory card slot 4 Microphone 4 Modem port 4 Monitor port 4 N Notes battery 11 boards 15 O ON OFF switch 4 ON OFF switch for radio components 4 Optical drive 4 P Power indi...

Страница 27: ...put screen 9 Touchpad 4 switching off 8 switching on 8 Touchpad keys 4 U UMTS 14 switching off 8 14 switching on 8 14 USB port 4 V Volume decrease 8 increase 8 W Warm reboot 9 Wireless LAN 14 switching off 14 switching on 14 WLAN switching off 8 switching on 8 A26391 K240 Z220 1 7619 edition 1 19 ...

Отзывы: