background image

14

Technical Manual

 D2779 

(TX100 

S2) 

CE certificate of conformity

Important information

Notes about boards

During installation/deinstallation of the board, observe the specific 
instructions described in the service supplement for the respective server.

Shut down the server and disconnect the power plug, before you make 
modifications on an installed board.

To prevent damage to the board, the components and conductors on it, 
please take great care when you insert or remove boards. Take great care 
to ensure that extension boards are slotted in straight, without damaging 
components or conductors on the board, or any other components, for 
example EMI spring contacts.

Be careful with the locking mechanisms (catches, centring pins etc.) when 
you replace the system board or components on it, for example memory 
modules or processors. 

Never use sharp objects (screw drivers) for leverage.

Do not damage or modify internal cables or devices. Doing so may cause a 
device failure, fire, or electric shock.

Do not touch the circuitry on boards or soldered parts. Hold the metallic 
areas or the edges of the circuit boards.

2.2

CE certificate of conformity

The board complies with the requirements of the EC directives 
2004/108/EC regarding “Electromagnetic Compatibility” and 
2006/95/EC “Low Voltage Directive”. This is indicated by the CE 
marking (CE = Communauté Européenne).

Compliance was tested in a typical PRIMERGY configuration.

Содержание D2779

Страница 1: ...Technical Manual English System Board D2779 for PRIMERGY TX100 S2 Technical Manual Edition June 2010 ...

Страница 2: ... Copyright and Trademarks Copyright 2010 Fujitsu Technology Solutions GmbH All rights reserved Delivery subject to availability right of technical modifications reserved All hardware and software names used are trademarks of their respective manufacturers The contents of this manual may be revised without prior notice Fujitsu assumes no liability for damages to third party copyrights or other righ...

Страница 3: ...d in the mouse and keyboard are limited life components Use of these components beyond their operating life may result in electrolyte leakage or depletion potentially causing emission of foul odor or smoke As a guideline in a normal office environment 25 C operating life is not expected to be reached within the maintenance support period 5 years However operating life may be reached more quickly i...

Страница 4: ... Computer issued by JEITA the Japan Electronics and Information Technology Industries Association Technology controlled by the Foreign Exchange and Foreign Trade Control Law of Japan Documents produced by Fujitsu may contain technology controlled by the Foreign Exchange and Foreign Trade Control Law of Japan Documents which contain such technology should not be exported from Japan or transferred t...

Страница 5: ...Technical Manual Only for the Japanese market I Although described in this manual some sections do not apply to the Japanese market These options and routines include USB Flash Module UFM Replacing the lithium battery ...

Страница 6: ...Technical Manual D2779 TX100 S2 ...

Страница 7: ... of conformity 14 2 3 Environmental protection 15 3 Features 17 3 1 Overview 17 3 2 Main memory 20 3 2 1 Fitting rules 21 3 3 PCI PCIe slots 23 3 4 Screen resolutions 24 3 5 Temperature and system monitoring 24 3 6 Connectors and jumpers 26 3 6 1 Onboard connectors 26 3 6 2 Onboard jumpers 28 3 6 3 External connectors 30 4 Replacing the lithium battery 31 ...

Страница 8: ...Technical Manual D2779 TX100 S2 Contents ...

Страница 9: ...format on the ServerView Suite DVD 2 The ServerView Suite DVD 2 is part of the ServerView Suite supplied with every server PRIMERGY Abbreviations and Glossary can also be found on the ServerView Suite DVD 2 1 1 Notational conventions The following notational conventions are used in this manual Text in italics indicates commands or menu items Quotation marks indicate names of chapters and terms tha...

Страница 10: ...10 Technical Manual D2779 TX100 S2 Notational conventions Introduction ...

Страница 11: ...ied staff Any failure to observe the guidelines in this manual and any unauthorized openings and improper repairs could expose the user to risks electric shock fire hazards and could also damage the equipment Please note that any unauthorized openings of the device will result in the invalidation of the warranty and exclusion from all liability Transport the device only in the antistatic original ...

Страница 12: ...SO IEC 11801 standard respectively The minimum requirement is a Category 5 shielded cable for 10 100 Ethernet or Category 5e for Gigabit Ethernet Never connect or disconnect data transmission lines during a thunderstorm risk of lightning hazard Batteries V CAUTION Incorrect replacement of batteries may lead to a risk of explosion The batteries may only be replaced with identical batteries or with ...

Страница 13: ...ou must always discharge static build up e g by touching a grounded object before working with such components Any devices or tools that are used must be free of electrostatic charge Wear a suitable grounding cable that connects you to the external chassis of the system unit Always hold components with ESDs at the edges or at the points marked green touch points Do not touch any connectors or cond...

Страница 14: ...oard or any other components for example EMI spring contacts Be careful with the locking mechanisms catches centring pins etc when you replace the system board or components on it for example memory modules or processors Never use sharp objects screw drivers for leverage Do not damage or modify internal cables or devices Doing so may cause a device failure fire or electric shock Do not touch the c...

Страница 15: ...ttp primeserver fujitsu com primergy concept for the Japanese market Energy saving information Devices that do not need to be constantly switched on should be switched off until they are needed as well as during long breaks and after completion of work Packaging information This packaging information doesn t apply to the Japanese market Do not throw away the packaging You may need it later for tra...

Страница 16: ...al regulations Details regarding the return and recycling of devices and consumables within Europe can also be found in the Returning used devices manual via your local Fujitsu branch or from our recycling center in Paderborn Fujitsu Technology Solutions Recycling Center D 33106 Paderborn Tel 49 5251 8 18010 Fax 49 5251 8 333 18010 The device must not be disposed of with domestic waste This device...

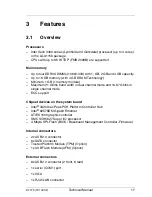
Страница 17: ...imum 21 Gbit s band width in dual channel mode and 10 67 Gbit s in single channel mode ECC support Chipset devices on the system board Intel 3420 Ibex Peak PCH Platform Controller Hub Intel 82578DM Gigabit Ethernet ATI ES1000 graphic controller SMC SCH5627 Super I O processor 4 Mbyte SPI Flash BIOS Baseboard Management Controller Firmware Internal connectors 2x USB 2 0 connector 6x SATA connector ...

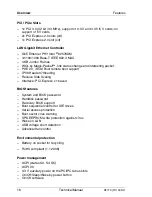
Страница 18: ...I Boot remote boot support IPV6 Header Offloading Receive Side Scaling Interface PCI Express x1 based BIOS features System and BIOS password Harddisk password Recovery BIOS support Boot sequential control for IDE drives Serial access protection Boot sector virus warning SPD EEPROM write protection against virus Wake on LAN USB voltage short detection Advanced fan control Environmental protection B...

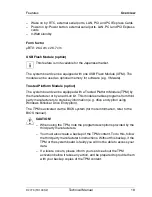
Страница 19: ... the manufacturer or by an add on kit This module enables programs from third party manufacturers to store key information e g drive encryption using Windows Bitlocker Drive Encryption The TPM is activated via the BIOS system for more information refer to the BIOS manual V CAUTION When using the TPM note the program descriptions provided by the third party manufacturers You must also create a back...

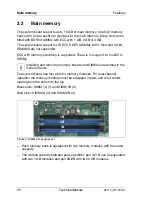
Страница 20: ... is no support for non ECC DIMMs I Installing and removing memory boards and DIMMs is described in the Options Guide The system board has four slots for memory modules For dual channel operation the memory modules must be equipped in pairs and color coded starting from the bottom to the top Black slots DIMM 1A 1 and DIMM 1B 2 Blue slots DIMM 2A 3 and DIMM 2B 4 Figure 2 DIMM slot assignment Each me...

Страница 21: ...e highest common frequency that is allowed by the SPD data of the DIMMs and the maximum speed of the selected configuration Configuration 1 single channel configuration Configuration 2 The dual channel mode is only activated if the size of the used memory module in socket DIMM 1B is equal to the summary of the memory modules in the sockets DIMM 1A and DIMM 2A e g DIMM 1A 1GB DIMM 2A 1GB DIMM 1B 2G...

Страница 22: ...22 Technical Manual D2779 TX100 S2 Main memory Features Install identical memory modules in sockets DIMM 1A and DIMM 1B and identical memory modules in sockets DIMM 2A and DIMM 2B ...

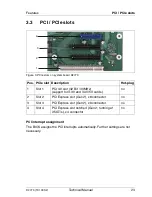
Страница 23: ...igns the PCI interrupts automatically Further settings are not necessary Pos PCIe slot Description Hot plug 1 Slot 1 PCI 3 0 slot 32 Bit 33MHz support for 3 3V and 3 3V 5V cards no 2 Slot 2 PCI Express slot Gen 2 x8 connector no 3 Slot 3 PCI Express slot Gen 2 x8 connector no 4 Slot 4 PCI Express slot notched Gen 2 running at 2 5GT s x4 connector no 4 3 2 1 ...

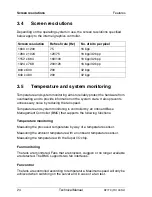
Страница 24: ...rts the following functions Temperature monitoring Measuring the processor temperature by way of a temperature sensor Measuring the ambient temperature with an onboard temperature sensor Measuring the temperature with the Super I O chip Fan monitoring The fans are monitored Fans that are blocked sluggish or no longer available are detected The BMC supports two fan interfaces Fan control The fans a...

Страница 25: ... voltages provided from the PSU are controlled Also voltage of the Lithium battery is supervised If one voltage exceeds or falls below its upper lower threshold value an alert is generated and stored in the System Event Log SEL System Event Log SEL System events only will be logged during OS runtime All monitored events of the system board are signalized and recorded in the System Event Log They c...

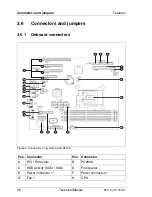
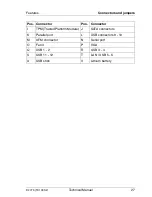
Страница 26: ...ors and jumpers 3 6 1 Onboard connectors Figure 4 Connectors on system board D2779 Pos Connector Pos Connector A PCI PCIe slots B PC2009 C HDD activity SCSI SAS D Front panel E Power connector 1 F Power connector 2 G Fan 1 H CPU 2 A 1 3 4 C D E F G H L M N O P Q R S T U V K J I B ...

Страница 27: ...ctors and jumpers I TPM Trusted Platform Module J SATA connectors K Parallel port L USB connectors 9 10 M UFM connector N Serial port O Fan 3 P VGA Q USB 1 2 R USB 3 4 S USB 11 12 T LAN USB 5 6 U USB stick V Lithium battery Pos Connector Pos Connector ...

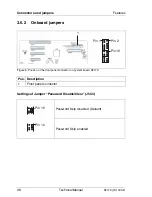
Страница 28: ...s 3 6 2 Onboard jumpers Figure 5 Position of the frontpanel connector on system board D2779 Settings of Jumper Password Disable Clear J5C3 Pos Description 1 Front panel connector Password Skip disabled Default Password Skip enabled 1 Pin 1 Pin 2 Pin 16 Pin 16 Pin 16 ...

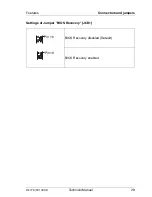
Страница 29: ...D2779 TX100 S2 Technical Manual 29 Features Connectors and jumpers Settings of Jumper BIOS Recovery J6D1 BIOS Recovery disabled Default BIOS Recovery enabled Pin 16 Pin 16 ...

Страница 30: ...l D2779 TX100 S2 Connectors and jumpers Features 3 6 3 External connectors Figure 6 External connectors on system board D2779 Pos Indicator A Gigabit LAN B USB 5 6 C USB 3 4 D USB 1 2 E VGA port F Serial port F E C D A B ...

Страница 31: ...er CR2032 This information does not apply to the Japanese market Do not throw lithium batteries into the trash can They must be disposed of in accordance with local regulations concerning special waste Make sure that you insert the battery the right way round The plus pole must be on the top Figure 7 Replacing the lithium battery Ê Press the locking spring into direction of the arrow 1 so that the...

Страница 32: ...32 Technical Manual D2779 TX100 S2 Replacing the lithium battery ...

Отзывы: