En-29
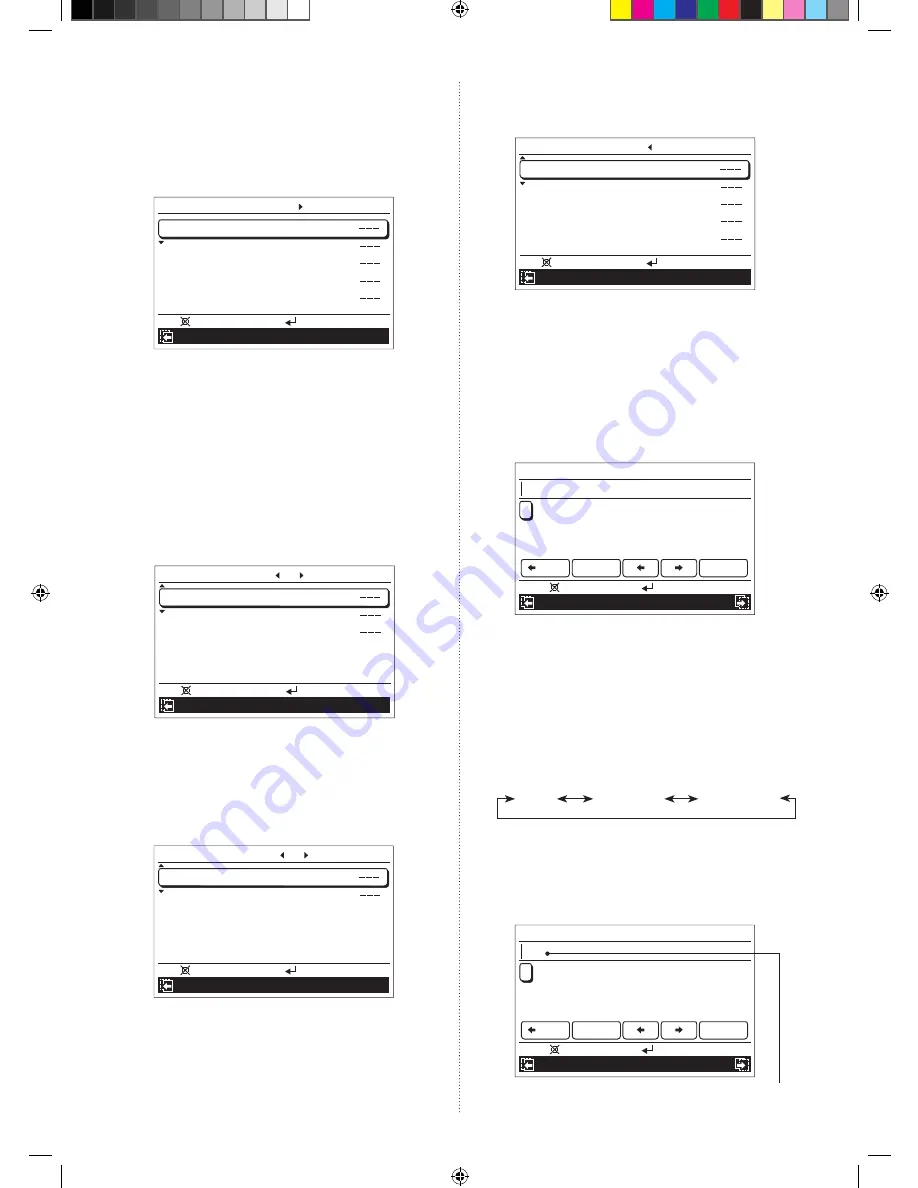
Selecting zone to be named:
1.
In “Zone user setting” screen, select [Zone name setting]
with the [Cursor button (Up/Down)]. When you press the
[Enter button], “Name setting (group)” screen is displayed.
As a setting example, Zone 1 to 8 are supposed to be
connected in following instructions.
Name setting (zone)
Zone 1
Zone 2
Zone 3
Zone 4
Zone 5
Mo 10:00
Setting:
Back:
Day/Night setting
[
1/4
]
If any names have been registered for the zones already,
the registered names are displayed instead of “---” on this
screen.
If more than 6 zones are connected, you will have an extra
page.
Any of following actions make the screen switches from
“Name setting (zone) [1/4]” to the extra setting screen.
•
Pressing the [Cursor button (Right)] in “Name setting
(zone) [1/4]” screen.
•
Pressing the [Cursor button (Down)] during the cursor
is set to the last zone name in “Name setting (zone)
[1/4]” screen.
Name setting (zone)
Zone 6
Zone 7
Zone 8
Mo 10:00
Setting:
Back:
Day/Night setting
[
2/4
]
2.
Select the zone to be named with the [Cursor button (Up/
Down)], and press the
[Enter button]
.
Selecting group to be named:
1.
In “Name setting (zone)” screen, press the
[Cursor button
(Right)]. “Name setting (group)” screen opens.
Name setting (group)
Day
Night
Mo 10:00
Setting:
Back:
Day/Night setting
[
3/4
]
If any names have been registered for the groups already,
the registered names are displayed instead of “---” on this
screen.
2.
Select the group to be named with the [Cursor button (Up/
Down)], and press the
[Enter button]
.
Selecting room-temperature sensor to be named:
1.
In “Name setting (group)” screen, press the
[Cursor button
(Right)]. “Name setting (sensor)” screen opens.
Name setting (sensor)
Indoor unit
Primary RC
Secondary RC
Optional 1
Optional 2
Mo 10:00
Setting:
Back:
Day/Night setting
[
4/4
]
If any names have been registered for the sensors already,
the registered names are displayed instead of “---” on this
screen.
2.
Select the sensor to be named with the [Cursor button (Up/
Down)], and press the
[Enter button]
.
When you press the [Enter button] after selecting any of zone,
group, or sensor, “Name setting” screen opens.
As the setting example, name setting screen for “Zone 1” is
used in following instructions.
Name setting (Zone 1)
A B C D E F G H I J K L M N O P Q R
S T U V W X Y Z & ( )
0 1 2 3 4 5 6 7 8 9 -
+ ; : . , / _
Back Space
End
Mo 10:00
Enter:
Cancel:
Preset names
Lower case
3
Enter desired name.
For entering the text of the name, there are following 3
screens.
• Capital
• Lower case
• Preset names
You can enter mixed text with “Capital”, “Lower case”,
and “Preset names”, up to 12 characters.
When you press the [Screen switch button (Left/Right)]
during entering the text, the screen switches as follows.
Capital
Lower case Preset names
Capital:
You can select and enter desired capital letter
.
In “Capital” screen, set the cursor to the target letter with the
[Cursor button], and press the [Enter button].
Selected letter is displayed in the text field.
Name setting (Zone 1)
A B C D E F G H I J K L M N O P Q R
S T U V W X Y Z & ( )
0 1 2 3 4 5 6 7 8 9 -
+ ; : . , / _
Back Space
End
Mo 10:00
Enter:
Cancel:
Preset names
Lower case
Text field
9381067121_OM_EN.indd 29
07-Aug-15 13:41:15


