


SCALEOVIEW S17-2 / S19-2
A26361-K1018-Z120-1-7619, edition 1
23
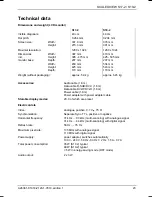
Technical data
Dimensions and weight (LCD monitor)
S17-2 S19-2
Visible diagonals:
43 cm
48 cm
Dot pitch:
0.264 mm
0.294 mm
Screen size:
Width:
Height:
337.9 mm
270.3 mm
376 mm
301 mm
Maximal resolution:
1280 x 1024
1280 x 1024
Dimensions
incl.
monitor base:
Width:
Height:
Depth:
Width:
Height:
Depth:
397 mm
395 - 475 mm
207 mm
450 mm
425 mm
170 mm
416 mm
425 - 505 mm
207 mm
534 mm
543 mm
170 mm
Weight (without packaging):
approx. 5.9 kg
approx. 6.45 kg
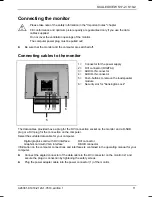
Accessories:
Audio cable (1.8 m)
Data cable D-SUB/DVI-I (1.8 m)
Data cable DVI-D/DVI-D (1.8 m)
Power cable (1.8 m)
Power adapter with power adapter cable
Storable display modes:
20, 9 of which are preset
Electrical data
Video:
analogue, positive, 0.7 V
pp
, 75
Ω
Synchronisation: Separate
Sync. TTL, positive or negative
Horizontal frequency:
31 kHz .... 80 kHz (multi-scanning) with analogue signal
31 kHz .... 64 kHz (multi-scanning) with digital signal
Refresh rate:
56 Hz .... 76 Hz
Maximum pixel rate:
135 MHz with analogue signal
110 MHz with digital signal
Power supply:
power adapter; switches automatically
100 V - 240 V, 50 Hz - 60 Hz
±
2 Hz, 1.5 A - 0.7 A
Total power consumption:
35 W (S17-2) typical
48 W (S19-2) typical
< 5 W in energy-saving mode (OFF mode)
Audio output:
2 x 3 W
Содержание FGSW-1602
Страница 1: ...Monitor Operating Manual English SCALEOVIEW S17 2 S19 2...
Страница 3: ......
Страница 5: ...SCALEOVIEW S17 2 S19 2 LCD monitor Operating Manual April 2005 edition...
Страница 8: ......


