Страница 1: ...Notebook EasyGuide English AMILO Pro V3205 AMILO Si 1520...
Страница 2: ...o to www fujitsu siemens com helpdesk your sales partner your sales outlet Additional information is contained in the Help Desk list and the Warranty manual The Warranty manual can be found on the Dri...
Страница 3: ......
Страница 4: ...eciclado Denne h ndboken er trykt p resirkulert papir Tato pr rucka byla vyti tena na recyklovan m pap re A haszn lati utas t st visszaforgatott pap rra nyomtatt k Podr cznik ten wydrukowano na wt rni...
Страница 5: ...d operating elements Manufacturer s notes Important notes Index Using your notebook for the first time Using your notebook Security functions Connecting external devices Removing and installing compon...
Страница 6: ...Inc All other trademarks referenced are trademarks or registered trademarks of their respective owners whose protected rights are acknowledged Copyright Fujitsu Siemens Computers GmbH 2006 All rights...
Страница 7: ...combinations 18 Easy Launch keys 21 Touchpad and touchpad buttons 22 LCD screen 23 Information on LCD monitor 23 Monitor settings 24 Battery 24 Charging caring for and maintaining the battery 24 Remo...
Страница 8: ...d removing boards and components 55 Removing and installing the battery 56 Removing and installing the hard disk 56 Removing the hard disk 56 Installing the hard disk 58 Memory expansion 60 Installing...
Страница 9: ...Contents 10600690568 edition 1 Manufacturer s notes 75 Disposal and recycling 75 Declarations of Conformity 75 Copyright protected technology 75 CE marking 76 Index 77...
Страница 10: ......
Страница 11: ...DVD movies and record your own disks S Video out for connecting your notebook to your television an IEEE 1394 FireWire connection for high speed devices such as digital camcorders four USB ports which...
Страница 12: ...n of the manual Information concerning useful accessories such as a CD DVD drive for your notebook may be found at www fujitsu siemens com accessories Notational conventions The following symbols are...
Страница 13: ...ntly depending on the device 13 14 15 17 20 21 22 23 24 25 1 2 3 4 5 6 7 8 9 10 11 12 16 18 19 26 1 USB port 2 S Video out socket 3 DC jack DC IN 4 FireWire port 5 DVI I connector 6 Modem port 7 USB p...
Страница 14: ......
Страница 15: ...a and the chapter Using your notebook for the first time before putting your notebook into operation and switching it on for the first time When cleaning the device please observe the relevant notes i...
Страница 16: ...n the menu Start Control Panel Performance and Maintenance Power Options Travelling with your notebook Please follow these guidelines when travelling with your notebook Before you travel Back up impor...
Страница 17: ...ices from the power socket Disconnect the mains adapter cable and the data cables for all external devices Close the LCD screen so that it locks into place To protect against damaging jolts and bumps...
Страница 18: ......
Страница 19: ...uilt in battery You can increase the battery s life by enabling the system s energy saving functions When you use your notebook in your home or office we recommend you use the mains adapter instead of...
Страница 20: ...ippery surface Please note that the rubber feet may mark certain types of surfaces Keep other objects 100 mm away from the notebook and its mains adapter to ensure adequate ventilation Never cover the...
Страница 21: ...ins outlet using the mains adapter During installation the notebook may only be rebooted when you are requested to do so Your operating system is pre installed on the hard disk to facilitate the proce...
Страница 22: ......
Страница 23: ...xternal devices chapter for instructions on how to connect devices such as a mouse and a printer to the notebook Please take note of the information in the Important notes chapter Switching on the not...
Страница 24: ...Turn off Computer If the notebook is not switched off automatically press the ON OFF switch 1 for approx five seconds Lower the LCD panel 2 Status indicators The status indicators provide information...
Страница 25: ...battery is empty Drive indicator The indicator lights up one of the drives e g hard disk CD DVD is being accessed Power on indicator The indicator lights up blue The notebook is switched on The indica...
Страница 26: ...functions are mapped with key combinations The following description of keys refers to Windows Additional functions supported by the keys are described in the relevant manuals supplied with your appli...
Страница 27: ...n Shift key The Shift key causes uppercase characters to appear In the case of overlay keys the character printed on the upper left of the key appears when that key is pressed Fn Fn key The Fn key ena...
Страница 28: ...Lock indicator is lit see Status indicators section Key combinations The following description of key combinations refers to functions when using Microsoft Windows Some of the following key combinatio...
Страница 29: ...tness This key combination decreases screen brightness Fn F6 Switching the loudspeakers on off This key combination switches your notebook s loudspeaker off and on Fn F7 Reducing the volume This key c...
Страница 30: ...itching between open applications With this key combination you can switch between several open applications Ctrl Alt Del Carrying out a warm boot This key combination triggers a reset and warm boots...
Страница 31: ...n or off Silent Mode whisper mode This key reduces the speed of the fan i When the Silent Mode is switched on the processor and graphics do not operate at the full performance level Multimedia This ke...
Страница 32: ...heavy objects e g books on the touchpad or the touchpad buttons Moving the pointer Move your finger on the touchpad The pointer will move accordingly Selecting an item Move the pointer to the item yo...
Страница 33: ...4 SXGA 1400 x 1050 WXGA 1440 x 900 UXGA 1600 x 1200 WSXGA 1680 x 1050 WUXGA 1920 x 1200 The screen resolution of the LCD monitor of your notebook is optimally set at the factory Permanently unlit or l...
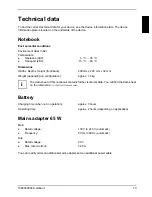
Страница 34: ...tures The life of the battery is dependent on its proper storage the number of charging discharging cycles and the operating temperature of the notebook Charging caring for and maintaining the battery...
Страница 35: ...long periods remove them from the notebook Never store batteries in the unit Monitoring the battery charging level With the battery charging indicator you can check the remaining battery capacity see...
Страница 36: ...screen so that it locks into place Disconnect all cables connected to the notebook Turn your notebook over and place it on a stabile sturdy flat surface If necessary lay an anti slip cloth on this su...
Страница 37: ...errupt your connection When you are finished working with your notebook we advise you to come out of an energy saving mode and then turn off as normal Never turn off your notebook while it is in an en...
Страница 38: ...ng or removing an ExpressCard Make sure that no foreign objects enter the ExpressCard slot Installing ExpressCard 1 2 Press the placeholder for the ExpressCard 1 so that it jumps out of the slot sligh...
Страница 39: ...on on the ExpressCard for driver installation instructions You should also read the help files supplied on CD the information provided for the ExpressCard driver or the information provided by the ope...
Страница 40: ...he ExpressCard 1 so that the ExpressCard jumps out of the slot slightly Pull the ExpressCard 2 out of the slot Insert the placeholder for the ExpressCard into the slot guide Gently slide the placehold...
Страница 41: ...ecure Digital SD Card MultiMediaCard MMC Memory Stick Memory Stick pro Sony i Please read the documentation supplied with the memory card for any special instructions Inserting memory card Carefully p...
Страница 42: ...notebook 2 Hard disk The hard disk is the most important storage medium of your notebook You can work considerably faster and more efficiently if you copy applications and files from CDs DVDs to your...
Страница 43: ...um of 700 Mbyte of data a virtually unlimited number of times This means the data can be deleted and changed DVD DVD ROM and DVD video Abbreviation for Digital Versatile Disc or Digital Video Disc A D...
Страница 44: ...esired CDRW DVD combo drive You can read all CD DVD types specified above with the CDRW DVD combo drive You can also write CD Rs and CD RWs Please ask your local computer store for assistance if you a...
Страница 45: ...al data storage devices You can also write CD Rs CD RWs DVD Rs DVD RWs DVD Rs DVD RWs and DVD R DLs Please ask your local computer store for assistance if you are not sure which CD or DVD type suits b...
Страница 46: ...ebook must be switched on 2 1 Push the insert eject button 1 The drive tray will open Gently pull the drive tray 2 completely out Place the CD DVD in the drive tray with the label facing upwards or Ta...
Страница 47: ...the event of a power failure or damage to the drive it may be necessary to manually remove the CD DVD Switch the notebook off 1 2 Press a pen or a piece of wire e g a paperclip firmly into the openin...
Страница 48: ...five times to play back corresponding DVD films Then the last regional code selected is retained and cannot be changed again i If a DVD film is to be watched in all regions it has the regional code 0...
Страница 49: ...ble to the modem port of the notebook 1 Connect the modem cable to your telephone wall socket 2 i Please note that the telephone line is busy and that you cannot use your telephone if the modem cable...
Страница 50: ...Ethernet LAN 10 100 Mbps With the LAN module you can establish a connection to a local network LAN Local Area Network 1 2 Connect the LAN cable to the LAN port of the notebook 1 Connect the LAN cable...
Страница 51: ...e CD provided in order to use all functions of Bluetooth 1 Press the key to switch wireless LAN Bluetooth on or off 1 The Wireless LAN Bluetooth indicator lights up when wireless LAN Bluetooth is acti...
Страница 52: ...radio components provided in the Safety manual Bluetooth must already have been switched on using the Easy Launch key Switching wireless LAN on off Press the key combination Fn F2 to switch wireless L...
Страница 53: ...a note of the passwords and keep them in a safe place The user password cannot be set on all systems If you forget your passwords you will need to contact the help desk Passwords are not covered by y...
Страница 54: ...Make a note of the passwords and keep them in a safe place If you forget your supervisor password you will not be able to access your notebook Passwords are not covered by your warranty and a charge w...
Страница 55: ...e Enter key With Enter new Password you are then requested to enter a password Enter the password and press the Enter key With Confirm new Password you are asked to confirm the password Enter the pass...
Страница 56: ...you must have assigned the supervisor password in the BIOS Setup Utility see the section Setting supervisor and user password Setting access authorization to the BIOS Setup Utility If you have forgot...
Страница 57: ...ct Enabled and press the Enter key If you do not want to make any other settings you can exit BIOS Setup Utility Select the Exit Saving Changes option under Exit Your notebook will now restart and you...
Страница 58: ......
Страница 59: ...ices to your notebook Connecting devices to notebook 1 Turn off your notebook and all external devices 2 Unplug your notebook and all devices from the mains sockets 3 Connect the cables for your exter...
Страница 60: ...edition 1 Ports 10 11 12 1 2 3 4 5 6 7 8 9 1 USB port 2 S Video out socket 3 DC jack DC IN 4 FireWire port 5 DVI I connector 6 Modem port 7 USB ports 8 Microphone port Line In 9 Headphone port SPDIF...
Страница 61: ...Settings Advanced Monitor Now select the Adapter tab Adjust the refresh rate and click Apply If the refresh rate set is too high the monitor may be damaged Please see the documentation included with y...
Страница 62: ...ok i If you purchase a cable from a retailer please note the following information The headphones SPDIF port on your notebook is a 3 5 mm jack socket If you want to connect headphones or loudspeakers...
Страница 63: ...den connector Connectors Port Pin configuration 1 2 3 4 Position 1 2 3 4 Meaning Y retur C retur Y C Activating television set Select the monitor type in the menu Start Control Panel Appearance and Th...
Страница 64: ......
Страница 65: ...rds and components Switch the notebook off and pull the power plug out of the mains socket Remove the battery Take care when you use the locking mechanisms on the battery and any other component Never...
Страница 66: ...d disk Switch the notebook off and pull the power plug out of the mains socket Close the LCD screen so that it locks into place Disconnect all cables connected to the notebook Turn your notebook over...
Страница 67: ...3 Remove the screws 1 Pull the hard disk by the pulling aids in the direction of the arrow 2 Remove the hard disk from the hard disk tray in the direction indicated by the arrow 3 1 1 1 1 2 Loosen th...
Страница 68: ...lockwise or anti clockwise The hard drive frame must be attached to the hard drive with 2 screws on either side 2 2 2 2 1 Slide the hard disk 1 into the hard disk carrier Fasten the hard disk carrier...
Страница 69: ...tion 1 59 2 2 2 2 2 1 1 Position the cover on its slot in the direction of the arrow 1 Fasten the cover with the screws 2 Install the battery see Inserting battery Turn the notebook over and place it...
Страница 70: ...objects do not fall into the memory extension compartment The memory modules are located in a larger service compartment You must open the entire service compartment when removing and installing a mem...
Страница 71: ...Removing and installing components during servicing 10600690568 edition 1 61 Removing cover 1 1 1 1 1 2 2 Remove the screws 1 Remove the cover off the notebook in the direction of the arrow 2...
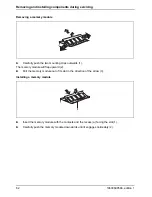
Страница 72: ...the two mounting clips outwards 1 The memory module will flap upward 2 Pull the memory module out of its slot in the direction of the arrow 3 Installing a memory module 1 2 a Insert the memory module...
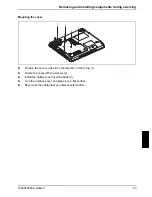
Страница 73: ...Mounting the cover 2 2 2 2 2 1 1 Position the cover on its slot in the direction of the arrow 1 Fasten the cover with the screws 2 Install the battery see Inserting battery Turn the notebook over and...
Страница 74: ......
Страница 75: ...such as interfaces keyboard and hard disks Security For security settings such as the password Boot For specifying the start order Info For displaying the system configuration e g processor and memor...
Страница 76: ...to save The Exit menu offers the following options You must mark the required option and activate it with the Enter key Exit Saving Changes Select Exit Saving Changes and Yes to save the current setti...
Страница 77: ...eceiving the notebook Any changes you have made to the BIOS Setup settings after receiving the notebook Your system configuration and all peripheral devices connected to your system Your sales contrac...
Страница 78: ...ve to restore Windows XP on your computer This can take a few minutes 5 After the relevant files have been loaded the Windows XP Home Edition Setup menu appears Press Enter to continue 6 The setup pro...
Страница 79: ...the bottom right hand corner of the screen 17 Click on Finish in the bottom right hand corner of the screen Windows XP completes the installation process 18 Remove the Recovery CD ROM from the CD DVD...
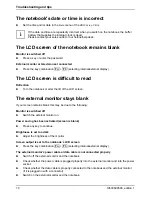
Страница 80: ...alter the tilt of the LCD screen The external monitor stays blank If your screen remains blank this may be due to the following Monitor is switched off Switch the external monitor on Power saving has...
Страница 81: ...correct monitor under Start Control Panel Appearance and Themes Display Settings Advanced Display The notebook cannot be started The battery is not installed correctly Switch the notebook off Check wh...
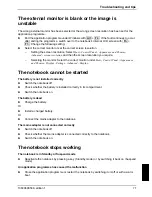
Страница 82: ...ure freeze when playing some DVD films deactivate the accelerated hardware decryption it is activated in the default setting this can be recognised from the checkmark in the corresponding checkbox Ope...
Страница 83: ...ck 299 mm x 220 mm x 32 mm Weight depending on configuration approx 1 8 kg i The data sheet of this notebook contains further technical data You will find the data sheet on the internet at www fujitsu...
Страница 84: ......
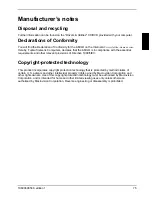
Страница 85: ...essential requirements and other relevant provisions of Directive 1999 5 EC Copyright protected technology This product incorporates copyright protection technology that is protected by method claims...
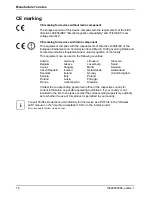
Страница 86: ...ollowing countries Austria Germany Lithuania Slovenia Belgium Greece Luxemburg Spain Cyprus Hungary Malta Sweden Czech Republic Iceland Netherlands Switzerland Denmark Ireland Norway United Kingdom Es...
Страница 87: ...speakers 3 Built in microphone 3 C Caps Lock indicator 15 Case of service 55 CD blank 35 CD DVD emergency removal 37 inserting 36 overview 33 removing 36 working with 35 CD DVD drive 3 33 AutoPlay fun...
Страница 88: ...eadphones port 3 Headphones connecting 52 High speed devices connecting 53 I Important notes 5 Indicator Caps Lock 15 drives 15 hard disk drive indicator 15 Num Lock 15 18 wireless LAN 15 Internet Eas...
Страница 89: ...Multimedia Easy Launch key 21 MultiMediaCard 31 N Notational conventions 2 Notebook before you travel 6 cleaning 7 first time setup 9 not starting 71 ON OFF switch 3 operating 13 setting up 10 stops...
Страница 90: ...isation screen display 24 System protecting with password 46 System configuration 65 System settings BIOS Setup Utility 65 T Technical data 73 battery 73 mains adapter 90 W 73 Time daylight savings 70...