background image

7

 1

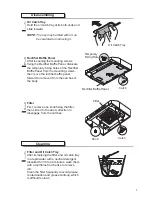
Oil Catch Tray
Hold the oil catch tray at its both ends and
slide forward.

NOTE: The tray may be filled with oil, so

be careful when removing it.

 2

Rectifier Baffle Panel
After loosening the mounting screws
fixing the Rectifier Baffle Panel, dislocate
the temporary fixing holes of the Rectifier
Baffle Panel from the mounting screws,
then move the rectifier baffle panel
forward to remove it from the catches of
the body.

 3

Filter
First, remove one knob fixing the filter,
then slide it to the arrow direction to
disengage from the catches.

Disassembling

 1

Filter and Oil Catch Tray
After immersing the filter and oil catch tray
in a tepid water with a neutral detergent
dissolved for 30 to 40 minutes, wash them
with a toothbrush or the like to remove
dirt.
Clean the filter frequently to avoid grease
contamination and grease build-up, which
is difficult to clean.

Cleaning

Oil Catch Tray

Rectifier Baffle Panel

Catch

Temporary
Fixing Hole

Filter

Knob

Catch

Содержание FSR-3000S

Страница 1: ...re reference FUJI INDUSTRIAL CO LTD TABLE OF CONTENTS Safety Instructions 2 Name of Parts 4 How to Use 5 Operating the Range Hood 5 Care and Maintenance 6 Disassembling 7 Cleaning 7 Re assembling 8 Replacing the Light Bulb 8 Requesting Service 9 Prior to Requesting Service 9 Inspection Label 9 Specifications 10 Circuit Diagram 10 Parts List 11 Warranty 12 ...

Страница 2: ...e panel 2 TO REDUCE THE RISK OF A RANGE TOP GREASE FIRE a Never leave surface units unattended at high settings Boilovers cause smoking and greasy spillovers that may ignite Heat oils slowly on low or medium settings b Always turn hood ON when cooking at high heat or when cooking flaming foods c Clean ventilating fans frequently Grease should not be allowed to accumulate on fan or filter d Use pro...

Страница 3: ...t be using the range hood for a long period If you do not do so damage to the electrical insulation may result 5 Fasten the filter and other parts securely Incorrect attachment may result in personal injury or damage to property 1 For General Ventilating Use Only Do not use to exhaust hazardous or explosive material and vapors 7 To protect hands from injury from the edges of the sheet metal wear w...

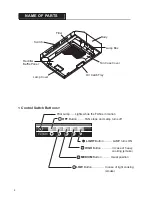
Страница 4: ...atch Tray Pilot Lamp Lights while the FAN is in motion LIGHT Button LAMP turns ON Control Switch Buttons Switch OFF Button FAN stops and Lamp turns off LOW Button In case of light cooking smoke HIGH Button In case of heavy cooking smoke NAME OF PARTS MEDIUM Button Usual position ...

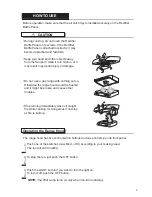
Страница 5: ... a gas range with nothing put on Otherwise the range hood would be heated and it might be broken and cause other troubles Stop running immediately when oil caught fire while cooking It s dangerous if not stop as fire is built up HOWTO USE CAUTION The range hood has five control switch buttons and one pilot lamp on its front panel 1 Push one of the switches Low Med or Hi according to your cooking n...

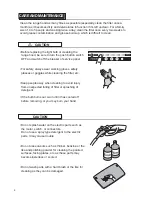
Страница 6: ...oves safety glasses or goggles while cleaning the filter etc Keep people away when cleaning to avoid injury from unexpected falling of filter or splashing of detergent If the bulb burns out wait until it has cooled off before removing or you may burn your hand Do not splash water on the electric parts such as the motor switch or connectors Do not use a spray type detergent to the electric parts It...

Страница 7: ...ard to remove it from the catches of the body 3 Filter First remove one knob fixing the filter then slide it to the arrow direction to disengage from the catches Disassembling 1 Filter and Oil Catch Tray After immersing the filter and oil catch tray in a tepid water with a neutral detergent dissolved for 30 to 40 minutes wash them with a toothbrush or the like to remove dirt Clean the filter frequ...

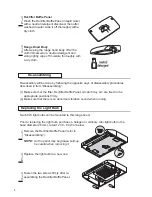
Страница 8: ...t off thoroughly with a dry cloth 3 Range Hood Body After wiping the range hood body off with a cloth immersed in a neutral detergent and wring tightly wipe off moisture thoroughly with a dry cloth 1 Remove the Rectifier Baffle Panel refer to Disassembling NOTE As the panel may be grease built up be careful when removing it 2 Replace the light bulb to a new one 3 Fasten the two screws firmly after...

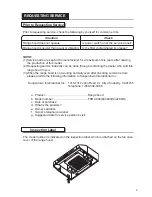
Страница 9: ...ng the dealer who sold this range hood to you 3 When the range hood is not working normally even after checking common errors please provide the following information to Sunpentown International Inc Sunpentown International Inc 1310 1312 John Reed Ct City of Industry CA91745 Telephone 1 800 330 0388 a Product Range hood b Model number FSR 3000 S 3600 S 4200 S c Date of purchase d What is the probl...

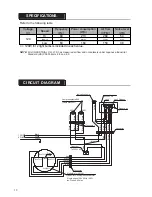
Страница 10: ...itor 7µF 250VAC Gray Gray Gray Red White Model No 1U201361 Capacitor Running Induction Motor Single phase 120V 60Hz 100W Ins Class A 4 Poles Main Coil 3 Main Coil 2 Main Coil 1 Thermal Cutoffs Auxiliary Coil Refer to the following table NOTE FUJI INDUSTRIAL CO LTD has measured air flow and noise levels under Japanese Industrial Standard JIS C9603 items 8 8 and 8 9 Voltage V Speed Frequency Hz Powe...

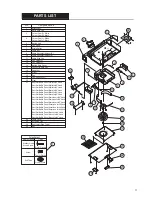
Страница 11: ...nel Black for36 Hood Rectifier Baffle Panel Black for30 Hood Rectifier Baffle Panel White for42 Hood Rectifier Baffle Panel White for36 Hood Corner Cap L Black Corner Cap L White Corner Cap R Black 1 Six 6 Pieces Washer Head Wood Screw One 1 Piece Soft Tape Attachment Figure Name of parts Two 2 Pieces Screw Attachment Duct Joint Pipe Type Oil Catch Tray Lamp Cover Rectifier Baffle Panel White for3...

Страница 12: ...ISING OUT OF OR IN CONNECTION WITH PRODUCT USE OR PERFORMANCE Some states do not allow the exclusion of incidental or consequential damages In that case the above limitation may not apply to you This warranty gives the original purchaser consumer specific legal rights and there may also be other rights that vary from state This warranty supersedes all prior warranties To qualify for warranty servi...

Страница 13: ...FSR 3000 S FSR 3600 S FSR 4200 S 1U020781 2 4 5 5 6 7 7 8 8 9 9 9 10 10 11 12 ...

Страница 14: ...2 4 5 6 1 a b 2 a b c d 3 a b c d 1 ABC 2 3 4 ...

Страница 15: ...3 1 2 3 4 6 5 7 ...

Страница 16: ...4 ...

Страница 17: ...5 5 1 1 2 3 ...

Страница 18: ...6 ...

Страница 19: ...7 1 2 3 1 30 40 ...

Страница 20: ...8 1 2 2 3 1 2 3 2 60W 26mm 120V 60W ...

Страница 21: ...9 1 6 2 3 a b FSR 3000 S 3600 S 4200 S c d e f g Sunpentown International Inc 1310 1312 John Reed Ct City of Industry CA91745 1 800 330 0388 ...

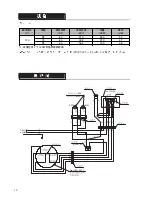
Страница 22: ...10 120V 60Hz E26 60W 60W 60W AC125V 3A 7µF 250VAC No 1U201361 駆協窮儿 V 距堀 駆協撞楕 Hz 債孔楕 W 欠楚 CFM 夐蕗 dB 互 60 213 260 54 嶄 60 189 210 47 120 詰 60 164 150 38 光峙淫凄 2 倖 120W 菊倒議 債孔楕 JIS C9603 8 8 8 9 ...

Страница 23: ...11 25 16 15 8 24 23 22 22 21 20 19 18 17 12 14 13 11 11 10 9 8 7 6 5 4 3 2 1 6 1 42 36 30 42 36 30 42 36 30 42 36 30 42 36 2 30 25 24 23 22 21 20 19 18 17 16 15 14 13 12 11 10 9 8 7 6 5 4 3 2 1 No ...

Страница 24: ...1U020781 1310 1312 John Reed Ct City of Industry CA91745 1 800 330 0388 Sunpentown 1 2 1 Sunpentown Sunpentown International Inc 1310 1312 John Reed Ct City of Industry CA91745 1 800 330 0388 2 3 ...

Отзывы: