background image

6

Clean the range hood as many times as possible (especially, clean the filter once a
month) as it becomes dirty and deteriorates in function if it’s left unclean. For a family
size of 4 to 5 people and cooking twice a day, clean the filter once every two weeks to
avoid grease contamination and grease build-up, which is difficult to clean.

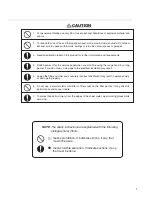
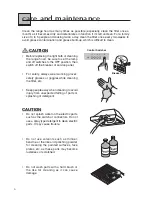
CAUTION

Before replacing the light bulb or cleaning
the range hood, be sure to set the lamp
and off switches to the OFF position, then
switch off the breaker of service panel.

For safety, always wear working gloves,
safety glasses or goggles while cleaning
the filter, etc.

Keep people away when cleaning to avoid
injury from unexpected falling of parts or
splashing of detergent.

CAUTION

Do not splash water on the electric parts
such as the switch or connectors. Do not
use a spray type detergent to clean electric
parts. It may cause trouble.

Do not use solvents such as thinner,
benzine or the like and polishing powder
for cleaning the painted surfaces, face
plates, etc. as these parts may become
lusterless or scratched.

Do not wash parts with a hard brush or
the like for cleaning as it can cause
damage.

care and maintenance

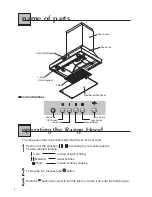
Control Switches

Breaker

Содержание ECW-300

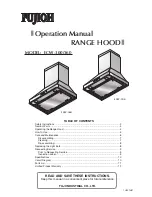
Страница 1: ...s 2 Name of Parts 4 Operating the Range Hood 4 How to Use 5 Care and Maintenance 6 Disassembling 7 Cleaning 7 Re assembling 8 Replacing the Light Bulb 8 Requesting Service 9 Prior to Requesting Service 9 Inspection Label 9 Specifications 10 Circuit Diagram 10 Parts List 11 Limited Product Warranty 12 Operation Manual RANGE HOOD ECW 360 ECW 300 MODEL ECW 300 360 ...

Страница 2: ...ISK OF A RANGE TOP GREASE FIRE a Never leave surface units unattended at high settings Boilovers cause smoking and greasy spillovers that may ignite Heat oils slowly on low or medium settings b Always turn hood ON when cooking at high heat or when flambeing foods i e Crepes Suzette Cherries Jubilee Peppercorn Beef Flambe c Clean ventilating fans frequently Grease should not be allowed to accumulat...

Страница 3: ... filter and other parts securely Incorrect attachment may result in personal injury or damage to property 1 For general ventilating use only Do not use to exhaust hazardous or explosive material and vapors 7 To protect hands from injury from the edges of the sheet metal wear working gloves while servicing means prohibition It indicates actions if any that mustn t be done means forcible execution I...

Страница 4: ...od has five control switch buttons on its front cover 1Push one of the switches according to your cooking need The fan will start rotating Low In case of light cooking Medium Usual position High In case of heavy cooking 2To stop the fan just push the button 3Push the button if you want to turn the light on To turn it off push the button again operating the Range Hood Control Switches ...

Страница 5: ...ectly it may become detached and fall down Do not touch the lamps or their peripheral areas when they are ON or your hand may be burned as they get overheated Do not use a gas range with nothing on the burners Otherwise the range hood could become overheated and it might be a cause of failure Stop running the range hood immediately if a fire occurs while cooking Continued operation of the range ho...

Страница 6: ...ker of service panel For safety always wear working gloves safety glasses or goggles while cleaning the filter etc Keep people away when cleaning to avoid injury from unexpected falling of parts or splashing of detergent CAUTION Do not splash water on the electric parts such as the switch or connectors Do not use a spray type detergent to clean electric parts It may cause trouble Do not use solven...

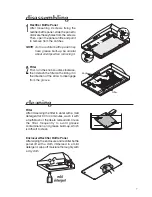
Страница 7: ...rn the knob counter clockwise then detach the filter with sliding it in the direction of the arrow to disengage from the groove cleaning Filter After immersing the filter in water with a mild detergent for 30 to 40 minutes wash it with a toothbrush or the like to remove dirt Clean the filter frequently to avoid grease contamination and grease build up which is difficult to clean Enclosure Rectifie...

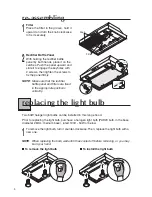
Страница 8: ... has cooled off before removing or you may burn your hand To remove the light bulb To install the light bulb re assembling 1 Filter Place the filter in the groove hold it upward and turn the knob clockwise to fix it securely 2 Rectifier Baffle Panel With holding the rectifier baffle panel by both hands place it on the catches Push the panel upward and slide it to engage the keyholes with 2 screws ...

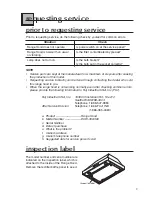
Страница 9: ...stensen Rd Ste 212 Seattle WA 98188 3403 Telephone 1 888 547 9880 After Service Division Telephone 1 866 FUJI IND 1 866 385 4463 a Product Range Hood b Model Number ECW 300 360 c Serial Number d Date of purchase e What is the problem f Owner s address g Owner s telephone number h Suggested date for service person s visit Situation Check Range Hood does not operate Is power switch on at the service...

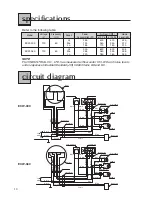
Страница 10: ...e White White White White Green Blue Blue Brown Brown Black Black Black Black Black White Black Black Grey Grey Grey Yellow Yellow Yellow Pilot Lamp Lamp Lamp Fan Switch Lamp Switch Capacitor Capacitor circuit diagram Hi 255 430 410 52 0 ECW 300 120 60 Me 190 260 240 41 0 Lo 155 170 150 31 0 Hi 330 620 600 50 5 ECW 360 120 60 Me 255 360 350 39 5 Lo 220 180 160 25 0 Refer to the following table NOT...

Страница 11: ...ctifier Baffle Panel Exhaust Pipe Unit Mounting Bracket Outer Duct Inner Duct Attachment 10 11 12 13 14 15 16 17 15 16 14 13 1 13 15 16 14 1 10 8 2 7 6 5 9 4 3 11 10 8 2 7 6 5 4 9 3 11 12 12 ECW 300 ECW 360 Parts Name Parts Name Attachment Name of parts Figure Two 2 Pieces Four 4 Pieces Screw M4 10 Screw M5 1 45 Two 2 Pieces Wood Screw M4 5 45 17 parts list ...

Страница 12: ...ome states do not allow the exclusion of incidental or consequential damages In that case the above limitation may not apply to you This warranty gives the original purchaser consumer specific legal rights and there may also be other rights that vary from state This warranty supersedes all prior warranties To qualify for warranty service first 1 Notify Fujioh at the address shown below or telephon...

Отзывы: