background image

5

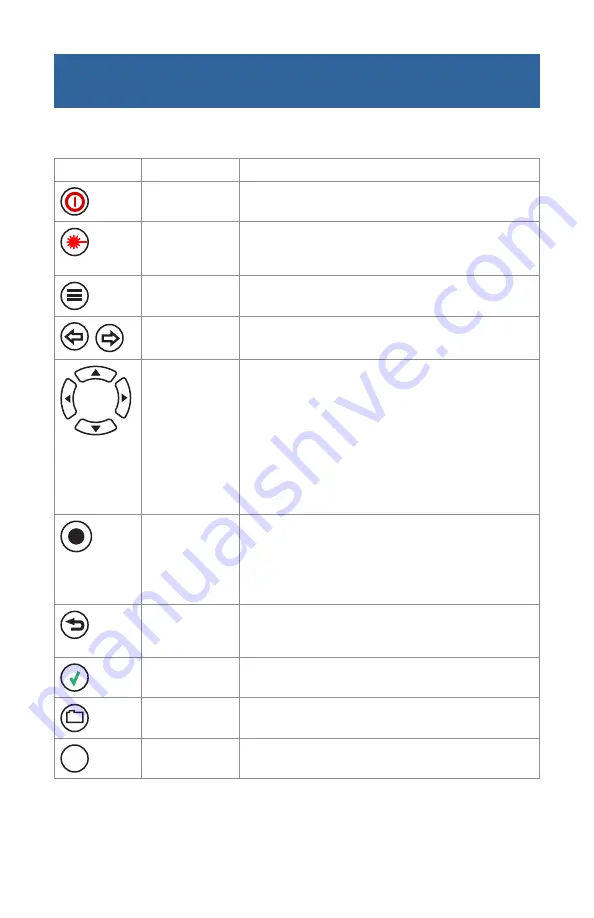
Getting Started: M200 Keys

The use of each key is summarized in the table below.

Key Symbol

Key Name

Key Function

Power

Press and hold (approx. 1 sec.) to turn the M200 on or off.

VFL laser

ON 2Hz

 - Press and hold (approx. 2 sec.) LED will flash

ON CW

 - Press and hold (approx. 4 sec.) LED will be solid

OFF

 - Press and hold (approx. 1 sec.) LED should be OFF

Menu

Press to access the Main Menu.


Left and Right 

Tab keys

Press to display the next/previous available Menu Tab or 

View Tab.

Arrow keys 

(Navigation Keys)

The arrow keys provide several functions as follows:

• In the Main Menu, these keys are used 

to navigate menus and change setup 
parameters.

• In the Trace Page, the Left and Right arrow 

keys are used to move cursors.

• In the Zoom Adjust Page, these keys are 

used to change horizontal and vertical 
zoom levels.

Select

This key provides several functions as follows: 

• In the Main Menu, press this key to display 

a submenu (if available)

.

• In the Trace Page, press this key to toggle 

between [A] and [B] cursor.

Back

Press once to return to the previous menu.

Press one or more times, depending on which menu or 

editor submenu is displayed, to return to the Home page.

Test

Press to start or stop a test.

Save

Press to save the currently displayed test results.

Soft keys

The label shown on the display above each key indicates 

the current use of each function key.

Содержание AFL NOYES M200

Страница 1: ...T e s t I n s p e c t i o n M200 Handheld OTDR User s Guide ...

Страница 2: ...s resulting from the following Unauthorized repair or modification Misuse negligence or accident CE Information These instruments have been designed and tested to comply with the relevant sections of any applicable specifications including full compliance with all essential requirements of all applicable EU Directives Returning Equipment To return equipment please contact Noyes to obtain additiona...

Страница 3: ...3 Set up File Menu Settings 14 Running Tests Viewing Results 15 Trace Page Features 16 Trace Page Features 17 Zoom Adjust View 18 Event Table Summary Results 19 Fault Locating Full Auto 20 Two Point A B Measurement 20 Text Editor 21 Numerical Editor 21 Transferring Files 22 Specifications 23 Recommended Accessories 24 Cleaning Tips 25 FAQs 26 Tips 26 Recharging Batteries 27 View Version Informatio...

Страница 4: ... a voltage that is different from that for which the AC adapter is rated Do not plug the unit into a power outlet that is shared by other devices Never modify the power cord or excessively bend twist or pull it Do not allow the power cord to become damaged Do not place heavy objects on the power cord or expose it to heat Never touch the AC adapter while your hands are wet Should the power cord bec...

Страница 5: ...hese keys are used to navigate menus and change setup parameters In the Trace Page the Left and Right arrow keys are used to move cursors In the Zoom Adjust Page these keys are used to change horizontal and vertical zoom levels Select This key provides several functions as follows In the Main Menu press this key to display a submenu if available In the Trace Page press this key to toggle between A...

Страница 6: ...Features Menu View Trace View Battery icon fully charged Results area Soft key labels Charging battery icon is displayed when the AC adapter charger is connected to the M200 Main Menu tabs Page header Menu area Test Viewer tabs ...

Страница 7: ...le options Select Display a submenu or editor Back Return the previous menu Press Select key to display submenu which allows setting Time Press Select key to display Touch Panel calibration screen Press Select key to display submenu which allows setting Date Press Left Right arrow key to select units of measure Press Left Right arrow key to toggle the Beeper function Set up General Settings ...

Страница 8: ... OTDR operation In the Full Auto mode OTDR parameters such as Range Pulse Width and Averaging Time are set automatically In addition Full Auto tests always include an Event Table and Summary Page Live This is the best mode for real time troubleshooting Note that the Wavelength setting can only be set to individual wavelengths Expert This mode is available for experienced users It provides the most...

Страница 9: ...measure the loss of the first connection Receive Cable Tail Cord A test cable used to terminate the far end of the link under test that is long enough for the OTDR to measure the loss of the last connection Display editor submenu to set the length of the Receive Cable used Press Select key to display editor submenu which allows setting the length of the Launch Cable used If set to User display sub...

Страница 10: ...e Left Right arrow key to display the desired value Set Up Live Mode Settings In addition to Core Settings the Live mode allows you to set the Wavelength and Range parameters If set to Auto the M200 will set the Range Pulse Time and Filter If set to Manual you will need to set Range Pulse Time and Filter Choose a single wavelength or dual wavelengths for your test port selected Press Left Right ar...

Страница 11: ...m 0 82 ft 8 km 26246 ft 0 5 m 1 64 ft 16 km 52493 ft 1 m 3 28 ft 32 km 104986 ft range 1600 m range 5249 ft SM 1310 SM 1550 SM 1310 1550 4 km 13123 ft 0 25 m 0 82 ft 8 km 26246 ft 0 5 m 1 64 ft 16 km 52493 ft 1 m 3 28 ft 32 km 104986 ft range 1600 m range 5249 ft Pulse Width The M200 can operate using different pulse widths Short pulse widths provide the shortest event and attenuation dead zones L...

Страница 12: ...ess to display Tools pop up menu Press to open the selected folder List of saved files and folders File Manager Keys used Key Symbol Key Name Key Function Up Down Arrows Navigate up down the list of folders and files Left Right Arrows Left move to the top of the folder file list Right move to the bottom of the folder file list Open Soft key Make the selected folder current Back Return the previous...

Страница 13: ...me Page by pressing the Files soft key Save After completing a test press Save key to save file in current folder with name established in the set up process Save As To change the folder or file name after a test has been completed go to the File tab and make changes Once satisfied press the save key Saving a File ...

Страница 14: ...85 1550 nm single mode S15 1300 nm multimode M13 Set Folder File name and Folder location where the next trace file will be saved Set up File Menu Settings Display submenu to define Folder name Press Left or Right arrow key to display the desired file Name Format Display submenu to define Near Location Display submenu to define Far Location Display submenu to define Cable Name Format Cable3004_001...

Страница 15: ...sed Page icon Page name Description Trace Page Displays OTDR trace setup A B cursors Loss and Distance between A B cursors Event Page Displays OTDR trace Event location type reflectance and insertion loss Summary Page Displays OTDR trace Link Length ORL and insertion loss File Information Page Displays file and fiber setup parameters of the currently displayed trace Running Tests Viewing Results T...

Страница 16: ...10 1 2 3 4 5 6 8 7 Trace Page Features Key definitions Move cursor Horizontal Zoom Left Move cursor Right A B cursor select Horizontal Zoom Active cursor is bold B inactive cursor is dashed A For dual wave tests press to toggle the displayed test results ...

Страница 17: ...shown on the display above each key indicates the current use of each function key 6 Wavelength field Displays test wavelengths of the currently displayed trace For the dual wavelength test 850 1300 nm or 1310 1550 nm press the Wave soft key to toggle between the 850 nm and 1300 nm test results or between the 1310 nm and 1550 nm test results respectively Note the Highlight box around the wavelengt...

Страница 18: ...18 Zoom Adjust View Unzoom Rezoom Keys definitions Zoom Adjust View Press to Unzoon Rezoom Active cursor Horizontal Zoom Vertical Zoom Vertical Zoom A B cursor select Horizontal Zoom ...

Страница 19: ...In the Event Table or Summary Page press the Calc soft key if no Event Table or Summary Page was created Or press the Re Calc soft key to generate a new Event Table or Summary Page if you changed the GIR or BC Event Icon Event Type Start of Fiber Under Test End of Fiber Under Test Reflective Event Non Reflective Event Gainer Multiple Event Event Icons and Types ...

Страница 20: ...ent where the trace returns to a constant slope Read the insertion loss Loss in dB measurement An OTDR trace shows relative power vs distance The insertion loss IL between any two points A to B on the optical fiber link under test equals the trace level at A minus the trace level at B To measure the end to end loss of a link use a launch and receive cable and put the A cursor before the first even...

Страница 21: ...lphanumeric characters Tap with stylus or use Arrow and Select keys Numerical Editor Parameter name Numeric Touch Pad Tap with stylus or use Arrow and Select keys Selection cursor Press when done Soft key labels Press when done Editable numeric field ...

Страница 22: ...older Installing the M200 USB Drivers and Using ActiveSync For information on installing the M200 USB Drivers and using ActiveSync please refer to our web site at www Afltele com select Noyes Test Inspection OTDRs M200 OTDR for drivers software and instructions From CompactFlash card or USB Flash drive to PC To transfer files from your M200 to a PC using your CF card or USB drive perform the follo...

Страница 23: ...le Transfer to PC USB Flash drive type 1 CompactFlash or Mini USB Cable w ActiveSync Visual Fault Locator Specifications Emitter Type Laser Safety Class Class II FDA 21 CFR 1040 10 1040 11 IEC 825 1 1993 EN60825 1 1994 Wavelength 650 nm Output Power nominal 0 8 mw General Specifications Size in boot 23 x 11 x 7 cm 8 8 x 4 3 x 2 8 inches Weight 0 9 kg 2 lb Operating Temperature 10 to 50 C Storage T...

Страница 24: ...iety of lengths and connector styles are available from AFL Telecommunications The table below will help you to select the right test jumpers or cables for your test To do the following test You will need the following accessories To connect your OTDR to the fiber link under test To terminate far end of the fiber link under test Fault locate find a break Measure link length Test Jumper 1 2 m typic...

Страница 25: ...aning the Exposed Ferrule two methods I Noyes Cleaning Procedure Lean a can of FCC2 back 30 press the button on FCC2 to fill the well Dip a CCTP stick into the well of the FCC2 to dampen the tip with optical cleaning fluid Place the damp tip over the ferrule to be cleaned Rotate the tip clockwise 10 revolutions while applying varying pressure to create a gentle pumping action where the tip contact...

Страница 26: ... up the location folder Internal CF or USB to save the file the file naming format and fiber number The fiber number will increment after each trace is saved Test in feet or meters If you know your fiber distances in feet it may be beneficial to measure distances to events faults in feet Fiber loss specifications are given in dB km Therefore it is often beneficial to measure fibers in meters kilom...

Страница 27: ...he UP Down arrow keys to highlight the View Version Information parameter Press the Select key to enter the Version Information Screen Note It is helpful to have the M200 version number if you need to contact Noyes Customer Service or Technical Support Unauthorized repair of the Noyes test equipment will void the warranty Calibration is recommended every 12 months Noyes Calibration department is i...

Страница 28: ...Thank you for choosing Noyes Test Inspection T e s t I n s p e c t i o n ...

Отзывы: