background image

20

EN

 Filter

 Adjusting/Processing Images (Eff ect)

~

Press the 

(Filter) button while shooting/playback 

screen is displayed.

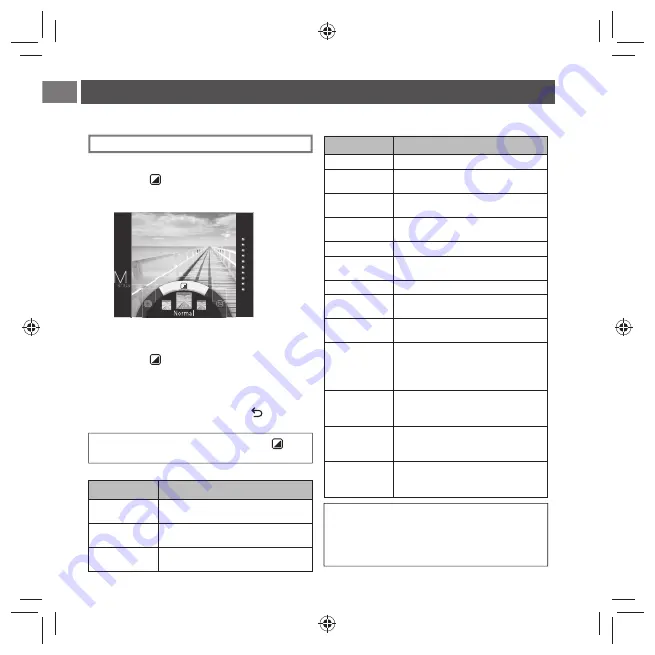
The screen below appears.

Ÿ

Use the command dial to select a filter.
For details on each filter see the table on the right.

!

Press the 

(Filter) button again.

The filter effect is applied to the image and returns 
to the previous screen.

•  You can also return to the previous screen by 

pressing the MENU/OK button or 

(back) 

button.

•  To cancel the filter effect, press and hold the 

(Filter) 

button.

Follow the steps below to select a filter.

You can select the image effects menu directly by pressing a button on the rear to adjust the image effect while the 
shooting/playback screen is displayed.


Filter eff ects you can use

Type

Details

Cornelius

Intensifies shadows and brightens 
highlights to the image.

Monochrome

Turns your image into basic 
monochrome.

Luna

Brightens the image and intensifies 
all colors.

Type

Details

Immerse

Adds saturation and shadows.

Amber

Desaturates and adds an aged look to 
the image.

Marmalade

Adds a strong red tint and a burnt 
edge to the image.

Martini

Smooths skin tones with a slight 
vintage feel.

Sepia

Strong taste of old school

Roppongi

Adds brightness and warmth to the 
image.

Highline

Intensifies shadows with a yellow tint.

Nostalgic
(still picture only)

Add a pale color effect with a soft feel to 
an image.

Skin Brightening
(still picture only)

Adds brightness to make your skin look 
more smooth and bright.

PARTIAL COLOR 
(RED)/(ORANGE)
(YELLOW)/(GREEN)
(BLUE)/(PURPLE)

Areas of the image that are the 
selected color are recorded in that 
color. All other areas of the image are 
recorded in black-and-white.

Retro 

*1

(movie shooting 
only)

Introduce a atmospheric retro feel to 
your movie.

Film Frame 

*1

(movie shooting 
only)

Add a film frame filter to your movie.

Sequence 

*1

(movie shooting 
only)

Create more dynamic images with a 
sequence filter.

*1    After the fi lter eff ect is applied to the movie, “Normal” 

is displayed as the applied filter on the LCD monitor. 
In addition, you cannot cancel the applied filter 
effect or apply another filter for movie shooting after 
shooting a movie.

instax̲BO-14̲14lang.indb   20

instax̲BO-14̲14lang.indb   20

8/21/2018   4:16:22 PM

8/21/2018   4:16:22 PM

Содержание instax SQUARE SQ20

Страница 1: ...PROLINE REFRIGERATEUR BRF40 FUJIFILM APP PHOTO INSTANTANE INSTAX SQ20 NOIR MANUEL D UTILISATION Besoin d aide Rendez vous sur votre communauté https sav darty com ...

Страница 2: ... problemas Precauções de segurança Руководство пользователя устранение неполадок меры предосторожности Guida per l Utente Risoluzione dei problemi Precauzioni per la sicurezza Gebruikershandleiding Probleemoplossing Veiligheidsmaatregelen Instrukcja obsługi Rozwiązywanie problemów Wskazówki bezpieczeństwa Uživatelská příručka Řešení potíží Bezpečnostní opatření Používateľská príručka Riešenie prob...

Страница 3: ...到 202 頁 한국어 203 242페이지를 참조하십시오 PORTUGUÊS Veja as páginas 243 a 282 РУССКИЙ См стр 283 322 ITALIANO Vedere le pagine da 323 a 362 NEDERLANDS Zie pagina s 363 tot 402 POLSKI Patrz strony od 403 do 442 ČESKY Viz strany 443 až 482 SLOVENČINA Pozrite si strany 483 až 522 MAGYAR Lásd 523 563 oldal instax BO 14 14lang indb 2 instax BO 14 14lang indb 2 8 8 2018 5 51 43 PM 8 8 2018 5 51 43 PM ...

Страница 4: ... and Playback 14 Taking a Picture 14 Viewing Images 15 Changing the Playback Display 15 Shooting a Movie and Playback 16 Shooting a Movie 16 Playing back Movies 17 Changing the number of images on the monitor 17 Printing 18 Adjusting Processing Images Effect 20 Filter 20 Adjusting the Brightness 21 Vignette 21 More on Photography 22 Using AF AE Lock 22 Using the Self Timer 22 Using the Flash 23 Ta...

Страница 5: ...e included in the package Read IMPORTANT SAFETY NOTICE Page 38 for safety use Ÿ Read this User s Guide before using the camera Supplied Accessories USB cable for charging 1 Hand strap 1 User s Guide 1 instax BO 14 14lang indb 4 instax BO 14 14lang indb 4 8 8 2018 5 51 43 PM 8 8 2018 5 51 43 PM ...

Страница 6: ...as household waste Instead it should be taken to an applicable collection point for the recycling of electrical and electronic equipment By ensuring this product is disposed of correctly you will help prevent potential negative consequences to the environment and human health which could otherwise be caused by inappropriate waste handling of this product The recycling of materials will help to con...

Страница 7: ...11 Back button 3 USB port 12 Print button 4 Reset button 13 MENU OK button 5 Micro SD card slot 14 Brightness button 6 Card slot cover 15 Film door 7 Filter button 16 Power switch Still picture Movie 8 Vignette button 17 LCD Monitor 9 Selector button Command dial 1 2 4 3 7 6 8 5 1 2 8 9 13 7 11 12 14 15 17 10 3 5 16 6 4 instax BO 14 14lang indb 6 instax BO 14 14lang indb 6 8 8 2018 5 51 43 PM 8 8 ...

Страница 8: ...y card is inserted the icon appears on the number If the number of available frames is under 10 the icon on the number turns red A remaining time is displayed while shooting a movie Using the selector buttons 1 6Move cursor up 2 8Move cursor left 3 7Move cursor down 4 9Move cursor right 5 Confirms selection Using the command dial Use the command dial on the following occasions Selecting a menu or ...

Страница 9: ...se the strap only as a shoulder strap Do not put the shoulder strap around your neck Be careful so that the shoulder strap does not obstruct the film ejection slot Attach the shoulder strap to the strap hook on each side as in the illustrations below Attaching the Shoulder Strap Purchased Separately Ÿ instax BO 14 14lang indb 8 instax BO 14 14lang indb 8 8 8 2018 5 51 46 PM 8 8 2018 5 51 46 PM ...

Страница 10: ... hub If the PC enters the sleep mode while charging is in progress charging will stop If you continue charging resume the PC and reconnect the USB cable You may not be able to charge the camera from a PC depending on your PC specifications settings or status Charging status indication Status While camera is on While camera is off While charging The icon appears on the lower right of the LCD monito...

Страница 11: ...the shutter button fully during the playback mode displays the shooting screen and changes to the shooting mode Indication Remaining battery life 8 Battery is partially discharged 0 Battery is more than half discharged Charging the battery is recommended Page 9 2 Battery level is low Charge as soon as possible Page 9 R When the battery level is low the icon appears on the lower right of the LCD mo...

Страница 12: ...utton or 9 The language is specified and the DATE TIME screen appears Specify the order then press the MENU OK button or 9 Select one of the orders below year month day month day year day month year The order is specified and the screen to specify the year month day hour and minute appears Specify the year month day hour and minute then press the MENU OK button or 9 Use 89to select an item year mo...

Страница 13: ...on Left Function Shutter button Shutter button Shutter button Shooting mode switching button Shutter button OFF Shooting mode switching button Shutter button OFF Shutter button When you shoot a movie Shutter button Right Shutter button Left Function Shutter button Shutter button Shutter button OFF OFF Shutter button By default shutter button function is assigned to both of the shutter buttons Use ...

Страница 14: ...he camera works to eject a film even though the film pack is not loaded For details refer to the instructions and warnings on FUJIFILM Instant Film instax SQUARE Hold both sides of the film pack align the bottom of the film pack on the groove of the film chamber 1 then insert it straight 2 Close the film door Make sure the film door lock clicks into place The film cover black is ejected automatica...

Страница 15: ... press the shutter button fully press it lightly Be careful that your fingers or the strap do not cover the flash lens or film ejection slot If a subject is poorly lit the flash may fire when the picture is taken You can change the flash setting to disable flashing Page 23 Select the shooting mode or perform the steps to select your image effects Pages 20 to 26 Cautions on the camera s memory When...

Страница 16: ...Page 18 Changing the number of images on the monitor Turning the command dial counterclockwise changes the number of images one four or nine Turning the command dial clockwise changes the number of images four or one Pressing the MENU OK button or Back button cancels the multiple image display You can print an image while four or nine images are displayed Page 18 Normal Zoom One image Four images ...

Страница 17: ... the zoom ring to confirm the desired composition of the final image When you shoot a movie hold the camera with both hands and brace your elbows against your sides Be careful not to touch the lens surface when you press the shutter button Be careful that your fingers or the strap do not cover the flash lens or film ejection slot When you use a memory card a movie can be shot for up to 15 seconds ...

Страница 18: ...ne image Four images Nine images The most recent movie thumbnail will be displayed Pressing 8displays a previous thumbnail Pressing 9displays a next thumbnail Ÿ Slide the power switch to movie Press 7 The movie playback starts Operations during movie playback Press 7to pause playback Pressing 7again resumes playback While the playback is paused pressing 8or 9 or turning the command dial allows you...

Страница 19: ...captured from a movie file 1 Press 8or 9to select a movie to play back Pressing 8displays a previous thumbnail Pressing 9displays a next thumbnail 2 Press 7to play back the movie 3 Press 7to pause playback 4 Press 8or 9 or turn the command dial to select an image frame to print 5 Press the MENU OK button The image is captured and saved To access a saved image captured from a movie file slide the p...

Страница 20: ...age 15 For details on taking out the film refer to the instructions and warnings on the FUJIFILM Instant Film instax SQUARE pack The development time is approximately 90 seconds The time varies depending on the ambient temperature Printing Press the Print button The screen below appears Press the MENU OK button Printing starts To cancel printing press the Back button Adjust the image effect as nec...

Страница 21: ...ook to the image Marmalade Adds a strong red tint and a burnt edge to the image Martini Smooths skin tones with a slight vintage feel Sepia Strong taste of old school Roppongi Adds brightness and warmth to the image Highline Intensifies shadows with a yellow tint Nostalgic still picture only Add a pale color effect with a soft feel to an image Skin Brightening still picture only Adds brightness to...

Страница 22: ... screen below appears Use the command dial to adjust the brightness of the four corners Turn the command dial clockwise to darken the corners and turn the dial counterclockwise to brighten them Press the Vignette button again The adjusted brightness is applied to the image and returns to the previous screen You can also return to the previous screen by pressing the MENU OK button or back button To...

Страница 23: ...F assist illuminator Self timer lamp lights up and then it flashes 3 seconds before shooting When you select 2 SEC When you press the shutter button the AF assist illuminator Self timer lamp flashes Select 10 SEC or 2 SEC then press the MENU OK button To cancel the self timer press the Back button As the camera may be unable to focus on the subjects listed below we recommend you use AF AE lock Ver...

Страница 24: ...n using a flash is prohibited We recommend using a stable surface to steady the camera when it s dark Press the MENU OK button on the shooting screen The shooting menu appears Select FLASH then press the MENU OK button Taking a Self Portrait Selfie You can take a self portrait using the selfie mirror Ÿ Hold the camera securely keeping 30 cm to 50 cm between you and the edge of the lens Hold the ca...

Страница 25: ...ne image is divided up at random or you can take photos for each segment TIMESHIFT Four images can be taken with a time difference Press the shutter button to shoot when four images appear on the monitor The time difference between frames can be adjusted within 0 2 to 2 0 seconds Changing the Shooting Mode Selecting a Shooting Mode Shooting Mode Select a shooting mode according to the subject or p...

Страница 26: ...ubject Ÿ Press the MENU OK button and shoot the second subject Press 8to retake the subject Pressing returns to the shooting screen Press the MENU OK button Press 8to retake the subject Pressing returns to the shooting screen Double exposure Select DOUBLE EXPOSURE for SHOOTING MODE press the MENU OK button and then follow the procedure below Split Select SPLIT for SHOOTING MODE press the MENU OK b...

Страница 27: ...fference The latest image appears in this order lower right lower left upper right and upper left Press the shutter button to shoot when four images appear on the monitor Collage Photo Select COLLAGE for SHOOTING MODE press the MENU OK button and then follow the procedure below Time Shift Collage Select TIMESHIFT COLLAGE for SHOOTING MODE press the MENU OK button and then follow the procedure belo...

Страница 28: ...print history overwrites the oldest image Press 8or 9to select an image to print Pressing 8displays a previous image Pressing 9displays a next image You can select a view with four or nine frames Press the MENU OK button Printing starts Press the Back button to cancel printing When the film has been ejected the camera stops making a sound grab the edges of the film then take it out You cannot save...

Страница 29: ...mory card after using the camera for a long time the card may be warm Please note this is not a malfunction Do not affix labels to memory cards Peeling labels can cause camera malfunction Caution when using the memory card on computer Format memory cards before first use and be sure to reformat all memory cards after using them in a computer or other device Folders are created automatically if you...

Страница 30: ... finished copying the images turn the camera off and then disconnect the USB cable from the computer Caution Do not cause the battery to run out while copying the images otherwise the images may be damaged Do not turn the camera off or disconnect the USB cable from the computer otherwise the images may be damaged or lost When you change the memory card make sure the camera is disconnected from the...

Страница 31: ...he self timer Page 22 AF ILLUMINATOR still picture only If you select ON the AF assist illuminator lights up while focusing to assist auto focus when it is dark Option ON OFF The camera may be unable to focus using the AF assist illuminator in some cases When you are close to the subject the AF assist illuminator may not be as effective as you expect Avoid shining the AF assist illuminator directl...

Страница 32: ...ow 1 Press the MENU OK button or 9 2 Select the destination then press the MENU OK button or 9 3 Select FRAME or ALL FRAMES then press the MENU OK button or 9 Copying starts if you select ALL FRAMES Proceed to step 4 if you select FRAME 4 Select an image to copy then press the MENU OK button or 9 AUTOROTATE PB still picture only If you select ON an image rotates on the playback screen Option ON OF...

Страница 33: ...OFF RESET Reset all settings to default values The date and time specified on DATE TIME are not reset FORMAT Initialize camera s memory or a memory card inserted in the card slot All saved images will be deleted FIRMWARE UPGRADE Update the firmware Save the firmware on a memory card in advance insert it in the card slot and then follow the instructions on the monitor Download the latest firmware f...

Страница 34: ...re F2 4 Auto focus system Single AF Contrast detect TTL equipped with AF illuminator Continuous AF Only for movie shooting Focus range 10cm to Shutter speed 1 7500 sec to 1 2 sec Auto maximum 10 sec in Bulb mode Sensitivity ISO 100 to 1600 Auto Exposure control Programmed AE Exposure compensation 2 0 EV to 2 0 EV in increments of 1 3 EV Metering 256 segment through the lens TTL metering Multi mete...

Страница 35: ...ints Up to 50 images stored in print history Digital zoom Up to 4 X in shooting printing Others LCD monitor 2 7 in 6 9 cm TFT color LCD monitor Pixels Approx 230k dots External interface Micro USB Micro B For charging file copying Power supply Li ion battery Built in Cannot be removed Charging function Built in Printing capacity Approx 100 prints From when the battery is charged fully Varies depen...

Страница 36: ...g to charge the battery when it is cold During the battery charge the Self timer lamp flashes or an error message appears on the LCD monitor indicating that the battery cannot be charged It is too warm or too cold Charge the battery at temperatures between 5 C and 40 C If this does not solve the problem contact a FUJIFILM authorized distributor An unintended language appears on the monitor The 言語 ...

Страница 37: ...ter speed e g bulb is selected at high temperatures This is due to the characteristics of a CCD and does not indicate a malfunction The camera is unresponsive Malfunction occurs temporarily The battery is running out Press the reset button Page 37 If this does not solve the problem contact a FUJIFILM authorized distributor Charge the camera fully The film pack cannot be loaded or cannot be loaded ...

Страница 38: ...the printer The picture did not come out easily Do not shake bend fold or press the print Do not cover the film ejection slot A black line is printed on the bottom of the finished print The camera shakes or has been dropped and the film has become misaligned Print the image again If this does not solve the problem load a new film pack Using the Reset Button to Reset the Camera If the camera does n...

Страница 39: ...ture could cause the camera to explode or catch fire and cause burns As the battery is built inside the camera do not subject it to heat throw it into an open fire attempt to drop it or apply impact to it Doing so could cause the camera to explode WARNING Never attempt to take this product apart You may be injured If anything is wrong with the camera never attempt to repair it by yourself You may ...

Страница 40: ...aphthalene may affect your camera and prints Be careful to keep your camera and prints in a safe dry place 8 Because your camera is software controlled there is the chance that on rare occasions it will malfunction If you experience incorrect operation press the reset button on the camera 9 Note that the temperature range within which your camera can be used is 5 C to 40 C 0 Take great care to ens...

Страница 41: ... at temperatures above 40 C at temperatures below 5 C the battery will not charge The battery does not however need to be fully discharged before charging Battery Life At normal temperatures the battery can be recharged about 300 times A noticeable decrease in the length of time the battery will hold a charge indicates that it has reached the end of its service life Storage Performance may be impa...

Страница 42: ...se Before date 6 Avoid airport checked luggage inspection and other strong X ray illumination The effect of fogging etc may appear on unused film We recommend that you carry the camera and or the film onto the aircraft as carry on luggage Check with each airport for more information 7 Avoid strong light and keep the developed prints in a cool and dry place Cautions on handling the film and prints ...

Страница 43: ...42 EN MEMO instax BO 14 14lang indb 42 instax BO 14 14lang indb 42 8 8 2018 5 52 07 PM 8 8 2018 5 52 07 PM ...

Страница 44: ...gende Fotografie und Wiedergabe 54 Eine Aufnahme machen 54 Bilder betrachten 55 Ändern der Wiedergabe Anzeige 55 Aufnehmen eines Films undWiedergabe 56 Aufnahmen eines Films 56 Wiedergabe von Filmen 57 Ändern der Anzahl von Bildern auf dem Monitor 57 Drucken 58 Anpassen Bearbeiten von Bildern Effekt 60 Filter 60 Einstellen der Helligkeit 61 Vignette 61 Weiteres zur Fotografie 62 Verwendung der AF ...

Страница 45: ...ten sind Lesen Sie den Abschnitt WICHTIGER SICHERHEITSHINWEIS Seite 78 für die sichere Anwendung Ÿ Lesen Sie die Benutzeranleitung vor der Verwendung der Kamera Mitgeliefertes Zubehör USB Kabel zum Aufladen 1 Handschlaufe 1 Benutzeranleitung 1 instax BO 14 14lang indb 44 instax BO 14 14lang indb 44 8 8 2018 5 52 07 PM 8 8 2018 5 52 07 PM ...

Страница 46: ...f Stattdessen soll es der zuständigen Sammelstelle übergeben werden die das Produkt dem Elektro Elektronikschrott Recycling zuführt Durch Sicherstellen einer korrekten Entsorgung dieses Produktes helfen Sie möglichen negativen Auswirkungen für Umwelt und Gesundheit vorzubeugen die bei unsachgemäßer Abfallbehandlung dieses Produktes entstehen könnten Das Recycling und die Wiederverwertung von Mater...

Страница 47: ... 2 Trageschlaufen Haken 11 Zurück Taste 3 USB Buchse 12 Drucken Taste 4 Reset Taste 13 MENU OK Taste 5 Micro SD Karteneinschub 14 Helligkeit Taste 6 Karteneinschubdeckel 15 Filmtür 7 Filter Taste 16 Ein Ausschalter Standbild Film 8 Vignette Taste 17 LCD Monitor 9 Auswahltaste Drehregler 1 2 4 3 7 6 8 5 1 2 8 9 13 7 11 12 14 15 17 10 3 5 16 6 4 instax BO 14 14lang indb 46 instax BO 14 14lang indb 4...

Страница 48: ... die Anzahl der verfügbaren Bilder unter 10 sinkt wird das Symbol auf der Zahl rot Die verbleibende Zeit wird während der Filmaufnahme angezeigt Verwendung der Auswahltasten 1 6Bewegt den Cursor nach oben 2 8Bewegt den Cursor nach links 3 7Bewegt den Cursor nach unten 4 9Bewegt den Cursor nach rechts 5 Bestätigt die Auswahl Verwendung des Drehreglers Verwenden Sie den Drehregler in den folgenden S...

Страница 49: ...en Sie die Schlaufe nur als Schulterriemen Hängen Sie den Schulterriemen nicht um den Hals Achten Sie darauf dass der Schulterriemen nicht den Filmausgabeschlitz behindert Bringen Sie den Schulterriemen am Trageschlaufen Haken auf beiden Seiten an wie in den Abbildungen unten gezeigt Anbringen des Schulterriemens getrennt erhältlich Ÿ instax BO 14 14lang indb 48 instax BO 14 14lang indb 48 8 8 201...

Страница 50: ...n der Tastatur oder einen USB Hub her Wenn der PC auf Ruhezustand schaltet während der Ladevorgang läuft stoppt der Ladevorgang Um den Ladevorgang fortzusetzen aktivieren Sie den PC erneut und schließen das USB Kabel neu an Unter Umständen ist es nicht möglich die Kamera nicht von einem PC laden je nach Spezifikationen Einstellungen oder Status Ihres PC Ladestatusanzeige Status Während die Kamera ...

Страница 51: ...t Durch vollständiges Drücken des Auslösers im Wiedergabemodus wird der Aufnahme Bildschirm angezeigt und auf den Aufnahmemodus umgeschaltet Anzeige Restliche Akkulebensdauer 8 Der Akku ist teilweise entladen 0 Der Akku ist mehr als halb entladen Aufladen des Akkus wird empfohlen Seite 49 2 Der Akkustand ist niedrig Laden Sie so schnell wie möglich Seite 49 R Wenn die Akkustärke niedrig ist ersche...

Страница 52: ...nd der DATUM ZEIT Bildschirm erscheint Legen Sie den Auftrag fest und drücken Sie dann die MENU OK Taste oder 9 Wählen Sie eine der Reihenfolgen wie unten aufgeführt Jahr Monat Tag Monat Tag Jahr Tag Monat Jahr Die Reihenfolge wird festgelegt und der Bildschirm zum Festlegen von Jahr Monat Tag Stunde und Minute erscheint Geben Sie das Jahr den Monat den Tag die Stunde und die Minute an und drücken...

Страница 53: ...ndbild aufnehmen Auslöser rechts Auslöser links Funktion Auslöser Auslöser Auslöser Aufnahmemodus Umschalttaste Auslöser AUS Aufnahmemodus Umschalttaste Auslöser AUS Auslöser Wenn Sie einen Film aufnehmen Auslöser rechts Auslöser links Funktion Auslöser Auslöser Auslöser AUS AUS Auslöser Standardmäßig ist die Auslöserfunktion beiden Auslösern zugewiesen Verwenden Sie 89zum Wählen der Kombination w...

Страница 54: ...era führt die Funktion zum Auswerfen eines Films aus auch wenn keine Filmpackung eingelegt wurde Einzelheiten finden Sie in der Anleitung und den Warnhinweisen zum FUJIFILM Sofortfilm instax SQUARE Halten Sie beide Seiten der Filmpackung richten Sie die Unterseite der Filmpackung auf die Rille der Filmkammer 1 aus und führen Sie sie dann gerade ein 2 Schließen Sie die Filmtür Stellen Sie sicher da...

Страница 55: ...ücken Sie ihn leicht Achten Sie darauf dass Ihre Finger oder dieTrageschlaufe nicht den Blitz das Objektiv oder den Filmausgabeschlitz verdecken Wenn ein Motiv schlecht beleuchtet ist kann der Blitz ausgelöst werden wenn das Bild aufgenommen wird Sie können die Blitzeinstellung ändern um den Blitz zu deaktivieren Seite 63 Wählen Sie den Aufnahmemodus oder führen Sie die Schritte zum Auswählen Ihre...

Страница 56: ...ist Seite 58 Ändern der Anzahl von Bildern auf dem Monitor Durch Drehen des Drehreglers gegen den Uhrzeigersinn wird die Anzahl der Bilder geändert eins vier oder neun Durch Drehen des Drehreglers im Uhrzeigersinn wird die Anzahl der Bilder geändert vier oder eines Durch Drücken der MENU OK Taste oder Taste Zurück wird die Mehrfachbildanzeige aufgehoben Sie können ein Bild drucken während vier ode...

Страница 57: ...r das endgültige Bild mit dem Zoomring Wenn Sie einen Film aufnehmen halten Sie die Kamera mit beiden Händen und stützen Sie Ihre Ellenbogen gegen die Seiten Achten Sie darauf nicht die Objektivoberfläche zu berühren wenn Sie den Auslöser drücken Achten Sie darauf dass Ihre Finger oder die Trageschlaufe nicht den Blitz das Objektiv oder den Filmausgabeschlitz verdecken Wenn Sie eine Speicherkarte ...

Страница 58: ...Symbolbild des zuletzt aufgenommenen Films wird angezeigt Durch Drücken von 8wird ein vorheriges Symbolbild angezeigt Durch Drücken von 9wird ein folgendes Symbolbild angezeigt Ÿ Schieben Sie den Ein Ausschalter auf Film Drücken Sie 7 Die Filmwiedergabe beginnt Funktionen während der Filmwiedergabe Drücken Sie 7 um die Wiedergabe anzuhalten Wenn Sie erneut 7drücken wird die Wiedergabe fortgesetzt ...

Страница 59: ...oder 9 um einen Film zur Wiedergabe auszuwählen Durch Drücken von 8wird ein vorheriges Symbolbild angezeigt Durch Drücken von 9wird ein folgendes Symbolbild angezeigt 2 Drücken Sie 7 um den Film abzuspielen 3 Drücken Sie 7 um die Wiedergabe anzuhalten 4 Drücken Sie 8oder 9 oder drehen Sie das Einstellrad um ein Bild Einzelbild zum Drucken auszuwählen 5 Drücken Sie die MENU OK Taste Das Bild wird e...

Страница 60: ...men des Films finden Sie in den Anweisungen und Warnhinweisen auf der Packung des FUJIFILM Instantfilms instax SQUARE Die Entwicklungszeit beträgt etwa 90 Sekunden Die Zeit ist je nach Umgebungstemperatur unterschiedlich Drucken Drücken Sie die Drucken Taste Der unten gezeigte Bildschirm erscheint Drücken Sie die MENU OK Taste Der Druckvorgang beginnt Zum Abbrechen des Druckvorgangs drücken Sie di...

Страница 61: ...ättigt und fügt dem Bild einen gealterten Look hinzu Marmalade Fügt dem Bild eine starke rote Färbung und einen überbelichteten Rand hinzu Martini Macht Hauttöne mit einem leichten Vintage Effekt weicher Sepia Starker historischer Look Roppongi Fügt dem Bild Helligkeit und Wärme hinzu Highline Verstärkt Schatten mit einer gelben Färbung Nostalgisch nur Standbilder Verleiht dem Bild einen sanften E...

Страница 62: ...rd Der unten gezeigte Bildschirm erscheint Verwenden Sie das Einstellrad um die Helligkeit der vier Ecken anzupassen Drehen Sie den Drehregler im Uhrzeigersinn um die Ecken abzudunkeln und drehen Sie den Regler gegen den Uhrzeigersinn um sie aufzuhellen Drücken Sie die Vignette Taste erneut Die angepasste Helligkeit wird auf das Bild angewendet und dann wird zum vorherigen Bildschirm zurückgeschal...

Страница 63: ...n Sie den Auslöser drücken leuchtet das AF Hilfslicht Selbstauslöserlämpchen und blinkt dann 3 Sekunden vor der Aufnahme Wenn Sie 2 SEK wählen Wenn Sie den Auslöser drücken blinkt das AF Hilfslicht Selbstauslöserlämpchen Wählen Sie 10 SEK oder 2 SEK aus und drücken Sie dann die MENU OK Taste Zum Abbrechen des Selbstauslösers drücken Sie die Zurück Taste Da die Kamera möglicherweise nicht in der La...

Страница 64: ...enn Blitzen nicht erlaubt ist Wir empfehlen die Kamera auf einem Tisch zu fixieren wenn es dunkel ist Drücken Sie die MENU OK Taste im Aufnahme Bildschirm Das Aufnahme Menü erscheint Wählen Sie BLITZ aus und drücken Sie dann die MENU OK Taste Selbstportrait aufnehmen Selfie Sie können ein Selbstportrait mit dem Selbstportrait Spiegel machen Ÿ Halten Sie die Kamera ruhig und sorgen Sie für 30 cm bi...

Страница 65: ...d zufällig geteilt und Sie können mehrere Fotos für jedes Segment aufnehmen ZEITRAFFER Ein dynamischeres Bild mit vier geteilten Rahmen mit Zeitunterschied kann mit einem Auslösen aufgenommen werden Der Zeitunterschied zwischen den Rahmen kann zwischen 0 2 auf 2 0 Sekunden eingestellt werden Ändern des Aufnahmemodus Wählen eines Aufnahmemodus Aufnahmemodus Wählen Sie einen Aufnahmemodus je nach Mo...

Страница 66: ...MENU OK Taste und nehmen Sie das zweite Motiv auf Drücken Sie 8 um das Motiv erneut aufzunehmen Beim Drücken von kehren Sie zum Aufnahmebildschirm zurück Drücken Sie die MENU OK Taste Drücken Sie 8 um das Motiv erneut aufzunehmen Beim Drücken von kehren Sie zum Aufnahmebildschirm zurück Doppelbelichtung Wählen Sie DOPPELBELICHTUNG als AUFNAHMEMODUS aus drücken Sie die MENU OK Taste und führen Sie ...

Страница 67: ...Verzögerung Das letzte Bild erscheint in dieser Reihenfolge unten rechts unten links oben rechts und oben links Drücken Sie den Auslöser um Aufnahmen zu machen wenn vier Bilder auf dem Monitor angezeigt werden Collagenaufnahme Wählen Sie COLLAGENAUFNAHME als AUFNAHMEMODUS aus drücken Sie die MENU OK Taste und führen Sie anschließend das folgende Verfahren aus Zeitraffer Collage Wählen Sie ZEITRAFF...

Страница 68: ...en Sie 8oder 9 um ein Bild zum Drucken auszuwählen Durch Drücken von 8wird ein vorheriges Bild angezeigt Durch Drücken von 9wird ein folgendes Bild angezeigt Sie können eine Ansicht mit vier oder neun Einzelbildern auswählen Drücken Sie die MENU OK Taste Der Druckvorgang beginnt Drücken Sie die Zurück Taste um den Druck abzubrechen Wenn das Bild herausgeschoben wurde die Kamera macht kein Geräusch...

Страница 69: ...a entnehmen ist die Karte möglicherweise warm Dies ist jedoch keine Fehlfunktion Bringen Sie keine Aufkleber auf Speicherkarten an Ablösende Aufkleber können Fehlfunktionen der Kamera verursachen Vorsichtshinweis bei der Verwendung der Speicherkarte im Computer Formatieren Sie Speicherkarten vor dem ersten Gebrauch und achten Sie darauf alle Speicherkarten neu zu formatieren nachdem Sie sie in ein...

Страница 70: ...ie alle Bilder kopiert haben schalten Sie die Kamera aus und trennen Sie anschließend das USB Kabel vom Computer ab Achtung Lassen Sie nicht zu dass sich der Akku während des Kopierens der Bilder entleert andernfalls können die Bilder beschädigt werden Schalten Sie die Kamera nicht aus und trennen Sie das USB Kabel nicht vom Computer ab andernfalls können die Bilder beschädigt werden oder verloren...

Страница 71: ...g des Selbstauslösers Seite 62 AF HILFSLICHT nur Standbild Wenn Sie EIN wählen leuchtet das AF Hilfslicht während der Fokussierung auf um den Autofokus bei Dunkelheit zu unterstützen Option EIN AUS Die Kamera kann in manchen Fällen nicht mit dem AF Hilfslicht fokussieren Wenn Sie nahe am Motiv sind ist das AF Hilfslicht möglicherweise nicht so wirksam wie erwartet Vermeiden Sie es das AF Hilfslich...

Страница 72: ...ie das Speicherziel und drücken Sie dann die MENU OK Taste oder 9 3 Wählen Sie BILD oder ALLE BILDER und drücken Sie dann die MENU OK Taste oder 9 Der Kopiervorgang beginnt wenn Sie ALLE BILDER wählen Gehen Sie zu Schritt 4 weiter wenn Sie BILD wählen 4 Wählen Sie ein Bild zum Kopieren und drücken Sie dann die MENU OK Taste oder 9 WG AUTO DREH nur Standbild Wenn Sie EIN wählen dreht sich ein Bild ...

Страница 73: ...s unter DATUM ZEIT festgelegte Datum und die Uhrzeit werden nicht zurückgesetzt FORMATIEREN Initialisieren Sie den Speicher der Kamera oder eine im Karteneinschub eingesetzte Speicherkarte Alle gespeicherten Bilder werden gelöscht FIRMWARE AKTUAL Aktualisieren Sie die Firmware Speichern Sie die Firmware vorher auf einer Speicherkarte setzen Sie sie in den Karteneinschub ein und folgen Sie dann den...

Страница 74: ...ssystem Einzel AF Kontrast Erkennung TTL ausgestattet mit AF Hilfslicht Dauer AF nur für Filmaufnahme Fokusbereich 10 cm bis Verschlusszeit 1 7 500 s bis 1 2 s Auto maximal 10 s bei Langzeitbelichtung Empfindlichkeit ISO 100 bis 1 600 Auto Belichtungssteuerung Programm Belichtungsautomatik Belichtungskompensation 2 0 LW bis 2 0 LW in Schritten von 1 3 LW Messung 256 Segment Messung durch das Objek...

Страница 75: ...Bis zu 50 im Druckverlauf gespeicherte Bilder Digitaler Zoom Bis zu 4 X bei der Aufnahme beim Drucken Sonstiges LCD Monitor 2 7 Zoll 6 9 cm TFT Farb LCD Monitor Pixel Ca 230 000 Punkte Externe Schnittstelle Micro USB Micro B Zum Laden Kopieren von Dateien Stromversorgung Li Ionen Akku eingebaut kann nicht herausgenommen werden Ladefunktion Eingebaut Druckkapazität Ca 100 Ausdrucke mit voll geladen...

Страница 76: ...angs blinkt das Selbstauslöserlämpchen oder eine Fehlermeldung erscheint im LCD Monitor die anzeigt dass der Akku nicht aufgeladen werden kann Es ist zu warm oder zu kalt Laden Sie den Akku bei Temperaturen zwischen 5 C und 40 C auf Wenn dadurch das Problem nicht behoben wird wenden Sie sich an einen Fachhändler für FUJIFILM Eine ungewünschte Sprache erscheint auf dem Monitor Die Einstellung für 言...

Страница 77: ...eraturen ausgewählt Dies liegt an den Eigenschaften eines CCD und zeigt keine Fehlfunktion an Die Kamera reagiert nicht Eine Fehlfunktion tritt vorübergehend auf Der Akku wird schwach Drücken Sie die Reset Taste Seite 77 Wenn dadurch das Problem nicht behoben wird wenden Sie sich an einen Fachhändler für FUJIFILM Laden Sie die Kamera ganz auf Die Filmpackung kann nicht eingelegt werden oder sie lä...

Страница 78: ...eraus Schütteln biegen falten oder quetschen Sie den Print nicht Blockieren Sie nicht den Filmausgabeschlitz Eine schwarze Linie wird am unteren Rand des fertigen Prints aufgedruckt Die Kamera wurde geschüttelt oder fallengelassen und der Film wurde falsch ausgerichtet Drucken Sie das Bild erneut Wenn das Problem dadurch nicht behoben wird legen Sie eine neue Filmpackung ein Verwendung der Reset T...

Страница 79: ...ser Art können zu Explosionen des Bränden der Kamera führen und Verletzungen verursachen Da der Akku in die Kamera eingebaut ist setzen Sie sie nicht der Hitze aus werfen Sie sie nicht ins offene Feuer lassen Sie sie nicht fallen und setzen Sie sie keinen Stößen aus Andernfalls könnte die Kamera explodieren VORSICHT Versuchen Sie niemals dieses Produkt zu zerlegen Dabei besteht Verletzungsgefahr W...

Страница 80: ... nicht längere Zeit an feuchten Orten liegen 7 Anti Motten Produkte wie Naphthalin können Ihre Kamera und die Prints beeinträchtigen Sorgen Sie dafür dass die Kamera oder die Prints an einem geschützten Ort wie in einer Schublade aufbewahrt werden 8 Ihre Kamera wird über Software gesteuert deshalb ist es möglich dass gelegentlich Fehlfunktionen auftreten Wenn die Kamera nicht richtig funktioniert ...

Страница 81: ...r 10 C oder über 35 C liegt Versuchen Sie nicht den Akku bei Temperaturen über 40 C aufzuladen bei Temperaturen unter 5 C wird der Akku nicht aufgeladen Der Akku muss jedoch nicht vollständig entladen sein bevor er erneut aufgeladen wird Lebensdauer des Akkus Bei normalen Temperaturen kann der Akku etwa 300 mal wieder aufgeladen werden Eine merkliche Verkürzung der Zeit in der der Akku die Ladung ...

Страница 82: ...en Film immer vor Ablauf des Verfallsdatums 6 Vermeiden Sie die Gepäckdurchleuchtung an Flughäfen und andere starke Röntgenstrahlquellen Dies könnte zu Schleierbildung auf unbelichtetem Film führen Wir empfehlen Ihnen die Kamera und oder den Film im Handgepäck mit ins Flugzeug zu nehmen Fragen Sie auf dem Flughafen nach weiteren diesbezüglichen Informationen 7 Vermeiden Sie helles Licht und bewahr...

Страница 83: ...82 DE MEMO instax BO 14 14lang indb 82 instax BO 14 14lang indb 82 8 8 2018 5 52 29 PM 8 8 2018 5 52 29 PM ...

Страница 84: ...t lecture 95 Affichage des images 95 Changement de l affichage de lecture 95 Enregistrement d une séquence vidéo et lecture 96 Enregistrer une séquence vidéo 96 Lecture d une séquence vidéo 97 Changement du nombre d images sur le moniteur 97 Impression 98 Réglage traitement des images effet 100 Filtre 100 Ajustement de la luminosité 101 Vignette 101 Plus d informations sur la photographie 102 Util...

Страница 85: ...allage Veuillez lire la section AVIS DE SÉCURITÉ IMPORTANT Page 118 pour plus d informations sur la sécurité d utilisation Ÿ Lisez ce Mode d emploi avant d utiliser l appareil photo Accessoires fournis Câble USB pour la charge 1 Dragonne 1 Mode d emploi 1 instax BO 14 14lang indb 84 instax BO 14 14lang indb 84 8 8 2018 5 52 30 PM 8 8 2018 5 52 30 PM ...

Страница 86: ...déchet ménager Il devra être acheminé vers une déchetterie qui recycle les appareils électriques et électroniques En s assurant d un bon retraitement de ce produit vous contribuerez à éviter des conséquences préjudiciables pour l environnement et la santé de l homme qui peuvent être provoquées en jetant ce produit de manière inappropriée Le recyclage de l appareil contribuera à préserver les resso...

Страница 87: ...Touche retour 3 Port USB 12 Touche imprimer 4 Touche reset 13 Touche MENU OK 5 Fente de la carte Micro SD 14 Touche luminosité 6 Couvercle de la fente de la carte 15 Porte du film 7 Touche filtre 16 Interrupteur d alimentation images statiques vidéo 8 Touche vignette 17 Moniteur LCD 9 Bouton de sélection Molette de commande 1 2 4 3 7 6 8 5 1 2 8 9 13 7 11 12 14 15 17 10 3 5 16 6 4 instax BO 14 14l...

Страница 88: ... images disponibles passe en dessous de 10 l icône du nombre devient rouge Une durée d enregistrement restante est affichée pendant l enregistrement d une séquence vidéo Utilisation des boutons de sélection 1 6Déplace le curseur vers le haut 2 8Déplace le curseur vers la gauche 3 7Déplace le curseur vers le bas 4 9Déplace le curseur vers la droite 5 Valide la sélection Utilisation de la molette de...

Страница 89: ... tombe pas Attention Utilisez la courroie uniquement comme une bandoulière Risque d étranglement si mauvaise utilisation Faites attention à ce que la bandoulière ne gêne pas la fente d éjection du film Attachez la bandoulière de l appareil photo au crochet de chaque côté comme illustré ci dessous Fixation de la bandoulière vendue séparément Ÿ instax BO 14 14lang indb 88 instax BO 14 14lang indb 88...

Страница 90: ...ctement Ne les connectez pas via un clavier ou un concentrateur USB Si l ordinateur entre en mode de veille pendant que la charge est en cours la charge s arrête Pour continuer la charge sortez du mode veille et reconnectez le câble USB Il se peut que vous ne puissiez pas charger l appareil photo à partir d un ordinateur en fonction des spécifications de l ordinateur des réglages ou de l état Indi...

Страница 91: ... à fond sur le déclencheur pendant que le mode de lecture affiche l écran de prise de vue sélectionne le mode de prise de vue Indication Durée de vie restante de la batterie 8 La batterie est partiellement déchargée 0 La batterie est chargée à moins de 50 Il est recommandé de charger la batterie Page 89 2 Le niveau de la batterie est faible Chargez la batterie dés que possible Page 89 R Lorsque le...

Страница 92: ...NU OK ou 9 La langue est spécifiée et l écran DATE HEURE apparaît Spécifiez l ordre puis appuyez sur la touche MENU OK ou 9 Sélectionnez un des ordres ci dessous année mois jour mois jour année jour mois année L ordre est spécifié et l écran permettant de spécifier l année le mois le jour les heures et les minutes apparaît Spécifiez l année le mois le jour les heures et les minutes puis appuyez su...

Страница 93: ...heur droit Déclencheur gauche Fonction Déclencheur Déclencheur Déclencheur Touche de commutation du mode de prise de vue Déclencheur NON Touche de commutation du mode de prise de vue Déclencheur NON Déclencheur Lorsque vous enregistrez une séquence vidéo Déclencheur droit Déclencheur gauche Fonction Déclencheur Déclencheur Déclencheur NON NON Déclencheur Par défaut la fonction de déclencheur est a...

Страница 94: ...ionne pour éjecter un film même si la cassette de film n est pas chargée Pour en savoir plus reportez vous aux consignes et aux avertissements du film instantané FUJIFILM instax SQUARE Tenez les deux côtés de la cassette film aligner le bas de la cassette film sur la rainure de la chambre du film 1 puis insérer bien droit 2 Fermez le compartiment arrière Assurez vous que le verrou du compartiment ...

Страница 95: ...ez sur le déclencheur Quand vous appuyez à fond sur le déclencheur appuyez doucement Veillez à ce que ni vos doigts ni la dragonne ne recouvre le flash l objectif ou la fente d éjection du film Si un sujet est mal éclairé le flash peut se déclencher au moment de la prise de vue Vous pouvez changer le réglage du flash pour le désactiver Page 103 Sélectionnez le mode de prise de vue ou effectuez les...

Страница 96: ...8 Changement du nombre d images sur le moniteur Tourner la molette de commande dans le sens inverse des aiguilles d une montre pour modifier le nombre d images une quatre ou neuf Tourner la molette de commande dans le sens des aiguilles d une montre pour modifier le nombre d images quatre ou une Appuyer sur la touche MENU OK ou la touche retour pour annuler l affichage multiple Vous pouvez imprime...

Страница 97: ... sélectionner vos effets d image Pages 100 à 101 Quand vous enregistrez une séquence vidéo tenez l appareil photo avec les deux mains et serrez vos coudes le long de votre corps Faites attention à ne pas toucher l objectif quand vous appuyez sur le déclencheur Veillez à ce que ni vos doigts ni la dragonne ne recouvre le flash l objectif ou la fente d éjection du film Lorsque vous utilisez une cart...

Страница 98: ... annuler l affichage multiple Une image Quatre images Neuf images La vignette de la séquence vidéo la plus récente est affichée Appuyer sur 8affiche la vignette précédente Appuyer sur 9affiche la vignette suivante Ÿ Passez le commutateur d alimentation sur vidéo Appuyez sur 7 La lecture de la séquence vidéo démarre Fonctions pendant la lecture d une séquence vidéo Appuyez sur 7pour mettre la lectu...

Страница 99: ...e séquence vidéo 1 Appuyez sur 8ou 9pour sélectionner une séquence vidéo à lire Appuyer sur 8affiche la vignette précédente Appuyer sur 9affiche la vignette suivante 2 Appuyez sur 7pour lire la séquence vidéo 3 Appuyez sur 7pour mettre la lecture en pause 4 Appuyez sur 8ou 9 ou tournez la molette de commande pour sélectionner une image à imprimer 5 Appuyez sur la touche MENU OK L image est prise e...

Страница 100: ...lus sur le retrait du film reportez vous aux consignes et avertissements de la cassette film instantané FUJIFILM instax SQUARE La durée du développement est d environ 90 secondes La durée varie en fonction de la température ambiante Impression Appuyez sur la touche imprimer L écran ci dessous s affiche Appuyez sur la touche MENU OK L impression démarre Pour annuler l impression appuyez sur la touc...

Страница 101: ...age Marmalade Ajoute une teinte rouge prononcée et des bords brûlés à l image Martini Lisse les couleurs de peau avec un léger effet vintage Sepia Look traditionnel prononcé Roppongi Ajoute de la luminosité et de la chaleur à l image Highline Intensifie les ombres avec une teinte jaune Nostalgique images statiques uniquement Ajoute une impression douce avec une couleur plus pâle à l image éclairci...

Страница 102: ...olette de commande pour ajuster la luminosité des quatre coins Tournez la molette de commande dans le sens des aiguilles d une montre pour assombrir les coins et dans le sens contraire des aiguilles d une montre pour les éclaircir Appuyez de nouveau sur la touche Vignette La luminosité ajustée est appliquée à l image et l écran précédent s affiche Vous pouvez aussi retourner à l écran précédent en...

Страница 103: ... déclencheur le témoin d aide AF Témoin du retardateur s allume puis il clignote 3 secondes avant la prise de vue Quand vous sélectionnez 2 SEC Quand vous appuyez sur le déclencheur le témoin d aide AF Témoin du retardateur clignote Sélectionnez 10 SEC ou 2 SEC puis appuyez sur la touche MENU OK Pour annuler le retardateur appuyez sur la touche retour Il se peut que l appareil photo ne puisse pas ...

Страница 104: ...ecommandé quand l utilisation du flash est interdite Nous vous recommandons d utiliser une table pour fixer l appareil photo lorsqu il fait nuit Appuyez sur la touche MENU OK sur l écran de prise de vue Le menu de prise de vue apparaît Sélectionnez FLASH puis appuyez sur la touche MENU OK Prendre un autoportrait selfie Vous pouvez prendre un autoportrait en utilisant le miroir d autoportrait Ÿ Ten...

Страница 105: ...oto type collage L image est divisée en plusieurs parties et plusieurs photos seront donc imprimées SUITE TEMPORELLE Une image plus dynamique utilisant quatre images divisées avec un décalage de temps peut être prise avec une seule pression Le décalage de temps entre les images peut être réglé de 0 2 à 2 0 secondes Changement du mode de prise de vue Sélection d un mode de prise de vue Mode de pris...

Страница 106: ...t photographiez le second sujet Appuyez sur 8pour photographier de nouveau le sujet Appuyer sur pour revenir à l écran de prise de vue Appuyez sur la touche MENU OK Appuyez sur 8pour photographier de nouveau le sujet Appuyer sur pour revenir à l écran de prise de vue Double exposition Sélectionnez DOUBLE EXPOSITION comme CLICHÉ SELÉCTIONNÉ appuyez sur la touche MENU OK puis suivez la procédure ci ...

Страница 107: ...age s affiche dans l ordre suivant en bas à droite en bas à gauche en haut à droite puis en haut à gauche Appuyez sur le déclencheur pour prendre la photo lorsque quatre images s affichent sur l écran Collage Sélectionnez COLLAGE comme CLICHÉ SELÉCTIONNÉ appuyez sur la touche MENU OK puis suivez la procédure ci dessous Timeshifting Sélectionnez Timeshifting comme CLICHÉ SELÉCTIONNÉ appuyez sur la ...

Страница 108: ... ancien Appuyez sur 8ou 9pour sélectionner une image à imprimer Appuyer sur 8affiche l image précédente Appuyer sur 9affiche l image suivante Vous pouvez sélectionner un mode d affichage de quatre ou neuf images Appuyez sur la touche MENU OK L impression démarre Appuyez sur la touche retour pour annuler l impression Quand le film a été éjecté l appareil photo ne fait plus de bruit tenez la photo p...

Страница 109: ...reil photo la carte peut être chaude Cependant ce n est pas un mauvais fonctionnement Ne collez pas d étiquettes sur les cartes mémoire Une étiquette mal collée peut entraîner un mauvais fonctionnement de l appareil photo Précaution lors de l utilisation de la carte mémoire sur un ordinateur Formatez les cartes mémoire avant de les utiliser pour la première fois et assurez vous de reformater toute...

Страница 110: ...ez fini de copier les images mettez l appareil hors tension puis débranchez le câble USB de l ordinateur Attention Ne laissez pas la batterie se décharger pendant la copie des images sinon les images risquent d être endommagées Ne pas mettre l appareil photo hors tension ou débrancher le câble USB de l ordinateur sinon les images risquent d être endommagées ou perdues Lorsque vous changez de carte...

Страница 111: ... de l utilisation du retardateur Page 102 TEMOIN AF images statiques uniquement Si vous sélectionnez OUI le témoin d aide AF s allume pendant la mise au point pour aider la mise au point automatique quand il fait sombre Option OUI NON L appareil photo peut ne pas être capable dans certain cas de faire la mise au point en utilisant le témoin d aide AF Quand vous êtes près du sujet le témoin d aide ...

Страница 112: ...ssous 1 Appuyez sur la touche MENU OK ou 9 2 Sélectionnez la destination puis appuyez sur la touche MENU OK ou 9 3 Sélectionnez IMAGE ou TOUTES IMAGES puis appuyez sur la touche MENU OK ou 9 La copie démarre si vous avez sélectionné TOUTES IMAGES Passez à l étape 4 si vous avez sélectionné IMAGE 4 Sélectionnez une image à copier puis appuyez sur la touche MENU OK ou 9 REGL ROTAT AUTO images statiq...

Страница 113: ...a date et l heure spécifiées pour DATE HEURE ne sont pas réinitialisées FORMATAGE Réinitialise la mémoire de l appareil photo ou de la carte mémoire insérée dans le compartiment de carte Toutes les images sauvegardées seront supprimées MAJ DU FIRMWARE Mise à jour du firmware Sauvegardez d abord le firmware sur une carte mémoire insérez la dans la fente de carte puis suivez les instructions sur le ...

Страница 114: ...erture F2 4 Système de mise au point automatique Mise au point automatique unique Détection du contraste TTL muni d un témoin d aide AF AF continu pour séquence vidéo Plage de mise au point 10 cm à Vitesse d obturation 1 7 500 sec à 1 2 sec Auto maximum 10 sec en mode Bulb Sensibilité ISO 100 à 1600 Auto Commande de l exposition Programme AE Compensation d exposition Située entre 2 0 EV et 2 0 EV ...

Страница 115: ...ions Maximum de 50 images stockées dans l historique d impression Zoom numérique Jusqu à 4 X maximum en prise de vue impression Autres Moniteur LCD Moniteur LCD couleur 2 7 pouces 6 9 cm TFT Pixels Environ 230 000 points Interface externe Micro USB Micro B Pour recharger copier des fichiers Alimentation électrique Batterie au lithium ion intégrée ne peut pas être retirée Fonction de charge Intégré...

Страница 116: ...up de temps quand il fait froid Pendant la recharge de la batterie le témoin du retardateur clignote ou un message d erreur s affiche à l écran indiquant que la batterie ne peut pas être chargée Il fait trop chaud ou trop froid Rechargez la batterie à une température ambiante comprise entre 5 C et 40 C Si cela ne résout pas le problème contactez un distributeur FUJIFILM agréé Une langue non souhai...

Страница 117: ...e photo Les images sont floues Une vitesse d obturation lente par ex Pause est sélectionnée à haute température Cela provient des caractéristiques des CCD et ne constitue pas un dysfonctionnement L appareil photo ne répond pas Un mauvais fonctionnement se produit temporairement La batterie est déchargée Appuyez sur le bouton de réinitialisation page 117 Si cela ne résout pas le problème contactez ...

Страница 118: ...ue Une pression a été appliquée sur l image juste après qu elle soit sortie de l imprimante L image ne sort pas facilement Ne secouez ne tordez ni n appliquez de pression sur l impression N obstruez pas la sortie du film Une ligne noire est imprimée en bas de l impression L appareil photo a été secoué ou est tombé et le film est devenu mal aligné Imprimez de nouveau l image Si ça ne résout pas le ...

Страница 119: ...ie et causer des brûlures Puisque la batterie est intégrée dans l appareil photo ne le soumettez pas à la chaleur ne le jetez pas dans un feu et n essayez pas de le faire tomber ou d appliquer de chocs Cela pourrait provoquer l explosion de l appareil photo ATTENTION N essayez jamais de démonter ce produit Vous pourriez vous blesser En cas de problème avec l appareil photo n essayez jamais de le r...

Страница 120: ...ndant une période prolongée 7 Les gaz des produits antimite tel que le naphtalène peuvent affecter votre appareil photo et les films Faites attention de conserver votre appareil photo ou vos impression dans un coffre ou un bureau 8 Comme votre appareil photo est commandé par un logiciel de rares dysfonctionnements peuvent se produire Si vous faites l expérience d un dysfonctionnement appuyez sur l...

Страница 121: ...périeure à 35 C N essayez pas de recharger la batterie à une température supérieure à 40 C ou si la température est inférieure à 5 C la batterie ne se rechargera pas La batterie n a cependant pas besoin d être totalement déchargée avant d être rechargée Autonomie de la batterie À des températures normales la batterie peut être rechargée environ 300 fois Une diminution importante de l autonomie de ...

Страница 122: ...film avant la date d expiration Utiliser avant 6 Évitez de soumettre les films aux rayons des inspections de bagages à l aéroport ou toute autre source de rayon X Un effet de voile etc risque d apparaître sur le film inutilisé Nous vous recommandons de transporter l appareil et ou le film avec vous dans l avion Vérifiez auprès de chaque aéroport pour avoir plus d informations 7 Évitez les lumières...

Страница 123: ...122 FR MEMO instax BO 14 14lang indb 122 instax BO 14 14lang indb 122 8 8 2018 5 52 54 PM 8 8 2018 5 52 54 PM ...

Страница 124: ...563 HU MEMO instax BO 14 14lang indb 563 instax BO 14 14lang indb 563 8 8 2018 6 00 12 PM 8 8 2018 6 00 12 PM ...

Страница 125: ...talos forgalmazóját vagy látogasson el az alábbi weboldalra Máte li jakékoli dotazy týkající se tohoto výrobku obraťte se prosím na autorizovaného distributora společnosti FUJIFILM nebo navštivte níže uvedené webové stránky Ak máte akékoľvek otázky týkajúce sa tohto výrobku kontaktujte autorizovaného distribútora spoločnosti FUJIFILM alebo si pozrite nižšie uvedenú webovú stránku Jeśli masz jakieś...

Отзывы: