background image

64

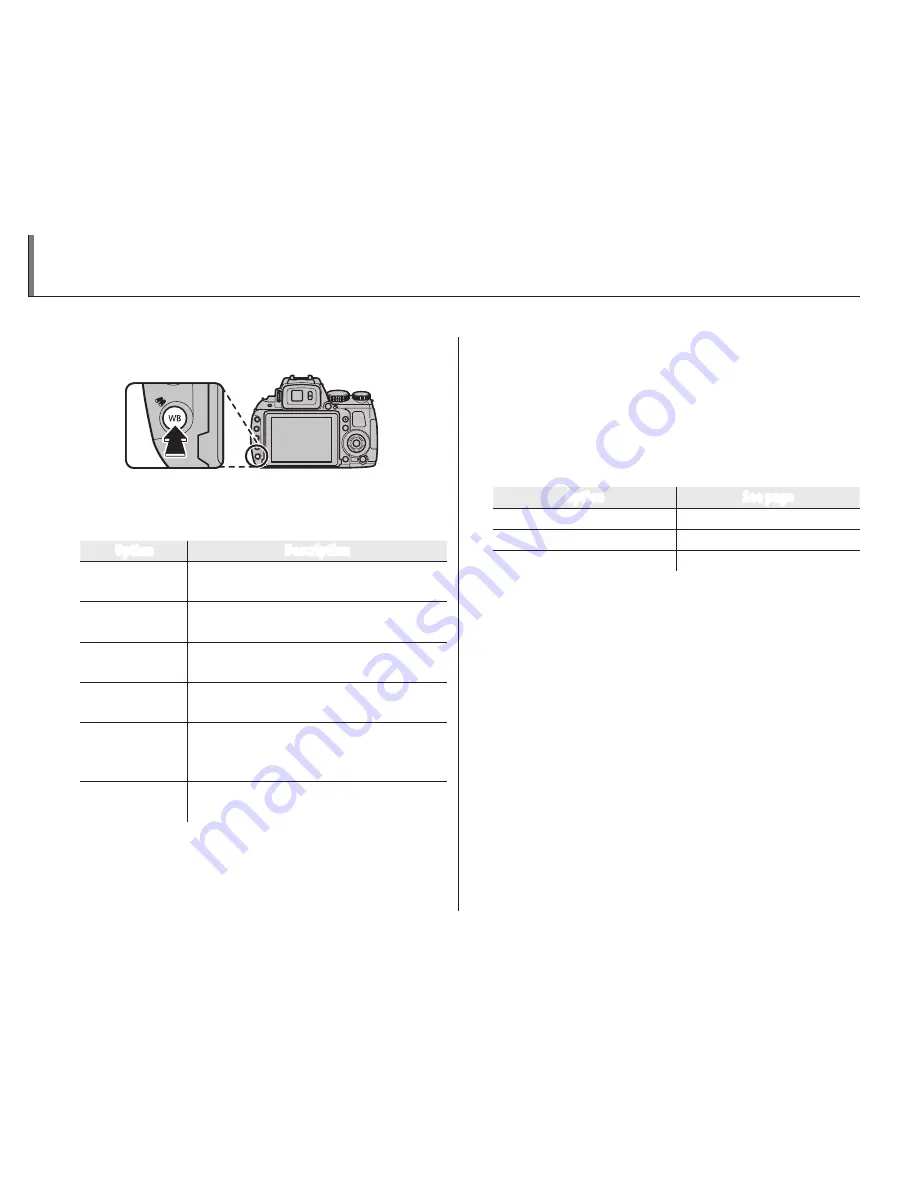
Image Search

Search for images by various criteria.

1

  Press the 

H

 button during playback.

2

  Highlight  one  of  the  following  options  and 

press 

MENU/OK

:

Option

Description

BY DATE

Find  all  pictures  taken  on  a  selected 
date.

BY FACE

Find all pictures based on specified face 
information.

BY 

I

 FAVORITES

Find all pictures with a specified rating 
(

P

 59).

BY SCENE

Find all pictures that match a selected 
scene.

BY TYPE OF DATA

Find all still pictures, all movies, all pic-
tures  taken  in  burst  mode,  or  all  RAW 
pictures.

BY UPLOAD MARK

Find all pictures selected for upload to a 
specified destination (

P

 94).

3

  Select a search condition.  Only pictures that 

match the search condition will be displayed.  
To  delete  or  protect  selected  pictures  or  to 
view  the  selected  pictures  in  a  slide  show, 
press 

MENU/OK

 and choose from the following 

options:

Option

See page


A


ERASE

62


D


PROTECT

96


I


SLIDE SHOW

95

Содержание HS35EXR

Страница 1: ... have read and understood its contents and the warnings in For Your Safety Pii before using the camera For information on related products visit our website at http www fujifilm com products digital_cameras index html Before You Begin First Steps Basic Photography and Playback More on Photography More on Playback Movies Connections Menus Technical Notes Troubleshooting Appendix BL01816 200 EN ...

Страница 2: ...deo prod uct on a bed sofa rug or other simi lar surface This video product should not be placed in a built in installation such as a bookcase or rack unless proper ventilation is provided or the manu facturer s instructions have been adhered to This video product should never be placed near or over a radiator or heat register Attachments Do not use attach ments not recommended by the video produc...

Страница 3: ...ning and power line surges Service Servicing Do not attempt to service this video product yourself as open ing or removing covers may expose you to dangerous voltage or other hazards Refer all servicing to quali fied service personnel Damage Requiring Service Unplug this video product from the wall outlet and refer servicing to qualified ser vice personnel under the following conditions When the p...

Страница 4: ... camera If water or foreign objects get inside the camera turn the camera off remove the battery and disconnect and unplug the AC power adapter Continued use of the camera can cause a fire or electric shock Contact your FUJIFILM dealer Donotusein thebathroom orshower Do not use the camera in the bathroom or shower This can cause a fire or electric shock Donotdisas semble Never attempt to disassemb...

Страница 5: ... shock Do not leave this camera in places subject to extremely high temperatures Do not leave the camera in locations such as a sealed vehicle or in direct sunlight This can cause a fire CAUTION Keep out of the reach of small children This product could cause injury in the hands of a child Do not place heavy objects on the camera This can cause the heavy object to tip over or fall and cause injury...

Страница 6: ...ter it has been charged or immediately after being used This is perfectly normal Do not recharge a fully charged battery Battery Life At normal temperatures the bat tery can be used at least 300 times If the time for which the battery provides power shortens markedly this indicates that the battery has reached the end of its effective life and should be replaced Notes on storage If a battery is st...

Страница 7: ...ng the camera s Discharging rechargeable batteries function Deactivation and memory are spe cific to Ni MH batteries and are not in fact battery faults See Owner s Manual for the proce dure for Discharging rechargeable batteries CAUTION Do not use the Discharging re chargeable batteries function when alkaline batteries being used To charge Ni MH batteries use the quick battery charger sold sepa ra...

Страница 8: ...oughly with soap and running water If liquid crystal gets into your eye Flush the affected eye with clean water for at least 15 minutes and then seek medical assistance If liquid crystal is swallowed Flush your mouth thoroughly with water Drink large quantities of wa ter and induce vomiting Then seek medical assistance Although the LCD panel is produced with highly sophisticated technolo gies ther...

Страница 9: ... is connected Consult the dealer or an experienced radio TV techni cian for help You are cautioned that any changes or modifications not expressly approved in this manual could void the user s authority to operate the equipment Notes on the Grant To comply with Part 15 of the FCC Rules this product must be used with a Fujifilm spec ified ferrite core A V cable USB cable and DC supply cord ForCusto...

Страница 10: ...memory or on optional SD SDHC and SDXC memory cards P14 referred to in this manual as memory cards WarningMessagesandDisplays P118 Find out what s behind that flashing icon or error message in the display Troubleshooting P112 Having a specific problem with the camera Find the answer here TableofContents Pxi The Table of Contents gives an overview of the entire manual The principal camera operation...

Страница 11: ...R E AUTO Mode 17 Viewing Pictures 21 More on Photography Shooting Mode 22 O E AUTO E Priority 23 B AUTO 24 Adv ADVANCED 24 SP1 SP2 SCENE POSITION 29 r MOTION PANORAMA 360 31 P PROGRAM AE 33 S SHUTTER PRIORITY AE 34 A APERTURE PRIORITY AE 34 M MANUAL 35 C CUSTOM MODE 36 Focus Lock 37 The AE AF LOCK Button 38 Locking Exposure 38 Locking Focus 38 F Macro and Super Macro Modes Close ups 39 N Using the...

Страница 12: ...Assist 65 Creating a PhotoBook 65 Viewing PhotoBooks 66 Editing and Deleting PhotoBooks 66 Viewing Panoramas 67 Movies Recording Movies 68 Movie Frame Size 70 a Viewing Movies 71 Connections Viewing Pictures on TV 72 Printing Pictures via USB 74 Connecting the Camera 74 Printing Selected Pictures 74 Printing the DPOF Print Order 75 Creating a DPOF Print Order 77 Viewing Pictures on a Computer 80 W...

Страница 13: ...E 90 a STILL SHOOTING IN MOVIE 90 J AE BKT EV STEPS 91 I FLASH 91 g EXTERNAL FLASH 91 K CUSTOM SET 92 2 ELECTRONIC LEVEL 92 Using the Menus Playback Mode 93 Using the Playback Menu 93 Playback Menu Options 93 X PHOTOBOOK ASSIST 93 x ERASE 93 j MARK FOR UPLOAD TO 94 I SLIDE SHOW 95 B RED EYE REMOVAL 95 D PROTECT 96 G CROP 96 O RESIZE 97 C IMAGE ROTATE 97 E COPY 98 F VOICE MEMO 98 n ERASE FACE RECOG...

Страница 14: ...F LOCK BUTTON 106 j RAW 106 j FOCUS CHECK 107 t SAVE ORG IMAGE 107 m AUTOROTATE PB 107 O BACKGROUND COLOR 107 c GUIDANCE DISPLAY 107 Q VIDEO SYSTEM 108 S CUSTOM RESET 108 U DATE STAMP 108 Technical Notes Optional Accessories 109 Accessories from FUJIFILM 110 Caring for the Camera 111 Troubleshooting Problems and Solutions 112 Warning Messages and Displays 118 Appendix Internal Memory Memory Card C...

Страница 15: ...the camera P Other pages in this manual on which related information may be found Menus and other text in the camera monitor are shown in bold In the illustrations in this manual the monitor display may be simplified for explanatory purposes Supplied Accessories The following items are included with the camera NP W126 rechargeable battery BC W126 battery charger USB cable Shoulder strap Owner s Ma...

Страница 16: ...tion button 47 12 Memory card slot 12 13 Flash 40 14 N flash pop up button 40 15 Speaker 71 98 1 Command dial 33 34 35 2 Mode dial 22 3 Hot shoe 91 4 AF assist illuminator 105 Self timer lamp 42 5 Lens 123 6 ON OFF switch 15 7 Shutter button 19 16 Terminal cover 72 74 84 17 Microphone L R 68 18 Focus ring 49 19 Zoom ring 18 20 Connector for HDMI cable 72 21 USB cable connector 74 84 22 A V cable c...

Страница 17: ... 25 Battery chamber latch 10 26 Battery chamber cover 10 27 Diopter adjustment control 4 28 Indicator lamp 20 29 ISO sensitivity button 52 k playback zoom in button 60 30 AE autoexposure button 48 n playback zoom out button 60 31 AF autofocus button 51 g IntelligentFaceDetection button 55 90 32 AF C S M focus mode button 49 info button 63 The Selector Button MENU OK button P16 86 93 100 Move curso...

Страница 18: ... eye away note that the eye sensor may not respond if you are wearing glasses or your head is an angle to the camera Eye sensor The camera is equipped with diopter adjustment to accommodate individual dif ferences in vision Slide the diopter adjustment control up and down until the view finder display is in sharp focus Bright Ambient Lighting Reflections and glare caused by bright ambient lighting...

Страница 19: ...g 19 118 25 Exposure compensation 47 26 Aperture 34 35 27 AE lock indicator 38 28 Shutter speed 34 35 29 Date and time 16 30 Focus frame 37 31 Electronic level 92 32 Self timer indicator 42 33 Macro close up mode 39 34 Flash mode 40 1 Shooting mode 22 2 Manual focus indicator 49 3 Intelligent Face Detection indicator 55 4 Intelligent sharpness 89 5 Metering 48 6 Intelligent digital zoom 89 7 Conti...

Страница 20: ...load to 94 13 Photobook assist 65 14 Voice memo indicator 98 15 DPOF print indicator 75 16 Protected image 96 17 Favorites 59 1 Playback mode indicator 21 59 2 Intelligent Face Detection indicator 55 90 3 Red eye removal indicator 95 4 Pro focus mode pro low light mode 25 5 Motion panorama z 31 67 6 3D image 27 7 Gift image 59 8 Frame number 103 ...

Страница 21: ... Sensitivity r Shutter speed aperture t Film simulation y Flash mode u White balance i Exposure compensation o Frame number 0 Picture overexposed areas blink on and off 1 Histogram Overexposed areas blink on and off Histograms show the distribution of tones in the im age Brightness is shown by the horizontal axis the number of pixels by the vertical axis Pixel brightness Shadows Highlights pixels ...

Страница 22: ...ow c To avoid dropping the camera be sure the strap is cor rectly secured The Lens Cap Attach the lens cap as shown To avoid losing the lens cap pass the supplied string through the eyelet q and secure the lens cap to the strap w The Lens Hood Rotate the lens hood in the direction shown until it clicks into place ...

Страница 23: ...wer out let The charging indicator will light The Charging Indicator The charging indicator shows battery charge status as follows Charging indicator Battery status Action Off Battery not inserted Insert the battery Battery fully charged Remove the battery On Battery charging Blinks Battery fault Unplug the charger and remove the battery 3 Charge the battery Remove the battery when charging is com...

Страница 24: ...amera is on Failure to observe this pre caution could result in damage to image files or memory cards Do not use excessive force when handling the battery chamber cover 2 Insert the battery Insert the battery as shown in the illustration inside the battery chamber using the bat tery to keep the latch pressed to one side Arrow Battery latch c Insert the battery in the correct orientation Do not use...

Страница 25: ...his precaution could prevent the battery from charging Do not affix stickers or other objects to the battery Failure to observe this precaution could make it im possible to remove the battery from the camera Do not short the battery terminals The battery could overheat Read the cautions in Power Supply and Battery Pvi Use only battery chargers designated for use with the battery Failure to observe...

Страница 26: ... below slide it in until it clicks into place at the back of the slot Click c Be sure card is in the correct orientation do not insert at an angle or use force If the memory card is not correctly inserted or no memory card is inserted a will appear in the LCD moni tor and internal memory will be used for record ing and playback SD SDHC SDXC memory cards can be locked mak ing it impossible to forma...

Страница 27: ...he cam era is off press the card in and then release it slowly The card can now be removed by hand c The memory card may spring out if you remove your finger immediately after pushing the card in Memory cards may be warm to the touch after be ing removed from the camera This is normal and does not indicate a malfunction ...

Страница 28: ... child swallows a memory card seek medical assistance immediately miniSD or microSD adapters that are larger or smaller than the standard dimensions of an SD SDHC SDXC card may not eject normally if the card does not eject take the camera to an authorized service repre sentative Do not forcibly remove the card Do not affix labels to memory cards Peeling labels can cause camera malfunction Movie re...

Страница 29: ...e camera will turn off automatically if no operations are performed for the length of time selected in the M AUTOPOWEROFFmenu P104 Toreactivatethe camera after it has turned off automatically turn the ON OFF switch to OFF and then back to ON Battery Level Battery level is shown as follows Indicator Description D white Battery partially discharged C white Battery more than half discharged B red Low...

Страница 30: ... time the camera is turned on SET NO DATE TIME NOT SET 2014 2013 2011 2010 YY MM DD 1 1 12 00 AM 2012 2 The date and time will be displayed Press the selector left or right to highlight the year month day hour or minute and press up or down to change To change the order in which the year month and day are displayed highlight the date format and press the selector up or down Press MENU OK when sett...

Страница 31: ...con In R mode the camera continuously adjusts focus and searches for faces increasing the drain on the battery o is displayed in the LCD monitor Scene Icon P23 The camera automatically selects the appropriate scene a The camera analyses the scene and selects the preferred E mode when the shutter button is pressed halfway P24 To raise the flash when lighting is poor press the flash pop up button P4...

Страница 32: ... b Focus Lock Use focus lock P37 to focus on subjects that are not in the focus frame Holding the Camera Hold the camera steady with both hands and brace your elbows against your sides Shaking or unsteady hands can blur your shots To prevent pictures that are out of focus or too dark un derexposed keep your fin gers and other objects away from the lens and flash ...

Страница 33: ... Change the composition or use focus lock P37 4 Shoot Smoothly press the shutter button the rest of the way down to take the picture b The Shutter Button The shutter button has two positions Pressing the shutter button halfway q sets focus and exposure to shoot press the shutter button the rest of the way down w q w Press halfway Press the rest of the way down Double beep Click a If the subject is...

Страница 34: ...onger displayed The Indicator Lamp Indicator lamp The indicator lamp shows camera status as follows Indicator lamp Camera status Glows green Focus locked Blinks green Blur focus or exposure warning Pic ture can be taken Blinks green and orange Recording pictures Additional pic tures can be taken Glows orange Recording pictures No additional pic tures can be taken at this time Blinks orange Flash c...

Страница 35: ...layed in the monitor 100 0001 1 1000 F4 5 F4 5 2 2 1 1 3 3 2 View additional pictures Press the selector right to view pictures in the order recorded left to view pictures in reverse order Press the shutter button to exit to shooting mode Deleting Pictures To delete pictures press the b button A menu of deletion options will be displayed P 62 b The Playback Menu Pictures can also be deleted from t...

Страница 36: ...call stored settings for modes P S A M and all E modes except R P36 N MOTION PANORAMA 360 Select for taking a panorama P31 O Improve clarity reduce noise in crease dynamic range or let the camera automatically adjust settings to suit the scene P23 Adv ADVANCED Sophisticated tech niques made easy P24 B AUTO A simple point and shoot mode recommended for first time users of digital cameras P24 SP1 SP...

Страница 37: ...ize TheSceneIcon The camera selects from the following scenes Scene Main subject AUTO LAND SCAPE NIGHT NIGHT TRIPOD MACRO BEACH SUNSET SNOW SKY GREEN ERY SKY GREENERY Non portrait a c d h e u v w x y z Portrait Normal d dc dd dh du dv dw dx dy dz Backlit g gc gu gv gw gx gy gz Moving object c cc cd ch ce cu cv cw cx cy cz Portrait and motion Normal a ac ad ah au av aw ax ay az Backlit b bc bu bv b...

Страница 38: ...s the preferred E mode S RESOLUTION PRIORITY Produces crisp clear shots T HIGH ISO LOW NOISE Reduces noise in pic tures taken at high sensitivities U D RANGE PRIORITY Increases the amount of detail visible in highlights n EPriority Select this mode to manually choose from the fol lowing E modes S RESOLUTION PRIORITY Choose for crisp clear shots T HIGH ISO LOW NOISE Reduce noise in pic tures taken ...

Страница 39: ...RTIAL COLOR GREEN y PARTIAL COLOR BLUE z PARTIAL COLOR PURPLE R R Depending on the subject and camera settings im ages may in some cases be grainy or vary in bright ness and hue n iPROFOCUS The camera takes up to three shots each time the shutter button is pressed softening the background to emphasize the main subject The amount of softening can be adjusted before shooting by rotating the command ...

Страница 40: ...ictures taken in these modes select ON for the t SAVE ORG IMAGE op tion in the setup menu P107 c Keep the camera steady during shooting Frame coverage is reduced n nMULTIPLEEXPOSURE Create a photograph that combines two expo sures 1 Take the first shot 2 Press MENU OK The first shot will be shown su perimposed on the view through the lens as a guide to taking the second shot a To return to Step 1 ...

Страница 41: ...thout recording a picture press DISP BACK 3 The first shot will be shown superimposed on the view through the lens Using it as a guide frame the second shot and press the shutter release button a The 3D effect may not be vis ible with some subjects or under some shooting conditions For best results the distance the camera is moved between shots should be about 1 30th to 1 50th of the dis tance to ...

Страница 42: ...naglyph images 3D photos can also be viewed using other applica tions that support the MP format 3D TVs that support the MP format can display im ages in 3D See the manual for your TV for details c Images are not output in 3D when printed directly from the camera 3D images are displayed in 2D in slide shows and when output on a conventional TV 3D images can not be edited or retouched Note The MP M...

Страница 43: ...hen photographing cats M LANDSCAPE Choose for daylight shots of buildings and landscapes N SPORT Choose when photographing moving subjects O NIGHT Choose this mode for poorly lit twilight or night scenes H NIGHT TRIPOD Choose this mode for slow shutter speeds when shooting at night U FIREWORKS Slow shutter speeds are used to capture the expanding burst of light from a firework Q SUNSET Choose this...

Страница 44: ...tected P42 During play back image search P64 can be used to search for pictures taken in either mode 1 Although camera can detect many different breeds of dogs and cats results may vary with the breed and shoot ing conditions The camera may fail to detect pets with dark colored faces or long hair covering their entire face If a dog or cat is not detected the camera focuses on the subject at the ce...

Страница 45: ...ector right to view a choice of pan directions Press the selector left or right to highlight a pan direction and press MENU OK 4 Press the shutter button all the way down to start recording There is no need to keep the shutter button pressed during recording 5 Pan the camera in the direction shown by the arrow Shooting ends automatically when the progress bar is full and the panorama is complete a...

Страница 46: ...ves and wa terfalls or subjects that undergo marked changes in brightness Panoramas may be blurred if the subject is poorly lit z Choose z for seamless 360 panoramas that can be played back in a loop P67 a The t SAVE ORG IMAGE option in the setup menu can be used to record a v panorama in addition to a seamless z panorama P107 c Depending on the subject and shooting conditions the camera may produ...

Страница 47: ...range of the cam era the shutter speed and aperture displays will show Press the shutter button halfway to measure ex posure again Program Shift Rotate the command dial to choose the desired com bination of shutter speed and aperture The default values can be restored by raising the flash or turning the camera off Program shift is only available if the flash is off and an option other than AUTO is...

Страница 48: ...e display will show F Press the shutter button halfway to measure exposure again The shutter speed is restricted depending on the ISO setting A APERTURE PRIORITY AE Choose the aperture using the com mand dial while the camera adjusts shutter speed for optimal exposure F3 5 Aperture c If the correct exposure can not be achieved at the se lected aperture shutter speed will be displayed in red Adjust...

Страница 49: ...tween shutter speed and aperture and rotate the command dial to adjust the selected setting 250 F4 5 M Shutter speed Aperture c Noise in the form of randomly spaced bright pixels may occur in long exposures The shutter speed is restricted depending on the ISO setting The Exposure Indicator The amount the picture will be under or over ex posed at current settings is shown by the exposure indicator ...

Страница 50: ...C RANGE P FILM SIMULA TION d WB SHIFT f COLOR e TONE q SHARPNESS h NOISE REDUCTION y INTELLIGENT SHARPNESS R INTELLI GENT DIGITAL ZOOM b FACE DETECTION n FACE RECOGNITION W MOVIE MODE a STILL SHOOTING IN MOVIE J AE BKT EV STEPS I FLASH g EXTERNAL FLASH 2 ELECTRONIC LEVEL Setup menu C AF ILLUMINATOR j RAW Other ISO metering autofocus mode focus mode white balance burst mode macro mode flash mode ex...

Страница 51: ...amera is unable to focus using autofocus use focus lock to focus on another subject at the same distance and then recompose the pho tograph Very shiny subjects such as mirrors or car bodies Fast moving subjects Subjects photographed through a window or other reflective object Dark subjects and subjects that absorb rather than reflect light such as hair or fur Insubstantial subjects such as smoke o...

Страница 52: ...teps 1 and 2 as desired to refocus before taking the picture 3 Recompose the picture Keeping the shutter button pressed halfway recompose the picture c Adjusting zoom ends AE lock AE lock is not avail able with Intelligent Face Detection 4 Shoot Locking Focus If AF LOCK ONLY is selected for v AE AF LOCK BUTTON in the setup menu P106 pressing the AE AF LOCK button locks focus If AE AF LOCK is selec...

Страница 53: ...ubjects near the center of the frame Use the zoom ring to compose pictures The following restrictions apply in super macro mode the lens must be zoomed all the way out at other zoom positions o is displayed and the flash can not be used a Use of a tripod is recommended to prevent blur caused by camera shake Flash compensation may be required when using the flash P91 Using the flash at close range ...

Страница 54: ...nes Use the flash when lighting is poor for example when shooting at night or indoors under low light 1 Raise the flash Press the flash pop up button to raise the flash 2 Choose a flash mode Press the selector right N The flash mode changes each time the selector is pressed Mode Description A K AUTO FLASH The flash fires when required Recommended in most situations N L FORCED FLASH The flash fires...

Страница 55: ...selectedforB REDEYEREMOVALinthe setup menu P105 red eye removal is available in K L and M Red eye removal minimizes red eye caused when light from the flash is reflected from the subject s retinas as shown in the illustration at right Turning the Flash Off Lower the flash where flash photography is prohibited or to capture natural lighting un der dim light At slow shutter speeds k will be displaye...

Страница 56: ...released ten seconds after the shutter button is pressed Use for self portraits The self timer lamp on the front of the camera lights when the timer starts and begins to blink shortly before the photo is taken R 2 SEC The shutter is released two seconds after the shutter button is pressed Use to reduce blur caused by the camera moving when the shutter button is pressed The self timer lamp will bli...

Страница 57: ...YNAMIC RANGE BKT a Focus and exposure are determined by the first frame in each series The flash turns off automatically the previously selected flash mode is restored when con tinuous shooting is turned off Frame rate varies with shutter speed shooting condi tions and the number of pictures in each burst The number of pictures that can be taken in a single burst varies with the scene and camera s...

Страница 58: ...n PBESTFRAMECAPTURE The camera takes a series of pictures starting before and ending after the shutter button is pressed To choose the frame rate and number of shots 1 Press the selector right when the camera is in shooting mode 2 Highlight the current frame rate and press the selector right then press selector up or down to choose a new value and press MENU OK to select c Some frame rates may red...

Страница 59: ...ompletes the burst when the shut ter button is pressed all the way down The illustration shows a burst of eight shots three before the shutter button is pressed and four after Shutter button pressed halfway Shutter button pressed all the way down After shots Before shots c If the shutter button is pressed all the way down be fore the number of frames selected for the before portion is recorded the...

Страница 60: ...eds the limits of the exposure metering system n XFILMSIMULATIONBKT Each time the shutter button is pressed the cam era takes one shot and processes it to create three copies with different P FILM SIMULATION set tings P88 c PROVIA STANDARDforthefirst d Velvia VIVID for the second and e ASTIA SOFT for the third n YDYNAMICRANGEBKT Each time the shutter button is pressed the cam era takes three shots...

Страница 61: ...lue F4 5 250 P Exposure indicator The effect is visible in the display Press the d button again to select Choose negative values to reduce exposure Choose positive values to increase exposure 1 A d icon and exposure indicator are displayed at settings other than 0 Exposure compensation is not reset when the camera is turned off to restore normal exposure control choose a value of 0 Turn the flash ...

Страница 62: ... wide range of shooting conditions p SPOT The camera meters lighting conditions at the center of the frame Recommended when the back ground is much brighter or darker than the main subject q AVERAGE Exposure is set to the average for the entire frame Provides consistent exposure across multiple shots with the same lighting and is particularly effective for landscapes and portraits of subjects dres...

Страница 63: ...ses the drain on the batteries r CENTER isautomaticallyselectedforautofocusmode P 51 ifIntelligentFace Detection is on the camera will continually adjust focus for the selected face Choose for moving subjects j MANUAL FOCUS Focus manually using the focus ring Rotate the ring left to reduce the focus distance right to increase The manual focus indicator indicates how closely the focus distance matc...

Страница 64: ... P 107 the whole image will be magnified to assist focus when the focus ring is rotated The camera will not focus when the focus ring is rotated all the way to the right To focus at infinity focus on a distant object To focus using autofocus press the AE AF LOCK button This can be used to quickly focus on a chosen subject in manual focus mode ...

Страница 65: ...with focus lock s MULTI When the shutter button is pressed halfway the camera detects high contrast subjects near the center of the frame and se lects the focus area automatically t AREA The focus position can be chosen manually by pressing the selector up down left or right and press ing MENU OK when the focus brackets are in the desired position Choose for precise focus when the camera is mounte...

Страница 66: ...0 ISO 12800 Bright Scene Dark Less noticeable Noise mottling More noticeable Option Description AUTO Sensitivity is adjusted automatically in response to shooting conditions AUTO 3200 AUTO 1600 AUTO 800 AUTO 400 As above except that sensitivity will not be raised above the value in paren theses 12800 6400 3200 1600 800 400 200 100 Sensitivity is set to the specified value which is shown in the dis...

Страница 67: ... ing conditions White balance measurement options will be displayed frame a white object so that it fills the LCD monitor and press the shutter button all the way down to measure white balance If COMPLETED is displayed press MENU OK to set white balance to the measured value If UNDER is displayed raise exposure compensa tion P47 and try again If OVER isdisplayed lower exposure compensation and try...

Страница 68: ...u P104 The following options are available IMAGESIZE P87 IMAGEQUALITY P87 RAW P106 DYNAMICRANGE P88 FILM SIMULATION P88 FACE DETECTION P90 FACE RECOGNITION P90 INTELLIGENTDIGITALZOOM P89 MOVIEMODE P90 ELECTRONICLEVEL P92 Fn button a The FFn BUTTON menu can also be displayed by pressing and holding the Fn button ...

Страница 69: ...e may not be in the area indicated by the green border when the picture is taken Intelligent Face Detection Intelligent Face Detection is recommended when using the self timer for group or self por traits P42 77 When a picture taken with Intelligent Face Detec tion is displayed the camera can automatically select facesforred eyeremoval P95 playbackzoom P60 slide shows P95 image search P64 image di...

Страница 70: ...subject us ing the guides and take the photograph a If an error is displayed take the photograph again 3 Enter face recognition data Press MENU OK to display face recognition data and enter the following information NAME Enter a name of up to 14 characters and press MENU OK BIRTHDAY Enter the subject s date of birth and press MENU OK CATEGORY Choose the option that describes your relationship to t...

Страница 71: ...bed above a To delete face recognition data for the selected sub ject select ERASE Adding Faces Automatically To automatically add frequently photographed subjects to the face recognition database select ON for AUTO REGISTRATION in the face recog nition menu If the camera detects a face that has been photographed many times without being added to the database it will display a message prompting yo...

Страница 72: ...e camera displays the name of the subject that will be used to set focus and exposure the subject shown by the green frame If no name is entered the camera will show Subjects identified using face rec ognition but not used to set focus and exposure are shown by orange frames other subjects by white frames c The camera may fail to identify subjects in the face recognition database if they are not f...

Страница 73: ...e desired frame a Pictures taken using other cameras are indicated by a m gift image icon during playback Continuous Shooting In the case of pictures taken in continuous shoot ing mode only the first frame of each series will be displayed Press the selector down to view the other pictures in the series I Favorites Rating Pictures To rate the picture currently displayed in full frame playback press...

Страница 74: ...icator Press DISP BACK or MENU OK to exit zoom a Rotate the command dial to view other pictures with out changing the zoom ratio The maximum zoom ratio varies with image size Playback zoom is not available with cropped or re sized copies saved at a size of a or smaller Intelligent Face Detection Pictures taken with Intelligent Face Detection P55 are indicated by a g icon Press the g button to zoom...

Страница 75: ...s n to view more images 100 0001 Press k to view fewer images Use the selector to highlight images and press MENU OK to view the highlighted image full frame In the nine and hundred frame displays press the selector up or down to view more pictures b Two Frame Display Two frame display can be used to compare pictures taken in C mode ...

Страница 76: ... display a confirmation dialog then highlight OK and press MENU OK to delete the selected pic tures ALL FRAMES A confirmation dialog will be displayed highlight OK and press MENU OK to delete all unprotected pic tures if a memory card is inserted only the pictures on the memory card will be affected the pictures in internal memory are only deleted if no memory card is inserted Pressing DISP BACK c...

Страница 77: ...STD PROVIA AUTO SHARPNESS WHITE BALANCE FILM SIM PLAYBACK INFORMATION 1 EXPOSURE MODE LENS AUTO 4mm F3 0 4mm OFF FOCAL LENGTH FLASH MODE METERING PATTERN AF INFORMATION 2 a Use the command dial to view other images The active focus point is shown by a icon Zooming in on the Focus Point Press the f button to zoom in on the focus point Press DISP BACK or MENU OK to return to full frame playback ...

Страница 78: ...ing P59 BY SCENE Find all pictures that match a selected scene BY TYPE OF DATA Find all still pictures all movies all pic tures taken in burst mode or all RAW pictures BY UPLOAD MARK Find all pictures selected for upload to a specified destination P94 3 Select a search condition Only pictures that match the search condition will be displayed To delete or protect selected pictures or to view the se...

Страница 79: ...ler nor movies can be selected for photobooks 5 Scroll through the images and press the selec tor up to select or deselect the current image for inclusion in the book To display the current image on the cover press the selector down a The first picture selected automatically becomes the cover image Press the selector down to select a different picture for the cover 6 Press MENU OK to exit when the...

Страница 80: ...Viewing PhotoBooks Highlight a book in the photobook assist menu and press MENU OK to display the book then press the selector left and right to scroll through the pictures Press DISP BACK to return to the photo book assist menu Editing and Deleting PhotoBooks 1 Display the photobook and press MENU OK to view book edit options 2 Choose from the following options EDIT Edit the book as described in ...

Страница 81: ...escription Start pause playback Press the selector down to start playback Press again to pause End playback Press the selector up to end playback a Once displayed in full frame playback panoramas can be zoomed in or out using the zoom buttons z panoramas play back in an endless loop P32 the playback direction can be controlled by pressing the selector left or right The camera will not turn off aut...

Страница 82: ...e z button again Recording ends automatically when the movie reaches maximum length or memory is full a Zoom can be adjusted while recording is in progress If the subject is poorly lit the AF assist lamp may light to assist the focus operation To turn the AF assist lamp off select OFF for C AF ILLUMINATOR in the setup menu P105 Exposure and white balance are adjusted automatically throughout recor...

Страница 83: ...t appear as part of the movie c Photos can not be taken while a high speed movie is being recorded The number of photos that can be taken is limited c The indicator lamp lights while movies are being re corded Do not open the battery chamber during shooting or while the indicator lamp is lit Failure to observe this precaution could prevent the movie from being played back Vertical or horizontal st...

Страница 84: ...ription i 1920 1920 1080 Full HD High Definition h 1280 1280 720 High Definition f 640 480 Standard definition Y 640 480 80fps High speed movie Sound is not recorded and focus exposure and white balance are not ad justed automatically Black bands appear at the top and bottom of movies recorded at Y 320 112 Y 320 240 160fps Y 320 112 320fps ...

Страница 85: ...End playback Press the selector up to end playback Adjust speed Press the selector left or right to adjust play back speed during playback Adjust volume Press MENU OK to pause playback and dis play volume controls Press the selector up or down to adjust the volume and press MENU OK to exit Volume can also be adjusted from the setup menu Playback Speed Press the selector left or right to adjust pla...

Страница 86: ...liers Insert into A V cable connector Connect white plug to audio in jack Connect yellow plug to video in jack Insert into HDMI connector Insert into HDMI connector HDMI Mini connector HDMI AnHDMIcable availablefromthird partysuppliers P109 canbeusedtoconnectthecameratoHighDefini tion HD devices playback only The USB cable or optional A V cable cannot be used while an HDMI cable is connected Conne...

Страница 87: ... the camera on and press the a button The camera monitor turns off and pictures and mov ies are played back on the TV Note that the camera volume controls have no effect on sounds played on the TV use the television volume controls to adjust the volume a Image quality drops during movie playback c When connecting the cable be sure the connectors are fully inserted ...

Страница 88: ...printer on 2 Turn the camera on t USB will be displayed in the monitor followed by the PictBridge dis play shown below at right USB 00 OK FRAME TOTAL 00000 SHEETS PICTBRIDGE SET Printing Selected Pictures 1 Press the selector left or right to display a pic ture you wish to print 2 Press the selector up or down to choose the number of copies up to 99 3 Repeat steps 1 2 to select additional pictures...

Страница 89: ...ut the date of recording select PRINT WITHOUT DATE a If no pictures are selected when the MENU OK button is pressed the camera will print one copy of the current picture Printing the DPOF Print Order To print the print order created with K PRINT ORDER DPOF in the playback menu P99 1 In the PictBridge display press DISP BACK to open the PictBridge menu PICTBRIDGE PRINT DPOF PRINT WITH DATE PRINT WI...

Страница 90: ...NCEL Disconnecting the Camera Confirm that PRINTING is not displayed in the moni tor and turn the camera off Disconnect the USB cable a Pictures can be printed from internal memory or a memory card that has been formatted in the camera If the printer does not support date printing the PRINT WITH DATE s option will not be available in the PictBridge menu and the date will not be printed on the pict...

Страница 91: ...formation in the order includes the pictures to be printed date im print and the number of copies of each picture WITHDATEs WITHOUTDATE 1 Select playback mode and press MENU OK to display the playback menu 2 Highlight K PRINT ORDER DPOF and press MENU OK 3 Highlight one of the following options and press MENU OK WITH DATE s Print the date of recording on pictures WITHOUTDATE Do not print the date ...

Страница 92: ...Intelligent Face Detection pressing g sets the number of copies to the number of faces detected a When pictures are printed via direct USB connec tion page size print quality and border selections are made using the printer 6 Repeat steps 4 5 to complete the print order Press MENU OK to save the print order when set tings are complete or DISP BACK to exit without changing the print order 7 The tot...

Страница 93: ...ning a print order cre ated by another camera the message shown at right will be displayed Pressing MENU OK cancels the print order a new print order must be created as described above RESETALL To cancel the current print order select RESET ALL in the K PRINT ORDER DPOF menu The confir mation shown at right will be displayed press MENU OK to remove all pictures from the order RESET DPOF OK YES NO ...

Страница 94: ... space 2GB or more GPU Supports DirectX 9 or later recommended Supports DirectX 7 or later required performance not guaranteed with other GPUs Video 1 024 768 pixels or more with 24 bit color or better Other Built in USB port recommended Operation is not guaranteed with other USB ports NET Framework 3 5 Service Pack 1 required when uploading images or using Map Viewer Internet connection broadband...

Страница 95: ... screen in structions to install MyFinePix Studio and RAW FILE CONVERTER If the Installer Does Not Start Automatically If the installer does not start automatically select Computer or My Computer from the Start menu then double click the FINEPIX CD icon to open the FINEPIX CD window and double click setup or SETUP EXE 4 If prompted to install Windows Media Player or DirectX follow the on screen in...

Страница 96: ...ty for more information RAM 1GB or more Free disk space A minimum of 200MB required for installation with 400MB available when RAW FILE CONVERTER is running Video 1 024 768 pixels or more with 24 bit color or better 2 After starting the computer and quitting any applications that may be running insert the installer CD in a CD ROM drive and double click SILKYRFCEXInstaller 3 Enter an administrator ...

Страница 97: ...ecessary quit Safari before removing the CD Store the installer CD in a dry location out of direct sunlight in case you need to re install the software Installation is now complete Proceed to Connecting the Camera on page 84 Importing Pictures or Movies to Mac Macintosh Use a standard application in Mac OS such as Image Capture to import pictures or movies to Mac ...

Страница 98: ...rd Charge the battery before connecting the camera 2 Turn the camera off and connect the supplied USB cable as shown making sure the connec tors are fully inserted Connect the camera di rectly to the computer do not use a USB hub or keyboard 3 Turn the camera on and follow the on screen instructions to copy pictures to the computer To exit without copying pictures click Cancel For more information...

Страница 99: ...s saved to a network server using the supplied software in the same way as on a standalone computer The user bears all applicable fees charged by the phone company or Internet service provider when using services that require an Internet connection Disconnecting the Camera After confirming that the indicator lamp is out follow the on screen instructions to turn the camera off and disconnect the US...

Страница 100: ... right to display op tions for the highlighted item 4 Press the selector up or down to highlight the desired option 5 Press MENU OK to select the high lighted option 6 Press DISP BACK to exit from the menu Shooting Menu Options Default values are shown in square brackets A E MODE R Choose an option for E mode P23 A Adv MODE ADVANCED FILTER Choose an advanced shooting mode P24 A SCENE POSITION SP1 ...

Страница 101: ... Prints at sizes up to O 34 25cm 13 5 10 in P 24 18 cm 9 5 7 in Q 17 13 cm 7 5 in Aspect ratio 4 3 Pictures have the same propor tions as the cam era display 4 3 3 2 Pictures have the same propor tions as a frame of 35 mm film 3 2 16 9 Suited for display on High Definition HD de vices 16 9 T IMAGE QUALITY FINE Choose how much image files are compressed Option Description FINE Low compression Selec...

Страница 102: ...ription AUTO A 100 Increase contrast when shooting indoors or under overcast skies Reduce loss of detail in highlights and shadows when photograph ing high contrast scenes B 200 C 400 D 800 M 1600 a M 1600 and D 800 are available only when D RANGE PRIORITY is selected in E mode P FILM SIMULATION c Simulate the effects of different types of film in cluding sepia and black and white Option Descripti...

Страница 103: ...er high resolution results a The time needed to record images increases The effects are not visible in the display during shoot ing Intelligent sharpness may turn off automatically in some modes This option has no effect on photos taken in continu ous mode R INTELLIGENT DIGITAL ZOOM OFF Intelligent digital zoom can be used to magnify the image by 1 4 or 2 while processing it for sharp high resolut...

Страница 104: ...iewed during playback P56 W MOVIE MODE i Choose a frame size for movies P70 a STILL SHOOTING IN MOVIE MOVIE PRIORITY Choose how the camera records photographs taken during movie recording P69 Option Description MOVIE PRIORITY The camera takes a photograph without interrupting movie recording Image size is determined by the option selected for W MOVIE MODE STILL IMAGE PRIORITY The camera interrupts...

Страница 105: ... subject g EXTERNAL FLASH OFF Choose ON when using an optional flash unit ex cept Fujifilm products mounted on the camera hot shoe c The flash may not fully light the subject at speeds faster than 1 1000 s Use auto or custom white balance P53 If the built in flash is raised when ON is selected for g EXTERNAL FLASH the built in flash will fire once to provide a signal for the optional flash unit to...

Страница 106: ...settings for P S A M and all O modes except R P36 2 ELECTRONIC LEVEL OFF This option is useful to correct for camera tilt When ON is selected 2 lines are displayed across the screen as shown If the lines stay perfectly over lapped the camera is leveled ...

Страница 107: ...to highlight the desired menu item 4 Press the selector right to display op tions for the highlighted item 5 Press the selector up or down to highlight the desired option 6 Press MENU OK to select the high lighted option 7 Press DISP BACK to exit from the menu Playback Menu Options X PHOTOBOOK ASSIST Create books from your favorite photos P65 x ERASE Delete all or selected pictures P62 ...

Страница 108: ...vies can be selected for upload to YouTube During playback selected pictures are indicated by j YouTube or j FACEBOOK icons RESETALL DeselectingAllPictures Choose RESET ALL to deselect all pictures If the number of pictures affected is very large a mes sage will be displayed while the operation is in progress Press DISP BACK to exit before the opera tion is complete UploadingPictures WindowsOnly S...

Страница 109: ...how is in progress B RED EYE REMOVAL If the current picture is marked with a g icon to indicate that it was taken with Intelligent Face De tection this option can be used to remove red eye The camera will analyze the image if red eye is detected the image will be processed to create a copy with reduced red eye 1 Display the desired picture 2 Select B RED EYE REMOVAL in the playback menu 3 Press ME...

Страница 110: ...ry is formatted P102 G CROP Create a cropped copy of the current picture 1 Display the desired picture 2 Select G CROP in the playback menu 3 Use the k and n buttons to zoom the image in and out and use the selector to scroll the picture until the desired portion is displayed 4 Press MENU OK to display a confirmation dialog 5 Press MENU OK again to save the cropped copy to a separate file a Larger...

Страница 111: ...E Rotate pictures taken in tall orientation so that they are displayed in tall orientation in the LCD monitor 1 Display the desired picture 2 Select C IMAGE ROTATE in the playback menu 3 Press the selector down to rotate the picture 90 clockwise up to rotate it 90 counterclock wise 4 Press MENU OK The picture automatically be displayed in the selected orientation when ever it is played back on the...

Страница 112: ...ull DPOF print information is not copied P77 F VOICE MEMO Add a voice memo to the current photograph Holding the camera at a distance of about 20 cm face the microphone and press MENU OK to begin recording Press MENU OK again to end recording recording ends automatically after 30 seconds a Voice memos can not be added to movies or protect ed pictures Remove protection from pictures before recordin...

Страница 113: ...removed from copies with a size of a or smaller K PRINT ORDER DPOF Select pictures for printing on DPOF and Pict Bridge compatible devices P75 J DISP ASPECT 4 3 Choose how High Definition HD devices display pictures with an aspect ratio of 4 3 this option is available only when an HDMI cable is connected Select 16 9 to display the image so that it fills the screen with its top and bottom cropped o...

Страница 114: ...T SET UP EXIT SET SET UP Tab 2 Adjust settings 2 1 Press the selector right to acti vate the setup menu 2 2Press the selector up or down to highlight a menu item 2 3Press the selector right to dis play options for the highlighted item 2 4Press the selector up or down to highlight an option 2 5Press MENU OK to select the highlighted option 2 6Press DISP BACK to exit from the menu The Setup Menu Usi...

Страница 115: ...e and your home time zone 3 Press MENU OK To switch between local time and your home time zone highlight g LOCAL or h HOME and press MENU OK Option Description h HOME Switch to the time currently selected for F DATE TIME see above g LOCAL Switch to local time If this option is selected g and the time and date will be displayed in yellow for three seconds each time the camera is turned on L a Choos...

Страница 116: ...mory c All data including protected pictures will be de leted from the memory card or internal memory Be sure important files have been copied to a computer or other storage device Do not open the battery chamber cover during for matting A IMAGE DISP 1 5 SEC Choose how long pictures are displayed in the LCD monitor after shooting Option Description 3 SEC Pictures are displayed for three sec onds 3...

Страница 117: ...e the number of pictures with duplicate file names RENEW Numbering is reset to 0001 after for matting or when a new memory card is inserted a If the frame number reaches 999 9999 the shutter release will be disabled P120 Selecting R RESET P102 sets B FRAME NO to CONTINUOUS but does not reset the file number Frame numbers for pictures taken with other cam eras may differ G OPERATION VOL c Adjust th...

Страница 118: ...he camera turns off automatically when no operations are performed Shorter times increase battery life if OFF is selected the camera must be turned off manually Note that in some situations the cam era turns off automatically even when OFF is se lected 1 QUICK START MODE OFF Allow the camera to restart in a fast manner after turned off ON OFF c If ON is selected the camera will continue to draw a ...

Страница 119: ...y is set to a fixed value and may also be unavailable at some other combinations of settings The effect may vary with lighting conditions and the speed at which the object is moving B RED EYE REMOVAL ON Choose ON to remove red eye effects caused by the flash when shooting with Intelligent Face De tection a Red eye reduction is performed only when a face is detected Red eye removal is not available...

Страница 120: ...xposure only focus or both exposure and focus AE L AF L AE AF j RAW OFF Choose RAW JPEG or RAW to record RAW pictures note that because RAW data are not processed on the camera RAW pictures must be copied to a computer for processing If RAW JPEG is selected JPEG copies will also be recorded Choose OFF to record pictures in JPEG format only 1 To convert RAW files for display on a computer use the s...

Страница 121: ... in manual focus mode t SAVE ORG IMAGE OFF Choose ON to save unprocessed copies of seam less z panoramas or pictures taken using B RED EYE REMOVAL j PRO LOW LIGHT MODE or i PRO FOCUS MODE m AUTOROTATE PB ON Choose ON to automatically rotate tall portrait orientation pictures during playback O BACKGROUND COLOR Choose a color scheme c GUIDANCE DISPLAY ON Choose whether to display tool tips ...

Страница 122: ...ht OK and press MENU OK U DATE STAMP OFF Stamp the time and or date of recording on pho tographs as they are taken Option Description R S Stamp new photographs with the date and time of recording R Stamp new photographs with the date of recording OFF Do not stamp the time and date on new photographs c Time and date stamps can not be deleted Turn U DATE STAMP off to prevent time and date stamps app...

Страница 123: ...using INDIVD SHUTTER 3D FINEPIX REAL 3D V3 sold separately FINEPIX HS35EXR Printing PictBridge compatible printer USB A V cable Printer HDTV HDMI cable RemoteShutterRelease RR 80 remote release sold separately USB ProtectorFilter PRF 58 protective filter sold separately ComputerRelated USB SD card slot or card reader Computer Available from third party suppliers SD SDHC SDXC memory card Technical ...

Страница 124: ... keep the shutter open during a time exposure Lens hoods LH HS10 Protect the lens and prevent glare and lens flare Shoe mounted flash units EF 20 This hot shoe clip on flash unit has a guide number of 20 ISO 100 supports i TTL can be angled up to 90 for bounce flash photography and takes two AA 1 5 V batteries EF 42 This hot shoe clip on flash unit has a guide number of 42 ISO 100 features 24 105 ...

Страница 125: ... using the camera at the beach or seaside avoid exposing the camera to water or sand Do not place the camera on a wet surface Condensation Sudden increases in temperature such as occur when entering a heated building on a cold day can cause condensation inside the camera If this occurs turn the camera off and wait an hour be fore turning it on again If condensation forms on the memory card remove ...

Страница 126: ...attery P22 xTRACKING is selected for FAF MODE Select a different AF mode P51 J is selected for focus mode Select a different focus mode P 49 The battery has been charged many times The battery has reached the end of its charging life Pur chase a new battery The camera turns off suddenly The battery is exhausted Charge the battery or insert a fully charged spare battery P9 Charging does not start R...

Страница 127: ...you attempted to record a panorama Wait until the indicator lamps turns off P20 The LCD monitor goes dark after shooting The LCD monitor may darken while the flash charges Wait for the flash to charge P40 The camera does not focus The subject is close to the camera Select macro mode P39 The subject is far away from the camera Cancel macro mode P39 The subject is not suited to autofocus Use focus l...

Страница 128: ...ooting mode P22 The camera is in super macro or continuous shooting mode Turn super macro and continuous shooting modes off P 39 The battery is exhausted Charge the battery or insert a fully charged spare battery P9 The camera is in silent mode Turn silent mode off P101 The flash is not raised Raise the flash P40 Some flash modes are not available The desired flash mode is not available in the cur...

Страница 129: ... model of camera Playback zoom unavail able The picture has been saved at a or is from another make or model of camera P 60 No sound in voice memo and movie playback The camera is in silent mode Turn silent mode off P 101 Playback volume is too low Adjust playback volume P104 The microphone was obstructed Hold the camera correctly during recording P2 The speaker is obstructed Hold the camera corre...

Страница 130: ...t recognize the camera Be sure the camera and computer are correctly connected P84 Can not transfer RAW or JPEG files to computer Use the bundled software to transfer pictures P80 Pictures can not be printed The camera is not properly connected Connect the camera correctly P74 The printer is off Turn the printer on Only one copy is printed the date is not printed The printer is not PictBridge comp...

Страница 131: ...expectedly Choose OFF for T MONITOR SUNLIGHT MODE P4 Time and date stamps Time and date stamps are not correct Set the camera clock P16 Time and date stamps appear on photographs Time and date stamps can not be deleted To prevent stamps appearing on new photographs select OFF for U DATE STAMP P108 ...

Страница 132: ...ht or too dark and the picture will be over or under exposed If the subject is dark use the flash P40 FOCUS ERROR Camera malfunction Turn the camera off and then on again If the message persists contact a FUJIFILM dealer TURN OFF THE CAMERA AND TURN ON AGAIN LENS CONTROL ERROR CARD NOT INITIALIZED The memory card or internal memory is not formatted or the memory card was formatted in a computer or...

Страница 133: ... can not be recorded or copied Delete pictures or insert a memory card with more free space b MEMORY FULL INTERNAL MEMORY IS FULL INSERT A NEW CARD WRITE ERROR Memory card error or connection error Reinsert the card or turn the camera off and then on again If the message persists contact a FUJIFILM dealer Not enough memory remaining to record additional pictures Delete pictures or insert a memory ...

Страница 134: ...Choose a search that returns fewer results More than 999 images are selected for deletion Choose fewer images PROTECTED FRAME An attempt was made to delete rotate or add a voice memo to a protected picture Remove protection and try again P96 a CAN NOT crop a pictures can not be cropped CAN NOT crop The picture is damaged or was not created with the camera P CANNOT EXECUTE An attempt was made to cr...

Страница 135: ...ere being printed or copied to a computer or other device Confirm that the device is turned on and that the USB cable is connected PRINTER ERROR Printer out of paper or ink or other printer error Check printer see printer manual for details To resume printing turn the printer off and then turn it back on PRINTER ERROR RESUME Printer out of paper or ink or other printer error Check printer see prin...

Страница 136: ...620 5080 Q4 3 12 23 1930 3640 3880 7320 Q16 9 22 33 3540 5160 7110 10370 Movie i19201 12sec 38min 76min h12801 16sec 49min 98min f2 40sec 115min 232min Y 640 4803 30sec 85min 172min Y 320 2403 62sec 172min 345min Y 320 1123 31sec 86min 172min 1 Use a G card or better Individual movies can not exceed 29 minutes in length 2 Individual movies can not exceed 115 minutes in length 3 Use a G card or bet...

Страница 137: ... 920 1 080 S MOTION PANORAMA 360 1 624 11 520 tall 11 520 1 080 wide S MOTION PANORAMA 180 1 624 5 760 tall 5 760 1 080 wide S MOTION PANORAMA 120 1 624 3 840 tall 3 840 1 080 wide Digital zoom About 1 4 2 with intelligent digital zoom up to 42 60 when combined with optical zoom Lens Focal length Fujinon 30 optical zoom lens F 2 8 wide angle 5 6 telephoto f 4 2mm 126 0mm 35 mm format equivalent 24...

Страница 138: ... system Contrast detect TTL AF with AF assist illuminator White balance Automatic scene detection six manual preset modes for direct sunlight shade daylight fluorescent warm white fluorescent cool white fluorescent and incandescent lighting custom white balance Self timer Off 2sec 10sec auto shutter release n and o Flash Manual pop up flash effective range when sensitivity is set to AUTO 800 is ap...

Страница 139: ...125 Appendix Specifications Input output terminals A V OUT audio video output NTSC or PAL output with monaural sound HDMI output HDMI Mini Connector Digital input output USB 2 0 High Speed MTP PTP ...

Страница 140: ... battery supplied with camera and SD memory card Note Number of shots that can be taken with battery varies with battery charge level and will decline at low temperatures Camera dimensions 130 6mm 96 6mm 126 0mm 5 1in 3 8in 4 9in W H D excluding projections Shooting weight Approx 687g 24 2oz including batteries and memory card Camera weight Approx 637g 22 4oz excluding batteries accessories and me...

Страница 141: ... 7oz BC W126 battery charger Rated input 100V 240V AC 50 60Hz Input capacity 13 21VA Rated output 8 4V DC 0 6A Supported batteries NP W126 rechargeable batteries Charging time Approx 150 minutes 25 C 77 F Operating temperature 5 C 40 C 41 F 104 F Dimensions W H D 65mm 91 5mm 28mm 2 5in 3 6in 1 1in excluding projections Weight Approx 77g 2 7oz excluding battery Weight and dimensions vary with the c...

Страница 142: ...ameras index html FUJIFILM shall not be held liable for damages resulting from errors in this manual Although the monitor is manufactured using advanced high precision technology small bright points and anomalous colors particularly in the vicinity of text may appear This is normal for this type of monitor and does not indicate a malfunction images recorded with the camera are unaffected Digital c...

Страница 143: ...129 Memo ...

Страница 144: ... AKASAKA 9 CHOME MINATO KU TOKYO 107 0052 JAPAN http www fujifilm com products digital_cameras index html Please contact your local distributor for repairs and technical support see Worldwide Network list ...

Страница 145: ...4 4 4 41 4 4 41 41 4 41 41 4 4 4 4 41 4 4 4 4 41 4 4 4 41 4 4 4 41 4 B ON K 4 4 4 4 4 4 4 4 4 4 4 41 L 4 4 4 4 4 4 4 4 4 4 41 4 4 4 4 4 M 4 4 4 4 4 4 4 4 4 4 P 4 4 4 41 4 4 41 41 4 41 41 4 4 4 4 41 4 4 41 41 4 4 41 4 4 4 41 41 h S R 4 4 4 4 4 4 4 4 4 4 4 4 4 4 4 4 4 4 4 4 4 4 4 4 4 4 4 4 4 4 4 o 4 4 4 4 4 4 4 4 4 4 4 4 4 4 4 4 4 4 4 4 4 4 n 4 4 I I P 4 4 4 4 4 4 4 4 4 4 4 4 4 4 4 4 4 J 4 4 4 4 4 4...

Страница 146: ...0 4 4 4 4 4 4 1600 4 4 4 4 4 4 800 4 4 4 4 4 4 4 400 4 4 4 4 4 4 4 200 4 4 4 4 4 4 4 100 4 4 4 4 4 4 4 5 o 41 4 4 4 41 41 41 41 4 41 41 4 4 4 4 41 41 41 41 41 41 41 41 41 41 41 41 41 41 41 41 41 41 p 4 4 4 4 4 4 4 4 q 4 4 4 4 4 4 4 4 6 r 41 4 4 4 4 41 41 41 4 41 41 4 4 4 4 41 41 41 41 41 41 41 41 41 41 41 41 41 41 41 41 41 s 4 4 4 4 4 4 4 4 t 4 4 4 4 4 4 4 4 x 4 4 4 4 4 4 4 4 4 7 J 41 4 4 4 4 4 4 ...

Страница 147: ...41 41 41 41 A 41 41 4 41 4 4 4 4 B 4 4 4 4 4 C 4 4 4 4 4 D 4 M 4 P c 4 4 4 4 4 41 4 4 4 4 4 4 4 4 4 4 4 4 4 4 4 4 4 4 4 4 4 4 4 4 4 4 4 d 4 4 4 4 4 4 4 4 4 4 4 4 4 4 4 e 4 4 4 4 4 4 4 4 4 4 4 4 4 4 4 b 4 4 4 4 4 4 4 4 4 4 4 4 4 4 4 4 4 4 4 4 4 4 4 4 4 4 4 4 4 4 4 4 f 4 4 4 4 4 4 4 4 4 4 4 4 4 4 4 4 4 4 4 4 4 4 4 4 4 4 4 4 4 4 4 4 d 4 4 4 4 4 4 4 f 4 4 4 4 4 4 4 e 4 4 4 4 4 4 4 q 4 4 4 4 4 4 4 h 4 ...

Страница 148: ... 4 4 4 4 4 4 4 4 4 4 4 4 4 4 4 l 4 4 4 4 4 4 4 4 4 4 4 4 4 4 4 4 4 4 4 4 4 4 4 4 4 4 4 4 4 4 M 4 4 4 4 4 4 4 4 4 4 4 4 4 4 4 4 4 4 4 4 4 4 4 4 4 4 m 4 4 4 4 4 4 4 4 4 41 4 4 4 4 4 4 4 4 4 4 4 4 4 4 4 4 4 4 4 4 4 OFF 4 4 4 4 4 4 4 4 4 4 4 4 4 4 4 4 4 4 4 4 4 41 4 4 4 4 4 4 4 4 C 4 4 4 4 4 4 4 4 4 4 43 4 4 4 4 4 4 4 4 4 4 43 43 4 4 43 43 4 4 43 43 4 4 j 4 4 4 4 4 43 43 43 43 43 43 4 4 4 4 43 4 4 4 4...

Отзывы: