background image

89

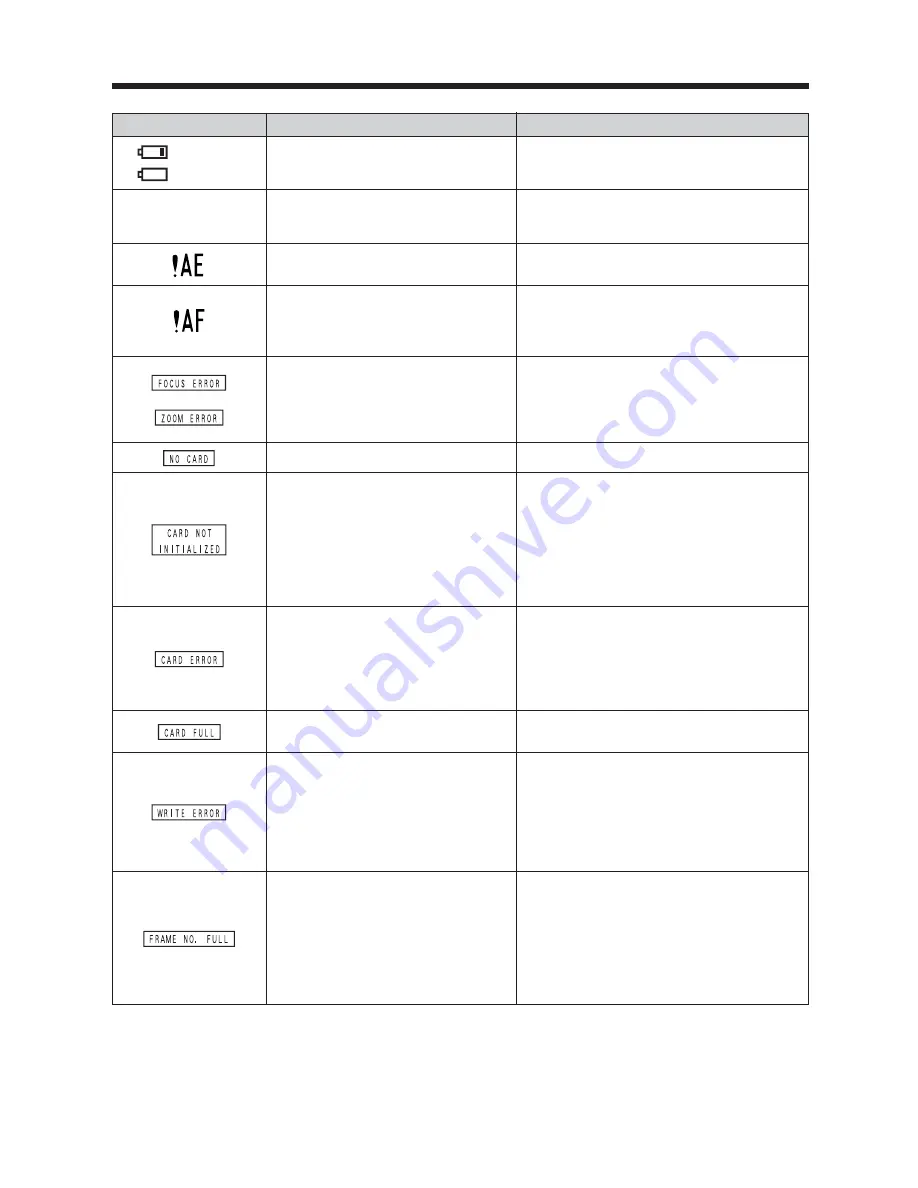
Warning Displays

e

The table below lists the warnings that are displayed on the screen.

(Lit red)

(Blinking red)

The camera batteries are low or
completely out of charge.

Load new or fully charged batteries.

There is a strong likelihood of camera
shake because the shutter speed is
slow.

Use flash photography. However, use a
tripod for some scenes and modes.

Outside the AE continuous range.

The picture can be taken, but the correct
brighthess (exposure) will not be obtained.

The AF (auto focus) cannot work
effectively.

i

If the image is too dark, take the picture at
a distance of around 2 m (6.6 ft.) from the
subject.

i

Use AF lock to take the picture.

No 

xD-Picture Card

is inserted.

Insert an 

xD-Picture Card

.

i

The 

xD-Picture Card

is not

formatted.

i

The 

xD-Picture Card

contact area

is soiled.

i

Camera fault.

i

Format the 

xD-Picture Card

on the

camera.

i

Wipe the contact area on the 

xD-Picture

Card

with a soft dry cloth. It may be

necessary to format the 

xD-Picture Card

.

If the message still appears, replace the

xD-Picture Card

.

i

Contact your FUJIFILM dealer.

The 

xD-Picture Card

is full.

Erase some images or use an 

xD-Picture

Card

that has ample free space.

The frame number has reached
999–9999.

1

Insert a formatted 

xD-Picture Card

into

the camera.

2

Set “RENEW” as the FRAME NO.
setting in the “SET-UP” menu.

3

Start taking pictures. (The frame
numbers start from “100-0001”.)

4

Set “CONT.” as the FRAME NO. setting
in the “SET-UP” menu.

Warning Displayed

Explanation

Remedy

i

The 

xD-Picture Card

contact area

is soiled.

i

The 

xD-Picture Card

is damaged.

i

The 

xD-Picture Card

format is

incorrect.

i

Camera fault.

i

Wipe the contact area on the 

xD-Picture

Card

with a soft dry cloth. It may be

necessary to format the 

xD-Picture Card

.

If the message still appears, replace the

xD-Picture Card

.

i

Contact your FUJIFILM dealer.

i

The data could not be recorded due
to an 

xD-Picture Card

error or a

connection error between the 

xD-

Picture Card

and camera.

i

The image cannot be recorded as it
is too large to fit in the available
space on the 

xD-Picture Card

.

i

Re-insert the 

xD-Picture Card

or turn the

camera off and then on again. If the
message still appears, contact your
FUJIFILM dealer.

i

Use a new 

xD-Picture Card

.

Camera malfunction or fault.

i

Turn the camera on again, taking care not
to touch the lens.

i

Turn the camera off and on again. If the
message still appears, contact your
FUJIFILM dealer.

Содержание FinePix S3100

Страница 1: ...era Advanced Features Software Installation Settings Viewing Images BL00404 200 1 This manual will show you how to use your FUJIFILM DIGITAL CAMERA FinePix S3100 FinePix S3500 correctly Please follow the instructions carefully OWNER S MANUAL ...

Страница 2: ...ontransferable nonexclusive license a to install one copy of Software onto one computer in binary machine executable form b to use Software on the computer onto which Software is installed and c to make one backup copy of Software 3 Restrictions 3 1 You shall not distribute rent lease or otherwise transfer all or any part of Software Media or Documentation to any third party without FUJIFILM s pri...

Страница 3: ... Nishiazabu 2 chome Minato ku Tokyo 106 8620 Japan is in conformity with the following Standards Safety EN60065 EMC EN55022 1998 Classe B EN55024 1998 EN61000 3 2 1995 A1 1998 A2 1998 following the provision of the EMC Directive 89 336 EEC 92 31 EEC and 93 68 EEC and Low Voltage Directive 73 23 EEC Dusseldorf Germany July 1 2004 Place Date Signature Managing Director Bij dit produkt zijn batterije...

Страница 4: ...23 Standard number of frames per xD Picture Card 23 USING AF AE LOCK 24 USING THE ZOOM OPTICAL ZOOM DIGITAL ZOOM 25 BEST FRAMING 25 VIEWING THE IMAGES w PLAYBACK 26 Single frame playback Selecting images Multi frame playback 26 Playback zoom 27 ERASING IMAGES o ERASE FRAME 28 PLAYBACK MODE PHOTOGRAPHY MODE 2 Using the Camera B STILL PHOTOGRAPHY TAKING PICTURES SELECTING THE CAMERA SETTINGS 29 PHOT...

Страница 5: ...ON A Mac OS X 69 5 Software Installation 6 1 CAMERA CONNECTION 72 6 1 1 Using the AC Power adapter sold separately 72 6 1 2 Connecting to a TV 72 6 2 CONNECTING THE CAMERA DIRECTLY TO THE PRINTER PictBridge FUNCTION 73 6 2 1 Specifying images for printing on the camera 73 6 2 2 Specifying images for printing without using DPOF single frame printing 74 6 3 CONNECTING TO A PC 76 6 3 1 Connecting to ...

Страница 6: ...induce vomiting Then seek medical assistance Notes on Electrical Interference If the camera is to be used in hospitals or aircrafts please note that this camera may cause interference to other equipment in the hospital or aircraft For details please check with the applicable regulations Handling Your Digital Camera This camera contains precision electronic components To ensure that images are reco...

Страница 7: ...i static case 1 h Shoulder strap h Lens cap 1 h Adapter ring 1 h LR6 AA size alkaline batteries 4 h Video cable 1 plug 2 5 mm dia to pin plug Approx 1 5 m h USB cable for FinePix S3100 FinePix S3500 1 h CD ROM Software for FinePix AX 1 h Owner s Manual this manual 1 ...

Страница 8: ...phy mode P 20 Power OFF P 13 Movie P 54 Manual P 31 AUTO P 30 Scene position P 30 Slot cover P 12 b Wide zoom button P 19 25 a Tele zoom button P 19 25 DISP Display BACK button P 18 Indicator lamp P 23 Viewfinder EVF P 20 EVF LCD monitor selector button P 20 LCD monitor P 20 Tripod mount MENU OK button P 19 Low Light Viewfinder button P 36 Strap mount Battery cover P 11 d Macro button P 32 c Flash...

Страница 9: ...1 1 1 200 1 2004 12 00 AM 12 00 AM 16 N 1 1 2004 Time UP UP Number of available frames Camera shake warning AF warning Battery level warning Quality mode AF frame Date 100 0001 1 1 2004 12 00 AM 16 16 N 1 1 200 1 2004 Macro close up White balance EV Exposure compensation Flash Photography mode Zoom bar Increasing monitor brightness Self Timer Playback mode ...

Страница 10: ...ns cap to the strap Attach the lens cap to the lens by pressing in on each side of the cap 2 Attach the strap to the strap mounts on the camera Once you have attached both ends of the strap check carefully to make sure that the strap is firmly secured Attaching the lens cap 0 1 0 2 ATTACHING THE LENS CAP STRAP ADAPTER RING 1 Getting Ready Mounting the adapter ring on the camera not only blocks unw...

Страница 11: ... or overheating 1 Batteries with split or peeling outer casings 2 Combinations of different types of batteries or new and used batteries together h Do not use manganese or Ni Cd batteries h Soil such as fingermarks on the poles of the batteries can shorten time for which the batteries can be used h The time for which AA size alkaline batteries referred to hereafter simply as alkaline batteries can...

Страница 12: ...ure Card If opening the slot cover while the camera is still on the camera will turn off 2 Align the indicators on the xD Picture Card slot and xD Picture Card and then push the card firmly all the way into the slot 3 Close the slot cover How to replace the xD Picture Card Push the xD Picture Card into the slot and then slowly remove your finger The lock is released and the xD Picture Card is push...

Страница 13: ...hotography or Playback mode Holding down a or b changes the numbers continuously When the time displayed passes 12 00 the AM PM setting changes At the time of purchase and after leaving the camera for a long period with the batteries removed settings such as the date and time are cleared Once the AC power adapter has been connected or the batteries have been installed for 2 hours or more the camer...

Страница 14: ...12 00 AM 12 00 AM MM DD DD YYYY YYYY SET SET CANCEL CANCEL 0 1 0 3 0 2 0 1 0 2 0 1 0 2 0 3 3 1Press d or c to select Year Month Day Hour or Minute 2Press a or b to correct the setting 3Always press the MENU OK button after the settings are completed DATE TIME DATE TIME 2004 2004 4 24 24 12 00 AM 12 00 AM YYY YYYY Y MM DD DD SET SET CANCEL CANCEL Holding down a or b changes the numbers continuously...

Страница 15: ...en appears Press d or c to move to option 3 and then press a or b to select 2Press c to select ENGLISH FRANCAIS DEUTSCH ESPAÑOL or Press c to cycle through the language settings The screens in this manual are shown in English See P 60 for more information on the F OPTION menu 1Press the MENU OK button to display the menu on the screen 2Press d or c to select F OPTION and then press a or b to selec...

Страница 16: ...ar location before use Battery level warning 1 The camera s estimation of the remaining battery charge varies greatly depending on the camera operation mode Consequently even if C or V is not displayed in Playback mode one of them may appear when you change to Photography mode 2 Depending on the battery type and the level of charge in the batteries the camera may run out of power without first dis...

Страница 17: ...pop up button Press the Flash pop up button to release the flash 0 Photography mode selector Turn the Mode dial to change Photography mode 0 ON OFF and Photography Playback mode selector switch Use the Power switch to select the mode BASIC OPERATION GUIDE 2 Using the Camera This section describes the camera s functions ...

Страница 18: ...tton toggles between the viewfinder and the LCD monitor Use whichever mode is best suited to your shot Low Light Viewfinder button The screen brightness is increased briefly DISP BACK button DISP Press this button to select the screen display BACK Press this button to stop a procedure midway through EVF LCD ...

Страница 19: ...xt step in the procedure appear at the bottom of the screen Press the button indicated For example to trim the image as shown in the figure at right press the MENU OK button Up down left and right are indicated by black triangles in the Owner s Manual Up or down is shown as a or b and left or right is shown as d or c Displaying the On screen Help 0 g button Photography d button Turns Macro on and ...

Страница 20: ... may appear in the image This is due to the flash reflecting off the dust particles or snowflakes Use Suppressed flash mode to fix the problem Press the Flash pop up button to pop up the flash Brace your elbows against your sides and hold the camera with both hands Position your right thumb so that it is handy for using the zoom Moving the camera while shooting gives a blurred picture camera shake...

Страница 21: ... short double beep is heard the camera focuses on your subject The AF frame on the screen becomes smaller The indicator lamp green changes from blinking to lit If the camera does not emit a short double beep and appears on the screen the camera cannot focus Pressing the shutter button down halfway freezes the image on the screen briefly This is not the recorded image If appears on the screen e g t...

Страница 22: ...hake particularly for shots in the dark when the selected flash mode is Suppressed flash Use the LCD monitor to frame the shot so that the subject fills the entire AF Autofocus frame 3 16 16 N AF frame TAKING PICTURES B AUTO MODE PHOTOGRAPHY MODE The image shown on the LCD monitor before the picture is taken may differ in brightness color etc from the image actually recorded Play back the recorded...

Страница 23: ... save mode P 61 Blinking red h xD Picture Card Warnings No card inserted card not formatted incorrect format card full xD Picture Card error h Lens operation error Detailed warning messages appear on the screen P 89 90 NUMBER OF AVAILABLE FRAMES The number of available frames appears on the screen See P 38 for information on changing the quality setting The default quality y set at shipment is 4 N...

Страница 24: ... the shutter button down halfway Move the camera back to the original image and press the shutter button fully 1 2 3 4 AF AE lock can be applied repeatedly before the shutter is released Use AF AE lock in all Photography modes to make sure excellent results 16 16 N 16 16 N Bebeep Beep AF Autofocus AE Auto exposure lock On the FinePix S3100 FinePix S3500 pressing the shutter button down half way lo...

Страница 25: ...oming status The area to above the separator indicates digital zooming while the area to below indicates optical zooming h Optical zoom focal length Approx 39 mm 234 mm max zoom scale 6 h Digital zoom focal lengths 2 approx 234 mm 327 6 mm max zoom scale approx 1 4 1 approx 234 mm 397 mm max zoom scale approx 1 7 approx 234 mm 796 5 mm max zoom scale approx 3 4 35 mm camera equivalents Text displa...

Страница 26: ...he display shown on the screen Press the DISP BACK button until the multi frame playback screen 9 frames appears 1Press a b d or c to move the cursor orange frame to the frame you want to select Press a or b repeatedly to jump to the next page 2Press the MENU OK button to enlarge the image Text displayed Multi frame playback No text displayed 0 1 0 2 0 1 0 2 VIEWING THE IMAGES w PLAYBACK PLAYBACK ...

Страница 27: ... to single frame playback Playback zoom cannot be used with multi frame playback CANCEL CANCEL PANNING PANNING Zoom bar 1Press d or c to select PANNING 2Press a b d or c to display another area Press the DISP BACK button to return to playback zoom CANCEL CANCEL 0 1 0 2 Zoom scales Quality mode Max zoom scale 4 2272 1704 Approx 14 2 1600 1200 Approx 10 1 1280 960 Approx 8 640 480 Approx 4 確認 ...

Страница 28: ...r information on ALL FRAMES 4 1Press d or c to select the frame file to be erased 2Press the MENU OK button to erase the displayed frame file To erase another image repeat steps 1 and 2 Press the DISP BACK button to cancel single frame erasing 0 1 0 2 0 1 0 2 0 1 0 2 0 1 0 2 To return to single frame playback press a or b to select BACK and then press the MENU OK button Press the MENU OK button re...

Страница 29: ...fect D Uses the AE exposure as a reference value of 0 This function brightens or darkens the shot A White balance Uses to fix the white balance to suit the photography conditions and lighting Aperture priority Use this mode for shots that have the background out of focus large aperture or have both near and far objects in focus small aperture G Sharpness Use this setting to soften or emphasize out...

Страница 30: ...NDSCAPE LANDSCAPE NIGHT NIGHT PORTRAIT PORTRAIT 0 1 0 2 0 3 16 16 N Explanation Available flash modes m PORTRAIT This is the best mode for shooting portrait Skin tones are shown beautifully and the overall tone is soft x b d c n LANDSCAPE This is the best mode for shooting scenery in daylight and provides crisp clear shots of scenery such as buildings and mountains Flash not available When the fla...

Страница 31: ... White balance Use to fix the white balance to suit the photography conditions and lighting 42 z Flash brightness adjustment Use this setting to adjust the amount of light emitted by the flash to suit the photography conditions or to achieve a desired effect 41 G Sharpness Use this setting to soften or emphasize outlines or to adjust the quality of the image 42 42 Aperture priority This is an auto...

Страница 32: ...flash range Approx 0 3 m to 0 8 m 1 0 ft to 2 6 ft Any of following cancels Macro mode i Changing the Mode dial setting i Turning the camera off Select the appropriate flash mode for the conditions Use a tripod to avoid camera shake when shooting in the dark when appears The lens is fixed at the wide angle zoom setting and only the digital zoom can be used 0 1 0 2 When using the flash When using t...

Страница 33: ...ator lamp blinks orange during charging The flash setting changes each time you press the d c Flash button The last flash mode shown is the mode selected If the flash is used in dusty conditions or when it is snowing white dots may appear in the image due to flash reflecting off the dust particles or snowflakes Use Suppressed flash mode When taking a picture using the flash the image may disappear...

Страница 34: ... of people in low light conditions The flash fires a pre flash just before the picture is taken and then fires again to take the actual picture The flash fires as required by the shooting conditions If pressing the shutter button while the flash is charging the picture will be taken without the flash d FLASH PHOTOGRAPHY FUNCTIONS Red eye effect When using the flash to take a picture of people in l...

Страница 35: ...ound brightly lit use the Night setting in Scene position P 30 Suppressed flash Use a tripod to avoid camera shake particularly for shots in the dark when the selected flash mode is Suppressed flash See P 23 89 for information on the camera shake warning Pressing the flash down changes the camera to Suppressed flash mode Use this mode for taking pictures using indoor lighting for shots taken throu...

Страница 36: ... cancel increased brightness Press the fi Low Light Viewfinder button again This function is automatically cancelled after each shot This function is purely for checking the composition of your shot It does not increase the brightness of the photographed image Even if you increase the brightness in dark locations you may not see the subject To make the monitor brighter permanently specify the desir...

Страница 37: ...a picture with the white balance fixed for the surroundings and lighting when the picture is taken Aperture priority P 42 This is an automatic mode to set the aperture Use this mode for shots that have the background out of focus large aperture or have both near and far objects in focus small aperture Scene position P 40 Specify m Portrait Landscape Sport or Night D EV P 41 Set when the correct ex...

Страница 38: ...en changing the quality setting the number of available frames also changes P 23 QUALITY QUALITY 25 25 20 20 10 10 N FRAME FRAME 33 33 F PHOTOGRAPHY MENU PHOTOGRAPHY MENU Displaying the menus P 37 Printing at up to 6R A5 size For better quality select F Quality mode 4 F 2272 1704 4 N 2272 1704 Printing at up to 4R A6 size 2 1600 1200 Printing at up to 3R size 1 1280 960 To use for e mail or web si...

Страница 39: ...o focus on the subject 3Without releasing the shutter button press the button all the way down fully pressed to start the self timer Bebeep Beep N N 16 16 2 0 1 0 2 0 3 SELF TIMER PHOTOGRAPHY Any of following cancels the self timer setting i Completing the shooting i Changing the Mode dial setting i Turning the camera off The AF AE lock can be used P 24 Take care not to stand in front of the lens ...

Страница 40: ... the menus P 37 Scene Explanation Available flash modes m PORTRAIT This is the best mode for shooting portraits Skin tones are shown beautifully and the overall tone is soft x b d c n LANDSCAPE This is the best mode for shooting scenery in daylight and provides crisp clear shots of scenery such as buildings and mountains Flash not available When the flash is popped up v appears SPORT This is the b...

Страница 41: ...es 0 6 EV to 0 6 EV in approx 0 3 EV increments total 5 levels selectable See P 95 for information on EV Depending on the type of subject and the shooting distance brightness adjustment may have no effect z FLASH BRIGHTNESS ADJUSTMENT FLASH FLASH 0 0 3 0 3 0 3 0 3 0 6 0 6 To obtain the optimum brightness Adjust the exposure compensation according to the level of brightness or darkness in the image...

Страница 42: ...gle zoom setting The actual aperture value varies depending on the focal length of the optical zoom APERTURE PRIORITY AUTO AUTO A PRIORITY A PRIORITY F8 F2 8 F5 F5 Displayed in red 1 1 2 2 F F5 PHOTOGRAPHY MENU PHOTOGRAPHY MENU A WHITE BALANCE SELECTING THE LIGHT SOURCE WB WB AUTO AUTO Select white balance in the s Photography mode Change the white balance setting to take a picture with the white ...

Страница 43: ...L FRAMES or FRAME 2Press the MENU OK button 0 1 0 2 1 o ERASING SINGLE ALL FRAMES PLAYBACK MENU Erased frames files cannot be recovered Back up important frames files onto your PC or another media Press d or c to select o ERASE ALL FRAMES Erases all unprotected frames files Back up important frames files onto your PC or another media FRAME Erases only the selected frame file BACK Returns to playba...

Страница 44: ... care not to erase a frame file by mistake Protected frames files cannot be erased Unprotect the frames files before erasing them P 49 FRAME Pressing the MENU OK button erases all the frames files ALL FRAMES Protected frames files cannot be erased Unprotect the frames files before erasing them P 49 0 1 0 2 o ERASING SINGLE ALL FRAMES PLAYBACK MENU If e or r appears press the MENU OK button again t...

Страница 45: ...00 FinePix S3500 you can specify only one print per image in the DPOF settings Note that some printers do not support date and time imprinting or specification of the number of prints Note that the warnings shown below may be displayed while you are specifying the prints e r P 44 When erasing the image the DPOF setting for that image is deleted at the same time 4 P 46 When inserting an xD Picture ...

Страница 46: ... select WITH DATE or WITHOUT DATE Selecting WITH DATE will cause the date to be imprinted on your prints 2Press the MENU OK button 0 1 0 2 When selecting the WITH DATE setting the date is imprinted on your shots using the Print Service or a DPOF compatible printer depending on the printer specifications the date may not be printed in some cases DPOF DPOF WITH WITH DATE DATE WITHOUT WITHOUT DATE DA...

Страница 47: ...button cancels that setting 100 0002 100 0002 01 01SHEETS SHEETS DPOF 0011 DPOF 0011 SET SET FRAME FRAME 0 1 0 2 Total number of prints 100 0001 100 0001 TOTAL TOTAL 11 11SHEETS SHEETS DPOF DPOF Pressing the DISP BACK button during the settings cancels all the new settings If there were previous DPOF settings only the modifications are cancelled Canceling a frame To cancel the DPOF setting for a f...

Страница 48: ...A message appears To reset all the DPOF settings press the MENU OK button DPOF DPOF WITH DATE WITH DATE WITHOUT DATE WITHOUT DATE RESET ALL RESET ALL 0 1 0 2 2 DPOF DPOF WITH WITH DATE DATE WITHOUT WITHOUT DATE DATE RESET RESET ALL ALL RESET DPOF OK RESET DPOF OK 100 0001 100 0001 YES YES NO NO Press d or c to select u DPOF u DPOF SET FRAME RESET ALL PLAYBACK MENU ...

Страница 49: ... frame file to be protected 2Press the MENU OK button to protect the frame file currently displayed To protect another frame file repeat steps 1 and 2 To finish protecting frames files press the DISP BACK button FRAME SET 0 1 0 2 i PROTECTING IMAGES FRAME SET ALL RESET ALL PLAYBACK MENU Protection is a setting that prevents frames files from being accidentally erased However the FORMAT function er...

Страница 50: ...SET ALL SET ALL OK SET ALL OK IT MAY IT MAY TAKE A WHILE TAKE A WHILE YES YES CANCEL CANCEL 100 0001 100 0001 FRAME FRAME UNPROTECT UNPROTECT OK OK YES YES CANCEL CANCEL 0 1 0 2 i PROTECTING IMAGES FRAME SET ALL RESET ALL PLAYBACK MENU To stop the procedure midway If the images are very large protecting or unprotecting all the frames files may take some time If you want to take a picture or record...

Страница 51: ...on moves it on 3 4 1Press a or b to select the playback interval and the type of image transition 2Press the MENU OK button The image frames are advanced and played back To interrupt PLAYBACK press the a button or MENU OK button Press the DISP BACK button once during playback to display the playback frame number and on screen help Press d or c to advance or go back through the images PLAYBACK PLAY...

Страница 52: ... the image Press the DISP BACK button to return to single frame playback 0 1 0 2 4 1Press a b d or c to display another area Press the DISP BACK button to return to playback zoom 2Press the MENU OK button to save the image 0 1 0 2 SET SET TRIMMING TRIMMING CANCEL CANCEL TRIMMING TRIMMING Zoom bar TRIMMING TRIMMING YES YES CANCEL CANCEL 1Set the Power switch to w 2Press d or c to select the frame f...

Страница 53: ...nd press the MENU OK button The trimmed image is added as a separate file in the final frame 0 3M 3M REC REC OK OK REC REC CANCEL CANCEL TRIMMING TRIMMING 2 1 Image Sizes Printing at up to 4R A6 size Printing at up to 3R size To use for e mail or web site ...

Страница 54: ...NG MOVIES MOVIE MODE 2 Movies up to 60 seconds long at the setting or 240 seconds long at the setting can be recorded h Specifications Motion JPEG without sound h Quality selection method 320 240 pixels 160 120 pixels h Frame rate 10 frames per second See P 95 for information on the frame rate See P 56 for information on changing the quality setting The available recording time for a movie may dec...

Страница 55: ...een during recording It shows the remaining time When the remaining time runs out recording ends and the movie is saved onto the xD Picture Card Press the shutter button during recording Recording ends and the movie is stored on the xD Picture Card If recording is stopped immediately after it begins 1 second of movie is recorded onto the xD Picture Card 53 53s REC REC 5 6 STORING STORING Pressing ...

Страница 56: ...n to confirm the setting QUALITY QUALITY 160x120 160x120 320x240 320x240 0 1 0 2 1Press a or b to change the setting 2 levels of quality can be selected For better image quality select and for longer photography time select y QUALITY SETTINGS IN MOVIE MODE Set the Movie mode before selecting the quality setting P 54 Recording times per movie quality setting 320 240 160 120 maximum shooting time 60...

Страница 57: ...l images Playing back movies Control Description Playback Playback begins Playback stops when the end of the movie is reached Pause Resume Pauses the movie during playback Press b again to resume playback Stop Stops playback Press d or c while playback is stopped to go back to the previous file or advance to the next file respectively Fast forward Rewind Press d or c during playback to skip forwar...

Страница 58: ...RIGHTNESS SET SET CANCEL CANCEL To end this procedure without changing the settings press the DISP BACK button 0 1 0 2 0 1 0 2 1 1Set the Power switch to q or w 2Press the MENU OK button to display the menu on the screen The monitor brightness specified here remains valid until the setting is changed again This setting applies to both photography and playback and can be used to change the monitor ...

Страница 59: ... display the SET UP screen Press d or c to move to options 1 to 3 After you have changed the settings press the MENU OK button to confirm the changes 1Press a or b to select a menu option 2Press d or c to change the setting Press c for FORMAT DATE TIME TIME DIFFERENCE DISCHARGE or q RESET 3 4 SET SET CANCEL CANCEL POWER POWER SAVE SAVE 2 2 MIN MIN FORMAT FORMAT OK OK SET UP SET UP ON ON LOW LOW IM...

Страница 60: ...e provides a simple way to read images from an xD Picture Card and store images onto an xD Picture Card This function allows you to conduct videoconferencing sessions between PCs connected to the Internet Windows SP1 only If a printer that supports PictBridge is available images can be printed by connecting the camera directly to the PictBridge compatible printer without using a PC qWEB ENGLISH Sp...

Страница 61: ...era remains unused for 2 or 5 minutes it is turned off Use this function when you want to get the maximum possible running time from your batteries The Power save setting is disabled during automatic playback during rechargeable battery discharging and when a USB connection is being used POWER SAVE SETTING When the camera is in sleep mode pressing the shutter button down halfway wakes the camera u...

Страница 62: ...OME Your home time zone ß LOCAL Your destination time zone 1Press d or c to select hour and minute 2Press a or b to correct the setting h Available time settings 23 45 to 23 45 in 15 minute increments 0 1 0 2 3 SET SET CANCEL CANCEL SET SET TIME DIFFERENCE TIME DIFFERENCE HOME HOME LOCATION LOCATION TIME DIFFEREN TIME DIFFERENCE CE 4 23 200 23 2004 10 30 AM 10 30 AM SET SET CANCEL CANCEL SET SET T...

Страница 63: ...urrent xD Picture Card Check the file number by viewing the image The last 4 digits of the 7 digit number in the top right corner of the screen are the file numbers while the first 3 digits show the directory number When changing the xD Picture Card always turn the camera off before opening the battery cover Opening the battery cover without turning the camera off may cause the frame number memory...

Страница 64: ...tachment function An Internet connection and e mail transmission software i Connection speed 56 k or better recommended 5 1 INSTALLATION ON A Windows PC 5 Software Installation Notes i Connect the camera directly to the PC using the USB cable included The software may not operate correctly when you use an extension cable or connect the camera via a USB hub i When your PC has more than one USB port...

Страница 65: ...installed on Windows XP SP 1 Do not connect the camera to your PC until the software installation is completed Launching the installer manually 1 Double click the My Computer icon Windows XP users should click My Computer in the Start menu 2 Right click FINEPIX CD ROM drive in the My Computer window and select Open 3 Double click SETUP or SETUP exe in the CD ROM window Installing other application...

Страница 66: ...oftware does not run correctly in the Mac OS X Classic environment 3 Turn virtual memory on if necessary 4 Required to use the FinePix Internet Service The software can still be installed even if you do not have an Internet connection Notes i Connect the camera directly to the Macintosh using the USB cable included The software may not operate correctly if you use an extension cable or connect the...

Страница 67: ... 1Click the Open button to open the installation destination folder 5 A confirmation message appears asking whether you want to continue with the installation Click the OK button 6 The User License Agreement for this software appears Read the agreement carefully and then if you agree to the terms of the Agreement click the Agree button If you click the Disagree button the software is not installed...

Страница 68: ...allation as directed by the on screen instructions 9 After restarting the Macintosh the FinePixViewer installation completed message appears Click Using FinePixViewer to view the basic FinePixViewer functions To install Acrobat Reader later 1 Double click the FinePix CD ROM to open the CD ROM window 2 Double click FinePixViewer for MacOS9 Acrobat Reader English folder 3 Double click English Reader...

Страница 69: ...the FinePix Internet Service or mail attachment function An Internet connection and e mail transmission software i Connection speed 56 k or better recommended Hardware and software requirements 1 Models with a USB port as a standard feature 2 Required to use the FinePix Internet Service The software can still be installed even if you do not have an Internet connection Notes i Connect the camera di...

Страница 70: ...strator account and then click the OK button The administrator account is the user account used for Mac OS X installation and you can confirm the user account in the Accounts dialog in the System Preferences 4 The Installer setup dialog appears Click the Installing FinePixViewer button For more information on what is installed click the Read Me First button and Using FinePixViewer button The Licen...

Страница 71: ...elect FPVBridge from FinePixViewer folder in the Applications folder and click the Open button 15 Select Quit Image Capture menu in the Image Capture menu 8 The FinePixInstallOSX window appears Click the Install button to install FinePixViewer and RAW FILE CONVERTER LE 9 The ImageMixer VCD2 installer automatically starts up and a window showing the installation progress appears Installation may ta...

Страница 72: ...so result in damage to the xD Picture Card or malfunctions during PC connection When there is a power outlet available connect the AC Power Adapter AC 5V 2 To video input socket Plug the other end of the cable into the video input socket on the TV Then turn the camera and TV on and take pictures or play back images as you would normally Refer to the instructions provided with your TV for more info...

Страница 73: ...ICTBRIDGE PICTBRIDGE PRINT PRINT DPOF DPOF AC 5V Sold separately USB socket 2 Select in USB MODE in the SET UP menu P 59 Do not connect to a PC when the USB mode setting is set to See P 92 if you connect to PC by mistake SET SET CANCEL CANCEL TIME DIFFERENCE TIME DIFFERENCE SET SET CONT CONT SET UP SET UP SET SET DATE TIME DATE TIME FRAME FRAME NO NO 1 3 USB USB MODE MODE 2 1 1Connect the camera t...

Страница 74: ... P 59 Do not connect to a PC when the USB mode setting is set to See P 92 if you connect to PC by mistake SET SET CANCEL CANCEL TIME DIFFERENCE TIME DIFFERENCE SET SET CONT CONT SET UP SET UP SET SET DATE TIME DATE TIME FRAME FRAME NO NO 1 3 USB USB MODE MODE 2 1 1Connect the camera to the printer using the USB cable included 2Turn the printer on The camera cannot be used to specify printer settin...

Страница 75: ... button 0 1 0 2 1Check that f is not displayed on the camera s screen 2Turn the camera off Unplug the USB cable Disconnecting the printer AC 5V Sold separately USB socket SET SET PRINT WITH DATE PRINT WITH DATE PRINT WITHOUT DATE PRINT WITHOUT DATE PICTBRIDGE PICTBRIDGE PRINT PRINT DPOF DPOF Movie images cannot be printed 5 1Press d or c to display the frame file for which you want to specify PRIN...

Страница 76: ... chat with Windows Messenger No i Please download it from the Messenger web site Images are not output to a TV When using Video Chat with the WEB Camera function Windows XP SP1 is required also for your partner s OS Change between and q WEB in the camera s SET UP screen q WEB WEB CAM Web Camera mode Using Video Chat with Windows Messenger Connecting camera to a PC q Plug the AC power adapter conne...

Страница 77: ...he Power switch to turn the camera on 3Select in USB MODE in the SET UP menu P 59 4Set the Power switch to turn the camera off 1Turn your PC on 2Connect the camera to the PC using the USB cable included 3Turn the camera on USE AT DSC MODE 0 1 0 3 0 2 0 4 USB socket DC IN 5V socket Camera 1Set a camera 2Connect a camera to a PC Make sure that the USB cable included is connected correctly and pushed...

Страница 78: ... cases Click the OK button and launch FinePixViewer manually 3A new removable disk icon appears in the My Computer window FinePixViewer automatically starts up and the Save Image Wizard window Save Image dialog box appears Follow the instructions provided on screen to save the images at this point To proceed without saving the images click the Cancel button The Windows CD ROM may also be required ...

Страница 79: ...3Unplug the USB cable included from the camera 6 3 2 Disconnecting the camera 1Windows Once the image has been saved the Remove Camera Media window appears Save Image Wizard Windows To disconnect the camera click the Remove button Macintosh Once the image has been saved the Remove camera media window appears Save Image dialog box To disconnect the camera click the OK button 0 3 0 2 ...

Страница 80: ...y 1Check that the camera is not connected to the PC 2Quit all currently running applications 3Open the My Computer window open the Control Panel and double click on Add Remove Programs 6 4 2 Uninstalling the software Windows Macintosh h To read How to Use FinePixViewer You must install Adobe Systems Acrobat Reader See P 68 for information on installing Acrobat Reader For more information on using ...

Страница 81: ...ewer Then drag the installed FinePixViewer folder to the Trash and select Empty Trash in the Special menu Uninstalling Exif Launcher FinePixViewer 1After you have quit Exif Launcher in Exif Launcher Settings in the FinePixViewer Settings menu move the Exif Launcher file from the Startup Items folder in the System folder to the Trash Then select Empty Trash in the Special menu 2After you have exite...

Страница 82: ...ble xD Picture Card xD Picture Card Digital Photo Printer CX 550 TV monitor commercially available Video output PC card slot Personal Computer commercially available Personal Computer commercially available Image Memory Card Reader DPC R1 PC Card Adapter DPC AD xD Picture Card USB Drive DPC UD1 CompactFlash Card Adapter DPC CF USB USB USB USB PictBridge eBy using the FinePix S3100 FinePix S3500 to...

Страница 83: ... Ni MH batteries h Fujifilm Battery Charger with Battery BK NH BK NH2 With Euro type or UK type plug The BK NH BK NH2 includes the quick battery charger BCH NH BCH NH2 and 2 Ni MH batteries The BCH NH BCH NH2 can charge 2 Ni MH batteries in approximately 120 minutes Up to 4 Ni MH batteries can be charged simultaneously h Carrying Case SC FX304 This is a special case made of polyester that protects...

Страница 84: ...filter should be mounted at a time Wide conversion lens WL FX9 WL FX9B Changes the focal length by a factor of 1 5 telephoto equivalent to 351 mm without altering the F stop value of the lens h Teleconversion lens specifications Magnification 1 5 Lens configuration 3 lenses in 3 groups Shooting range Approx 5 0 m to infinity Dimensions 65 mm 2 56 in dia 55 mm 2 17 in Mass Weight Approx 100 g 3 5 o...

Страница 85: ...batteries Do not use AA size manganese or nickel cadmium Ni Cd batteries in your FinePix S3100 FinePix S3500 because the heat created by the batteries could damage the camera or cause it not to work h The life of alkaline batteries varies between brands The life of batteries you purchase may be shorter than those provided with the camera Notes on the Batteries Incorrect use of the batteries could ...

Страница 86: ...he problem of only providing power for a short time after being charged To prevent this problem discharge and recharge them several times using the camera s Discharging rechargeable batteries function By repeating this cycle several times the temporary reduction in performance caused by memory or deactivation can be remedied and the batteries can be restored to their original performance levels De...

Страница 87: ...teries 1 SET UP SET UP OPTION OPTION EVF LCD EVF LCD 1Press the MENU OK button 2Press d or c to select F OPTION and then press a or b to select SET UP 3Press the MENU OK button 0 1 0 3 0 2 Do not use the procedure for discharging rechargeable batteries with alkaline batteries 2 1Press d or c to move to option 3 and then press a or b to select DISCHARGE 2Press c SET SET CANCEL CANCEL 言語 言語 LANG LAN...

Страница 88: ...t dry piece of cloth when dirty h When carrying or storing an xD Picture Card keep it in the special protective case h The xD Picture Card will work well for long time but will sooner or later lose its ability to store and play back images or movies If this happens replace it with a new xD Picture Card h Never remove the xD Picture Card or turn the camera off during data recording or erasing xD Pi...

Страница 89: ...e some images or use an xD Picture Card that has ample free space The frame number has reached 999 9999 1 Insert a formatted xD Picture Card into the camera 2 Set RENEW as the FRAME NO setting in the SET UP menu 3 Start taking pictures The frame numbers start from 100 0001 4 Set CONT as the FRAME NO setting in the SET UP menu Warning Displayed Explanation Remedy i The xD Picture Card contact area ...

Страница 90: ...nected correctly i Check that your printer is turned on Displayed for PictBridge i Check that the printer is not out of paper or out of ink i Turn the printer off briefly and then turn it back on i Refer to the user manual supplied with your printer Displayed for PictBridge Check that the printer is not out of paper or out of ink Printing automatically restarts when the error is cleared If the mes...

Страница 91: ...ed scenery with Macro mode selected i You took a close up shot without selecting Macro mode i You are shooting a subject that is not suited to autofocusing The picture was taken with a slow shutter speed long exposure in a high temperature environment The xD Picture Card contact area is soiled i Load new or fully charged batteries i Load the batteries in the correct direction i Close the battery c...

Страница 92: ... adapter and try again i Load new or fully charged batteries 1Press the MENU OK button to display the menu on the screen 2Press d or c to select F and press a or b to select SET UP Press the MENU OK button to display the SET UP screen on the screen 3Press d or c to move to option 3 and then use a or b to select 4Press d or c several times to select ENGLISH 5Press the MENU OK button i Connect the c...

Страница 93: ...trast type Auto focus Sensitivity Equivalent to ISO 100 automatically set between ISO 64 250 depend on the shooting mode and subject Photometry TTL 64 zones metering Exposure control Program AE Exposure compensation 2 1 EV to 1 5 EV in 0 3 step increments in Manual mode White balance Auto B Scene position m Manual modes 7 positions can be selected Viewfinder 0 33 inches 110 000 pixels electronic v...

Страница 94: ...every 30 seconds the flash used at full power every second shot and the camera turned off and then on again once every 10 shots Alkaline batteries Ni MH batteries 2300mAH Using LCD monitor Approx frames Battery Type These specifications are subject to change without notice FUJIFILM shall not be held liable for damages resulting from errors in this Owner s Manual The LCD monitor and viewfinder EVF ...

Страница 95: ...e EV increases by 1 Likewise when the light is halved the EV decreases by 1 Frame rate fps The frame rate refers to the number of images frames that are photographed or played back per second For example when 10 frames are continuously photographed in a 1 second interval the frame rate is expressed as 10 fps For reference TV images are displayed at 30 fps NTSC JPEG Joint Photographics Experts Grou...

Страница 96: ...ntact your FUJIFILM dealer Do not allow water or foreign objects to enter the camera If water or foreign objects get inside the camera turn the camera off remove the batteries and disconnect and unplug the AC power adapter Continued use of the camera can cause a fire or electric shock h Contact your FUJIFILM dealer Do not use the camera in the bathroom or shower This can cause a fire or electric s...

Страница 97: ... your finger to hold it and gently release the card Request regular internal testing and cleaning for your camera Build up of dust in your camera can cause a fire or electric shock h Contact your FUJIFILM dealer to request internal cleaning every 2 years Please note this is not a free of charge service Do not heat change or take apart the batteries Do not drop or subject the batteries to impacts D...

Страница 98: ...98 Memo ...

Страница 99: ...99 Memo ...

Страница 100: ...26 30 Nishiazabu 2 chome Minato ku Tokyo 106 8620 Japan http home fujifilm com products digital Printed in China FGS 406107 Ni ...

Отзывы: