

SmartMedia
hood
Selection Frame
7
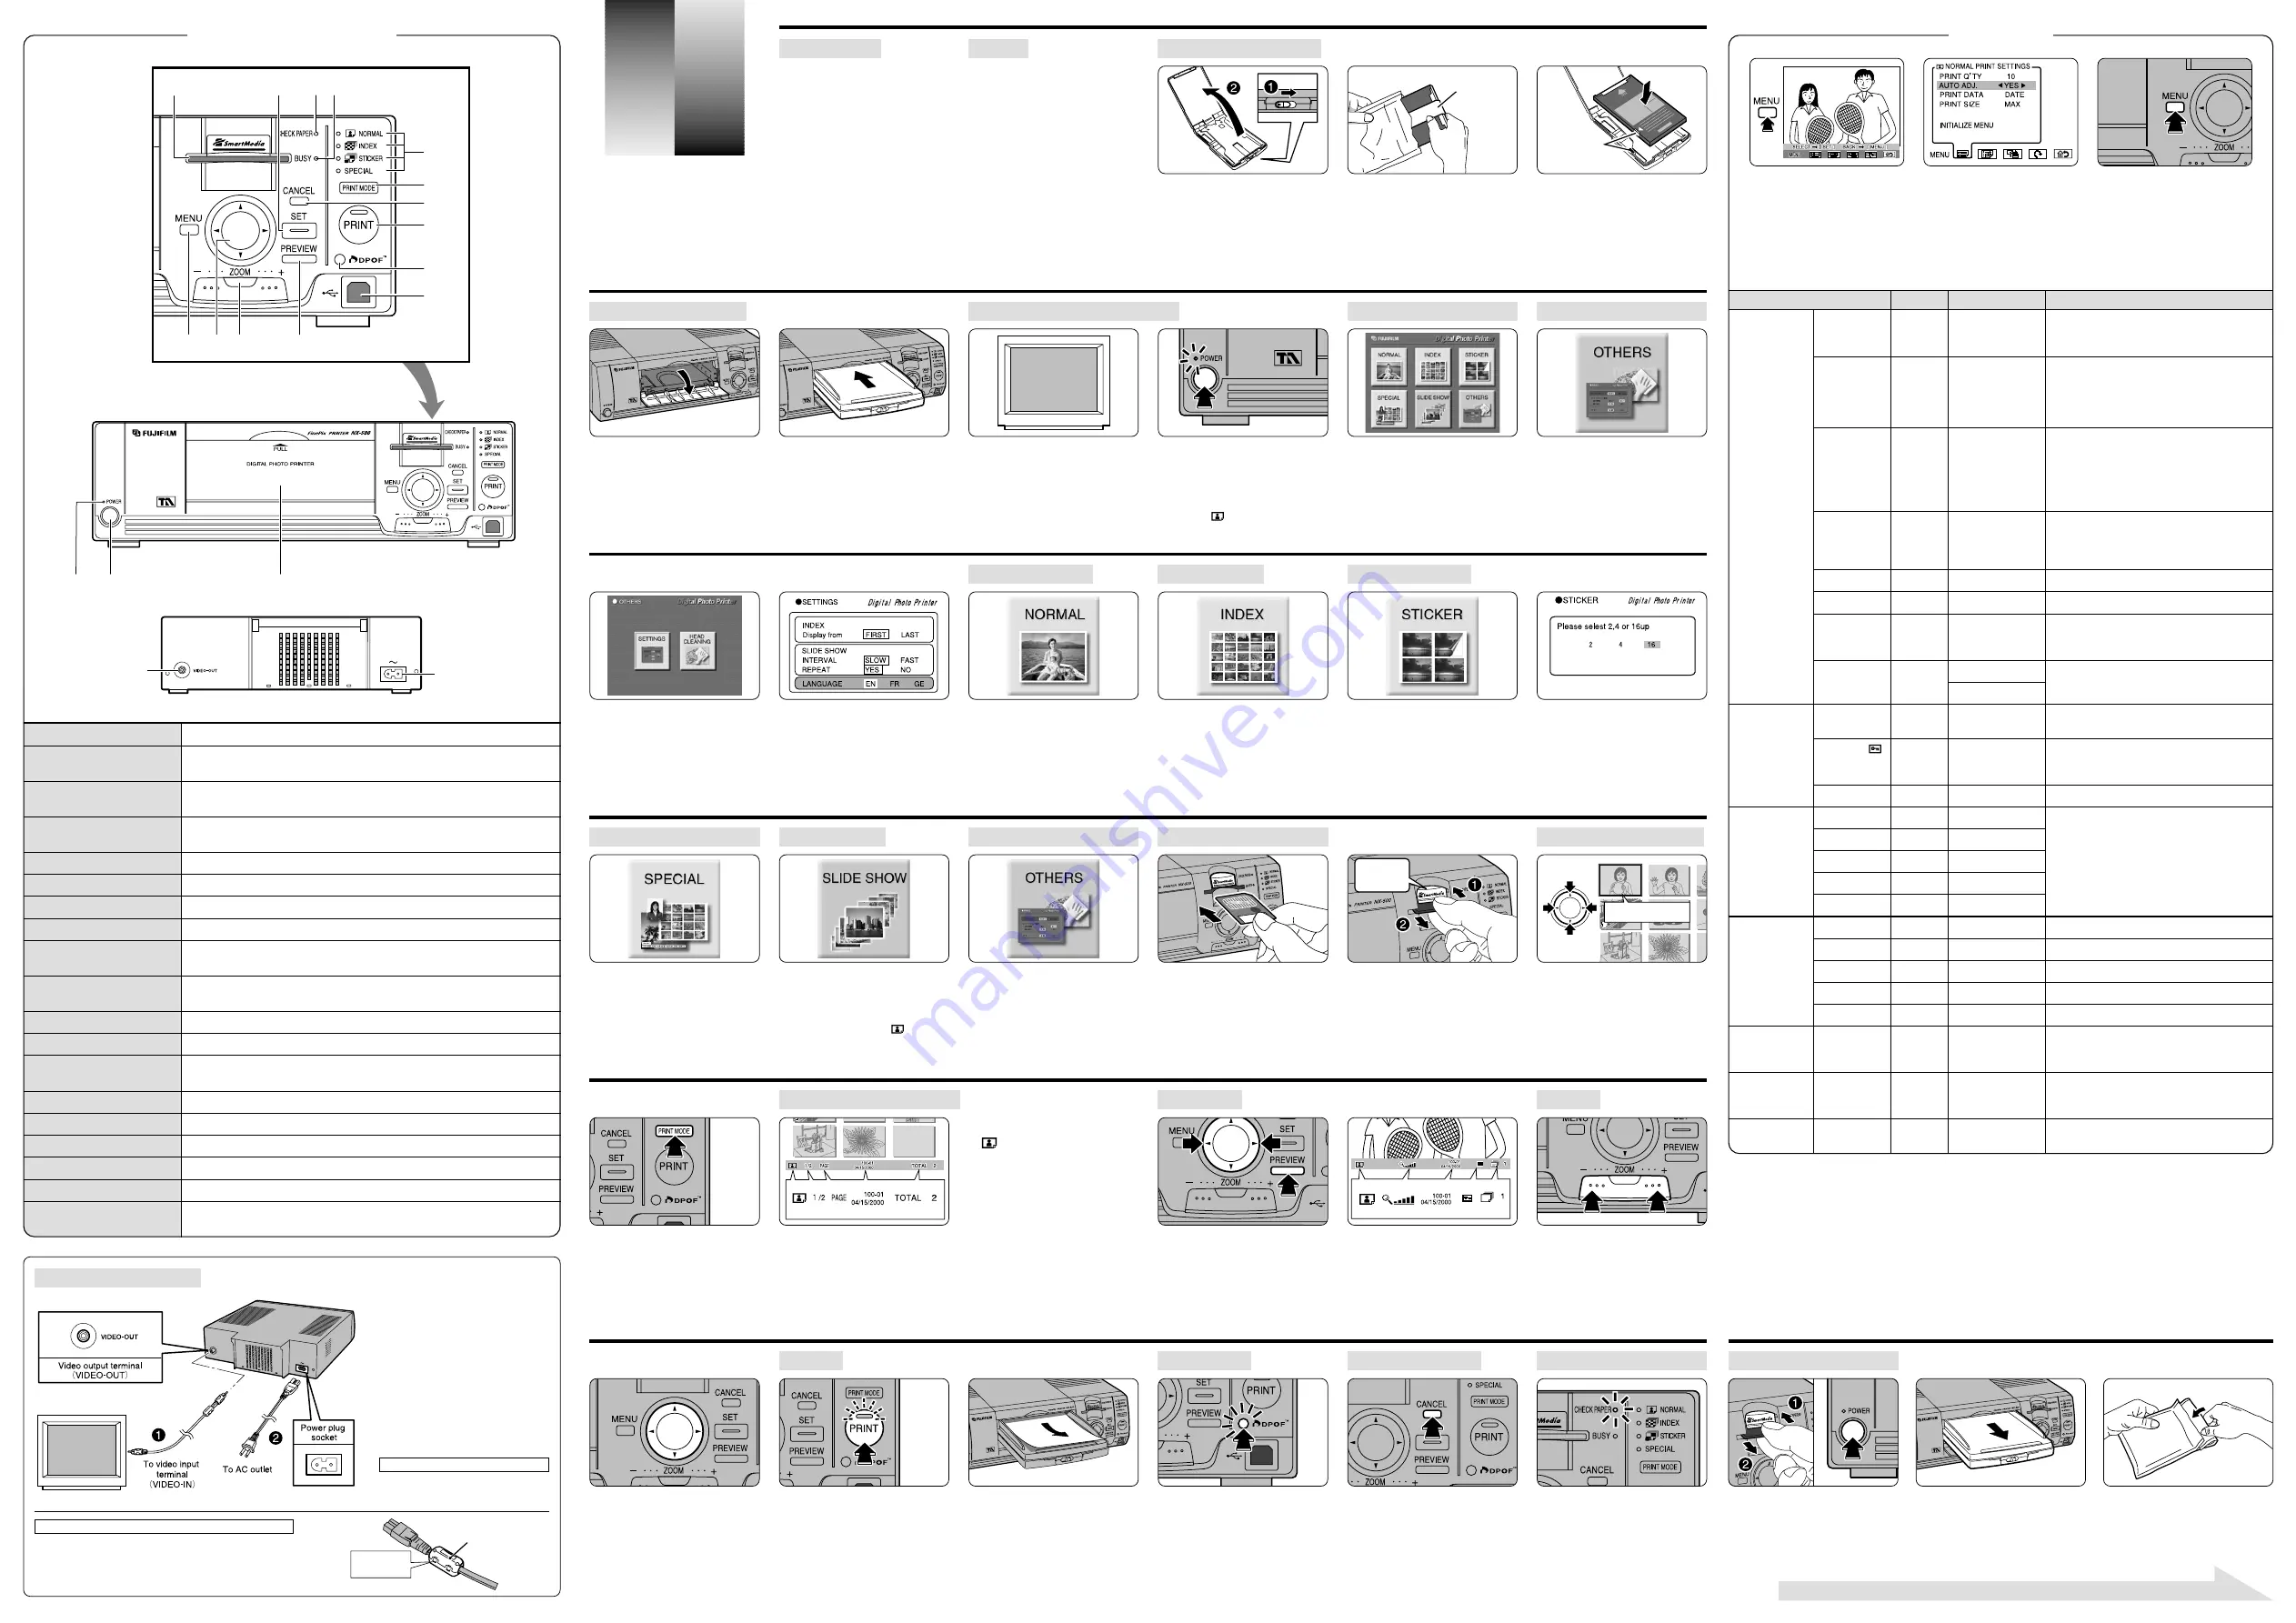
Slide the lock lever in the arrow
direction and
8
open the cassette cover.
✽
Do not get the acrylic window at the back
of the cassette or the code label on the
back of the cartridge dirty. If the window or
label gets dirty, images may not be printed
at optimum sharpness and number of
divisions.
Remove the cartridge from its protective
package and peel off the gripping tape.
✽
The protective package is used to store an
unfinished cartridge. Do not throw it away.
While matching the positioning marks on
the cassette and cartridge, insert the
cartridge into the cassette, and gently
close the cassette cover.
✽
Be sure the paper does not protrude from
the cartridge.
Open the paper cassette slot.
✽
Be sure that foreign matter does not enter
the cassette slot.
Paying careful attention to the direction of
the cassette, insert the cassette straight
into the cassette slot.
✽
If the printer will not be used for a long
time, remove the cassette and store the
cartridge in the protective package.
Turn on the monitor power and switch the
printer to the connected monitor input
mode.
✽
For information on monitor switching, refer
to the instruction manual that comes with
the monitor.
Press the POWER button to turn on the
power. When the power comes on, the
initial screen appears on the monitor
screen. When the POWER button is
pressed again, the power goes off.
✽
When the power comes on, the NX-500
enters the “
” NORMAL print mode.
Twenty-five images can be printed on one
sheet of paper. This is convenient when
indexing the images in SmartMedia.
✽
If there are no images to be printed, set
the cursor to the selected frame (blue
frame) and press the SET button, then
select CANCEL from the reservation menu
and press the SET button.
✽
Sticker paper cannot be used.
Normal size finish.
✽
Printing can be reserved. The PRINT SIZE
can also be selected from the MENU.
✽
Sticker paper cannot be used.
When the PRINT MODE button is
pressed on the index screen, the print
mode is switched while displaying the
index screen.
✽
If the preview screen is being displayed,
the screen is switched to the index screen
and the print mode is switched.
At the initial screen, select the print mode
using the direction button. Enter the
selected mode by pressing the SET
button.
When removing the SmartMedia,
8
always grasp the SmartMedia and pull it
out
7
while pushing in the SmartMedia
hood.
✽
Do not remove the SmartMedia while the
BUSY lamp is lit or blinked.
With the printer power turned on, insert
the SmartMedia into the SmartMedia slot
with the terminals (gold-color portion)
upwards and push it in until it clicks.
✽
Do not touch the SmartMedia terminals.
Prints one image on 2, 4, or 16 divisions
sticker paper.
✽
Printing can be reserved.
When sticker paper is loaded, the
number of divisions is automatically
selected.
✽
When standard paper is loaded, or there is
no paper, the screen from which the
number of divisions is selected is
displayed. Select the number of divisions
as required.
Verifies MULTIPLE, CALENDAR, and ID
PHOTO printing and DPOF setting
verification. For more information, see the
back of this page.
Automatically and sequentially displays
the images in the SmartMedia.
✽
Printing can be reserved.
✽
Make slide show settings using
SETTINGS.
✽
The printing mode is the “
” NORMAL
mode.
Performs various settings and head
cleaning. For more information, see the
back of this page.
Select the image to be printed at the
selected frame (blue frame) using the
direction button.
✽
When the SET button is pressed, printing
can be reserved.
✽
When “
I
” is selected at the MENU
from the index screen, the monitor returns
to the initial screen.
When zooming, the image can be
cropped using the direction button. When
the PRINT button is pressed, the image
range being displayed is printed.
✽
ZOOM can be canceled by canceling
preview or changing the image.
When the ZOOM button “
+
” is pressed,
the image is magnified up to five times.
When the ZOOM button “
–
” is pressed,
the image returns to normal size.
✽
This function can be used in the
NORMAL, STICKER, MULTI (SAME), and
CALENDAR modes.
The print mode icon, zoom display,
filename/date, and the number of prints
of the protected (in certain cases) and
displayed image are displayed along the
bottom of the screen.
✽
The above screen shows the NTSC
model. The date order differs in the PAL
model (day, month, year).
When the PREVIEW button is pressed,
the print image is displayed. Advance to
the next image using “
K
” and “
L
” on
the direction button.
✽
When the SET button is pressed, printing
can be reserved. [NORMAL, STICKER,
MULTI (SAME)]
✽
Only the screen being displayed is printed.
<The print mode icon>
: NORMAL
5
: INDEX
V
: STICKER
2
: SLIDE SHOW
3
: MULTI (RANDOM)
4
: MULTI (SAME)
0
: CALENDAR
1
: ID PHOTO
H
: DPOF
The print mode icon, index screen’s page
quantity, filename/date, and total number
of prints are displayed along the bottom
of the screen.
✽
The above screen shows the NTSC
model. The date order differs in the PAL
model (day, month, year).
When the PRINT button is pressed,
printing starts.
✽
During printing, the BUSY lamp lights and
the PRINT lamp blinks.
✽
Do not touch the paper during printing.
✽
Do not remove the SmartMedia or
cassette during printing.
At the end of printing, the printed paper is
ejected and the BUSY lamp goes off.
✽
Do not allow a large number of sheets of
printed paper to pile up on the cassette.
✽
Do not touch the paper while it is being
ejected.
When the DPOF lamp is lit, DPOF printing
is possible. When the DPOF button is
pressed, printing is performed in accor-
dance with the DPOF PRINT SETTINGS.
✽
With the NX-500, DPOF settings is
impossible. Specify DPOF settings with a
device (digital camera, etc) that allows
DPOF settings.
✽
During printing, the DPOF button lights.
Printing can be halted by pressing the
CANCEL button.
✽
The image being printed is printed even if
the CANCEL button is pressed.
When the CHECK PAPER lamp is lit
and the message “REFILL PAPER
CASSETTE” is displayed, load a new
cartridge into the cassette.
Set a new cartridge into the cassette as
described in the “Inserting the Cartridge”
item.
Remove the SmartMedia and turn off the
power.
✽
Do not turn off the power during printing or
when the BUSY lamp is lit.
Remove the cassette from the printer and
close the paper cassette slot.
Place the used cartridge in the protective
package. Always store the cartridge by
folding the opening of the protective
package closed.
●
Accessories
●
Paper
●
Inserting the Cartridge
●
Loading the Cassette
●
Turning the Power On and Off
●
STICKER PRINT
●
SPECIAL (Print Variation)
●
SLIDE SHOW
●
OTHERS (Various Operations)
●
Using the Index Screen
●
Viewing the Index Screen
●
PREVIEW
●
ZOOM
●
●
DPOF Print
●
Halting Printing...
●
When the Printer Runs
Out of Paper
●
After the End of Printing
●
Loading the SmartMedia
●
Selecting the Print Mode
●
NORMAL PRINT
●
INDEX PRINT
7
Connect the video output terminal
(VIDEO-OUT) of the NX-500 to the
video input terminal (VIDEO-IN) of the
monitor using a video cable.
✽
For a description of the video input
terminal (VIDEO-IN), refer to the
monitor instruction manual.
8
Connect the power cable to the power
connector of the NX-500, and plug the
power plug into an AC outlet.
✽
The shapes of the plug and socket-
outlet depends on the country of use.
✽
The socket-outlet shall installed near
the equipment and shall be easily
accessible.
When the MENU button is pressed, a
menu is displayed. Select the desired
item using “
K
” and “
L
” on the
direction button and press the SET
button.
Select setting using “
M
” and “
N
” on
the direction button and change the
settings using “
K
” and “
L
” on the
direction button. Return to the MENU
display by pressing the SET button.
✽
The contents of the setting item
depend on the PRINT mode. Only the
items that can be set in the selected
mode are displayed.
When the MENU button is pressed,
all the settings are verified.
✽
When the multiple divisions count or
other item is changed, the preview
display is updated.
Menus
Factory Default
Settings
Explanation
B
PRINT Q’TY
1
1 to 99
Sets the number of prints. (When the PRINT MODE is
SETTINGS
switched, the number of prints returns to the initial
value.)
AUTO ADJ.
YES
YES/NO
Optimum compensation is applied according to the
photographed scene.
✽
For instance, for back lit scenes, the subject is often
dark. This function applies compensation so the
subject is beautifully printed.
PRINT DATA
DATE
NO/DATE/FILE NAME The date, or filename, can be printed on the print in
alphanumeric characters.
•
The date, or filename, is printed on the print in
orange.
•
The date is not printed on images that do not have
print data.
PRINT SIZE
MAX
MAX/NORM
Selects the printing area.
•
MAX:
Entire print area (The image may be cut.)
•
NORM: Entire image area (The white space on the
printing surface increases.)
CALENDAR SETTINGS
<SET>
—
For details, see the back of this page.
PAPER
STANDARD STANDARD/STICKER Selects the paper.
MULTI
RANDOM
RANDOM/SAME
Selects the MULTI mode menu.
•
RANDOM: Multiple images can be specified.
•
SAME: Uses the same image.
SPLIT
16
STANDARD 2/4/9/16/25 Selects the number of divisions.
STICKER 2/4/16
P
FRAME
ALL
—
<SET>
Reserves printing of all the frames. (The number of
SELECTION
prints is the number specified by PRINT settings.)
PROTECT (
)
—
<SET>
Reserves printing of protected frames only. (The
number of prints is the number specified by PRINT
settings.)
RESET ALL
—
<SET>
Cancels printing reservation of all frames.
Q
COLOR ADJ
BRIGHTNESS
0
–3 to +3
CONTRAST
0
–3 to +3
SHARPNESS
0
–3 to +3
HUE
0
–3 to +3
COLOR
0
–3 to +3
COLOR ENHANCE
—
<SET>
Produces a brilliant color effect.
OIL PAINTING
—
<SET>
Produces an oil painting image.
FANTASY
—
<SET>
Produces a bright effect.
SEPIA
—
<SET>
Produces a sepia image.
MONOCHROME
—
<SET>
Produces a monochrome image.
—
—
<SET>
Rotates the image in 90-degree steps.
I
INITIAL
—
—
<SET>
When “
I
” is selected and the SET button is
SCREEN
pressed, the monitor screen returns to the initial
screen.
INITIALIZE MENU
—
—
<SET>
Returns the items displayed in each menu to their
initial value.
✽
For more infor-
mation, see the
back of this page.
For a description of Print Reservation, SPECIAL, and OTHERS, see the back of this page.
Video cable (pin plug) ................... 1
Power cable ................................... 1
Loading cassette ........................... 1
Owner’s Manual ............................ 1
Safety Notes .................................. 1
Cleaning paper .................. 5 sheets
CD-ROM ........................................ 1
Software Installation Manual ......... 1
Noise suppression core ................ 1
✽
The image can
be selected at the
index screen.
Gripping tape
✽
For more infor-
mation, see the
back of this page.
Positioning
mark
●
a
SmartMedia slot
Insert the SmartMedia here.
●
b
SET button
Use to specify the print mode, print reservation, and to display the next menu
on the MENU screen.
●
c
CHECK PAPER lamp
The lamp will turn on when the printer runs out of paper and will blink when the
paper is jammed.
●
d
BUSY lamp
Blinks when accessing the SmartMedia and lights when the printer is printing.
✽
Do not touch the SmartMedia while this lamp is blinking or lit.
●
e
Print mode lamps
The lamp of the selected print mode lights.
●
f
PRINT MODE button
Use to select the NORMAL, INDEX, or STICKER mode.
●
g
CANCEL button
Used to cancel the settings during MENU setting, or to halt printing.
●
h
PRINT button
Starts printing.
●
i
DPOF button
Prints according to DPOF specification. (The lamp lights when the printer is
ready to print.)
●
j
USB terminal
Use to connect to a personal computer by using a commercially avairable
USB cable.
●
k
PREVIEW button
Use to view the image to be printed. (The display depends on the print mode.)
●
l
ZOOM button
Use to enlarge (up to five times) the image on the preview screen.
●
m
Direction button
Use to select the print mode and image at the initial, index, and preview
screens and to change the menu selections and settings.
●
n
MENU button
Use to turn the menu display on and off.
●
o
Paper cassette slot
Insert the cassette here.
●
p
Power button
Switches the printer on and off.
●
q
POWER lamp
Lights when the printer is on.
●
r
Power plug socket
The power cable connects to this socket.
●
s
Video output terminal
Use to connect the printer to a monitor using a video cable.
(VIDEO-OUT)
f
g
h
i
j
k
l
m
n
q
p
o
a
b
cd
e
<Compatible Paper>
Thermo Autochrome Paper (sold
separately)
• B-20HG (standard type)
• B-10S2HG (sticker type, 2 cuts sheet)
• B-10S4HG (sticker type, 4 cuts sheet)
• B-10S16HG (sticker type, 16 cuts sheet)
✽
The cartridge is vulnerable to direct
sunlight and high temperature and
humidity. Do not store it other than inside
of its protective package.
✽
Do not attempt to insert or remove paper
into or from the cartridge. It will cause the
paper to jam.
✽
Use unpacked cartridges as quickly as
possible. The use of a cartridge that has
exceeded its valid period may cause a
decrease in its printing quality.
◆
MENUS
◆
◆
COMPONENT NAMES
◆
r
s
BASIC
PROCEDURES
BASIC
PROCEDURES
Select LANGUAGE using the direction
button. Then use “
K
” and “
L
” to select
your language and press the SET button
to end this menu.
EN: English
FR: French
GE: German
Select OTHERS at the initial screen
using the direction button. Then press the
SET button.
●
Selecting the Language
Select SETTINGS. Then press the SET
button.
The print quality can be adjusted. Changes can be
verified on the monitor screen.
✽
Sharpness cannot be verified on the monitor
screen.
CAUTION: TO PREVENT ELECTRIC SHOCK,
MATCH WIDE BLADE OF PLUG
TO WIDE SLOT, FULLY INSERT.
Note on using the power cable.
●
Connecting the Printer
To reduce interference for extraneous electrical noise, attach
the noise suppression core to the power cable before
connection.
Note on using the printer in the U.S.A. and Canada.
Noise
Suppression core
Press until
it clicks shut.


