background image

47

More

 on
 P

laybac

k


FRAME

FRAME

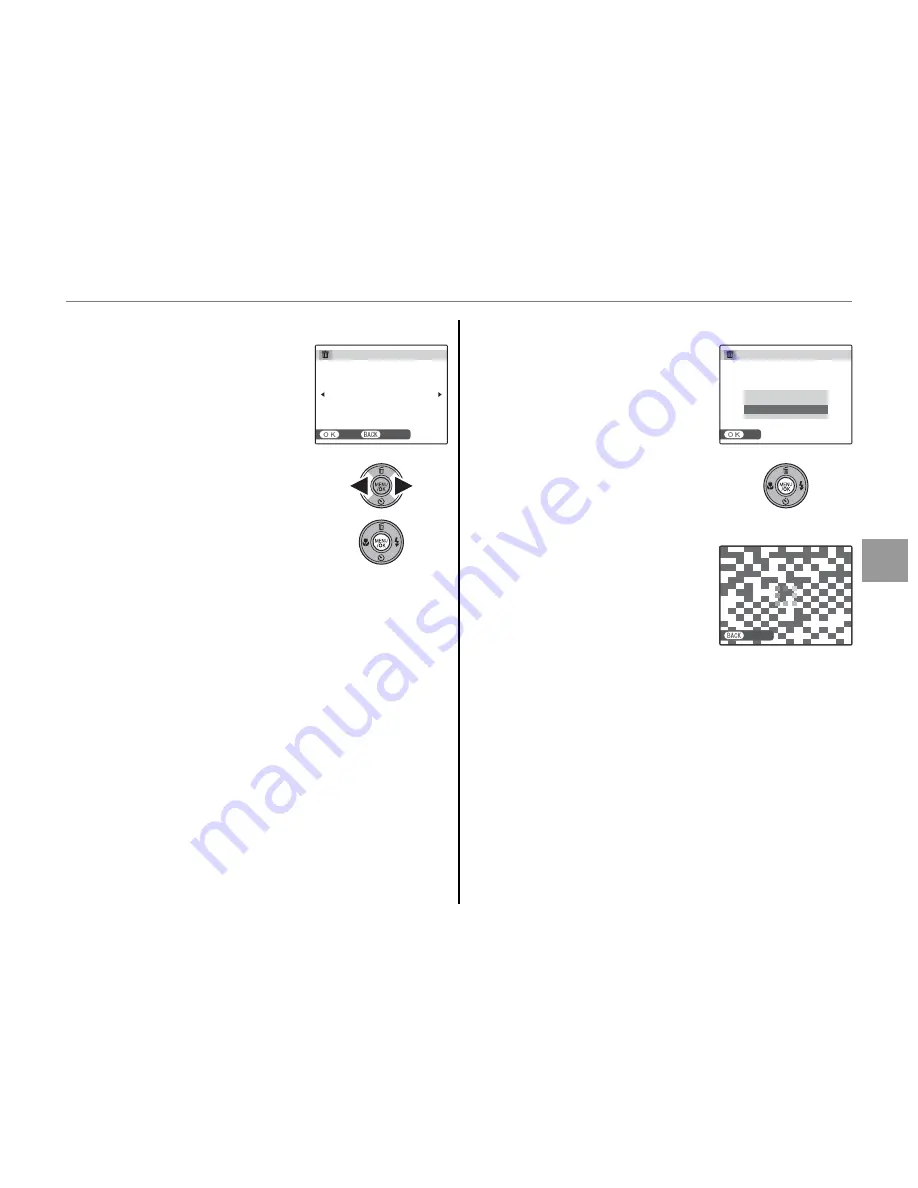
: Deleting Selected Images

: Deleting Selected Images

Selecting 

FRAME

 displays the 

dialog shown at right.

YES

CANCEL

ERASE OK?

Press the selector left or right 
to scroll through pictures and 
press 

MENU/OK

 to delete the 

current picture (the picture 
is deleted immediately; be 
careful not to delete the 
wrong picture).

Press 

DISP/BACK

 to exit when all the desired 

pictures have been deleted.


ALL FRAMES

ALL FRAMES

: Deleting All Images

: Deleting All Images

Selecting 

ALL FRAMES


displays the confirmation 
shown at right.

ERASE ALL OK?

IT MAY TAKE A WHILE

SET

CANCEL

OK

Highlight 

OK

 and press 

MENU/

OK

 to delete all unprotected 

pictures.

The dialog shown at right is 
displayed during deletion. 
Press 

DISP/BACK

 to cancel 

before all pictures have been 
deleted (any pictures deleted 
before the button was pressed can not be 
recovered).

CANCEL

CANCEL

M

 Deleting Pictures

Содержание FINEPIX F80EXR

Страница 1: ...involved in using your camera for the first time Complete operating instructions may be found in the Owner s Manual provided in pdf format on the supplied CD Viewing and Deleting Pictures Movies Restr...

Страница 2: ...ilation is provided or the manufacturer s instructions have been adhered to This video product should never be placed near or over a radiator or heat register Attachments Do not use attachments not re...

Страница 3: ...dropped or the cabinet has been damaged If the video product does not operate normally follow the operating instructions Adjust only those controls that are covered by the operating instructions as an...

Страница 4: ...the battery installitin adigitalcameraorkeepitin thehardcase When storing the battery keepitin the hardcase When discarding coverthe batteryterminals withinsulationtape Contact with other metallic obj...

Страница 5: ...necklaces or hairpins Do not expose to flame or heat Do not disassemble or modify Use with designated chargers only Dispose of used batteries promptly Do not drop or subject to strong physical shocks...

Страница 6: ...uipment does cause harmful interference to radio or television reception which can be determined by turning the equipment off and on the user is encouraged to try to correct the interference by one or...

Страница 7: ...Windows Vista and Compatible with Windows 7 logos apply only to the camera and camera hardware driver If your equipment contains easy removable batteries or accumulators please dispose these separatel...

Страница 8: ...l 1 Symbols and Conventions 1 Before You Begin 2 Supplied Accessories 2 Parts of the Camera 3 The Mode Dial 4 Firs t Step s 5 Charging the Battery 5 Inserting the Battery 6 Inserting a Memory Card 8 T...

Страница 9: ...rt it into your computer s CD drive and follow the on screen instructions See pages 20 22 of this Basic Manual for restrictions on the options available in each shooting mode S mbo s Qnd Conventions T...

Страница 10: ...he box and confirm that you have all the following items NP 50 rechargeable battery BG45W battery charger USB coble CO ROM A Vcoble Attaching the Strap Attach the strap as shown o Strap Owne s Manual...

Страница 11: ...OFF button 9 AF assist illuminator OM 34 Self timer lamp OM 40 Lens and lens cover Microphone OM 90 Flash OM 37 Zoom control 14 OM 42 Monitor OM 3 lE playback button OM 41 t Indicator lamp OM 19 Mode...

Страница 12: ...Select for full control over Icamera settings including shutter speed I I I Iand aperture OM pg 27 J _ _ _ _ _ _ _ _ __ 1 I MOVIE Record movies with sound i il OM pg 48 I _ __ _ _ _ _ _ __ _ _ j Q AU...

Страница 13: ...J Cautions Unplug the charger when it is not in use Remove dirt from the battery terminals with a clean dry cloth Failure to observe this precaution could prevent the battery from charging Charging ti...

Страница 14: ...emory cards Do not use excessive force when handling the battery chamber cover 2 Insert the battery Insert the battery with the terminals first and the orange stripe aligned with the orange battery la...

Страница 15: ...ailure to observe this precaution could make it impossible to remove the battery from the camera Do not short the battery terminals The battery could overheat Use only battery chargers designated for...

Страница 16: ...w be removed by hand The camera stores pictures in internal memory or on Secure Digital SD memory cards sold separately see pages 8 10 of the Owne s Manual If a memory card is inserted in the camera a...

Страница 17: ...nts and other marks on the lens Keep the lens clean The ON OFF button does not completely disconnect the camera from its power supply Play back Mode To turn the camera on and begin playback press the...

Страница 18: ...ge _a LANG 1 1 Press the selector up or down to highlight a language 1 2 Press MENU OK 2 Set the date and time 2012 2011 YV MM DD t1flIfj 1 1 12 00 2009 AM 2008 2 1 Press the selector left or right tf...

Страница 19: ...a or an optional AC adapter connected for about four days the battery can be removed for about seven days without resetting clock language selection or power management options Power saving for longer...

Страница 20: ...rged c J Battery exhausted Turn camera off blinks red and charge battery IhdicatorDescriptiol1 3 Check the battery level Check the battery level in the display 2 Select l m mode Rotate the mode dial t...

Страница 21: ...portrait subject o LANDSCAPE Man made or natural landscape 9 NIGHT Poorly lit landscape e MACRO Subject close to camera BACKLIT PORTRAIT Back lit portrait subject NIGHT PORTRAIT Poorly lit portrait su...

Страница 22: ...tion of the zoom control Holding the Camera Hold the camera steady with both hands and brace your elbows against your sides Shaking or unsteady hands can blur your shots To prevent pictures that are o...

Страница 23: ...e lens may make a noise when the camera focuses This is normal Ifthe camera is able to focus it will beep twice and the indicator lamp will glow green Ifthe camera is unable to focus the red colored f...

Страница 24: ...ck Menu Pictures can also be deleted from the playback menu Owne s Manual pg 46 The most recent picture will be displayed in the monitor 1 Press the lE button 2 View additional pictures Press the sele...

Страница 25: ...o keep the shutter button pressed during recording e Display shows time STA available ImJ Zoom indicator Shoot short movies with sound Sound is recorded via the built in microphone do not cover the mi...

Страница 26: ...on halfway to end record ing Recording ends automatically when the movie reaches maximum length or memory is full Recording Movies 1 Caution The indicator lamp lights while movies are being recorded D...

Страница 27: ...end playback If playback playback is not in progress pressing the delete selector up will delete the current movie Press the selector right to advance left to Advance rewind If playback is paused the...

Страница 28: ...Restrictions on Camera Settings Shooting Mode and Camera Settings The options available in each shooting mode are listed below...

Страница 29: ...Restrictions on Carnero Settings...

Страница 30: ...IZE is set to 0 till DYNAMIC RANGE to 6 0 IMAGE SIZE is set to 0 1m ISO to 400 or above II DYNAMIC RANGE to 7 is displayed when Intelligent Face Detection is on 8 Dynamic ranges of 1m and above are av...

Страница 31: ...Memo 23...

Страница 32: ...FUJIFILM FUJIFILM Corporation 7 3 AKASAKA 9 CHOME MINATO KU TOKYO 107 0052 JAPAN http www fujifilm com products index html Printed in China...

Страница 33: ...TAL CAMERA For information on related products visit our website at http www fujifilm com products digital_cameras index html Owner s Manual Thank you for your purchase of this product This manual des...

Страница 34: ...he openings should never be blocked by placing the video product on a bed sofa rug or other similar surface This video product should not be placed in a built in installation such as a bookcase or rac...

Страница 35: ...ning and power line surges Service Service Servicing Do not attempt to service this video product yourself as opening or removing covers may expose you to dangerous voltage or other hazards Refer all...

Страница 36: ...rmal state can cause a fire or electric shock Contact your FUJIFILM dealer Do not allow water or foreign objects to enter the camera If water or foreign objects get inside the camera turn the camera o...

Страница 37: ...es steam humidity or dust This can cause a fire or electric shock Do not leave this camera in places subject to extremely high temperatures Do not leave the camera in locations such as a sealed vehicl...

Страница 38: ...fter it has been charged or immediately after being used This is perfectly normal Do not recharge a fully charged battery Battery Life At normal temperatures the battery can be used at least 300 times...

Страница 39: ...g the camera s Discharging rechargeable batteries function Deactivation and memory are specific to Ni MH batteries and are not in fact battery faults See OWNER S MANUAL for the procedure for Dischargi...

Страница 40: ...the urgent action indicated If liquid crystal comes in contact with your skin Wipe the area with a cloth and then wash thoroughly with soap and running water If liquid crystal gets into your eye Flus...

Страница 41: ...Glossary Glossary pg 118 pg 118 The meanings of some technical terms may be found here TableofContents TableofContents pg xiii pg xiii The Table of Contents gives an overview of the entire manual The...

Страница 42: ...king Operation and shutter volume 94 Silent mode 19 Can I change the sound the shutter makes Shutter sound 94 What are the parts of the camera called Parts of the camera 2 What do the icons in the dis...

Страница 43: ...fied person s face FACE RECOGNITION 76 How do I shoot close ups Close ups macro mode 36 How do I keep the flash from firing Flash mode 37 How do I stop my subjects eyes glowing red when I use the flas...

Страница 44: ...s at once Multi frame playback 43 How do I find pictures Image search 44 Can I protect my pictures from accidental deletion Protect 85 Can I hide the icons in the display when viewing my pictures Choo...

Страница 45: ...y Shooting Mode 21 k AUTO 21 O EXR 21 A NATURAL K 22 B NATURAL LIGHT 23 SP SCENE POSITION 23 M MANUAL 27 P PROGRAM AE A APERTURE PRIORITY AE 28 B Intelligent Face Detection 30 Focus Lock 32 5 Exposur...

Страница 46: ...82 Using the Playback Menu 83 Playback Menu Options 84 a RED EYE REMOVAL 85 O PROTECT 85 R CROP 86 j RESIZE 87 N IMAGE ROTATE 88 P COPY 89 Q VOICE MEMO 90 S ERASE FACE RECOG 92 J DISP ASPECT 92 The S...

Страница 47: ...on that may be helpful when using the camera Menus and other text in the camera monitor are shown in bold In the illustrations in this manual the monitor display may be simplified for explanatory purp...

Страница 48: ...39 18 Battery chamber cover 6 19 Tripod mount 20 Speaker 91 21 Connector for USB cable 54 63 Connector for A V cable 52 22 HDMI connector 52 23 Battery latch 6 7 24 Battery chamber 6 25 Memory card sl...

Страница 49: ...tery level 14 24 Dual IS mode 17 25 Exposure compensation 35 1 Internal memory indicator 2 Focus frame 32 3 Silent mode indicator 19 4 Continuous shooting mode 74 5 Metering 75 6 Intelligent Face Dete...

Страница 50: ...users of digital cameras pg 21 B NATURAL LIGHT Capture natural light indoors under low light or where the flash can not be used pg 23 P PROGRAM AE Select for full control over all camera settings exce...

Страница 51: ...ht C Cautions Unplug the charger when it is not in use Remove dirt from the battery terminals with a clean dry cloth Failure to observe this precaution could prevent the battery from charging Charging...

Страница 52: ...ards Do not use excessive force when handling the battery chamber cover 2 Insert the battery Insert the battery with the terminals first and the orange stripe aligned with the orange battery latch Sli...

Страница 53: ...by an AC adapter demo mode instructions will be displayed when the camera is turned on Selecting this option starts a slide show To cancel press the shutter button C Cautions Do not affix stickers or...

Страница 54: ...be sure to delete pictures when they are no longer needed When a memory card is inserted as described below the card will be used for recording and playback CompatibleMemoryCards CompatibleMemoryCards...

Страница 55: ...orientation shown below slide it all the way in Press firmly until it clicks into place Click Battery C Caution Be sure card is in correct orientation do not insert at an angle or use force If the mem...

Страница 56: ...of reach of children If a child swallows a memory card seek medical assistance immediately miniSD or microSD adapters that are larger or smaller than the standard dimensions of an SD card may not eje...

Страница 57: ...ected by fingerprints and other marks on the lens Keep the lens clean The n button does not completely disconnect the camera from its power supply Playback Mode Playback Mode To turn the camera on and...

Страница 58: ...PORTUGU S FRANCAIS ESPA OL 1 1 Press the selector up or down to highlight a language 1 2 Press MENU OK 2 Set the date and time SET NO DATE TIME NOT SET 2012 2011 2009 2008 1 1 12 00 AM 2010 YY MM DD...

Страница 59: ...response x CLEAR DISPLAY Choose this option for a brighter higher quality display 3 2 Press MENU OK B Tip The Camera Clock If the battery is removed for an extended period the camera clock will be re...

Страница 60: ...e dial to O B Tip r P AUTO The camera automatically selects the scene and P mode according to shooting conditions 3 Check the battery level Check the battery level in the display q w e r Indicator Ind...

Страница 61: ...ene detected Type of subject or scene detected H PORTRAIT Human portrait subject I LANDSCAPE Man made or natural landscape J NIGHT Poorly lit landscape K MACRO Subject close to camera T BACKLIT PORTRA...

Страница 62: ...6x 1 6x Select B to zoom out Select A to zoom in Zoom indicator Holding the Camera Hold the camera steady with both hands and brace your elbows against your sides Shaking or unsteady hands can blur y...

Страница 63: ...the horizon HD FRAMING Displays the High Definition HD 16 9 crop Avoiding Blurred Pictures If the subject is poorly lit blurring caused by camera shake can be reduced by activating the Z DUAL IS MODE...

Страница 64: ...lamp will blink green Change the composition or use focus lock pg 32 6 Shoot Smoothly press the shutter button the rest of the way down to take the picture B Tip The Shutter Button The shutter button...

Страница 65: ...layed Silent mode can also be set from the setup menu pg 93 The Indicator Lamp Indicator lamp The indicator lamp shows camera status as follows Indicator lamp Indicator lamp Camera status Camera statu...

Страница 66: ...ictures Press the selector right to view pictures in the order recorded left to view pictures in reverse order Press the shutter button to exit to shooting mode Deleting Pictures To delete the picture...

Страница 67: ...OK to display the shooting menu EXIT 1 2 SHOOTING MENU MODE ISO DYNAMIC RANGE IMAGE SIZE IMAGE QUALITY AUTO AUTO 4 3 N FILM SIMULATION 2 Highlight A P MODE 3 Press the selector right to display the f...

Страница 68: ...s U DYNAMIC RANGE is set to D 800 5 Press MENU OK to select the highlighted option 6 Press DISP BACK to exit from the menu A A NATURAL NATURAL K K This mode helps ensure good results with backlit subj...

Страница 69: ...Rotate the mode dial to SP 2 Press MENU OK to display the following menu EXIT 1 2 SHOOTING MENU SCENE POSITION ISO DYNAMIC RANGE IMAGE SIZE IMAGE QUALITY AUTO AUTO 4 3 N FILM SIMULATION 3 Highlight A...

Страница 70: ...hen the camera fails to create effect the message 5 PLAYBACK TO CHECK IMAGE appears Take a picture again C Cautions Hold the camera firmly while you shoot Frame coverage is reduced in this mode B Tip...

Страница 71: ...P ZOOM CONTINUOUS pg 97 PRINT ORDER DPOF pg 56 CROP pg 86 C Cautions Although the camera detects faces of many kinds of dogs or cats in Y DOG or T CAT some kinds of dogs or cats may not be detected Al...

Страница 72: ...er shutter speeds D NIGHT Choose this mode for poorly lit twilight or night scenes Sensitivity is automatically raised to reduce blur caused by camera shake U NIGHT TRIPOD Choose this mode for slow sh...

Страница 73: ...ill be displayed F3 3 200 SET Shutter speed Aperture 3 Press the selector up or down to choose the aperture 4 Press the selector left or right to choose the shutter speed C Caution Noise in the form o...

Страница 74: ...camera control shutter speed for optimal exposure To take pictures in program and aperture priority AE 1 Rotate the mode dial to P 2 Press MENU OK to display the shooting menu 3 Press the selector up...

Страница 75: ...to choose exposure compensation program AE or aperture aperture priority AE If the correct exposure can not be achieved at the aperture selected for aperture priority AE the shutter speed will be disp...

Страница 76: ...tion on Press the B button to turn Intelligent Face Detection on The selection changes each time the B button is pressed ANote When removing red eye effect select ON for a RED EYE REMOVAL in the setup...

Страница 77: ...e Removal Select ON for the H SAVE ORIGINAL IMAGE option in the setup menu pg 93 to save unprocessed copies of pictures created with a RED EYE REMOVAL Intelligent Face Detection Intelligent Face Detec...

Страница 78: ...remain locked while the shutter button is pressed halfway AF AE lock 250 250 F3 3 F3 3 Press halfway Repeat steps 1 and 2 as desired to refocus before taking the picture 3 Recompose the picture Keepi...

Страница 79: ...rs or car bodies Fast moving subjects Subjects photographed through a window or other reflective object Dark subjects and subjects that absorb rather than reflect light such as hair or fur Insubstanti...

Страница 80: ...luminator ANotes Avoid shining the AF assist illuminator directly into your subject s eyes See page 93 for information on disabling the AF assist illuminator The camera may be unable to focus using th...

Страница 81: ...lue Press the selector button The effect is visible in the display Choose positive values to increase exposure Choose negative values to reduce exposure 3 Return to shooting mode Press MENU OK to retu...

Страница 82: ...r of the frame Use the zoom control to compose pictures To exit macro mode press the selector left L and select OFF Macro mode can also be cancelled by turning the camera off or selecting another shoo...

Страница 83: ...mode Press the selector right K The flash mode changes each time the selector is pressed in modes other than 4 the current mode is indicated by an icon in the display Choose from the following options...

Страница 84: ...rest of the way down to shoot C Caution The flash may fire several times with each shot Do not move the camera until shooting is complete Red Eye Removal When Intelligent Face Detection is active pg 3...

Страница 85: ...h time the selector is pressed The current self timer mode is displayed in the monitor OFF OFF Choose from y self timer off c 10s delay or b 2s delay 2 Focus Press the shutter button halfway to focus...

Страница 86: ...elf portraits To use the self timer with Intelligent Face Detection turn Intelligent Face Detection on set the timer as described in Step 1 and then press the shutter button all the way down to start...

Страница 87: ...to view pictures in reverse order Keep the selector pressed to scroll rapidly to the desired frame Choosing a Display Format In playback mode press DISP BACK to select a playback display format The se...

Страница 88: ...vigation window shows portion of image currently displayed in monitor Zoom indicator Press DISP BACK to exit zoom ANote Playback zoom is not available with cropped or resized copies saved at a size of...

Страница 89: ...o increase the number of pictures displayed to one frame with previous and next two nine and a hundred Select A to reduce the number of images displayed Use the selector to highlight images and press...

Страница 90: ...p or down to highlight the desired search category Option Option Description Description BY DATE Show images based on the specified date BY FACE Show images based on specified face information BY SCEN...

Страница 91: ...e the search results are displayed The playback menu will be displayed 2 Press the selector up or down to highlight the desired menu item 3 Press MENU OK to select the highlighted menu B Tips For each...

Страница 92: ...Press the selector up or down to highlight M ERASE 3 Press the selector right to display delete options 1 3 PLAYBACK MENU RED EYE REMOVAL ERASE IMAGE SEARCH SLIDE SHOW PROTECT CROP BACK FRAME ALL FRAM...

Страница 93: ...re Press DISP BACK to exit when all the desired pictures have been deleted ALL FRAMES ALL FRAMES DeletingAllImages DeletingAllImages Selecting ALL FRAMES displays the confirmation shown at right ERASE...

Страница 94: ...Y 12s 12s Zoom indicator 3 Press the shutter button all the way down to start recording 12s 12s REC REC zREC and time remaining are displayed B Tip There is no need to keep the shutter button pressed...

Страница 95: ...g Recording ends automatically when the movie reaches maximum length or memory is full C Caution The indicator lamp lights while movies are being recorded Do not open the battery chamber card during s...

Страница 96: ...white fluorescent lights u Use under cool white fluorescent lights r Use under incandescent lighting g For underwater photography Selecting focus mode Select F AF MODE in the shooting menu w CENTER Wh...

Страница 97: ...yback is not in progress pressing the selector up will delete the current movie Advance rewind Press the selector right to advance left to rewind If playback is paused the movie will advance or rewind...

Страница 98: ...e cable Connect yellow plug to video in jack Connect white plug to audio in jack Insert into A V cable connector Connecting the Camera to High Definition HD TVs An HDMI cable available from third part...

Страница 99: ...and pictures and voice memos are played back on the TV Note that the camera volume controls have no effect on sounds played on the TV use the television volume controls to adjust the volume ANote Imag...

Страница 100: ...cond to turn the camera on w USB will be displayed in the monitor followed by the PictBridge display shown below at right USB 00 OK SET FRAME PICTBRIDGE TOTAL 00000 SHEETS Printing Selected Pictures P...

Страница 101: ...rs that support date printing ANotes Use an optional AC adapter and DC coupler to power the camera for extended periods Print pictures from internal memory or a memory card that has been formatted in...

Страница 102: ...DPOF in the playback menu pg 54 1 In the PictBridge display press DISP BACK to open the PictBridge menu PRINT DPOF PRINT WITH DATE PRINT WITHOUT DATE PICTBRIDGE 2 Press the selector up or down to high...

Страница 103: ...r WITHOUT DATE 2 3 PLAYBACK MENU RESIZE PRINT ORDER VOICE MEMO COPY IMAGE ROTATE ERASE FACE RECOG WITH DATE WITHOUT DATE RESET ALL WITH DATE y Print date of recording on pictures WITHOUT DATE Print pi...

Страница 104: ...ders can contain a maximum of 999 pictures If a memory card is inserted containing a print order created by another camera the message shown at right will be displayed Pressing MENU OK cancels the pri...

Страница 105: ...ollowing system requirements Windows 7 Windows 7 Windows Vista Windows Vista Windows XP Windows XP CPU CPU 3 GHz Pentium 4 or better 2 GHz Pentium 4 or better RAM RAM 1 GB or more 512 MB or more Free...

Страница 106: ...taller Does Not Start Automatically If the installer does not start automatically select Computer or My Computer from the Start menu then double click the FINEPIX CD icon to open the FINEPIX CD window...

Страница 107: ...ands of colors or better Other Other Built in USB port recommended Operation is not guaranteed other USB ports Internet connection 56kbps or faster recommended required to use FinePix Internet Service...

Страница 108: ...lier Open the Applications folder start Image Capture and select Preferences from the Image Capture application menu The Image Capture preferences dialog will be displayed Choose Other in the When a c...

Страница 109: ...he supplied USB cable as shown making sure the connectors are fully inserted Connect the camera directly to the computer do not use a USB hub or keyboard 3 Press the D button for about a second to tur...

Страница 110: ...access pictures saved to a network server using the supplied software in the same way as on a standalone computer The user bears all applicable fees charged by the phone company or Internet service pr...

Страница 111: ...ODE menu EXIT FILM SIMULATION MODE MENU ISO IMAGE SIZE 800 4 3 2 Press the selector up or down to highlight the desired menu item 3 Press the selector right to display options for the highlighted item...

Страница 112: ...ect is poorly lit AUTO AUTO 1600 AUTO 800 AUTO 400 12800 6400 3200 1600 800 400 200 100 AUTO oIMAGE SIZE Choose image size and aspect ratio pg 67 o 4 3 o 3 2 o 16 9 p 4 3 p 3 2 p 16 9 q 4 3 q 3 2 q 16...

Страница 113: ...selected when the subject is poorly lit Settings other than AUTO are shown by an icon in the display o o IMAGE SIZE IMAGE SIZE Choose the size and aspect ratio at which still pictures are recorded La...

Страница 114: ...when the camera is turned off or another shooting mode is selected W W FILM SIMULATION FILM SIMULATION Simulate the effects of different types of film including sepia and black and white Option Option...

Страница 115: ...ight the desired menu item 3 Press the selector right to display options for the highlighted item 1 2 SHOOTING MENU IMAGE SIZE AUTO AUTO 4 3 N L AUTO AUTO N 4 3 255 3 2 287 336 396 445 529 16 9 4 3 3...

Страница 116: ...ISO sensitivity pg 67 Choose higher values when the subject is poorly lit AUTO AUTO 1600 AUTO 800 AUTO 400 12800 6400 3200 1600 800 400 200 100 AUTO oIMAGE SIZE Choose image size and aspect ratio pg...

Страница 117: ...CE Adjust color for different light sources pg 72 AUTO Q p q s t u r g AUTO ECONTINUOUS Shoot a series of pictures pg 74 R S o m OFF OFF BPHOTOMETRY Choose how the camera meters exposure pg 75 N O P N...

Страница 118: ...shooting conditions ANote D 800 is available only when U DYNAMIC RANGE is selected in O mode and an option other than d Velvia VIVID or e ASTIA SOFT is selected for W FILM SIMULATION C C WHITE BALANC...

Страница 119: ...onitor and press the shutter button all the way down to measure white balance If COMPLETED is displayed press MENU OK to set white balance to the measured value This value is stored even when the batt...

Страница 120: ...recording is in progress ANote The Self Timer If the self timer is used only one picture will be taken when R or o is selected STORING STORING E E CONTINUOUS CONTINUOUS Capture motion in a series of p...

Страница 121: ...sure across multiple shots with the same lighting and is particularly effective for landscapes and portraits of subjects dressed in black or white F F AF MODE AF MODE This option controls how the came...

Страница 122: ...CKING The focus frame will track the moving subject keeping it in focus START TRACKING CANCEL ANote TRACKING may not work depending on the subject S S FACE RECOGNITION FACE RECOGNITION Once personal i...

Страница 123: ...hoot Capture a front face CANCEL REGISTER FACE CAPTURE THE FACE ALONG WITH THE GUIDLINE 4 Press MENU OK to display PERSONAL INFO NAME BIRTHDAY CATEGORY 2050 12 31 NONE PERSONAL INFO PERSONAL INFO BACK...

Страница 124: ...ing a birthday Registering a birthday 1 Press the selector up or down to highlight BIRTHDAY in PERSONAL INFO 2 Press MENU OK to display BIRTHDAY 3 Input the date of birthday in the same way as setting...

Страница 125: ...O NAME BIRTHDAY CATEGORY 2050 12 31 NONE PERSONAL INFO BACK REPLACING IMAGE 4 View the registration or edit as the same way of REGISTER pg 77 ANote Select REPLACING IMAGE to take another face image an...

Страница 126: ...ON Up to 8 people s information can be registered If 8 people s information has already been registered the confirmation window appears when trying to add a new one Delete a registered person from VIE...

Страница 127: ...ctor up or down to highlight the desired menu item 4 Press the selector right to display options for the highlighted item 5 Press the selector up or down to highlight the desired option 6 Press MENU O...

Страница 128: ...will continue when the movie ends The show can be ended at any time by pressing MENU OK Option Option Displayed in Displayed in NORMAL Press selector left or right to go back or skip ahead one frame S...

Страница 129: ...XIT 3 Press the selector up or down to highlight the desired menu item 4 Press the selector right to display options for the highlighted item 1 3 PLAYBACK MENU RED EYE REMOVAL ERASE IMAGE SEARCH SLIDE...

Страница 130: ...dental deletion pg 85 RCROP Create cropped copies of pictures pg 86 jRESIZE Create small copies of pictures pg 87 NIMAGE ROTATE Rotate pictures pg 88 PCOPY Copy pictures between internal memory and a...

Страница 131: ...en processed using red eye removal or pictures created with other devices The amount of time needed to process the image varies with the number of faces detected Copies created with a RED EYE REMOVAL...

Страница 132: ...is in progress Press DISP BACK to exit before the operation is complete C Caution Protected pictures will be deleted when the memory card or internal memory is formatted pg 97 R R CROP CROP To create...

Страница 133: ...atio of 4 3 3 Press MENU OK to save the cropped copy to a separate file j j RESIZE RESIZE To create a small copy of a picture play the picture back and select j RESIZE in the playback menu 1 Press the...

Страница 134: ...Remove protection before rotating pictures pg 85 The camera may not be able to rotate pictures created with other devices To rotate a picture play the picture back and select N IMAGE ROTATE in the pl...

Страница 135: ...D COPY ALL FRAMES FRAME 3 Press the selector up or down to highlight FRAME or ALL FRAMES 4 Press MENU OK B Tip Copying Pictures Between Memory Cards To copy pictures between two memory cards insert th...

Страница 136: ...56 Q Q VOICE MEMO VOICE MEMO To add a voice memo to a still picture select Q VOICE MEMO after displaying the picture in playback mode ANote Voice memos can not be added to movies or protected pictures...

Страница 137: ...pause press the selector down again to end playback press the selector up Press the selector left to rewind right to fast forward Volume controls can be displayed by pressing the MENU OK button press...

Страница 138: ...e is t J J DISP ASPECT DISP ASPECT Choose the aspect ratio used when photographs with at a 4 3 aspect ratio pg 68 are viewed on a High Definition device pg 52 This option is available when an HDMI cab...

Страница 139: ...DE FORMAT TIME DIFFERENCE OFF ENGLISH EXIT 2 Adjust settings 2 1 Press the selector right to activate the setup menu 2 2 Press the selector up or down to highlight a menu item CONT 2 4 SET UP IMAGE DI...

Страница 140: ...SYSTEM to default values A confirmation dialog will be displayed press the selector left or right to highlight OK and press MENU OK mFORMAT Format internal memory or memory cards pg 97 2 4 2 4 aIMAGE...

Страница 141: ...cDIGITAL ZOOM Enable or disable digital zoom pg 100 ON OFF OFF bAF ILLUMINATOR Turn the AF assist illuminator on or off pg 34 ON OFF ON 4 4 4 4 HSAVE ORG IMAGE Choose whether to save unprocessed copie...

Страница 142: ...23 00 00 1 3 Press the selector left or right to highlight hours or minutes press up or down to edit The minimum increment is 15 minutes 1 4 Press MENU OK when settings are complete 2 Switch between...

Страница 143: ...Choose how long pictures are displayed in the monitor after shooting 3 SEC Pictures are displayed for about 3s before being recorded to the memory card 1 5 SEC Pictures are displayed for about 1 5s be...

Страница 144: ...adding one to the last file number used The file number is displayed during playback as shown at right FRAME NO controls whether file numbering is reset to 0001 when a new memory card is inserted or t...

Страница 145: ...selector up or down to choose display brightness and press MENU OK to select 0 SET CANCEL LCD BRIGHTNESS o o AUTO POWER OFF AUTO POWER OFF Choose the length of time before the camera turns off automa...

Страница 146: ...splayed in the shooting mode G V Y or T is selected in the shooting mode c c DIGITAL ZOOM DIGITAL ZOOM If ON is selected selecting A at the maximum optical zoom position will trigger digital zoom furt...

Страница 147: ...matically to save power This option is recommended when the camera is used for extended periods at high temperatures to prevent mottled vertical streaks from appearing in photographs w QUICK AF Reduce...

Страница 148: ...M and other manufacturers Available from third party suppliers ComputerRelated ComputerRelated Computer USB SD card slot or card reader Audio Visual Audio Visual TV Audio visual output Printer Printin...

Страница 149: ...r BC 45W supplied Replacement battery chargers can be purchased as required The BC 45W charges an NP 50 battery in about 150 minutes at 20 C 68 F AC power adapter AC 5VX requires CP 50 Use for extende...

Страница 150: ...camera at the beach or seaside avoid exposing the camera to water or sand Do not place the camera on a wet surface Condensation Condensation Sudden increases in temperature such as occur when entering...

Страница 151: ...battery by placing it in a pocket or other warm place and re insert it in the camera immediately before taking a picture There is dirt on the battery terminals Clean the terminals with a soft dry clot...

Страница 152: ...ut the battery does not charge There is dirt on the battery terminals Clean the terminals with a soft dry cloth The battery has been charged many times The battery has reached the end of its charging...

Страница 153: ...ged Insert a new memory card 8 The battery is exhausted Insert a fresh or fully charged spare battery 6 The camera has turned off automatically Turn the camera on 11 The monitor goes dark after shooti...

Страница 154: ...a small area of the frame Change the composition so that the subject s face occupies a larger area of the frame The subject s head is at an angle or the subject is not facing the camera Ask the subje...

Страница 155: ...off 74 Flash mode not available The desired flash mode is not available in the current shooting mode Choose a different shooting mode 21 The camera is in silent mode Turn silent mode off 19 The flash...

Страница 156: ...atures Turn the camera off and wait for it to cool down Smear appears in pictures The sun or another bright object was in the frame White or purple vertical lines may appear when a very bright object...

Страница 157: ...le The pictures were taken with a different make or model of camera The pictures were cropped or resized to the size of t Audio No sound in voice memo and movie playback The camera is in silent mode T...

Страница 158: ...he camera is not set to the correct video standard Match the camera r VIDEO SYSTEM setting to the TV 93 The volume on the television is too low Adjust the volume No color The camera is not set to the...

Страница 159: ...era malfunction Remove and reinsert the battery or disconnect and reconnect the AC adapter DC coupler 6 The battery is exhausted Insert a fresh or fully charged spare battery 6 The camera does not fun...

Страница 160: ...ark use the flash FOCUS ERROR TURN OFF THE CAMERA AND TURN ON AGAIN Camera malfunction Turn the camera off and then on again taking care not to touch the lens If the message persists contact a FUJIFIL...

Страница 161: ...ctures or insert a memory card with more free space d MEMORY FULL INTERNAL MEMORY IS FULL INSERT A NEW CARD WRITE ERROR Not enough memory remaining to record additional pictures Delete pictures or ins...

Страница 162: ...e to delete rotate or add a voice memo to a protected picture Remove protection before deleting rotating or adding voice memos to pictures 5 ERROR Voice memo file is corrupt The voice memo can not be...

Страница 163: ...ing the volume COMMUNICATION ERROR A connection error occurred while pictures were being printed or copied to a computer or other device Confirm that the device is turned on and that the USB cable is...

Страница 164: ...mera can be controlled by adjusting aperture and shutter speed HDMI High Definition Multimedia Interface An interface standard for the transmission of images and sound that adds audio input to the DVI...

Страница 165: ...minish at an even rate Still Pictures FINE 4 3 Still Pictures FINE 4 3 Movies Movies o o p p q q 1280 1280 1 1 2 2 1 1 Internal memory Internal memory approx 40MB approx 40MB 8 13 25 30 sec 1GB 1GB 20...

Страница 166: ...mm format equivalent 27mm 270mm Digital zoom o p Approx 4 0 up to 40 when combined with optical zoom q Approx 4 4 up to 44 when combined with optical zoom Aperture F3 3 F9 0 wide angle F5 6 F16 0 tele...

Страница 167: ...nic shutter D 1 4 s 1 1 000 s U 3s 1 1 000 s W 4s 1 2 s Manual selection 8s 1 2 000 s Other modes 1 4 s 1 2 000 s Continuous m up to 1 6fps max 5 frames o up to 1 6fps last 5 frames recorded S up to 4...

Страница 168: ...elligent Face Detection with red eye removal PRO LOW LIGHT PRO FOCUS Dog Cat detection power management framing guideline frame number memory and film simulation Playback options Intelligent Face Dete...

Страница 169: ...When using a battery use the battery supplied with the camera The storage media should be SD memory card Note that the number of shots that can be taken with a fully charged battery varies with temper...

Страница 170: ...oz BC 45W battery charger Rated input 100V 240V AC 50 60Hz Input capacity 8 0VA 100V 12VA 240V Rated output 4 2V DC 550mA Supported batteries NP 50 rechargeable batteries Charging time Approx 150 minu...

Страница 171: ...eld liable for damages resulting from errors in this manual Although the monitor is manufactured using advanced high precision technology small bright points and anomalous colors particularly in the v...

Страница 172: ...7 3 AKASAKA 9 CHOME MINATO KU TOKYO 107 0052 JAPAN http www fujifilm com...

Страница 173: ...FUJIFILM FinePix CD FINEPIX FBOEXR...

Страница 174: ...visiting our website at www fujifilmusa com If you are experiencing technical problems or need product information please contact our Digital Help Desk at 800 800 FUJI 3854 Option 1 Monday Friday 9 0...

Страница 175: ...t TEL 385 1 233 2653 tkrsnik fujifilmhr FOTOTEHd o o Repair service TEL 3851 6196608 info fototeh hr PMS IMAGING LTD Technical support repairs TEL 35722746746 info fujifilmcomcy T ec h n ic a i su p p...

Страница 176: ...m farag fotoexpress com eg Repair service TEL 254 20 4446265 8 info fujifilm co ke Technical support repairs TEL 2711 251 2400 wwwcameratek co za Australia FUJIFILM Australia Pty Ltd Fiji Brijlal Co L...

Страница 177: ...uct registration include Product Protection o With the information you provide we can confirm the date of purchase of your product This is a benefit to you in the event your original proof of purchase...

Страница 178: ...mage incurred in transit or otherwise in connection with the return of the Product nor will FUJIFILM be responsible for the return of any items that are included with the Product SOME STATES DO NOT AL...

Отзывы: