background image

17

B

a

si

c P
h

o

to

g

ra

p

h

y a
n

d P
la

y

b

a

ck

Viewing Pictures

Pictures can be viewed in the monitor.  When taking important photographs, take a test shot and 
check the results.

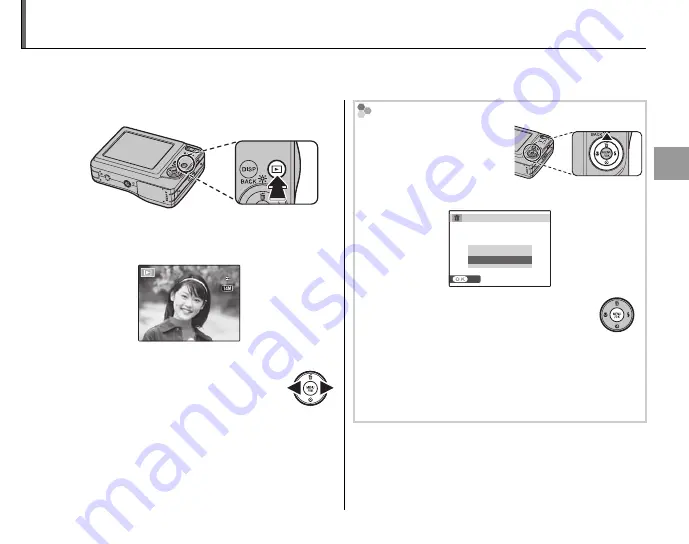
  1

 Press the 

D

 button.

The most recent picture will be displayed in 
the monitor.

12 / 31 / 2050

12 / 31 / 2050

10 : 00  AM

10 : 00  AM

1/250

1/250

F3.3

F3.3

100-0001

100 0001

400

400

N

N

  2

  View additional pictures.

Press the selector right to view 
pictures in the order recorded, 
left to view pictures in reverse 
order.

Press the shutter button to exit to shooting 
mode.

 Deleting Pictures

To delete the picture 
currently displayed in the 
monitor, press the selector 
up (

I

).  The following 

dialog will be displayed.

SET

ERASE OK?

CANCEL

OK

To delete the picture, highlight 

OK

 and 

press 

MENU/OK

.  To exit without deleting 

the picture, highlight 

CANCEL

 and press 

MENU/OK

.

B

  Tip: The Playback Menu

Pictures can also be deleted from the playback 
menu (pg. 38).

Содержание Finepix AV100 Series

Страница 1: ...ooting Appendix For information on related products visit our website at http www fujifilm com products digital_cameras index html Owner s Manual Thank you for your purchase of this product This manual describes how to use your FUJIFILM FinePix AX200 series AV100 series digital camera and the supplied software Be sure that you have read and understood its contents before using the camera YF00626 1...

Страница 2: ...The openings should never be blocked by placing the video product on a bed sofa rug or other similar surface This video product should not be placed in a built in installation such as a bookcase or rack unless proper ventilation is provided or the manufacturer s instructions have been adhered to This video product should never be placed near or over a radiator or heat register Attachments Do not u...

Страница 3: ...tning and power line surges Service Service Servicing Do not attempt to service this video product yourself as opening or removing covers may expose you to dangerous voltage or other hazards Refer all servicing to qualified service personnel Damage Requiring Service Unplug this video product from the wall outlet and refer servicing to qualified service personnel under the following conditions When...

Страница 4: ...ormal state can cause a fire or electric shock Contact your FUJIFILM dealer Do not allow water or foreign objects to enter the camera If water or foreign objects get inside the camera turn the camera off remove the battery and disconnect and unplug the AC power adapter Continued use of the camera can cause a fire or electric shock Contact your FUJIFILM dealer Do not use in the bathroom or shower D...

Страница 5: ...mes steam humidity or dust This can cause a fire or electric shock Do not leave this camera in places subject to extremely high temperatures Do not leave the camera in locations such as a sealed vehicle or in direct sunlight This can cause a fire CAUTION CAUTION Keep out of the reach of small children This product could cause injury in the hands of a child Do not place heavy objects on the camera ...

Страница 6: ...after it has been charged or immediately after being used This is perfectly normal Do not recharge a fully charged battery Battery Life At normal temperatures the battery can be used at least 300 times If the time for which the battery provides power shortens markedly this indicates that the battery has reached the end of its effective life and should be replaced Notes on storage If a battery is s...

Страница 7: ... using the camera s Discharging rechargeable batteries function Deactivation and memory are specific to Ni MH batteries and are not in fact battery faults See OWNER S MANUAL for the procedure for Discharging rechargeable batteries CAUTION Do not use the Discharging rechargeable batteries function when alkaline batteries being used To charge Ni MH batteries use the quick battery charger sold separa...

Страница 8: ...e the urgent action indicated If liquid crystal comes in contact with your skin Wipe the area with a cloth and then wash thoroughly with soap and running water If liquid crystal gets into your eye Flush the affected eye with clean water for at least 15 minutes and then seek medical assistance If liquid crystal is swallowed Flush your mouth thoroughly with water Drink large quantities of water and ...

Страница 9: ... answer here Glossary Glossary pg 93 pg 93 The meanings of some technical terms may be found here TableofContents TableofContents pg xiii pg xiii The Table of Contents gives an overview of the entire manual The principal camera operations are listed here WarningMessagesandDisplays WarningMessagesandDisplays pg 89 pg 89 Find out what s behind that flashing icon or error message in the monitor Camer...

Страница 10: ...y Auto power off 78 How do I stop the camera beeping and clicking Silent mode 30 Operation and shutter volume 73 What are the parts of the camera called Parts of the camera 2 What do the icons in the monitor mean Monitor 3 How do I use the menus Menus 56 What s behind that flashing icon or error message in the monitor Messages and displays 89 How much charge is left in the battery Battery level 12...

Страница 11: ...Shooting mode 18 How do I shoot a panorama W mode 20 How do I shoot close ups Macro mode Close ups 27 How do I keep the flash from firing Flash mode 28 How do I stop my subjects eyes glowing red when I use the flash How do I fill in shadows on back lit subjects How do I take a series of pictures in a single burst Continuous shooting mode 62 How do I take a group portrait that includes the photogra...

Страница 12: ...ect my pictures from accidental deletion Protect 67 Can I hide the icons in the monitor when viewing my pictures Choosing a display format 33 Can I view my pictures in a slide show Slide show 65 Can I crop unwanted elements out of my pictures Crop 68 Can I make small copies of pictures Resize 69 Can I copy pictures from internal memory to a memory card Copy 70 How do I view my pictures on TV Viewi...

Страница 13: ...COGNITION Mode 12 Viewing Pictures 17 More on Photography More on Photography A Shooting Mode 18 Selecting a Shooting Mode 18 Shooting Modes 19 Intelligent Face Detection 23 Focus Lock 25 L Macro mode Close ups 27 K Using the Flash Intelligent Flash 28 J Using the Self Timer 31 More on Playback More on Playback Single Frame Playback 33 Playback Zoom 34 Multi Frame Playback 35 V Image Search 36 Ima...

Страница 14: ...s 64 q SLIDE SHOW 65 a RED EYE REMOVAL 66 O PROTECT 67 R CROP 68 j RESIZE 69 N IMAGE ROTATE 69 P COPY 70 The Setup Menu 72 Using the Setup Menu 72 Setup Menu Options 73 p TIME DIFFERENCE 75 m FORMAT 76 a IMAGE DISP 76 b FRAME NO 77 f PLAYBACK VOLUME 77 g LCD BRIGHTNESS 78 a LCD MODE 78 o AUTO POWER OFF 78 c DIGITAL ZOOM 79 k BATTERY TYPE 79 l DISCHARGE Ni MH Batteries Only 79 Technical Notes Techn...

Страница 15: ...rmation that may be helpful when using the camera Menus and other text in the camera monitor are shown in bold In the illustrations in this manual the monitor display may be simplified for explanatory purposes p Supplied Accessories The following items are included with the camera CD ROM AA alkaline LR6 batteries 2 USB cable Attaching the Strap Attach the strap as shown Owner s Manual may be distr...

Страница 16: ...yelet 1 15 Battery chamber cover 4 16 Tripod mount 17 Speaker 42 18 Memory card slot 5 19 Battery chamber 4 8 DISP display BACK button 15 30 U silent mode button 30 9 Indicator lamp 16 10 W zoom out button 14 35 11 T zoom in button 14 34 12 D playback button 33 13 USB multi connector 43 44 54 1 Shutter button 15 16 2 ON OFF button 9 3 Flash 28 4 Self timer lamp 31 5 Lens and lens cover 6 Microphon...

Страница 17: ...vity 58 18 Image quality 59 19 White balance 61 20 Battery level 12 21 Exposure compensation 60 1 Internal memory indicator 2 Focus frame 25 3 Silent mode indicator 30 4 Continuous shooting mode 62 5 Intelligent Face Detection indicator 23 6 Shooting mode 18 7 Flash mode 28 8 Macro close up mode 27 9 Self timer indicator 31 10 Focus warning 15 Playback 2 3 1 400 10 00 AM 100 0001 1 250 F3 3 F 12 3...

Страница 18: ... chamber cover 2 Insert the batteries Insert the batteries in the orientation shown by the E and F marks inside the battery chamber 3 Close the battery chamber cover C Cautions Insert the batteries in the correct orientation Neverusebatterieswith peelingordamagedcasing ormixoldandnewbatteries batterieswithdifferentcharge levels orbatteriesofdifferent types Failure to observe these precautions coul...

Страница 19: ...ernal memory from becoming full be sure to delete pictures when they are no longer needed When a memory card is inserted as described below the card will be used for recording and playback CompatibleMemoryCards SanDisk SD and SDHC memory cards have been tested and approved for use in the camera Use a card with a class 4 write speed 4 MB s or better when shooting HD movies A complete list of approv...

Страница 20: ...l you hear feel a click Holding the memory card in the orientation shown below slide it all the way in CLICK Be sure card is in correct orientation do not insert at an angle or use force If the memory card is not inserted correctly d will appear in the monitor and images will be recorded to internal memory 3 Close the battery chamber cover ...

Страница 21: ...er cover Press the card in and then release it slowly The card can now be removed by hand C Cautions The memory card may spring out if you remove your finger immediately after pushing the card in Memory cards may be warm to the touch after being removed from the camera This is normal and does not indicate a malfunction ...

Страница 22: ... of an SD card may not eject normally if the card does not eject take the camera to an authorized service representative Do not forcibly remove the card Do not affix labels to memory cards Peeling labels can cause camera malfunction Movie recording may be interrupted with some types of memory card The data in internal memory may be erased or corrupted when the camera is repaired Please note that t...

Страница 23: ...nts and other marks on the lens Keep the lens clean The n button does not completely disconnect the camera from its power supply y Playback Mode To turn the camera on and begin playback press the D button for about a second Press the D button again to turn the camera off B Tip Switching to Shooting Mode To exit to shooting mode press the shutter button halfway Press the D button to return to playb...

Страница 24: ...t a language 1 2Press MENU OK 2 Set the date and time SET NO DATE T ME NOT SET 2012 2011 2009 2008 1 1 12 00 AM 2010 YY MM DD 2 1 Press the selector left or right to highlight the year month day hour or minute and press up or down to change To change the order in which the year month and day are displayed highlight the date format and press the selector up or down 2 2Press MENU OK 3 Check the batt...

Страница 25: ...mera Clock If the batteries are removed for an extended period e DATE TIME and k BATTERY TYPE will be cleared and the language selection dialog will be displayed Set up the camera again If the batteries have been left in the camera for about 2 hours or more the batteries can be removed for about 24 hours without resetting the clock ...

Страница 26: ...e camera to the subject the camera automatically analyzes and selects the most appropriate setting using scene recognition 2 Check the battery level Check the battery level in the monitor Indicator Indicator Description Description q white Batteries partially discharged w white Batteries more than half discharged e red Batteries are low Replace as soon as possible r blinks red Batteries are exhaus...

Страница 27: ...ots of buildings and landscapes NIGHT J For night and twilight scenes using a high sensitivity setting to minimize blurring MACRO K For clear close ups of flowers etc BACKLIT PORTRAIT T For a subject backlit against the sun preventing the background from becoming dim NIGHT PORTRAIT Z For a subject in a dim place reducing blur B Tip When a subject can not be analyzed by the camera LAUTO mode will b...

Страница 28: ...Shaking or unsteady hands can blur your shots To prevent pictures that are out of focus or too dark underexposed keep your fingers and other objects away from the lens and flash Z DIGITAL IS If the subject is poorly lit blurring caused by camera shake can be reduced by activating the Z DIGITAL IS pg 72 Note that blurring may still occur depending on the scene or shooting conditions ANote When the ...

Страница 29: ...ect at the intersection of two lines or align one of the horizontal lines with the horizon 4 Focus Press the shutter button halfway to focus If the camera is able to focus it will beep twice and the indicator lamp will glow green If the camera is unable to focus the red colored focus frame and R will appear in the monitor and the indicator lamp will blink green Change the composition or use focus ...

Страница 30: ...sh mode pg 28 The Indicator Lamp Indicator lamp The indicator lamp shows camera status as follows Indicator lamp Indicator lamp Camera status Camera status Glows green Focus locked Blinks green Camera shake warning AF warning or AE warning ready to shoot Blinks green and orange Recording pictures Additional pictures can be taken Glows orange Recording pictures No additional pictures can be taken a...

Страница 31: ...additional pictures Press the selector right to view pictures in the order recorded left to view pictures in reverse order Press the shutter button to exit to shooting mode Deleting Pictures To delete the picture currently displayed in the monitor press the selector up I The following dialog will be displayed SET ERASE OK CANCEL OK To delete the picture highlight OK and press MENU OK To exit witho...

Страница 32: ... N WHITE BALANCE AUTO ISO AUTO EXP COMPENSATION 0 2 Press the selector up or down to highlight A SHOOTING MODE 3 Press the selector right to display shooting mode options 4 Press the selector up or down to highlight the desired mode CANCEL SET PORTRAIT Portrait with soft overall tone and beautiful skin tones 5 Press MENU OK to select the highlighted option ANote See the restrictions in another sup...

Страница 33: ...ATURAL K This mode helps ensure good results with backlit subjects and in other situations with difficult lighting Each time the shutter button is pressed the camera takes two shots one shot without the flash to preserve natural lighting followed immediately by a second shot with the flash Do not move the camera until shooting is complete ANotes Do not use where flash photography is prohibited The...

Страница 34: ...elect W 2 Press the selector up to select a frame and press the selector left or right to highlight a pan direction and press MENU OK 2 1 3 2 3 1 3 Take a photograph Exposure and white balance for the panorama are set with the first shot 4 Press MENU OK An edge of the picture you have just taken will be displayed at one side of the frame 2 2 3 3 1 1 SELECT FRAME 19 5 Frame the next shot to overlap...

Страница 35: ...y wide margins at the top and bottom or left and right L SPORT Choose this mode when photographing moving subjects Priority is given to faster shutter speeds D NIGHT A high sensitivity setting is selected automatically to minimize blurring for recording night and twilight scenes U NIGHT TRIPOD Slow shutter speeds are used to record night scenes Use of a tripod is recommended to prevent camera shak...

Страница 36: ... G BEACH Choose for crisp clear shots that capture the brightness of sunlit beaches I PARTY Capture indoor background lighting under low light conditions O FLOWER Choose for vivid close ups of flowers The camera focuses in the macro range and the flash turns off automatically P TEXT Take clear pictures of text or drawings in print The camera focuses in the macro range A Shooting Mode ...

Страница 37: ...GE SIZE IMAGE QUALITY N WHITE BALANCE AUTO ISO AUTO EXP COMPENSATION 0 1 2Press the selector up or down to highlight 3 FACE DETECTION 1 3Press the selector right to display Intelligent Face Detection options 1 4Press the selector up or down to highlight the desired option 1 5Press MENU OK to select the highlighted option and return to shooting mode B icon appears in monitor when Intelligent Face D...

Страница 38: ...ss the shutter button all the way down to shoot C Caution If the subject moves as the shutter button is pressed their face may not be in the area indicated by the green border when the picture is taken B Tip Red Eye Removal Select ON for the R SAVE ORG IMAGE option in the setup menu pg 72 to save unprocessed copies of pictures created with red eye removal Intelligent Face Detection Intelligent Fac...

Страница 39: ...posure will remain locked while the shutter button is pressed halfway AF AE lock 250 250 F3 3 F3 3 Press halfway Repeat steps 1 and 2 as desired to refocus before taking the picture 3 Recompose the picture Keeping the shutter button pressed halfway recompose the picture 250 250 F3 3 F3 3 4 Shoot Press the shutter release button the rest of the way down to take the picture Press the rest of the way...

Страница 40: ... bodies Fast moving subjects Subjects photographed through a window or other reflective object Dark subjects and subjects that absorb rather than reflect light such as hair or fur Insubstantial subjects such as smoke or flame Subjects that show little contrast with the background for example subjects in clothing that is the same color as the background Subjects positioned in front of or behind a h...

Страница 41: ... left L The selection changes each time the selector is pressed MACRO OFF When macro mode is in effect the camera focuses on subjects near the center of the monitor Use the zoom buttons to frame pictures ANote Use of a tripod is recommended to prevent blur caused by camera shake ...

Страница 42: ...selector right K The flash mode changes each time the selector is pressed in modes other than 4 the current mode is indicated by an icon in the display Choose from the following options Mode Mode Description Description 4 AUTO FLASH The flash fires when required Recommended in most situations K FORCED FLASH The flash fires whenever a picture is taken Use for backlit subjects or for natural colorat...

Страница 43: ...er button the rest of the way down to shoot C Caution The flash may fire several times with each shot Do not move the camera until shooting is complete Red Eye Removal When Intelligent Face Detection is active pg 23 and ON is selected for a RED EYE REMOVAL in the setup menu pg 72 red eye removal is available in V U and Z Red eye removal minimizes red eye caused when light from the flash is reflect...

Страница 44: ...nitor The camera speaker shooting indicator flash and indicator and self timer lamps turn off note that the flash will still fire in A mode Flash and volume settings pg 77 can not be adjusted while silent mode is in effect To restore normal operation press the DISP BACK button until the U icon is no longer displayed K Using the Flash Intelligent Flash ...

Страница 45: ...ressed The current self timer mode is displayed in the monitor OFF OFF Choose from y self timer off c 10s delay or b 2s delay 2 Focus Press the shutter button halfway to focus C Caution Stand behind the camera when using the shutter button Standing in front of the lens can interfere with focus and exposure 3 Start the timer Press the shutter button the rest of the way down to start the timer The d...

Страница 46: ...s Intelligent Face Detection pg 23 is recommended when using the self timer for group portraits or self portraits To use the self timer with Intelligent Face Detection set the timer as described in Step 1 and then press the shutter button all the way down to start the timer The camera will detect faces while the timer is counting down and adjust focus and exposure immediately before the shutter is...

Страница 47: ...eft to view pictures in reverse order Keep the selector pressed to scroll rapidly to the desired frame Choosing a Display Format In playback mode press DISP BACK to select a playback display format The selection changes each time DISP BACK is pressed 100 0001 100 0001 400 400 N N 12 31 2050 12 31 2050 10 00 AM 10 00 AM 1 250 1 250 F3 3 F3 3 INFORMATION ON INFORMATION OFF ANote Pictures taken using...

Страница 48: ...dow shows portion of image currently displayed in monitor Press DISP BACK to exit zoom ANotes The maximum zoom ratio varies with image size Playback zoom is not available with images saved or cropped at the size of p or copies created with j RESIZE pg 69 Intelligent Face Detection Pictures taken with Intelligent Face Detection pg 23 are indicated by a B icon Press the F button to zoom in on the su...

Страница 49: ...er of pictures displayed to one frame with previous and next two nine and a hundred Press T to reduce the number of images displayed Use the selector to highlight images and press MENU OK to view the highlighted image full frame In the nine and hundred frame displays press the selector up or down to view more pictures B Tip Two Frame Display Two frame display can be used to compare pictures taken ...

Страница 50: ...p or down to highlight the desired search category Option Option Description Description BY DATE Show images based on the specified date BY FACE Show images based on specified face information BY SCENE Show images based on the specified scene mode BY TYPE OF DATA Show images based on whether still pictures or movies 5 Press MENU OK to select the highlighted search category A detailed search list w...

Страница 51: ...lts are displayed The playback menu will be displayed 2 Press the selector up or down to highlight the desired menu item 3 Press MENU OK to select the highlighted menu B Tips For each operation refer to the page listed Option Option See Page See Page M ERASE 38 O PROTECT 67 q SLIDE SHOW 65 Select EXIT SEARCH to go back to the normal playback mode V Image Search ...

Страница 52: ...PROTECT CROP EXIT 2 Press the selector up or down to highlight ERASE 3 Press the selector right to display delete options 1 2 PLAYBACK MENU RED E ERAS IMAG SLIDE PROT CROP BACK FRAME ALL FRAMES 4 Press the selector up or down to highlight FRAME or ALL FRAMES 5 Press MENU OK to display options for the selected item see pg 39 B Tips Deleting Pictures When a memory card is inserted pictures will be d...

Страница 53: ...cture Press DISP BACK to exit when all the desired pictures have been deleted ALL FRAMES DeletingAllImages Selecting ALL FRAMES displays the confirmation shown at right ERASE ALL OK IT MAY TAKE A WHILE SET CANCEL OK Highlight OK and press MENU OK to delete all unprotected pictures The dialog shown at right is displayed during deletion Press DISP BACK to cancel before all pictures have been deleted...

Страница 54: ...ect o QUALITY Choose a pixel size in the following 1280 1280 720 for high definition movies 640 480 for standard definition movies 9 320 240 for longer movies 1 1 SHOOTING MENU QUAL 10m59s 15m00s 5m00s 280 2 Frame the scene using the zoom buttons STAN BY 12s Zoom indicator Zoom control during movie recording The camera lets you zoom in and out during movie recording Select the type of zoom availab...

Страница 55: ...vary from that displayed before recording begins Some operating noise of the camera may be recorded during movie shooting 4 Press the shutter button to end recording Recording ends automatically when the movie reaches maximum length or memory is full B Tip There is no need to keep the shutter button pressed during recording C Caution Vertical or horizontal streaks may appear in movies containing v...

Страница 56: ...ess the selector up to end playback If playback is not in progress pressing the selector up will delete the current movie Advance rewind Press the selector right to advance left to rewind If playback is paused the movie will advance or rewind one frame each time the selector is pressed Adjust volume Press MENU OK to pause playback and display volume controls Press the selector up or down to adjust...

Страница 57: ... played back on the TV Note that the camera volume controls have no effect on sounds played on the TV use the television volume controls to adjust the volume ANotes Use fully charged batteries for extended playback Image quality drops during movie playback C Cautions When making the A V cable connection be sure the connectors are fully inserted HD movies are played back as standard definition movi...

Страница 58: ...the D button for about a second to turn the camera on w USB will be displayed in the monitor followed by the PictBridge display shown below at right USB 00 OK SET FRAME PICTBRIDGE TOTAL 00000 SHEETS Printing Selected Pictures 1 Press the selector left or right to display a picture you wish to print 2 Press the selector up or down to choose the number of copies up to 99 3 Repeat steps 1 2 to select...

Страница 59: ...UT DATE The date will not be printed if the camera clock was not set when the picture was taken ANote If no pictures are selected when the MENU OK button is pressed the camera will print one copy of the current picture Printing the DPOF Print Order To print the print order created with r PRINT ORDER DPOF in the playback menu pg 63 1 In the PictBridge display press DISP BACK to open the PictBridge ...

Страница 60: ...firm that PRINTING is not displayed in the monitor and press D to turn the camera off Disconnect the USB cable ANotes Use fully charged batteries to power the camera for extended periods Print pictures from internal memory or a memory card that has been formatted in the camera If the printer does not support date printing the PRINT WITH DATE y option will not be available in the PictBridge menu an...

Страница 61: ...udes the pictures to be printed and the number of copies of each picture WITH DATE y WITHOUT DATE To modify the DPOF print order select r PRINT ORDER DPOF in the playback menu and press the selector up or down to highlight WITH DATE y or WITHOUT DATE 2 2 PLAYBACK MENU RESI COPY PR N IMAG WITH DATE WITHOUT DATE RESET ALL WITH DATE y Print date of recording on pictures WITHOUT DATE Print pictures wi...

Страница 62: ...ntelligent Face Detection If the current picture was created with Intelligent Face Detection pressing F sets the number of copies to the number of faces detected 3 Repeat steps 1 2 to complete the print order Press MENU OK to save the print order when settings are complete or DISP BACK to exit without changing the print order 4 The total number of prints is displayed in the monitor Press MENU OK t...

Страница 63: ...ill be displayed Pressing MENU OK cancels the print order a new print order must be created as described above Whether WITH DATE y WITHOUT DATE is available may depend on the printer setting Check the printer RESET ALL To cancel the current print order select RESET ALL in the r PRINT ORDER DPOF menu The confirmation shown at right will be displayed press MENU OK to remove all pictures from the ord...

Страница 64: ...s 7 Windows 7 Windows Vista Windows Vista Windows XP Windows XP CPU CPU 3 GHz Pentium 4 or better 2 GHz Pentium 4 or better RAM RAM 1 GB or more 512 MB or more Free disk space Free disk space 15 GB or more 2 GB or more Video Video 1 024 768 pixels or more with 24 bit color or better A graphics processing unit GPU that supports DirectX 7 or later Other Other Built in USB port recommended Operation ...

Страница 65: ...the Installer Does Not Start Automatically If the installer does not start automatically select Computer or My Computer from the Start menu then double click the FINEPIX CD icon to open the FINEPIX CD window and double click SETUP or SETUP EXE 4 If prompted to install Windows Media Player or DirectX follow the on screen instructions to complete installation 5 Remove the installer CD from the CD RO...

Страница 66: ...r Other Other Built in USB port recommended Operation is not guaranteed other USB ports Internet connection 56kbps or faster recommended required to use FinePix Internet Service Internet connection and e mail software required to use e mail option 2 After starting the computer and quitting any applications that may be running insert the installer CD in a CD ROM drive and double click Installer for...

Страница 67: ... or earlier Open the Applications folder start Image Capture and select Preferences from the Image Capture application menu The Image Capture preferences dialog will be displayed Choose Other in the When a camera is connected open menu then select FPVBridge in the Applications FinePixViewer folder and click Open Quit Image Capture Mac OS X 10 6 Connect the camera and turn it on Open the Applicatio...

Страница 68: ...upplied USB cable as shown making sure the connectors are fully inserted Connect the camera directly to the computer do not use a USB hub or keyboard 3 Press the D button for about a second to turn the camera on MyFinePix Studio or FinePixViewer will start automatically follow the on screen instructions to copy pictures to the computer To exit without copying pictures click Cancel C Caution If the...

Страница 69: ...ble to access pictures saved to a network server using the supplied software in the same way as on a standalone computer The user bears all applicable fees charged by the phone company or Internet service provider when using services that require an Internet connection Disconnecting the Camera After confirming that the indicator lamp is out follow the on screen instructions to turn the camera off ...

Страница 70: ...ODE IMAGE SIZE IMAGE QUALITY N WHITE BALANCE AUTO ISO AUTO EXP COMPENSATION 0 2 Press the selector up or down to highlight the desired menu item 3 Press the selector right to display options for the highlighted item 1 2 SHOOTING MENU AUTO AUTO IMAG 0 FINE NORMAL 4 Press the selector up or down to highlight the desired option 5 Press MENU OK to select the highlighted option 6 Press DISP BACK to exi...

Страница 71: ...sensitivity pg 58 Choose higher values when the subject is poorly lit AUTO 3200 1600 800 400 200 100 AUTO o IMAGE SIZE Choose image size and quality pg 58 AX290 AX280 AX260 AX250 AV190 AV180 AV160 AV150 i y3 2 r16 9 7 n m16 9 m p i AX240 AX230 AX210 AX200 AV140 AV130 AV110 AV100 y 3 2 g16 9 0 n m16 9 m p y T IMAGE QUALITY Choose image quality pg 59 FINE NORMAL NORMAL C WHITE BALANCE Adjust color f...

Страница 72: ...an icon in the display o IMAGE SIZE Choose the size and quality at which still pictures are recorded Large pictures can be printed at large sizes with no drop in quality small pictures require less memory allowing more pictures to be recorded Option Option Prints at sizes up to Prints at sizes up to i y r 31 23cm 12 9in or 31 21cm 12 8in g 7 0 22 16cm 8 5 6 5in n 17 13cm 7 5in m 14 10cm 5 3 4in p ...

Страница 73: ...e of 35 mm film while an aspect ratio of 16 9 is suited to display on High Definition HD devices 4 3 3 2 16 9 ANote Image quality is not reset when the camera is turned off or another shooting mode is selected T IMAGE QUALITY Choose how much image files are compressed Select FINE low compression for higher image quality NORMAL high compression to increase the number of pictures that can be stored ...

Страница 74: ...anation of the term EV see the Glossary on page 93 Highly reflective subjects or very bright scenes e g snowfields 1EV Scenes that are mostly sky 1EV Spotlit subjects particularly if photographed against dark backgrounds 2 3 EV Subjects with low reflectivity pine trees or dark colored foliage 2 3 EV ANote At settings other than 0 a 5 icon is displayed in the monitor Exposure compensation is not re...

Страница 75: ...p For subjects in direct sunlight q For subjects in the shade s Use under daylight fluorescent lights t Use under warm white fluorescent lights u Use under cool white fluorescent lights r Use under incandescent lighting If AUTO does not produce the desired results for example when taking close ups choose the option that matches the light source ANote Results vary with shooting conditions Play pict...

Страница 76: ...ton is pressed ANotes Frame rate varies with shutter speed Focus and exposure are determined by the first frame in each series The number of pictures that can be recorded depends on the memory available Additional time may be required to record pictures when shooting ends The pictures are displayed in the monitor while recording is in progress STORING STORING ...

Страница 77: ...ayback menu 1 2 PLAYBACK MENU RED EYE REMOVAL ERASE IMAGE SEARCH SLIDE SHOW PROTECT CROP EXIT 3 Press the selector up or down to highlight the desired menu item 4 Press the selector right to display options for the highlighted item 1 2 PLAYBACK MENU RED E ERAS IMAG SLIDE PROT CROP BACK FRAME ALL FRAMES 5 Press the selector up or down to highlight the desired option 6 Press MENU OK to select the hi...

Страница 78: ...ctures in a slide show pg 65 a RED EYE REMOVAL Create copies with reduced red eye pg 66 O PROTECT Protect pictures from accidental deletion pg 67 R CROP Create cropped copies of pictures pg 68 j RESIZE Create small copies of pictures pg 69 N IMAGE ROTATE Rotate pictures pg 69 P COPY Copy pictures between internal memory and a memory card pg 70 r PRINT ORDER DPOF Select pictures for printing on DPO...

Страница 79: ... any time by pressing MENU OK ANote The camera will not turn off automatically while a slide show is in progress 1 2 PLAYBACK MENU ERAS RED E SLIDE PROT CROP IMAG NORMAL NORMAL WIPE WIPE 1 2 PLAYBACK MENU ERAS RED E SLIDE PROT CROP IMAG NORMAL NORMAL WIPE WIPE Option Option Description Description NORMAL Press selector left or right to go back or skip ahead one frame Select WIPE for wipe transitio...

Страница 80: ...with reduced red eye DETECTING CANCEL REMOVING a RED EYE REMOVAL This option is used with pictures taken using Intelligent Face Detection to create copies that have been processed to remove red eye ANotes Red eye may not be removed if the camera is unable to detect a face or the face is in profile Results may differ depending on the scene Red eye can not be removed from pictures that have already ...

Страница 81: ...s Press DISP BACK to exit when the operation is complete SET ALL Press MENU OK to protect all pictures or press DISP BACK to exit without changing picture status YES CANCEL SET ALL OK IT MAY TAKE A WHILE RESET ALL Press MENU OK to remove protection from all pictures or press DISP BACK to exit without changing picture status YES CANCEL RESET ALL OK IT MAY TAKE A WHILE If the number of pictures affe...

Страница 82: ...currently displayed in monitor CANCEL YES CROP Zoom indicator B Tip Intelligent Face Detection If the picture was shot with Intelligent Face Detection pg 23 B will be displayed in the monitor Press the F button to zoom in on the selected face 2 Press MENU OK A confirmation dialog will be displayed CANCEL REC REC OK Copy size is shown at the top if the size is p OK is displayed in yellow Larger cro...

Страница 83: ...ault pictures taken in tall orientation are displayed in wide orientation Use this option to display pictures in the correct orientation in the monitor It has no effect on pictures displayed on a computer or other device ANotes Protected pictures can not be rotated Remove protection before rotating pictures pg 67 The camera may not be able to rotate pictures created with other devices To rotate a ...

Страница 84: ...omatically be rotated P COPY Copy pictures between internal memory and a memory card 1 Press the selector up or down to highlight d INTERNAL MEMORY g x CARD copy pictures from internal memory to the memory card or x CARD g d INTERNAL MEMORY copy pictures from a memory card to internal memory 2 Press the selector right to display options for the highlighted item CAR INTE COPY ALL FRAMES FRAME 3 Pre...

Страница 85: ...elected frames 100 0001 YES CANCEL COPY OK 1 Press the selector left or right to display the desired picture 2 Press MENU OK to copy the picture 3 Repeat steps 1 2 to copy additional images Press DISP BACK to exit when the operation is complete ALL FRAMES Press MENU OK to copy all pictures or press DISP BACK to exit without copying pictures 100 0001 IT MAY TAKE A WHILE COPY ALL OK YES CANCEL C Cau...

Страница 86: ...T MODE FORMAT TIME DIFFERENCE OFF ENGLISH EXIT 2 Adjust settings 2 1 Press the selector right to activate the setup menu 2 2Press the selector up or down to highlight a menu item 1 4 SET UP DATE TIME RESET SILENT MODE FORMAT OFF ENGLISH TIME D FFERENCE EXIT 2 3Press the selector right to display options for the highlighted item 2 4Press the selector up or down to highlight an option 2 5Press MENU ...

Страница 87: ...to default values A confirmation dialog will be displayed press the selector left or right to highlight OK and press MENU OK mFORMAT Format internal memory or memory cards pg 76 2 4 2 4 aIMAGE DISP Choose how long pictures are displayed after shooting pg 76 3 SEC 1 5 SEC ZOOM CONTINUOUS OFF 1 5 SEC bFRAME NO Choose how files are named pg 77 CONTINUOUS RENEW CONTINUOUS dOPERATION VOL Adjust the vol...

Страница 88: ...the flash ON OFF ON cDIGITAL ZOOM Enable or disable digital zoom pg 79 ON OFF OFF cMOVIE ZOOM TYPE Choose the zoom type when recording movies DIGITAL OPTICAL DIGITAL 4 4 4 4 RSAVE ORG IMAGE Choose whether to save unprocessed copies of pictures taken using red eye removal ON OFF OFF uGUIDANCE DISPLAY Choose whether to display tool tips ON OFF ON rVIDEO SYSTEM Choose a video mode for connection to a...

Страница 89: ...NCE 01 23 00 00 1 3Press the selector left or right to highlight hours or minutes press up or down to edit The minimum increment is 15 minutes 1 4Press MENU OK when settings are complete 2 Switch between local time and your home time zone To set the camera clock to local time highlight j LOCAL and press MENU OK To set the clock to the time in your home time zone select k HOME If j LOCAL is selecte...

Страница 90: ...shooting 3 SEC Pictures are displayed for about 3s before being recorded to the memory card 1 5 SEC Pictures are displayed for about 1 5s before being recorded to the memory card ZOOM CONTINUOUS Pictures are displayed until the MENU OK button is pressed Pictures can be zoomed in to check fine details When the picture is zoomed in the selector can be used to view areas of the image not currently vi...

Страница 91: ...ted CONTINUOUS Numbering continues from the last file number used or the first available file number whichever is higher Choose this option to reduce the number of pictures with duplicate file names RENEW Numbering is reset to 0001 after formatting or when a new memory card is inserted ANotes If the frame number reaches 999 9999 the shutter release will be disabled pg 91 Selecting sRESET pg 73 res...

Страница 92: ...n no operations are performed Shorter times increase battery life if OFF is selected the camera must be turned off manually Note that regardless of the option selected the camera will not turn off automatically when connected to a printer pg 44 or computer pg 54 or when a slide show is in progress pg 65 B Tip Reactivating the Camera To reactivate the camera after it has turned off automatically us...

Страница 93: ...to ensure that the battery level is displayed correctly and the camera does not turn off unexpectedly ALKALINE AA alkaline LR6 battery Ni MH AA Ni MH nickel metal hydride battery l DISCHARGE Ni MH Batteries Only The capacity of rechargeable Ni MH batteries may be temporarily reduced when new after long periods of disuse or if they are repeatedly recharged before being fully discharged Capacity can...

Страница 94: ...MAY TAKE A WH LE FOR DISCHARG NG SET 2 Press the selector up or down to highlight OK 3 Press MENU OK to begin discharging the batteries When the batteries are fully discharged the battery level indicator will blink red and the camera will turn off To cancel the process before the batteries are fully discharged press DISP BACK ...

Страница 95: ...d other manufacturers Available from third party suppliers DIGITAL CAMERA FINEPIX AX200 Series FINEPIX AV100 Series ComputerRelated Computer USB SD card slot or card reader Audio Visual TV Audio visual output Printer Printing PictBridge compatible printer USB HDMI cable HDTV SD SDHC memory card HD player ...

Страница 96: ...tion on the accessories available in your region check with your local Fujifilm representative or visit http www fujifilm com products digital_cameras index html A V cable AV C1 Connects the camera and a TV HD player HDP L1 Still pictures and movies in SD card can be viewed by HDTV requires HDMI cable available from third party suppliers ...

Страница 97: ...mediately before taking a picture There is dirt on the battery terminals Clean the terminals with a soft dry cloth The camera is in G mode Choose a different shooting mode 13 The batteries are new have been left unused for an extended period or have been recharged without first being fully discharged rechargeable Ni MH batteries only Discharge Ni MH batteries using the l DISCHARGE option and recha...

Страница 98: ...tted Format the memory card or internal memory 76 There is dirt on the memory card contacts Clean the contacts with a soft dry cloth 6 The memory card is damaged Insert a new memory card 5 The batteries are exhausted Insert fresh or fully charged spare batteries 4 The camera has turned off automatically Turn the camera on 9 78 The monitor goes dark after shooting The flash has fired The monitor ma...

Страница 99: ...mall area of the frame Change the composition so that the subject s face occupies a larger area of the frame The subject s head is tilted or horizontal Ask the subject to hold their head straight The camera is tilted Hold the camera straight 14 The subject s face is poorly lit Shoot in bright light Wrong subject selected The selected subject is closer to the center of the frame than the main subje...

Страница 100: ...The subject is not in range of the flash Position the subject in range of the flash 98 The flash window is obstructed Hold the camera correctly 14 Problem images Pictures are blurred The lens is dirty Clean the lens 102 The lens is blocked Keep objects away from the lens 14 R is displayed during shooting and the focus frame is displayed in red Check focus before shooting 15 89 0 is displayed durin...

Страница 101: ...elected for deletion are protected Remove protection using the device with which it was originally applied 64 Frame no File numbering is unexpectedly reset The battery chamber cover was opened while the camera was on Turn the camera off before opening the battery chamber cover to replace the battery or insert a memory card 9 77 Connections Problem Problem Possible cause Possible cause Solution Sol...

Страница 102: ...tly 44 The printer is off Turn the printer on Only one copy is printed The printer is not PictBridge compatible The date is not printed Miscellaneous Problem Problem Possible cause Possible cause So ution Solution Page Page Nothing happens when the shutter button is pressed Temporary camera malfunction Remove and reinsert the batteries 4 The batteries are exhausted Insert fresh or fully charged sp...

Страница 103: ... dark The picture will be over or under exposed If the subject is dark use the flash FOCUS ERROR TURN OFF THE CAMERA AND TURN ON AGAIN Camera malfunction Turn the camera off and then on again taking care not to touch the lens If the message persists contact a FUJIFILM dealer The lens barrel is touched NO CARD No memory card inserted when COPY is selected in the playback menu Insert a memory card C...

Страница 104: ...h more free space d MEMORY FULL INTERNAL MEMORY IS FULL INSERT A NEW CARD WRITE ERROR Not enough memory remaining to record additional pictures Delete pictures or insert a memory card with more free space The memory card or internal memory is not formatted Format the memory card or internal memory pg 76 Memory card error or connection error Re insert the memory card or turn the camera off and then...

Страница 105: ...menu contains no pictures Select a different source d NO IMAGE p CAN NOT CROP An attempt was made to crop a p picture These pictures can not be cropped t CAN NOT CROP An attempt was made to crop a t picture s CAN NOT CROP An attempt was made to crop a s picture CAN NOT CROP The picture selected for cropping is damaged or was not created with the camera t CANNOT EXECUTE An attempt was made to resiz...

Страница 106: ...RINTER ERROR Printer out of paper or ink or other printer error Check printer see printer manual for details To resume printing turn the printer off and then turn it back on PRINTER ERROR RESUME Check printer see printer manual for details If printing does not resume automatically press MENU OK to resume CAN NOT BE PRINTED An attempt was made to print a movie a picture not created with the camera ...

Страница 107: ...sting aperture and shutter speed Exif Print A standard that allows information stored with pictures to be used for optimal color reproduction during printing JPEG Joint Photographic Experts Group A compressed file format for color images The higher the compression rate the greater the loss of information and more noticeable drop in quality when the picture is displayed Motion JPEG An AVI Audio Vid...

Страница 108: ...y card FinePixAX290 AX280 AX260 AX250 AV190 AV180 AV160 AV150 Still Pictures FINE Movies i y3 2 r16 9 7 n m16 9 m p 1280 9 Internalmemory Internalmemory approx 24MB approx 24MB 3 3 4 6 15 22 23 96 5s 19s 41s 1GB 1GB 130 150 180 270 580 850 920 3650 4min 13min 28min 2GB 2GB 270 310 370 540 1170 1710 1850 7310 8min 27min 57min 4GB 4GB 550 630 750 1090 2350 3430 3700 14620 17min 54min 114min 8GB 8GB ...

Страница 109: ... 8 8 36 3s 6s 14s 1GB 1GB 160 180 210 360 580 850 920 3650 7min 13min 28min 2GB 2GB 320 360 430 730 1170 1710 1850 7310 14min 27min 57min 4GB 4GB 650 730 860 1470 2350 3430 3700 14620 29min 54min 114min 8GB 8GB 1300 1460 1730 2940 4700 6870 7400 29250 58min 108min 228min 16GB 16GB 2610 2920 3460 5880 9410 13740 14800 58520 117min 216min 456min Individual movies cannot exceed 2GB in size regardless...

Страница 110: ...l pictures Exif 2 2 JPEG compressed Movies Motion JPEG AVI Image size pixels i 4 288 3 216 y3 2 4 288 2 864 y 4 000 3 000 3 2 4 000 2 666 r16 9 4 288 2 416 7 3 072 2 304 g16 9 4 000 2 248 0 2 816 2 112 n 2 048 1 536 m16 9 1 920 1 080 n 2 048 1 536 m16 9 1 920 1 080 m 1 600 1 200 p 640 480 m 1 600 1 200 p 640 480 Lens Focal length FinePix AX290 AX280 AX260 AX250 AX240 AX230 AX210 AX200 Fujinon 5 op...

Страница 111: ...ont of lens FinePix AX290 AX280 AX260 AX250 AX240 AX230 AX210 AX200 Approx 45 cm 1 5 ft infinity wide angle 80 cm 2 6 ft infinity telephoto Macro mode approx 10 cm 80 cm 3 9 in 2 6 ft wide angle 60 cm 100 cm 2 0 ft 3 3 ft telephoto FinePix AV190 AV180 AV160 AV150 AV140 AV130 AV110 AV100 Approx 60 cm 2 0 ft infinity Macro mode approx 10 cm 70 cm 3 9 in 2 3 ft wide angle 35 cm 70 cm 1 2 ft 2 3 ft te...

Страница 112: ...wide angle 60cm 2 0m 2 0ft 6 6ft telephoto 30cm 80cm 1 0ft 2 6ft macro FinePix AV190 AV180 AV160 AV150 AV140 AV130 AV110 AV100 Auto flash effective range when sensitivity is set to AUTO is approx 60cm 3 5m 2 0ft 11 5ft wide angle 60cm 2 0m 2 0ft 6 6ft telephoto 30cm 80cm 1 0ft 2 6ft macro Flash modes Auto forced flash off slow synchro red eye removal off auto with red eye removal forced flash with...

Страница 113: ...tteries Input output terminals A V OUT audio video output NTSC or PAL with monaural sound Digital input output USB 2 0 High Speed shares A V OUT connector Power supply other Power sources AA alkaline batteries 2 AA rechargeable nickel metal hydride Ni MH batteries 2 sold separately Battery life AUTO mode Approx 180 frames alkaline batteries of the type supplied with the camera or 400 frames 2 700 ...

Страница 114: ...FinePix AV160 AV150 AV110 AV100 Approx 119g 4 2oz excluding battery accessories and memory cards Shooting weight FinePix AX290 AX280 AX240 AX230 Approx 167g 5 9oz including batteries and memory card FinePix AX260 AX250 AX210 AX200 Approx 163g 5 7oz including batteries and memory card FinePix AV190 AV180 AV140 AV130 Approx 171g 6 0oz including batteries and memory card FinePix AV160 AV150 AV110 AV1...

Страница 115: ...held liable for damages resulting from errors in this manual Although the monitor is manufactured using advanced high precision technology small bright points and anomalous colors particularly in the vicinity of text may appear This is normal for this type of monitor and does not indicate a malfunction images recorded with the camera are unaffected Digital cameras may malfunction when exposed to s...

Страница 116: ...he camera at the beach or seaside avoid exposing the camera to water or sand Do not place the camera on a wet surface Condensation Sudden increases in temperature such as occur when entering a heated building on a cold day can cause condensation inside the camera If this occurs turn the camera off and wait an hour before turning it on again If condensation forms on the memory card remove the card ...

Страница 117: ...7 3 AKASAKA 9 CHOME MINATO KU TOKYO 107 0052 JAPAN http www fujifilm com ...

Отзывы: