background image

23

Using

the Camera

22

Beep

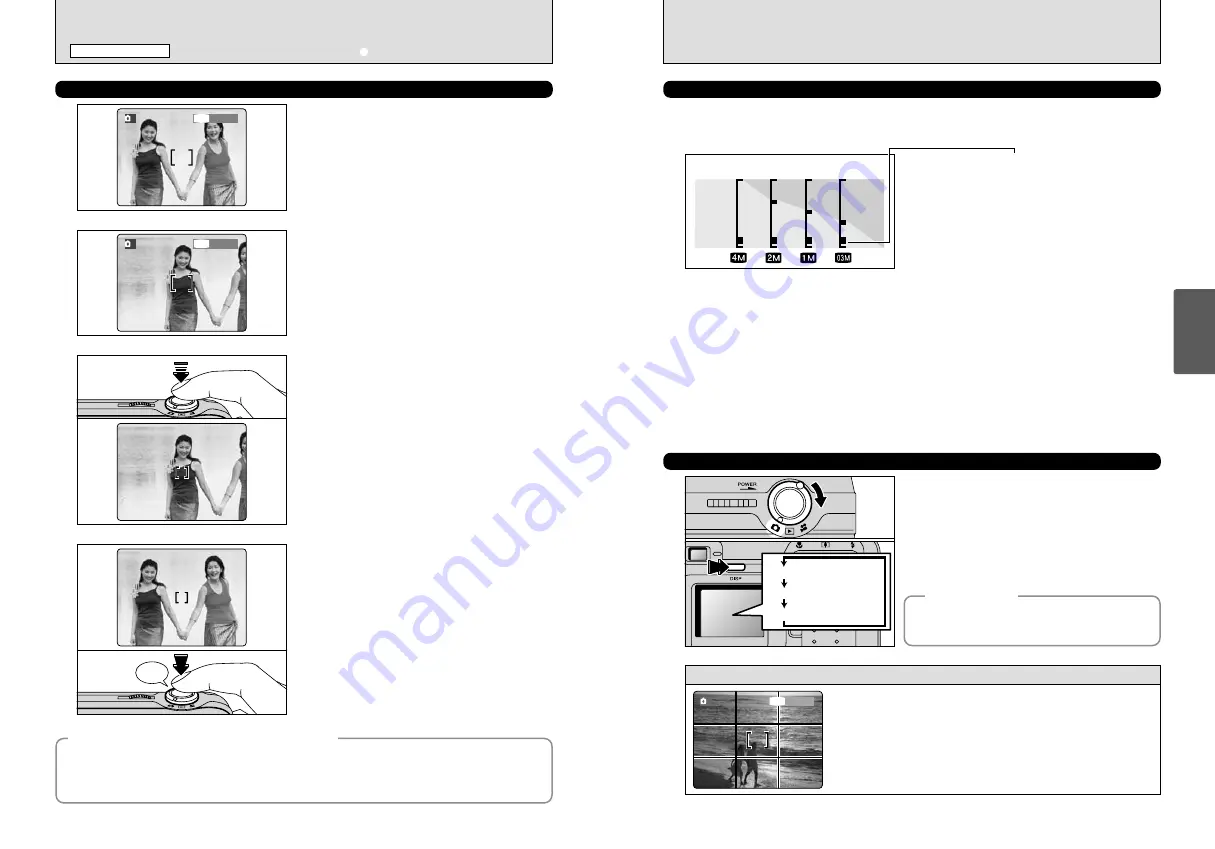
In a shot with this type of composition, the subjects
(two people in this case) are not in the AF frame. If
the shot is taken at this point, the subjects will not
be in focus.

Move the camera slightly so that one of the
subjects is in the AF frame.

Without moving the camera, press the Shutter
button down halfway (AF/AE lock). Focusing is
complete when the AF frame on the LCD monitor
shrinks and the viewfinder lamp (green) stops
blinking and remains lit.

Continue to hold the Shutter button down halfway
(AF/AE lock). Move the camera back to the original
image and then fully press down on the Shutter
button.

1

2

3

4

!

You can reapply the AF/AE lock as many times as you like
before releasing the shutter.

!

The AF/AE lock operates in all photography modes and can
be used to ensure excellent results.

AF (Autofocus)/AE lock (Auto-exposure) 

On the FinePix A405, when you press the Shutter button down half way, the focus and exposure
settings are fixed (AF/AE lock). If you want to focus on a subject that is off to one side of the image or if
you want to set the exposure before you compose the final shot, lock the AF and AE settings and then
compose and shoot your picture to get the best results.

1M

A

   33

   33 

1M

A

   33

   33 

USING AF/AE LOCK

Scene

USING THE ZOOM (OPTICAL ZOOM/DIGITAL ZOOM)

Zoom in and out by pressing “

a

(

[

)” and “

b

(

]

)” respectively.

When zooming switches between optical and digital, the “

” indicator stops. Pressing the same

zoom button again starts the “

” indicator moving again.

The position of the “

” indicator on the zoom bar

shows the zooming status.

h

If the “

” is below the dividing line, the optical

zoom is being used. If it is above the line, the
digital zoom is being used.

!

The digital zoom cannot be used with the “

4

” setting.

!

See P.30 for information on changing the quality mode
setting.

!

If the shot goes out of focus during zooming, hold the Shutter
button down halfway to refocus the shot.

!

The digital zoom can only be used for shots taken using the
LCD monitor.

!

This camera features 5 levels of zoom magnification.
However, due to the lens performance characteristics, the
intervals between the 5 levels are not equal. Note also that
the zoom speed varies slightly close to the maximum
telephoto setting.

BEST FRAMING

Turn the modo switch to “

q

” to set “Framing

Guideline”.
The LCD monitor display changes each time you
press the “DISP” button. Press the “DISP” button
until “Framing Guideline” appears.

Use this frame with main subject positioned at the intersection of
two lines or align one of the horizontal lines with the horizon.
This frame allows you to compose your own shots while
remaining aware of the subject's size and the balance of the shot.

!

The framing guideline is not recorded on the image.

!

The lines in the scene frame divide the recorded pixels into 3 roughly equal
parts horizontally and vertically. When the image is printed, the resulting print
may be shifted slightly from the scene frame.

h

Optical zoom focal length 

(35 mm camera equivalent)

Approx. 36 mm-108 mm, Maximum zoom scale: 3

×

h

Digital zoom focal lengths

(35 mm camera equivalent)

2

: Approx. 108 mm-155 mm, Maximum zoom scale: 1.44

×

1

: Approx. 108 mm-194 mm, Maximum zoom scale: 1.8

×

`

: Approx. 108 mm-270 mm, Maximum zoom scale: 2.5

×

LCD monitor ON

Framing guideline displayed

LCD monitor OFF


   33

33

1M

1M

A

Optical

zoom

Digital

zoom

Zoom bar display

Important 

Always use AF/AE lock when composing a shot.
The image may not be focused correctly if you do
not use AE/AF lock.

SHOOTING STILL IMAGES (

a

AUTO MODE)

STILL PHOTOGRAPHY MODE

Содержание FinePix A405

Страница 1: ...how you how to use your FUJIFILM DIGITAL CAMERA FinePix A405 correctly Please follow the instructions carefully BL00330 100 1 Getting Ready Using the Camera Advanced Features Software Installation Viewing Images Settings ...

Страница 2: ... you shall not copy or reproduce all or any part of Software or Documentation 3 3 You shall not modify adapt or translate Software or Documentation You also shall not alter or remove copyright and other proprietary notices that appear on or in Software or Documentation 3 4 You shall not or shall not have any third party reverse engineer decompile or disassemble Software 4 Ownership All copyrights ...

Страница 3: ...MODE STILL PHOTOGRAPHY MENU STILL PHOTOGRAPHY MODE o ERASING SINGLE ALL FRAMES 37 ALL FRAMES FRAME BACK 37 u DPOF SET FRAME 39 HOW TO SPECIFY PRINT OPTIONS DPOF 39 HOW TO SPECIFY PRINT OPTIONS FRAME SET RESET 39 RESET ALL 41 i PROTECTING IMAGES FRAME SET ALL RESET ALL 42 FRAME SET 42 FRAME RESET SET ALL RESET ALL 43 g AUTO PLAY AUTOMATIC PLAYBACK 44 PLAYBACK MENU Warning 2 IMPORTANT 2 EC Declarati...

Страница 4: ...amera This camera contains precision electronic components To ensure that images are recorded correctly do not subject the camera to impact or shock while an image is being recorded Trademark Information h and xD Picture Card are trademarks of Fuji Photo Film Co Ltd h IBM PC AT is a registered trademark of International Business Machines Corp of the U S A h Macintosh Power Macintosh iMac PowerBook...

Страница 5: ...ndicated Press the DISP button to use the zoom or the MENU OK button to crop the image Nomenclature Refer to the pages in parentheses for information on using the camera features POWER switch P 12 VIDEO OUT Video output socket P 59 Self timer lamp P 31 Shutter button DC IN 3V power input socket P 58 Viewfinder Window Lens cover Flash control sensor Flash P 27 Cradle connection socket USB socket P ...

Страница 6: ...3 The batteries run out The display will shortly go blank and the camera will stop working Replace or recharge the batteries Blinking red Lit red 1 2 3 No icon LOADING THE BATTERIES AND THE MEDIA 1 Getting Ready Compatible batteries h AA size alkaline batteries 2 Rechargeable Battery NH 10 sold separately or AA size Ni MH batteries sold separately 2 Please use the same brand AA size alkaline batte...

Страница 7: ...irst switch the camera on the date is cleared Press the MENU OK button to set the date and time To set the date and time later press the BACK button If you do not set the date and time this confirmation message will appear each time you switch the camera on 1Press d or c to select Year Month Day Hour or Minute 2Press a or b to correct the setting Holding down a or b the numbers change continuously...

Страница 8: ... the date order 1Press d or c to select the date order 2Press a or b to set the date order Refer to the table below for details of the settings 4 0 1 0 2 5 1 1Press the MENU OK button to display the menu screen 2Press a b d or c to select SET UP from the F OPTION menu 3Press the MENU OK button 1The SET UP screen appears Press a or b to select 2Press c to select ENGLISH FRANCAIS DEUTSCH ESPAÑOL or ...

Страница 9: ...isplay on and off or selects multi frame playback Photography ab button Press to zoom in telephoto Press to zoom out wide angle Playback ab button Panning frames files Press to enlarge the image Press to revert to normal display 0 dc button Photography d button Switches Macro on and off c button Sets the flash Playback Change frame or in a movie frame advance 0 Changing modes POWER switch 0 DISP b...

Страница 10: ...hots in dark locations when the flash is set to Suppressed Flash mode There may be some unevenness in the brightness at the lower edge of the LCD monitor This is normal and does not indicate a fault This does not affect the photographed image SHOOTING STILL IMAGES a AUTO MODE STILL PHOTOGRAPHY MODE 4 To zoom in on your subject press Zoom switch a telephoto To zoom out press b wide angle A zoom bar...

Страница 11: ... between the subject and the background such as white walls or subjects dressed in the same color as the background h Subjects moving at high speed h When something other than your subject is close to the AF frame has contrasting areas of light and dark and is either closer or further away than your subject as when you photograph someone against a background with strongly contrasting elements For ...

Страница 12: ...e line the digital zoom is being used The digital zoom cannot be used with the 4 setting See P 30 for information on changing the quality mode setting If the shot goes out of focus during zooming hold the Shutter button down halfway to refocus the shot The digital zoom can only be used for shots taken using the LCD monitor This camera features 5 levels of zoom magnification However due to the lens...

Страница 13: ...ds Playback zoom cannot be used with multi frame playback Text displayed No text displayed Multi frame playback 0 1 0 2 0 1 0 2 Still images that can be viewed You can use this camera to view still images recorded on the FinePix A405 or still images excluding some uncompressed images recorded on a FUJIFILM digital camera that supports xD Picture Cards Playback frame number Pressing the a or b swit...

Страница 14: ...appropriate flash mode for the conditions To take pictures in a dark location when the camera shake warning icon is displayed use a tripod to prevent camera shake The lens is fixed at the wide angle zoom setting and only the digital zoom can be used The LCD monitor is automatically switched ON and cannot be switched OFF Canceling Macro mode the LCD monitor remains on 0 1 d FLASH Choose from 6 flas...

Страница 15: ...e is too great for the flash to be effective In this situation you can use the specified white balance P 32 to take shots that retain the atmosphere given by the ambient lighting To take pictures in Suppressed Flash mode in dark conditions use a tripod to prevent camera shake See P 72 for information on the camera shake warning Red Eye Effect When you use the flash to photograph people in low ligh...

Страница 16: ...in situations such as group shots where the photographer is included in the shot Setting the self timer to ON appears on the LCD monitor In this mode a timer runs for roughly 10 seconds before the shutter is released 1Position the AF frame over the subject 2Press the Shutter button down halfway to focus the shot 3Without releasing the Shutter button press the button all the way down fully pressed ...

Страница 17: ...ots of pine trees or dark foliage 0 6 EV AUTO Automatic adjustment Shooting to show the ambience of the light source 6 Shooting outdoors in fine weather 7 Shooting in shade 9 Shooting under Daylight fluorescent lamps 0 Shooting under Warm White fluorescent lamps Shooting under Cool White fluorescent lamps 8 Shooting in incandescent light When the flash fires the white balance set for the flash is ...

Страница 18: ...ton during shooting shooting ends and the movie is stored on the xD Picture Card If you end shooting immediately after you start shooting only 1 second of movie is shot 5 6 Pressing the Shutter button down fully locks the focus but the exposure varies automatically according to the scene being shot y QUALITY SETTINGS IN MOVIE MODE MOVIE MENU 1Press the MENU OK button to display the menu 2Press d o...

Страница 19: ...nces or goes back one frame Hold down the button to move through the frames quickly Playing back movie files i It may not be possible to play back a movie file that was recorded on a camera other than the FinePix A405 i To play back movie files on a computer save the movie file on the xD Picture Card to the computer s hard disk and then play back the saved file 0 1 0 2 0 1 0 2 When paused Rewind F...

Страница 20: ...files will be erased 1Turn the Mode switch to w 2Press the MENU OK button 2 Press d or c to select u DPOF 1 0 1 0 2 DPOF stands for Digital Print Order Format and refers to a format that is used for recording printing specifications for images shot using a digital camera on media such as an xD Picture Card The recorded specifications include information on which frames are to be printed This secti...

Страница 21: ...ttings all the new settings are cancelled If there were previous DPOF settings only the modifications are cancelled When DPOF settings were specified on another camera When the data includes a frame with DPOF setting that were specified on another camera appears Pressing the MENU OK button erases all of the DPOF settings already specified for each frame You must then specify the DPOF setting for e...

Страница 22: ...files P 48 0 1 0 2 0 1 0 2 0 1 0 2 RESET ALL Removes the protection from all the frames files SET ALL Protects all the frames files FRAME Protects or unprotects only the selected frame file i PROTECTING IMAGES FRAME SET ALL RESET ALL PLAYBACK MENU 0 1 0 2 1Press d or c to select the protected frame file 2Press the MENU OK button to unprotect the displayed frame file FRAME RESET Press the MENU OK b...

Страница 23: ...anced and played back Pressing the DISP button once during playback the playback frame number is displayed on the LCD monitor To interrput g PLAYBACK press the BACK button 3 1Turn the Mode switch to q w or r 2Press the MENU OK button to display the menu on the LCD monitor 1Press d or c to select F OPTION and then press a or b to select 6LCD 2Press the MENU OK button 2 1Press d or c to adjust the L...

Страница 24: ...deo output is set to NTSC or PAL qRESET OK Resets all the camera settings other than the date and time language and video output settings to the factory default values set at shipment Pressing c displays a confirmation screen To reset the settings press the MENU OK button DISCHARGE OK Discharges rechargeable batteries See P 70 for details Settings Display Default setting Explanation 0 1 0 3 0 4 Po...

Страница 25: ...er media 1Press d or c to select OK 2Press the MENU OK button to erase all the files and format the xD Picture Card Formatting erases protected files also FRAME NO CONT Pictures are stored beginning from the highest file number stored on the last xD Picture Card used RENEW Pictures are stored on each xD Picture Card beginning with a file number 0001 Setting this function to CONT makes file managem...

Страница 26: ...y if the connection is faulty i Additional USB interface board is not guaranteed i Windows 95 cannot be used i Operation is not guaranteed on home built computers or on computers running updated operating system software i If your Internet connection is via a router or via a LAN connecting machines on the LAN to the Internet you cannot use videoconferencing i If you are using Windows XP and you ti...

Страница 27: ...ware i Connection speed 56k or better recommended Sound functions Speakers and microphone 1 Models with a USB port as a standard feature 2 This software does not run correctly in the Mac OS X Classic environment 3 Turn virtual memory on if necessary 4 Required to use the FinePix Internet Service The software can still be installed even if you do not have an Internet connection Note i Connect the c...

Страница 28: ...B minimum 256 MB or more recommended Hard disk space Amount required for installation 110 MB minimum Amount required for operation 300 MB minimum Display 800 600 pixels or better at least 32 000 colors Internet connection 3 i To use the FinePix Internet Service or mail attachment function An Internet connection and e mail transmission software i Connection speed 56k or better recommended Hardware ...

Страница 29: ...aller for MacOS X 4Click the icon This operation is not required on version 10 2 or later 5 Enter the administrator name and password Then click the OK button 6 Click the Continue button 7 Quit any other programs that are running and then click the Continue button 9 Select the Mac OS X startup disk as the installation destination and click the Continue button 10 Click the Install upgrade button 11...

Страница 30: ...o result in damage to the xD Picture Card or malfunctions during PC connection 6 1 CAMERA CONNECTION 6 Viewing Images The Camera Connection section explains how to connect the camera to your computer using the included USB cable and describes the functions you can use once the camera and computer are connected Switch off the camera and TV Plug the Video cable provided with the camera into the VIDE...

Страница 31: ...always disconnect the camera from the PC using the procedure on P 62 Do not disconnect the USB cable when the camera is communicating with the PC See P 62 for information on the disconnection procedure The Windows CD ROM may also be required during installation In this event switch CD ROMs as directed by the on screen instructions h FinePixViewer automatically starts up Screen for Windows 98 SE Wi...

Страница 32: ...on in the taskbar and eject USB Disk 3The menu option shown below appears Click on this option 4The Eject hardware dialog box appears Click the OK button or the close button Screen for Windows Me Screen for Windows Me Macintosh Drag the Removable drive icon on the desktop to the Trash Dragging the icon to the Trash µ appears on the camera s LCD monitor 3 1Switch the camera off 2Unplug the included...

Страница 33: ...installation ends click the OK button Only perform this operation when you no longer require the installed software or when the software was not installed correctly Mac OS 8 6 9 2 2 Uninstalling Mass Storage Driver and PC Camera Driver 1Check that the camera is not connected to your Macintosh 2Open the Extensions folder in the System folder and then drag all the files that begin with USB04CB to th...

Страница 34: ...cts when it is being carried h Rechargeable Battery NH 10 This is a battery pack that uses nickel metal hydride Ni MH batteries The NH 10 can be charged using the Digital Camera FinePix A405 and Cradle CP FXA10 or the AC Power Adapter AC 3VW Obtain this battery pack if you need a spare battery after purchasing the cradle Note that the NH 10 cannot be charged by itself h Image Memory Card Reader DP...

Страница 35: ...oading the batteries into the camera ensure that the battery polarity and is as indicated on the camera h Do not use a new battery together with a used battery In the case of rechargeable batteries do not use charged and discharged batteries together Do not use batteries of different types or brands together h If you do not intend to use the camera for a long period of time remove the batteries fr...

Страница 36: ...d by FUJIFILM are used h The xD Picture Card may feel warm when it is removed from the camera after extended periods of picture taking or image viewing This is normal and does not indicate a fault h Do not affix labels to the xD Picture Card This could result in the label peeling off and causing a fault when the card is inserted or removed Notes on Using xD Picture Card with a PC h If you intend t...

Страница 37: ...tact area is soiled i Camera fault i You attempted to play a movie that was not recorded on this camera i Images cannot be played back i Wipe the contact area on the xD Picture Card with a soft dry cloth It may be necessary to format the xD Picture Card If the error message is still displayed replace the xD Picture Card i Contact your FUJIFILM dealer i Movies cannot be played back The frame number...

Страница 38: ...g the camera in extremely cold conditions i The terminals are soiled i The batteries get un rechargeable i No xD Picture Card is inserted i The xD Picture Card is fully recorded i The xD Picture Card is not formatted i The xD Picture Card contact area is soiled i The xD Picture Card is damaged i The camera was not used for 2 minutes i The batteries run out i The flash is set to Suppressed Flash mo...

Страница 39: ...lion pixels CCD sensor 1 2 7 inch Super CCD in an interwoven pattern Number of total pixels 2 11 million pixels Number of recorded pixels Still image 2304 1728 pixels 1600 1200 pixels 1280 960 pixels 640 480 pixels 4 2 1 Movie 320 240 pixels 10 frames per second without sound 160 120 pixels 10 frames per second without sound Storage media xD Picture Card 16 32 64 128 256 512 MB File format Still i...

Страница 40: ...indicated by the and marks WARNING Unplug from power socket Do not use in the bathroom or shower Do not disassemble Explanation of Terms Deactivated batteries Leaving an Ni MH battery unused in storage for a long period may cause a rise in the level of substances that inhibit current flow inside the battery and result in a dormant battery A battery in this state is referred to as deactivated Becau...

Страница 41: ...xD Picture Card is allowed to fly out it could hit someone and cause injury Request regular internal testing and cleaning for your camera Build up of dust in your camera can cause a fire or electric shock h Contact your FUJIFILM dealer to request internal cleaning every 2 years Do not heat modify or attempt to disassemble the batteries Do not drop or subject the batteries to impacts Do not attempt...

Страница 42: ......

Страница 43: ...Printed in Japan FGS 305107 FG Printed on recycled paper 26 30 Nishiazabu 2 chome Minato ku Tokyo 106 8620 Japan http home fujifilm com products digital ...

Отзывы: