background image

14

15

1

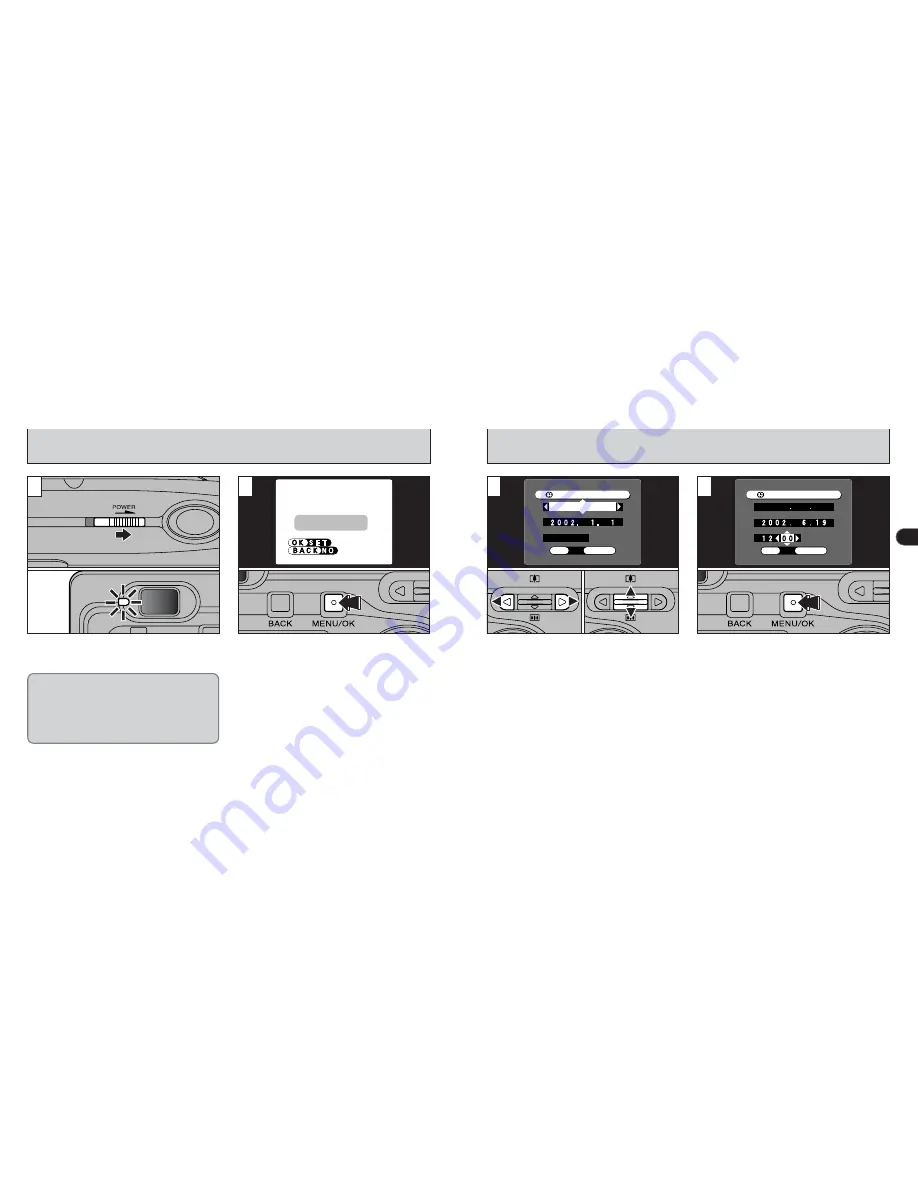
SWITCHING ON AND OFF

DATE/TIME

DATE/TIME 
 NOT SET

 NOT SET 

!

To set the date and time later, press the “BACK”
button.

!

If you do not set the date and time, this confirmation
screen will appear each time you switch the camera on.

When you first switch the camera on, the date is
cleared. Press the “MENU/OK” button to set the
date and time.

1

2

Slide the “POWER” switch sideways to turn the
camera on and off. When you switch the camera
on, the viewfinder lamp lights (green).

SETTING THE DATE AND TIME

DATE/TIME

DATE/TIME 

YYYY.MM.DD 

YYYY.MM.DD  

12:00

12:00 

AM

AM 

OK 

OK

OK 

BACK

BACK 

DATE/TIME

DATE/TIME 

YYYY MM DD

YYYY MM DD 

AM

AM 

OK 

OK

OK 

BACK

BACK 

1

Use “

d

” or “

c

” to select Year, Month, Day,

Hour or Minute.

2

Press “

a

” or “

b

” to set the number.

Once you have set the date and time, press the
“MENU/OK” button. Pressing the “MENU/OK”
button switches the camera to Photography or
Playback mode.

!

To set the time more precisely, press the “MENU/OK” button
when the time on your reference clock reaches zero seconds.

!

At the time of purchase and after you leave the camera for a
long period with the batteries removed, settings such as the
date and time are cleared.
Unless the battery has been left in the camera for at least 20
minutes, the camera settings may not be retained when you
replace the xD-Picture Card or battery.

!

If you hold down “

a

” or “

b

”, the numbers change

continuously.

!

When the time displayed passes “12:00”, the AM/PM
setting automatically switches.

3

4

0

1

0

2

In “

Q

” mode, the lens cover opens and the lens

extends. Take care not to press on these
precision components as this could result in a fault
or a “

ç

” message being displayed on

the LCD monitor. Take care also not to leave
fingermarks on the lens as this will degrade the
picture quality.

Содержание FINEPIX A203

Страница 1: ...BL00147 200 1 FinePix A203 FinePix A303 7 8 Getting Ready Camera Connection Using FinePixViewer Basic Photography Advanced Features Photography Advanced Features Playback Software Installation Settings ...

Страница 2: ...cautioned that any changes or modifications not expressly approved in this manual could void the user s authority to operate the equipment Notes on the Grant To comply with Part 15 of the FCC rules this product must be used with a Fujifilm specified ferrite core USB cable and DC supply cord For customers in Canada CAUTION This Class B digital apparatus complies with Canadian ICES 003 Warning This ...

Страница 3: ...ND xD Picture Card 11 SWITCHING ON AND OFF 14 SETTING THE DATE AND TIME 15 Changing the date and time 16 To change the date display format 16 SELECTING THE LANGUAGE 18 BASIC OPERATION GUIDE PHOTOGRAPHY 19 BASIC OPERATION GUIDE PLAYBACK 20 BASIC OPERATION GUIDE MENU 21 TAKING PICTURES A AUTO MODE 22 Viewfinder Lamp Display 27 Number of Available Frames 28 USING AF AE LOCK 30 FRAMING GUIDELINE FUNCT...

Страница 4: ...Then seek medical assistance Accessories Notes on Electrical Interference If the camera is to be used in hospitals or aircrafts please note that this camera may cause interference to other equipment in the hospital or aircraft For details please check with the applicable regulations Handling Your Digital Camera This camera contains precision electronic components To ensure that images are recorded...

Страница 5: ...ill photography mode P 22 Self Timer mode P 43 Playback mode P 37 Movie mode P 45 Macro close up mode P 42 Mode dial Attaching the strap Lens Lens cover Self timer lamp P 44 Flash control sensor Flash P 34 DC IN 3V Power input socket P 87 Shutter button POWER switch P 14 Viewfinder window USB socket P 88 91 Nomenclature Refer to the pages in parentheses for information on using the camera features...

Страница 6: ...ries h It is recommended that you use the same brand of alka batteries as those supplied with the camera h Never use a battery when the outer casing is split or peeling as this could result in a short circuit and cause major problems due to battery fluid leakage or overheating h You cannot use lithium manganese or nickel cadmium Ni Cd batteries h Do not use different types of batteries or old and ...

Страница 7: ...f you open the battery cover while the camera is switched on the camera automatically switches off to protect the data on the xD Picture Card The xD Picture Card will not slide fully into the slot if it is inserted facing the wrong way Be careful not to apply undue force to the xD Picture Card To protect the xD Picture Card always store it in the special anti static case When you want to replace t...

Страница 8: ...e press the MENU OK button Pressing the MENU OK button switches the camera to Photography or Playback mode To set the time more precisely press the MENU OK button when the time on your reference clock reaches zero seconds At the time of purchase and after you leave the camera for a long period with the batteries removed settings such as the date and time are cleared Unless the battery has been lef...

Страница 9: ...hat no battery level warning Z or X is displayed on the LCD monitor If no icon is displayed there is ample charge left in the battery i Z Lit red The battery is low on charge Have a new battery ready i X Blinking red The battery is exhausted The display will shortly go blank and the camera will stop working Replace or recharge the battery The above estimates are for the Still photography modes In ...

Страница 10: ...s the camera to Playback mode 0Mode dial Pressed halfway Sets the focus Pressed fully Releases the shutter 0Focus and shoot You can further reduce power consumption by switching preview image checking OFF SELECTING THE LANGUAGE 1Press the MENU OK button to display the menu screen 2Use fg to select SET UP from the g OPTION menu 3Press the MENU OK button 1The SET UP screen appears Use a or b to sele...

Страница 11: ... the next frame d Selects the previous frame 0Playback frame selector Set the mode dial to 0Mode dial This feature displays help on moving to the next step at the bottom of the screen Press the corresponding button Displaying help DISP DISP DISP ZOOM ZOOM Press the BACK button Using the Menus 1Display the menu Press the MENU OK button 2Select a menu option Press d or c 3Select a setting Press a or...

Страница 12: ...e camera may not be able to take successful pictures if your fingers or the strap are in the way Check that the lens is clean If it is dirty clean the lens as described on P 108 For subjects closer than 60 cm 2 ft use Macro photography P 42 3 You have read the section called Getting Ready and now your camera is ready to take pictures The Basic Photography section takes you through the basic proced...

Страница 13: ...ake the picture using the LCD monitor In some conditions it may be difficult to see your subject clearly on the LCD monitor such as in sunny weather outdoors or when you are shooting dimly lit scenes In such situations use the viewfinder to take the shot The image shown on the LCD monitor before you take the shot may differ in its brightness color etc from the image actually recorded If necessary ...

Страница 14: ...rror h Lens operation error h Very shiny subjects such as a mirror or car body h Subjects photographed through glass h Subjects that do not reflect well such as hair or fur h Subjects with no substance such as smoke or flames h When the subject is dark h When there is very little contrast between the subject and the background such as white walls or subjects dressed in the same color as the backgr...

Страница 15: ...lable shots and the standard number of shots tends to be larger when the capacity of the xD Picture Card is larger 49 49 1M 1M FinePix A303 Image Data Size Approx 1300 KB Approx 590 KB 12 26 25 53 50 107 102 215 DPC 16 16 MB DPC 32 32 MB DPC 64 64 MB DPC 128 128 MB Number of recorded pixels Quality Mode 3M F 2048 1536 1600 1200 1280 960 640 480 3M N Approx 390 KB 39 79 159 319 2M Approx 320 KB 49 ...

Страница 16: ... want to focus on a subject that is off to one side of the image or if you want to set the exposure before you compose the final shot lock the AF and AE settings and then compose and shoot your picture to get the best results Hold the shutter button down halfway AF AE Lock and chech that the AF frame on the LCD lmonitor shrinks Continue to hold the shutter button down halfway AF AE lock Move the c...

Страница 17: ...se the LCD monitor to take pictures you can continue zooming with the digital zoom after the optical zoom finishes See P 52 for information on changing the quality setting If the image goes out of focus when you use the zoom press the shutter button down halfway to refocus The optical zoom is equivalent to approximately 38 mm 114 mm on a 35 mm camera The position of the on the zoom bar indicates t...

Страница 18: ...ye Reduction Use this mode to ensure that the subject s eyes appear natural when photographing people in low light conditions The flash fires automatically as required by the photography conditions The flash fires a pre flash just before the picture is taken and then fires again to take the actual picture c Forced Flash Use this mode to photograph backlit scenes such as a subject against a window ...

Страница 19: ...ce function P 124 operates so that natural colors are captured along with the ambience of the available light If you are shooting in Suppressed Flash mode in dark conditions use a tripod to prevent camera shake See P 26 115 for information on the camera shake warning VIEWING YOUR IMAGES PLAYBACK w PLAYBACK MODE Set the Mode dial to w Press d and c to move forward and backward respectively through ...

Страница 20: ...tton again 2 0 1 0 2 Text displayed No text displayed Multi frame playback 1 PLAYBACK ZOOM w PLAYBACK MODE It may not be possible to play back images shot on other camera models Playback zoom cannot be used during multi frame playback This function is useful for things such as checking the focus of shots you have taken To switch to the zoom screen press a during single frame playback Maximum zoom ...

Страница 21: ...LL FRAMES BACK BACK BACK BACK ERASE ERASE 2 FRAME FRAME FRAME FRAME FORMAT FORMAT ALL FRAMES ALL FRAMES BACK BACK BACK BACK ERASE ERASE 0 1 0 2 3 ERASE OK ERASE OK FRAME FRAME 4 Press d or c to view the frame individual file you want to erase Press the BACK button to cancel frame erasing Note that mistakenly erased images cannot be recovered You should copy important files that you want to keep to...

Страница 22: ...CLOSE UP PHOTOGRAPHY 3Advanced Features Photograhy When shooting in dark conditions use a tripod to prevent camera shake If you use the viewfinder to take a picture in Macro mode the field visible through the viewfinder does not match the field actually photographed because the viewfinder and lens are in different positions Accordingly you should use the LCD monitor to take pictures in Macro mode ...

Страница 23: ...for information on changing the quality setting Set the Mode dial to T hMovie format Motion JPEG P 124 320 240 pixels 160 120 pixels selectable 10 frames per second Without sound The available shooting time and the œ message are shown on the LCD monitor xD Picture Card standard shooting time The self timer lamp lights steadily for roughly 5 seconds and then blinks for another 5 seconds after which...

Страница 24: ... zoom can be used Use a or b to zoom in and out A zooming bar is displayed on the LCD monitor The focal distances and maximum zoom ratios for the digital zoom are shown below You do not need to hold down the shutter button The focus is fixed at approximately 80 cm 2 6 ft to infinity The white balance is fixed during shooting but the exposure varies automatically to suit the scene being shot The im...

Страница 25: ... you to specify your own EV exposure compensation and White Balance settings Q AUTO Q MANUAL BASIC PHOTOGRAPHY MENU OPERATIONS The settings available in the menu screen differ depending on the still photography mode When you validate the settings the respective icons appear at the top of the screen Example When the EV exposure compensation is set in Manual mode 49 49 1M 1M 1M 2 Set the Mode dial t...

Страница 26: ...n and WHITE BALANCE settings 2M 2M 39 26 3M N QUALITY 122 1M 1M 49 49 EV 0 0 0 6 3 3 3 AUTO AUTO WHITE BALANCE WHITE BALANCE AUTO LCD BRIGHTNESS SET UP MANUAL OPTION 2M 2M 39 49 26 3M N QUALITY 122 1M 1M 03M AUTO LCD BRIGHTNESS SET UP MANUAL OPTION Q AUTO Q MANUAL You can switch between AUTO and MANUAL in OPTION Movie Mode If you press the MENU OK button in T mode the menu screens shown below appe...

Страница 27: ... 1200 1M 1280 960 0 3M 640 480 Usage FinePix A303 Photography Q E 320 240 160 120 FinePix A203 FinePix A303 Movie T 2M N 2M N 2M N 39 39 25 25 2M F 2M F QUALITY QUALITY 122 122 1M 1M 1M 1M Factory default Number of re maining shots FinePix A303 Photography Q E Any of 5 settings can be selected Select the setting that best suits your needs Examples h To print at A4 size 3M F or 3M N Select 3M F for...

Страница 28: ...in the optimum image brightness exposure when the subject is much brighter or darker than the background hCorrection range 13 steps 2 1 EV to 1 5 EV in 0 3 EV increments See P 124 for more information on EV hCopying of printed text black characters on white paper 1 5 EV hBacklit portraits 0 6 EV to 1 5 EV hLocations with very bright backgrounds or strong reflections such as ski resorts 0 9 EV hSho...

Страница 29: ...ovie file on the xD Picture Card to the computer s hard disk and then play back the saved file i Video files contain large amounts of data Depending on the performance of the computer movies may not run smoothly if the computer cannot process the images quickly enough i If you play back your movies on a computer or a different camera model they may run slightly faster than normal Rewind Forward 2 ...

Страница 30: ...d to your computer or other media FORMAT Erases all the images Because formatting also erases protected files check carefully before formatting a card and copy any files that you want to keep onto other media such as your hard disk 3 p ERASING SINGLE ALL FRAMES FORMATTING PLAYBACK MENU 1Set the Mode dial to w 2Press the MENU OK button to view the menu screen Use d or c to select p ERASE 1 0 1 0 2 ...

Страница 31: ...be erased 2Press the MENU OK button to erase the displayed image To erase another image repeat steps 1 and 2 When you have finished erasing images press the BACK button Press the MENU OK button to erase all the unprotected images Images with ˆ displayed cannot be erased Unprotect the image before erasing it If ø appears press the MENU OK button again to erase the image p ERASING SINGLE ALL FRAMES ...

Страница 32: ...mages Protects all the images FRAME SET RESET UNPROTECT ALL PROTECT ALL Continued over page 3 Protection is a setting that prevents images from being accidentally erased However FORMAT erases all images regardless of protected or not P 61 1Set the Mode dial to w 2Press the MENU OK button to view the menu screen Use d or c to select k PROTECT 1 0 1 0 2 FRAME SET RESET PROTECT PROTECT 2 k PROTECTING...

Страница 33: ...BACK OK OK OK OK IT MAY IT MAY TAKE A WHILE TAKE A WHILE k PROTECTING IMAGES FRAME ALL PLAYBACK MENU FRAME SET RESET BACK BACK BACK OK OK OK FRAME SET RESET FRAME SET RESET PROTECT OK PROTECT OK 0 1 0 2 1Press d or c to select the image to be protected 2Press the MENU OK button to protect the displayed image To protect another file repeat steps 1 and 2 To finish protecting files press the BACK but...

Страница 34: ... order your prints with the FinePix A203 FinePix A303 On the FinePix A203 FinePix A303 you can specify only one print per image in the DPOF settings Note that some printers do not support date and time imprinting or specification of the number of prints Note that the warnings shown below may be displayed while you are specifying the prints ø P 60 When you erase the image the DPOF setting for that ...

Страница 35: ...al number of frames for which prints have been ordered When you have finished the settings always select FINISH and press the MENU OK button If you press the BACK button no DPOF settings are specified You can only specify one print per frame in the DPOF settings Note also that you can specify prints for up to 999 frames on the same xD Picture Card 1Use b to select DDATE 2Use d and c to select DATE...

Страница 36: ...ing the MENU OK button confirms the DPOF settings Pressing the BACK button returns you to the settings screen 5 FINISH OK FINISH OK DPOF DPOF BACK BACK OK OK 7 Pressing the MENU OK button confirms all the settings DPOF settings cannot be added to or changed DPOF DPOF RESET DPOF RESET DPOF OK OK BACK BACK OK OK If you select a frame for which DPOF settings have already been specified the message ap...

Страница 37: ...amera settings including the photography and playback menu settings other than DATE TIME and LANGUAGE to the factory default values set at shipment LANGUAGE ENGLISH FRANCAIS DEUTSCH Select English French or German as the language used for screen display ENGLISH List of Settings The options available in the settings menus vary depending on the mode as shown in the table below A AUTO S MANUAL LCD BR...

Страница 38: ... BACK BACK OK OK OK hPower saving ON default setting Power consumption is kept to a minimum to prevent battery depletion You should select the ON setting when you are using alkaline batteries iIf the camera is not used for approximately 30 seconds the LCD monitor switches off temporarily to reduce power consumption Sleep mode iOnce the camera is in Sleep mode if it is left unused for a further 90 ...

Страница 39: ... FinePixViewer installation to restart 6 2 Installation on a Windows PC 6 2 1 Load the CD ROM into your PC 1 Switch on your PC and start up Windows If you have already switched on your PC restart your PC at this point Users of Windows 2000 or Windows XP should log in using a system administrator account e g Administrator 2 Quit all other active applications until no applications are shown in the t...

Страница 40: ...e is already installed on your PC this installation is not performed When next screen appears click the Restart button In Windows Media Component Setup window tick the I have read the Privacy Statement checkbox and then click the Next button When you click the Finish button your PC is restarted 3 Check the installation destination folder and then click the Next button 4 Confirmation screen shown m...

Страница 41: ... box is ticked If not click in the box so that an appears and then restart your Macintosh NOTE 6 3 2 From FinePixViewer installation to restart 1 When you load the enclosed CD ROM into the CD ROM drive the FinePix window automatically opens If the FinePix window does not open automatically double click the CD ROM icon NOTE 15 Proceed with the installation as directed by the on screen instructions ...

Страница 42: ... Mac OS 8 6 9 x Acrobat Reader English folder 3 Double click English Reader Installer 4 Proceed with the installation as directed by the on screen instructions 6 Select the installation destination for FinePixViewer and ImageMixer VCD for FinePix 1 Click the Open button to open the installation destination folder 2 Click the Save button 7 Install QuickTime as directed by the on screen instructions...

Страница 43: ...back on version 10 0 4 1 Switch your Macintosh on and start up Mac OS X Do not launch any other applications 2 Load the enclosed CD ROM into the CD ROM drive The FinePix window opens If the FinePix window does not open automatically double click the CD ROM icon 3 Double click Installer for MacOS X NOTE NOTE 4 Click the icon 5 Enter the administrator name and password Then click the OK button 6 Cli...

Страница 44: ...ket outlet depends on the country of use Connecting the AC power adapter does not allow you to charge the Ni MH batteries Use the optional charger P 106 to charge the Ni MH batteries Sold separately DSC Mass storage device Mode This mode provides a simple way to read images from an xD Picture Card and store images on to an xD Picture Card P 88 The first time you connect the camera to your computer...

Страница 45: ...MODE POWER SAVE POWER SAVE ON ON POSTVIEW ON ON SET SET DSC DSC DSC DSC DSC SET UP SET UP BACK BACK BACK OK OK OK 1 Load an xD Picture Card containing photographed images into your camera Plug the AC power adapter connector into the DC IN 3V socket on the camera and then plug the adapter itself into the main power outlet 2 Slide the power switch to the side to turn the camera on 3 Set the USB MODE...

Страница 46: ...cified when installation ends Just wait a few moments 7 3 Use at PC CAM mode USB socket PC Sold separately 1 The Found New Hardware help message appears in the bottom right corner of your screen This message will close when the settings are completed No action is required This step is not required for subsequent connections 2 Specify the settings in the AutoPlay dialog box When FinePixViewer is in...

Страница 47: ...ch CD ROMs as directed by the on screen instructions Windows 98 98 SE Me Camera Operation i When the camera and computer are exchanging data the self timer lamp flashes and the viewfinder lamp flashes alternately green and orange i The lens is fixed at the wide angle zoom setting i PC CAM appears on the screen i Power Save and Auto Power Off are disabled during USB connection Do not disconnect the...

Страница 48: ... data is being exchanged with the computer Perform the steps shown below before you switch the camera off This procedure differs depending on the operating system software or PC you are using No PC operation is needed 1 Right click the removable disk icon in the My Computer window and select Eject This step is only required in Windows Me Windows Me 2000 Professional XP Windows 98 98 SE 2 Left clic...

Страница 49: ...ed a CD R drive h Refer to the ImageMixer VCD for FinePix help file for more detailed information h For inquiries regarding ImageMixer VCD for FinePix PIXELA User Support Center PIXELA Home Page http www ImageMixer com North America Los Angels Telephone 1 213 341 0163 Europe U K Telephone 44 1489 564 764 Asia Philippines Telephone 63 2 438 0090 Japan Osaka Telephone 81 72 224 0181 3 Click the Auto...

Страница 50: ...oes not appear in the pull down list select OTHERS 8 3 Using the FinePix Internet Service Mac OS X users should refer to P 100 Using FinePixViewer also allows you to access the FinePix Internet Service via the Internet A working Internet connection is required not only for FinePix Internet Service but also online FAQ FinePixViewer frequently asked and responses and latest updates A FinePix Interne...

Страница 51: ...y differ slightly in appearance from the sample shown here 7 When you have entered all the required information click the Register button at the bottom of the page Once you complete the registration a confirmation E mail is sent Wait a few moments until the message is sent 1 2 3 4 5 Enter the required information in the user registration page 1 Enter the name of your choice nickname etc 2 Enter a ...

Страница 52: ...ion begins When uninstallation ends click the OK button 8 4 Mastering FinePixViewer For more information on FinePixViewer functions not fully explained in this manual refer to How to Use FinePixViewer in the Help menu for details To read How to Use FinePixViewer You must install Adobe Systems Acrobat Reader See P 83 for information on installing Acrobat Reader What is explained in How to Use FineP...

Страница 53: ...the Trash Then select Empty Trash in the Special menu 2 After you have exited FinePixViewer and DP Editor and then drag the installed Mac OS 8 6 9 2 NOTE Macintosh FinePixViewer folder to the Trash Then click Empty Trash in the Special menu Uninstalling FinePixViewer Quit FinePixViewer and DP Editor Then drag the installed FinePixViewer folder to the Trash and select Empty Trash in the Special men...

Страница 54: ...want to take pictures or play back images for long periods or when the camera is connected to a computer The shape of the AC power adapter the plug and socket outlet depend on the country Fujifilm Rechargeable Battery 2HR 3UF The 2HR 3UF includes 2 pieces of high capacity AA size Nickel Metal Hydride Ni MH batteries Fujifilm Battery charger with Battery BK NH With Euro type or UK type plug The BK ...

Страница 55: ...eel off or cut the battery casing h Do not drop strike or otherwise subject the batteries to strong impacts Notes on the Batteries Notes on Using Your Camera Correctly Places to Avoid Do not store or use the camera in the following types of locations h In the rain or in very humid dirty or dusty places h In direct sunlight or in places subject to extreme temperature rises such as in a closed car i...

Страница 56: ...y feel warm immediately after being charged h Ni MH batteries are not charged at shipment Be sure to charge the batteries before using them h The camera mechanism is such that it draws a minute amount of current even when the camera is switched off Take particular care not to leave Ni MH batteries in the camera for a long period of time as they can become excessively discharged and may no longer b...

Страница 57: ...of existing image data as well as re recording of new image data h When using a new Memory Card or a Memory Card that has been initialized by a PC be sure to initialize format initialize the card with your digital camera before using it Protecting Your Data h Data may be lost or destroyed in the following situations Please note that FUJIFILM assumes no responsibility for data that is lost or destr...

Страница 58: ... The playback frame number has reached 999 9999 Take the shots using a formatted xD Picture Card Warning Displays e The table below lists the warnings that are displayed on the LCD monitor Warning Displayed Explanation Remedy The batteries in the camera are fully depleted or very low on charge No xD Picture Card is loaded i The xD Picture Card is not formatted i The xD Picture Card contact area is...

Страница 59: ... Card is not formatted i The xD Picture Card contact area is soiled i The xD Picture Card is damaged i The camera has been switched off because 2 minutes have elapsed since it was last used i The battery is exhausted i Load a xD Picture Card i Insert a new xD Picture Card or erase some unwanted frames i Format the xD Picture Card i Wipe the xD Picture Card contact area with a clean dry cloth i Loa...

Страница 60: ...you think the camera is faulty check the following once more Problem Cause Remedy Can t use the flash to take pictures i The flash is set to Suppressed Flash mode i You pressed the shutter button while the flash was charging i The battery is exhausted i Set the flash to Auto Red Eye Reduction or Forced Flash mode i Wait until charging is completed before pressing the shutter button i Replace with ...

Страница 61: ... personal computer h DC IN 3V Power input socket Socket for specified AC power adapter optional These specifications are subject to change without notice FUJIFILM shall not be held liable for damages resulting from errors in this Owner s Manual The LCD monitor on your digital camera is manufactured using advanced high precision technology Even so small bright points and anomalous colors particular...

Страница 62: ...1 for image data output with a personal computer h DC IN 3V Power input socket Socket for specified AC power adapter optional These specifications are subject to change without notice FUJIFILM shall not be held liable for damages resulting from errors in this Owner s Manual The LCD monitor on your digital camera is manufactured using advanced high precision technology Even so small bright points a...

Страница 63: ...f an action that must be performed Required Safety Notes WARNING Unplug from power socket Do not use in the bathroom or shower Explanation of Terms DPOF Digital Print Order Format DPOF is a format used for recording information on a storage media image memory card etc that allows you to specify which of the frames shot using a digital camera are printed and how many prints are made of each image E...

Страница 64: ...s into your eyes or comes into contact with your skin or clothing this can cause injury or loss of eyesight Immediately flush the affected area thoroughly with clean water and seek medical treatment When discarding or storing batteries cover the battery terminals with insulation tape h Contact with other metallic objects or batteries could cause the batteries to ignite or burst WARNING Do not disa...

Страница 65: ...KCA Safety Notes CAUTION Do not cover or wrap the camera or the AC power adapter in a cloth or quilt This can cause heat to build up and distort the casing or cause a fire Remove the batteries and disconnect the AC power adapter when you are cleaning the camera or if you intend to leave the camera unused for a long period Failure to do so can cause a fire or electric shock Using a flash too close ...

Страница 66: ...engineer decompile or disassemble Software 4 Ownership All copyrights and other proprietary rights to Software and Documentation are owned and retained by FUJIFILM or the third party suppliers as indicated on or in Software or Documentation Nothing contained herein shall be construed expressly or implicitly as transferring or granting any right license or title to you other than those explicitly g...

Страница 67: ...Printed in Japan FGS 204107 FG Printed on recycled paper 26 30 Nishiazabu 2 chome Minato ku Tokyo 106 8620 Japan ...

Отзывы: