background image

97

7

96

i

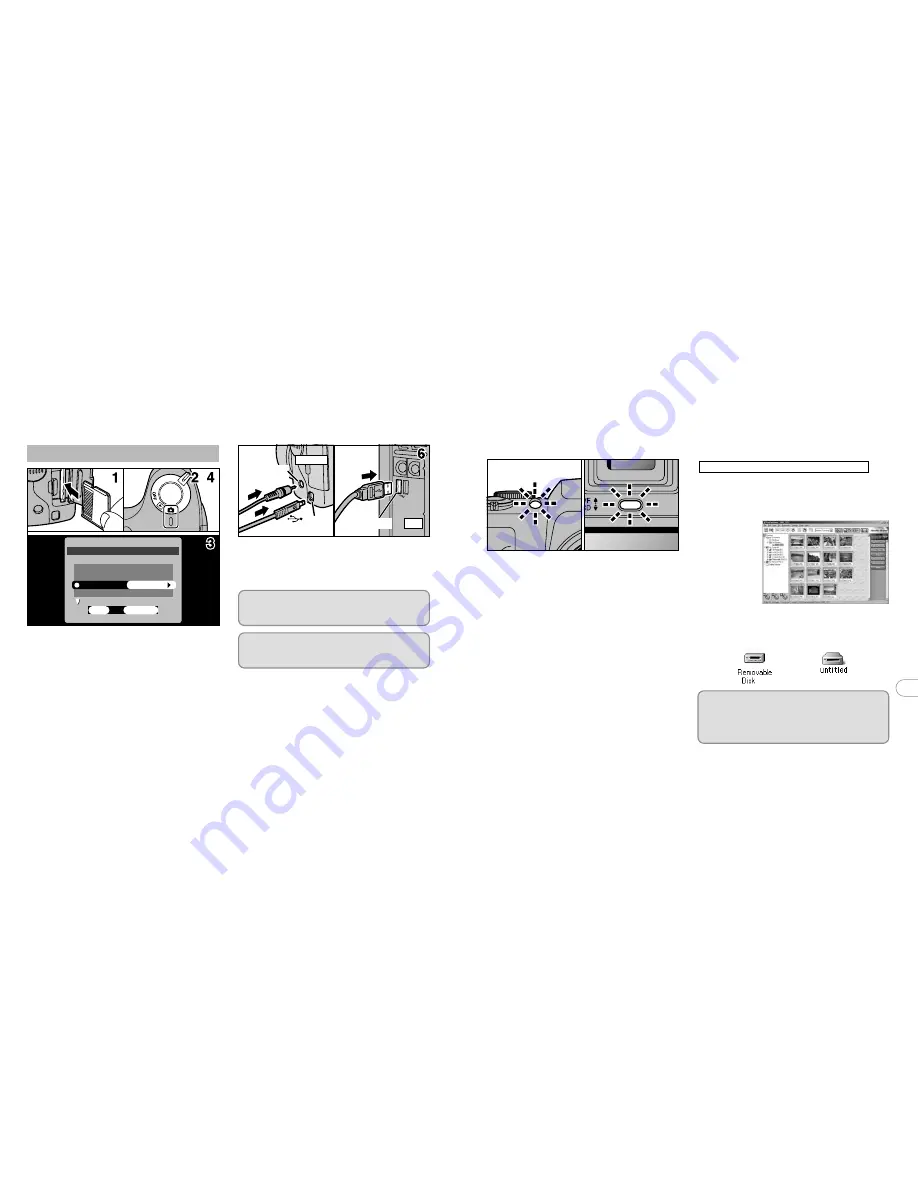
When the camera and computer are exchanging
data, the self timer lamp blinks and the indicator
lamp blinks alternately green and orange.

i

“DSC” appears on the screen.

i

Power Save is disabled when the camera is
connected to a USB port.

Before replacing the xD-Picture Card, always disconnect
the camera from the PC using the procedure on P.102.

Do not disconnect the USB cable when the camera is
communicating with the PC. See P.102 for information
on the disconnection procedure.

           Digital
(USB) socket

Camera

DC IN 5V 
socket

PC

(USB)socket 

OK 

BACK 

POWER SAVE 

DATE/TIME 

USB MODE

USB MODE 

OFF 

SET 

SET−UP

SET−UP 

POSTVIEW

POSTVIEW  ON 

DSC 

1. Load an xD-Picture Card containing

photographed images into your camera.

2. Slide the Power switch to the side to turn

the camera on.

3. Set the “USB MODE” setting in the “SET–

UP” menu to “DSC” (

P.80, 81).

4. Slide the Power switch to the side to turn

the camera off.

You should use the AC power adapter (sold
separately) the camera is connected to your PC
(

P.95). Loss of power during data transmission can

prevent successful data downloading.

5. Switch your PC on.
6. Use the special USB cable to connect the

camera to your computer.

7. Switch the camera on.

Always use the prescribed procedure when
disconnecting or switching off the camera
(

P.102).

If you are using a Windows PC, the driver settings
are specified automatically when installation is
completed. No further action is required.

On Windows XP and Mac OS X, you must specify the
automatic launch settings the first time you connect
the camera to your computer.

Take care to ensure that the special USB cable is
connected the correct way around and that the plugs
are pushed fully into the connection sockets.

7.2 Use at DSC mode

Camera Operation

PC Operation

✽ 

The Windows CD-ROM may also be required
during installation. In this event, switch CD-ROMs
as directed by the on-screen instructions.

i

FinePixViewer automatically starts up.

Windows 98/98 SE/Me/2000 Professional

i

A removable disk icon appears and you can
use your PC to transfer files to and from the
camera.

Windows

Macintosh

Screen for 
Windows 98 SE

If the above operations do not occur, you do not
have the required software programs or drivers
installed on your PC. Complete the required PC
setup procedures. Then reconnect the camera
to your PC.

Содержание FinePix 3800

Страница 1: ...TAL CAMERA FinePix S304 correctly Please follow the instructions carefully BL00171 200 1 7 8 Getting Ready Camera Connection Using FinePixViewer Basic Photography Advanced Features Photography Advance...

Страница 2: ...sonable protection against harmful interference in a residential installation This equipment generates uses and can radiate radio frequency energy and if not installed and used in accordance with the...

Страница 3: ...Mac OS 8 6 to 9 2 89 6 3 1 Check the system software settings 89 6 3 2 From FinePixViewer installation to restart 89 6 4 Installation on a Mac OS X 92 6 4 1 From FinePixViewer installation to restart...

Страница 4: ...bits even when intended purely for personal use Users are also asked to note that the transfer of memory cards containing images or data protected under copyright laws is only permissible within the r...

Страница 5: ...ography mode P 22 Power OFF P 17 MOVIE Video P 47 Manual P 44 AUTO P 22 Scene Position P 45 Mode dial Nomenclature Refer to the pages in parentheses for information on using the camera features a Tele...

Страница 6: ...on White balance Macro Battery low warning Number of remaining shots Quality mode Number of recorded pixels for images AF warning AF frame EV Exposure compensation Self Timer Camera shake warning Exam...

Страница 7: ...ries Adapter Ring AR FX9 see below for specifications Lens caps front and rear Lens pouch The enclosed adapter ring for FinePix 4800 6900 S602 cannot be used Only use the wide conversion lens at the w...

Страница 8: ...es can greatly reduce the time for which the batteries provide power h You will need the optional charger P 114 to recharge Ni MH batteries h See P 117 118 for notes on using batteries xD Picture Card...

Страница 9: ...he xD Picture Card When you push the xD Picture Card into the slot and then slowly remove your finger the lock is released and the xD Picture Card is pushed out You can then pull the xD Picture Card t...

Страница 10: ...ear month day and MM DD YYYY month day year Once you have set the date and time press the MENU OK button Pressing the MENU OK button switches the camera to Photography or Playback mode To set the time...

Страница 11: ...ing Z or X is displayed on the LCD monitor If no icon is displayed there is ample charge left in the batteries i X Lit red Batteries charge low Replace or recharge the batteries as they will run out s...

Страница 12: ...der EVF or the LCD monitor to take pictures by pressing the EVF LCD button to switch between the two 2 3 Mode qPhotography mode wPlay back mode Default setting EVF LCD monitor LCD monitor EVF After sw...

Страница 13: ...n halfway the image on the screen freezes temporarily However this image is not the recorded image If V is displayed on the screen e g the shot is too dark for the camera to focus try standing about 2...

Страница 14: ...alternately Recording data to the xD Picture Card ready to shoot Lit orange Recording data to the xD Picture Card not ready to shoot Blinking orange Charging the flash flash will not fire Blinking red...

Страница 15: ...d formatted in the camera Number of available frames Standard number of shots per xD Picture Card Because the amount of data recorded varies depending on the subject the number of available shots may...

Страница 16: ...e being out of focus Important Scene Use this frame when you want to position your main subject in the center of the frame or when you want to align your shot with the horizon This feature provides a...

Страница 17: ...M Press a to zoom in on your subject and b to zoom out When the limit of optical zooming is reached the digital zoom can then be used to zoom still further See P 51 for information on changing the qua...

Страница 18: ...main subject at night with the background brightly lit please use the E mode Night Scene settings P 45 n Red Eye Reduction Use this mode to ensure that the subject s eyes appear natural when photogra...

Страница 19: ...ng Suppressed Flash Pressing the flash down switches the camera to Suppressed Flash mode Use this mode for photography using indoor lighting for shots taken through glass and for photography in venues...

Страница 20: ...ed image by pressing the DISP button again VIEWING YOUR IMAGES PLAYBACK wPLAYBACK During playback you can skip backwards or forwards through the images the frame number increases or decreases by holdi...

Страница 21: ...e erased to your computer or another media PLAYBACK ZOOM wPLAYBACK This function is useful for things such as checking the focus of shots you have taken Pressing a during single frame playback switche...

Страница 22: ...stment 0 6 to 0 6 g OPTION SET UP LCD BRIGHTNESS OK OK OK OK OK OK 1 2 OK OK OK 1 OK OK OK OK OK OK OK OK OK OK OK OK OK R AUTO E SCENE POSITION W MANUAL T MOVIE 1 Restrictions apply to the available...

Страница 23: ...ITY SELF TIMER ESCENE POSITION g OPTION 0 1 This is the simplest photography mode to use and is suitable for the widest range of shots Available menu options yQUALITY SELF TIMER g OPTION Available men...

Страница 24: ...e xD Picture Card is formatted in the camera T MOVIE VIDEO q MOVIE 2 Use this mode for daytime shots of scenery Landscape mode provides crisp clear shots of buildings mountains and other scenery hWhen...

Страница 25: ...d on the screen 3 When the camera is used to shoot a movie you can get brighter images by using a light source such as a fluorescent lamp to illuminate the subject You do not need to hold down the shu...

Страница 26: ...ll image R E W Movie u Quality pixels Usage Continued on next page PHOTOGRAPHY MENU OPERATION The accessible menu settings differ depending on the photography mode When you validate the settings the r...

Страница 27: ...de is switched between photography and playback When the camera is switched off You can also use the AF AE lock P 29 Be careful not to stand in front of the camera when you press the shutter button as...

Страница 28: ...paper 0 6 EV hScenes with low reflectivity such as shots of pine trees or dark foliage 0 6 EV Guide to using positive compensation Guide to using negative compensation Subjects for Which Exposure Adju...

Страница 29: ...eople where a softer image is desirable PHOTOGRAPHY MENU K SHARPNESS PHOTOGRAPHY MENU Displaying the menus P 50 PHOTOGRAPHY MENU a WHITE BALANCE SELECTING THE LIGHT SOURCE AUTO Automatic adjustment Sh...

Страница 30: ...4 Advanced Features Playback 0 1 0 2 2 1 0 1 0 2 Indicated by the u icon This mode can be selected in the W photography mode This is an automatic mode that allows you to set the aperture You can use t...

Страница 31: ...ideo files contain large amounts of data Depending on the performance of the computer movies may not run smoothly if the computer cannot process the images quickly enough The movie automatically stops...

Страница 32: ...button once more to erase the image 1Use a or b to select FRAME ALL FRAMES or FORMAT 2Press MENU OK button to confirm your selection 0 1 0 2 Back Returns to playback without erasing any files Frame E...

Страница 33: ...U OK button to view the menu screen Use d or c to select k PROTECT k PROTECTING IMAGES FRAME ALL w PLAYBACK MENU Format Pressing the MENU OK button erases all the files and initializes the xD Picture...

Страница 34: ...files press the BACK button To remove the protection press the MENU OK button again 1 2 k PROTECTING IMAGES FRAME ALL w PLAYBACK MENU 1Press a or b to select UNPROTECT ALL PROTECT ALL or FRAME SET RES...

Страница 35: ...s shown below may be displayed while you are specifying the prints P 63 When you erase the image the DPOF setting for that image is deleted at the same time P 73 If you load an xD Picture Card that co...

Страница 36: ...selected setting is then valid for all frames with DPOF settings 3 0 1 0 2 4 0 1 0 2 1Press a to select OK 2Press the MENU OK button 1 0 1 0 2 2 1Set the Power switch to Q 2Press the MENU OK button to...

Страница 37: ...the previous settings i DPOF SET FRAME w PLAYBACK MENU 3 5 0 1 0 2 6 1Use d or c to display the frame for which you want to specify DPOF settings 2Press a or b to set YES for the frame to be printed a...

Страница 38: ...ds the self timer lamp starts blinking quickly To end your comment during recording press the MENU OK button r RECORDING VOICE MEMOS w PLAYBACK MENU 2 0 3 0 1 0 2 1 You can also add voice memos to ima...

Страница 39: ...ws the playback time and a playback progress bar Take care not to block the speaker If the sound is difficult to hear adjust the volume P 79 0 1 0 2 r RECORDING VOICE MEMOS w PLAYBACK MENU 5 If you se...

Страница 40: ...PLAYING BACK VOICE MEMOS w PLAYBACK MENU The voice memo automatically stops when playback ends Playback Control Description Pauses the voice memo during playback Press this button again to resume play...

Страница 41: ...of the beep emitted when the camera controls are used LOW RESET ALL OK Except for the DATE TIME and LANGUAGE settings this function resets all the camera settings including the photography and playbac...

Страница 42: ...d for a further 90 seconds it is automatically switched off i The charging time for the flash increases slightly because the flash charging power is reduced Software needed for playing back movies etc...

Страница 43: ...he Setup screen appears Click the Installing FinePixViewer button For more information on what is installed click the Read Me First button and Using FinePixViewer button Launching the Installer Manual...

Страница 44: ...lled QuickTime version 5 0 2 or later this installation is not performed Click Agree button in the Software License Agreement window If the Connection speed window appears set the correct speed for yo...

Страница 45: ...talling FinePixViewer button For more information on what is installed click the Read Me First button and Using FinePixViewer button 4 A confirmation message appears asking whether you want to continu...

Страница 46: ...t button Click Agree button in the License window 8 After you restart your Macintosh the FinePixViewer installation completed message appears Click Using FinePixViewer to view the basic FinePixViewer...

Страница 47: ...w does not open automatically double click the CD ROM icon 3 Double click Installer for MacOS X NOTE NOTE 4 Click the icon 5 Enter the administrator name and password Then click the OK button 6 Click...

Страница 48: ...le The shape of the plug and socket outlet depends on the country of use Connecting the AC power adapter does not allow you to charge the Ni MH batteries Use the optional charger P 114 to charge the N...

Страница 49: ...Use the special USB cable to connect the camera to your computer 7 Switch the camera on Always use the prescribed procedure when disconnecting or switching off the camera P 102 If you are using a Wind...

Страница 50: ...SB socket Camera DC IN 5V socket 7 3 Use at PC CAM mode 1 The Found New Hardware help message appears in the bottom right corner of your screen This message will close when the settings are completed...

Страница 51: ...uired software programs or drivers installed on your PC Complete the required PC setup procedures Then reconnect the camera to your PC If the Digital Signature Not Found dialog box appears click the Y...

Страница 52: ...s being exchanged with the computer Perform the steps shown below before you switch the camera off This procedure differs depending on the operating system software or PC you are using No PC operation...

Страница 53: ...e software refer to How to use FinePixViewer in the HELP menu which was installed from the CD ROM 8 2 Making a FinePix CD Album For using ImageMixer VCD for FinePix to create CD albums and video CDs h...

Страница 54: ...tructions If the country or area where you are living does not appear in the pull down list select OTHERS 8 4 User Registration 8 3 Using the FinePix Internet Service Mac OS X users should refer to P...

Страница 55: ...differ slightly in appearance from the sample shown here 7 When you have entered all the required information click the Register button at the bottom of the page Once you complete the registration a...

Страница 56: ...ress the key to view the previous page or the key to view the next page For more information on using Acrobat Reader refer to the Acrobat Reader Help menu 8 6 Uninstalling the Software Only perform th...

Страница 57: ...nected to your Macintosh 2 Drag all the files that begin with USB04CB to the Trash 3 Restart your Macintosh 4 Select Empty Trash in the Special menu Uninstalling Exif Launcher FinePixViewer and DP Edi...

Страница 58: ...teries Fujifilm Battery charger with Battery BK NH with Euro type or UK type plug The BK NH includes the quick battery charger BCH NH and 2 Ni MH batteries The BCH NH can charge 2 Ni MH batteries in a...

Страница 59: ...Do not attempt to deform disassemble or modify the batteries h Do not attempt to peel off or cut the battery casing h Do not drop strike or otherwise subject the batteries to strong impacts Notes on...

Страница 60: ...gerprints etc on the terminals of Ni MH batteries can greatly reduce the number of available shots When this occurs clean the terminals carefully with a soft dry cloth Then use up the remaining charge...

Страница 61: ...The recording process is electrically performed and enables erasure of existing image data as well as re recording of new image data h When using a new Memory Card or a Memory Card that has been init...

Страница 62: ...planation Remedy Lit red Blinking red The batteries in the camera are fully depleted or very low on charge No xD Picture Card is loaded i The xD Picture Card is not formatted i The xD Picture Card con...

Страница 63: ...ressed i No xD Picture Card is loaded i The xD Picture Card is fully recorded i The xD Picture Card is write protected i The xD Picture Card is not formatted i The xD Picture Card contact area gold co...

Страница 64: ...reload the batteries or reconnect the AC power adapter and try again i Replace the batteries Troubleshooting e If you think the camera is faulty check the following once more Troubleshooting Possible...

Страница 65: ...eries or xD Picture Card h Weight for photography Approx 437 g 15 4 oz including batteries xD Picture Card lens cap and strap h Accessories See P 7 h Optional Accessories See P 114 115 Approx 5 min Ap...

Страница 66: ...tion that must be performed Required Safety Notes WARNING Unplug from power socket Do not use in the bathroom or shower Explanation of Terms DPOF Digital Print Order Format DPOF is a format used for r...

Страница 67: ...disassemble the camera Never open the casing Do not use the camera when it has been dropped or the casing is damaged This can cause a fire or electric shock h Contact your FUJIFILM dealer Never attem...

Страница 68: ...as expressly granted by FUJIFILM hereunder you shall not copy or reproduce all or any part of Software or Documentation 3 3 You shall not modify adapt or translate Software or Documentation You also s...

Страница 69: ...Printed in Japan FGS 204107 FG Printed on recycled paper 26 30 Nishiazabu 2 chome Minato ku Tokyo 106 8620 Japan...

Отзывы: