background image

12

Disconnecting the USB cable

Check that the READY/ACCESS lamp is no longer lit and then disconnect the USB

cable.

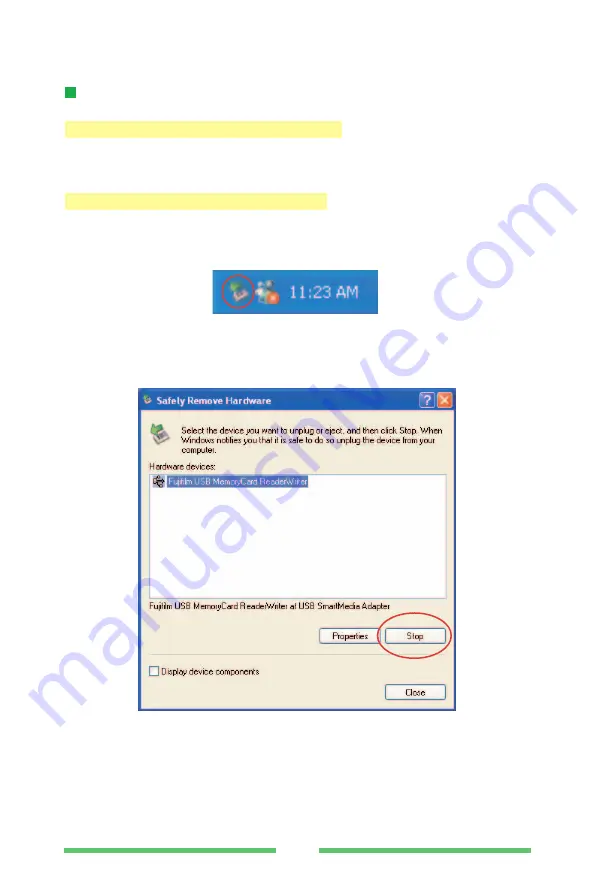
(1) Double-click the icon (circled) displayed in the taskbar (in the

bottom-right corner of the screen).

(2) When the next screen appears, check that the READY/ACCESS lamp

is no longer lit or flashing and then left-click "Fujifilm USB
MemoryCard ReaderWriter" to select it. Then click the [Stop] button.

Windows 2000 Professional /  XP

Windows 98 / 98SE / Me, Macintosh

Содержание DPC-R1

Страница 1: ...User s Guide This manual will show you how to use your IMAGE MEMORY CARD READER DPC R1 correctly Please follow the instructions carefully IMAGE MEMORY CARD READER DPC R1 for Windows Macintosh...

Страница 2: ...t names are trademarks or registered trademarks of the respective companies Notes on Electrical Interference Usage of the DPC R1 in an aircraft or hospital may cause erroneous operations of the aircra...

Страница 3: ...personal computer When disconnecting the USB interface cable pull out the connector while pressing the end with your finger Forcefully pulling out the cable itself will damage the DPC R1 and the cable...

Страница 4: ...th Windows 14 Hardware and software requirements 14 Setup Procedure in Windows 15 Using the DPC R1 18 Using with a Macintosh 19 Hardware and software requirements 19 Set up procedure 20 Hardware and s...

Страница 5: ...tored data 1 When the customer or other party used the xD Picture Card SmartMedia Card and DPC R1 improperly 2 When the USB cable or xD Picture Card or SmartMedia Card were removed and when the device...

Страница 6: ...the USB cable fully and firmly Improper connection will cause the DPC R1 to malfunction The DPC R1 can be connected and disconnected even while the personal computer power is on When there are two or...

Страница 7: ...1 When you first connect the DPC R1 to your computer the Found New Hardware Wizard window appears Click the Next button 2 The search window shown below appears Windows XP 7...

Страница 8: ...the Continue Anyway button Note that clicking the STOP installation button requires you to redo the installation from the beginning 4 The software installation window appears NOTE Tests are being per...

Страница 9: ...9 5 When the Installation completed window appears click the Finish button...

Страница 10: ...losed the READY ACSESS lamp will be lit The same READY ACSESS lamp is used for both the xD Picture Card slot and the SmartMedia slot NOTE SmartMedia slot Cover READY ACSESS lamp green SmartMedia Inser...

Страница 11: ...cover while the xD Picture Card or SmartMedia is being accessed while the READY ACCESS lamp is lit NOTE 1 To remove a xD Picture Card or SmartMedia drag the corresponding icon on the desktop to the Tr...

Страница 12: ...the icon circled displayed in the taskbar in the bottom right corner of the screen 2 When the next screen appears check that the READY ACCESS lamp is no longer lit or flashing and then left click Fuji...

Страница 13: ...emoryCard ReaderWriter and click the OK button 4 In Windows 2000 the window shown below appears Click the OK button and close the Disconnect hardware window In Windows XP close the It is safe to disco...

Страница 14: ...Windows XP Home Edition 2 Windows XP Professional 2 CPU 200 MHz Pentium or better recommended 800 MHz Pentium III or better recommended for Windows XP RAM 64MB minimum 128 MB minimum for Windows XP H...

Страница 15: ...r active applications until no applications are shown in the taskbar 1 Click the right mouse button on the application icon in the taskbar 2 Click Close in the menu that appears to quit the applicatio...

Страница 16: ...TUP or SETUP exe in the CD ROM window The way file names are displayed differs as described below depending on your computer settings File extensions 3 letter suffixes indicating the file type may be...

Страница 17: ...izard finished window appears Click Finish 6 When the screen shown below appears select Yes I want to restart my computer now and click the Finish button Restart your computer This completes driver so...

Страница 18: ...gging them from your hard disk to the xD Picture Card or SmartMedia Files can also be read and written by specifying the xD Picture Card or SmartMedia as the drive name from an application program Fil...

Страница 19: ...software you must have the hardware and software described below Check your system before you begin the installation Mac OS 8 6 to 9 2 Compatible Mac Power Macintosh G3 1 PowerBook G3 1 Power Macintos...

Страница 20: ...dled CD ROM DPC R1 setup disk into the CD ROM drive 3 Double click the DPC R1 CD ROM icon displayed on the desktop 4 Double click Installer for Mac OS 8 6 9 x to launch the installer 5 A message appea...

Страница 21: ...unit Insert the USB connector fully and firmly Improper connection will cause the DPC R1 to malfunction If connected through a USB hub depending on the type of hub the DPC R1 may malfunction In this c...

Страница 22: ...osh G4 Cube or PowerBook G4 Operating System Mac OS X compatible with version 10 1 2 to 10 1 5 RAM 128 MB minimum Hard disk space Amount required for installation 40 MB minimum 1 Models with a USB por...

Страница 23: ...ble click Installer for MacOS X the window shown below appears Click the padlock icon beside Click the lock to make changes 3 The Authorization window shown below appears Enter the administrator name...

Страница 24: ...24 Macintosh 4 The Introduction window shown below appears Click Continue 5 The Important Information window shown below appears Click Continue...

Страница 25: ...25 Macintosh 6 The Select a Destination window shown below appears Select the installation destination disk and click Continue 7 The Easy Install window shown below appears Click Install...

Страница 26: ...connect the DPC R1 directly to the USB port on the personal computer base unit Insert the USB connector fully and firmly Improper connection will cause the DPC R1 to malfunction If connected through a...

Страница 27: ...s the drive name from an application program Files can be copied in either direction between a xD Picture Card and a SmartMedia Never shut down your Macintosh or touch the DPC R1 slot cover while the...

Страница 28: ...ility provided with the Mac OS system is required Check that File Exchange is installed in the Extensions Manager Control Panel inside the System folder Check that there is an in the File Exchange che...

Страница 29: ...correctly Install the device driver correctly Page 14 17 19 26 The xD Picture Card or SmartMedia is inserted the wrong way round Insert the xD Picture Card or SmartMedia correctly Page 10 There is no...

Страница 30: ...ot be used FinePix 700 FinePix 500 CLIP IT 50 or DS 250HD xD Picture Card 16 32 64 or 128MB Host interface Universal Serial Bus USB Interface ver 1 1 Current drain Operating Max 530mA or less Operatin...

Страница 31: ...ct the DPC R1 3 Quit all currently running applications 4 Close all files 5 Open the My Computer window and double click Add Remove Programs in the Control Panel 6 The Add Remove Programs Properties w...

Страница 32: ...process cannot be cancelled once you click OK 8 The uninstallation in progress window is displayed When uninstallation ends the maintenance completion screen shown below appears Click Finish 9 The res...

Страница 33: ...ations 3 Close all files 4 Open the My Computer window and double click Add Remove Programs Windows 2000 or Add or Remove Programs Windows XP in the Control Panel 5 Select the file name of the driver...

Страница 34: ...ress window is displayed When uninstallation ends the maintenance completion screen shown below appears Click Finish 8 The restart request window shown below appears Click Finish and restart your comp...

Страница 35: ...acintosh Open the Extensions folder in the Mac OS System Folder on the startup volume and put the 2 files shown below in the Trash Alauda StorageDriver Y Alauda StorageShim Y 2 Restart your Macintosh...

Страница 36: ...FGS 204106...

Отзывы: