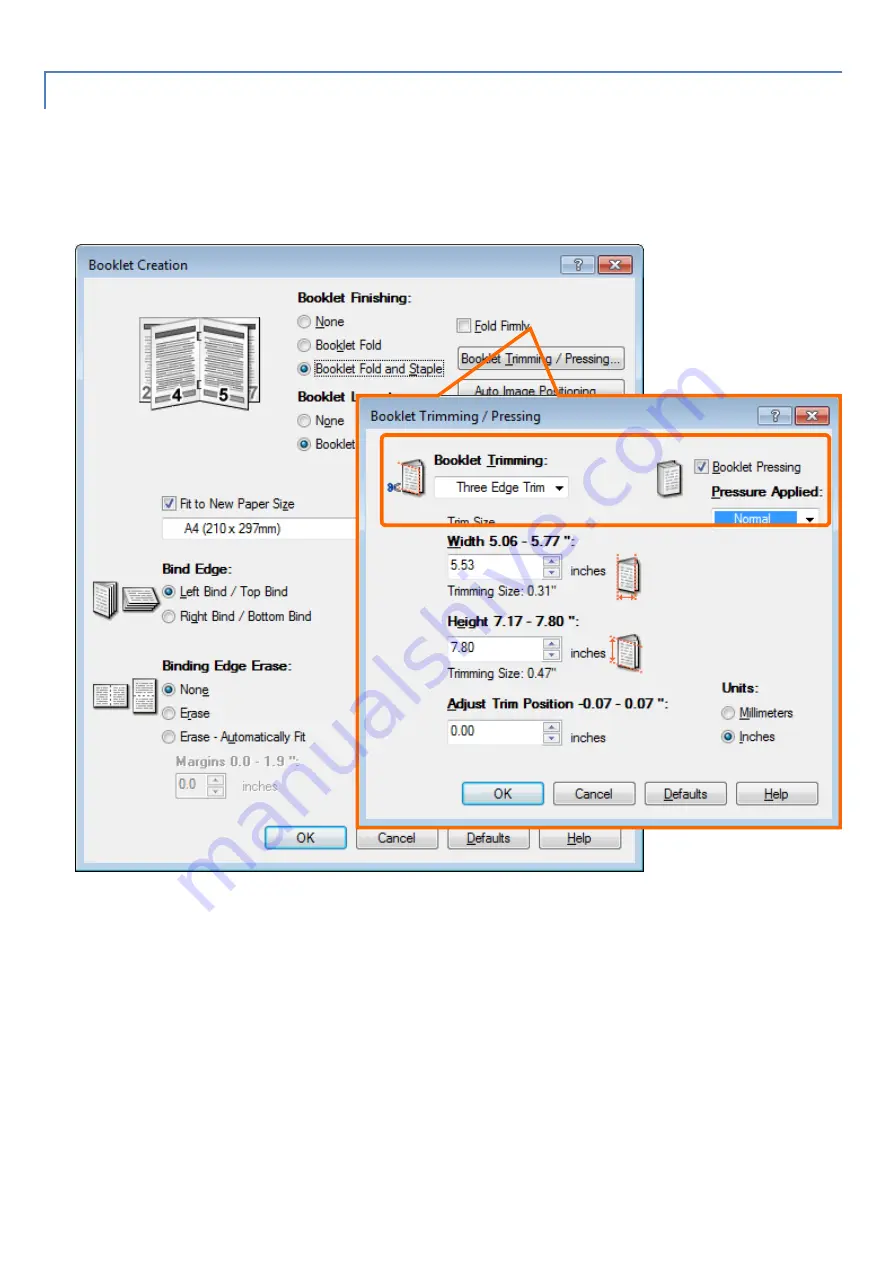
FujiFilm B9100 Скачать руководство пользователя страница 22


Page 20 of 28 

1.2.4 

Trimming/Pressing…

裁切

/

書冊壓邊


(Optional)


When the Crease/Two-sided Trimmer D2 is 
installed, [Trimming] and [Book Pressing] become 
available if you select [Fold Only] or [Fold & Staple] 
on the [Booklet Creation - Fold & staple] screen. 


當安裝壓痕

/

上下裁切器

D2

時,若選擇【小冊子作成

-


  /

裝訂】畫面中的【對摺】或【對摺

+

裝訂】,便可使用


【裁切】和【書冊壓邊】。


Содержание B9100

Страница 1: ...Prepared by Customer Training Team FUJIFILM Business Innovation Hong Kong Limited B9136_9125_9110_9100 Quick Reference Notes Print...

Страница 2: ...1 3 Staple Hole Punch 8 Image Options 9 1 1 Image Quality 9 1 1 1 Image Settings 10 1 2 Image Shift Summary 11 Layout Watermark 12 1 1 Multiple Up 12 1 2 Booklet Layout 13 1 2 1 Booklet Creation 14 1...

Страница 3: ...1 of 28 SELECT PRINTER 1 Select Print from the File menu of the application 2 Choose an appropriate printer from Name list 3 Click OK to send print job 4 Or click Properties to change print option 1 2...

Страница 4: ...CONFIGURE THE PROPERTIES 1 1 SELECT PAPER TRAY AND SELECT PAPER TYPE Click button to go to Advanced Paper Selection 5 items available Paper Tray Original Document Size Scale Options Output Paper Size...

Страница 5: ...y 5 Bypass 5 If you want to make copies on paper that cannot be loaded in the Trays 1 to 4 use the Tray 5 Bypass 1 4 5 Load paper print side up in Tray 5 Bypass 5 Select Paper Tray 5 Bypass 5 Select O...

Страница 6: ...Page 4 of 28 Select Bypass Paper Type Select Bypass Feed Orientation...

Страница 7: ...Page 5 of 28 1 1 2 Tray 6 and 7 6 7 Optional Select Paper Tray 6 and 7 6 7 Select Original Document Size...

Страница 8: ...Page 6 of 28 Select Bypass Paper Type Load paper of 253gsm or less in Tray 5 Bypass if Tray 6 and 7 is installed Load paper of 253 350gsm in Tray 6 and 7 6 7 5 253gsm 253 350gsm 6 7...

Страница 9: ...Page 7 of 28 1 2 2 SIDED PRINT 1 Sided Print Print on single page 2 Sided Print 2 sided print as head to head 2 Sided Flip on Short Edge 2 sided print as head to toe...

Страница 10: ...Page 8 of 28 1 3 STAPLE HOLE PUNCH Click button to select Staple Hole Punch Z Fold Half Sheet Optional Z...

Страница 11: ...u can specify the print quality of the document Standard Slightly lowers the resolution and the gradation tone Suitable when you need a quicker printing High Resolution Prints with the highest resolut...

Страница 12: ...Page 10 of 28 1 1 1 Image Settings According to your needs under Image Settings you can adjust Lightness Contrast manually...

Страница 13: ...Page 11 of 28 1 2 IMAGE SHIFT SUMMARY According to your needs under Image Shift Summary you can adjust Image Shift manually...

Страница 14: ...nts multiple pages onto one sheet of paper 2 4 8 16 32 Prints the number of selected pages on one sheet of paper Pages are automatically processed with rotation and reduction so that they fit in evenl...

Страница 15: ...28 1 2 BOOKLET LAYOUT You can set the layout of a booklet when folding printed paper in half or staple it Select Booklet Layout and click the Booklet Creation button to display the Booklet Creation d...

Страница 16: ...Page 14 of 28 1 2 1 Booklet Creation Select Left Bind or Right Bind and then Choose desired paper size from Fit to New Paper Size press OK to print OK...

Страница 17: ...28 1 2 2 Fold Staple After selecting Booklet Creation go to Booklet Finishing and choose Booklet Fold and Staple The number of copies that can be folded and stapled is 2 to 30 when 90 gsm paper is us...

Страница 18: ...Page 16 of 28 1 2 3 Covers Select Special Pages and then choose Add Covers Add pre printed color cover 1 Select Tray T1 Inserter 1 T1...

Страница 19: ...Page 17 of 28 2 Select Type 2 Add and print on cover 1 Load paper print side down in Tray 5 Bypass Make sure the paper size and paper type match with the paper loaded in the tray 1 5...

Страница 20: ...Page 18 of 28 2 Select Change Settings Choose Paper Type and Paper Size 2...

Страница 21: ...Page 19 of 28 3 On print driver select Type 3...

Страница 22: ...1 2 4 Trimming Pressing Optional When the Crease Two sided Trimmer D2 is installed Trimming and Book Pressing become available if you select Fold Only or Fold Staple on the Booklet Creation Fold stap...

Страница 23: ...Page 21 of 28 1 3 ANNOTATION In this dialog box you can select Page Number from Print Items to print at a specified position...

Страница 24: ...Page 22 of 28 1 4 WATERMARK Configures settings for printing a logo watermark over a file Select Watermark and choose new to display the Watermark Editor dialog box...

Страница 25: ...Page 23 of 28 Scale Density and Position can be adjusted Select Text or Bitmap in Options...

Страница 26: ...Page 24 of 28 JOB TYPE Select Job Type Select Job Type...

Страница 27: ...print data in the machine to print it with the print command from the machine The feature also enables you to set a passcode which is helpful to print confidential documents 1 Select Secure Print 1 2...

Страница 28: ...Page 26 of 28 Retrieve Secure Print 1 Press the Job Status button on the Control Panel 1 Job Status 2 Select Secure Print Jobs More and Choose Secure Print 2...

Страница 29: ...Page 27 of 28 3 Select your User ID and press Job List button 3 4 Enter the passcode and select Confirm 4 5 Select the job to be printed or deleted 5...

Страница 30: ...Page 28 of 28 7 Specify how to process the job after printing 7...

Страница 31: ...d Design as well as Fuji Xerox and Design are registered trademarks or trademarks of Xerox Corporation in Japan and or other countries FUJIFILM and FUJIFILM logo are registered trademarks or trademark...

Отзывы: