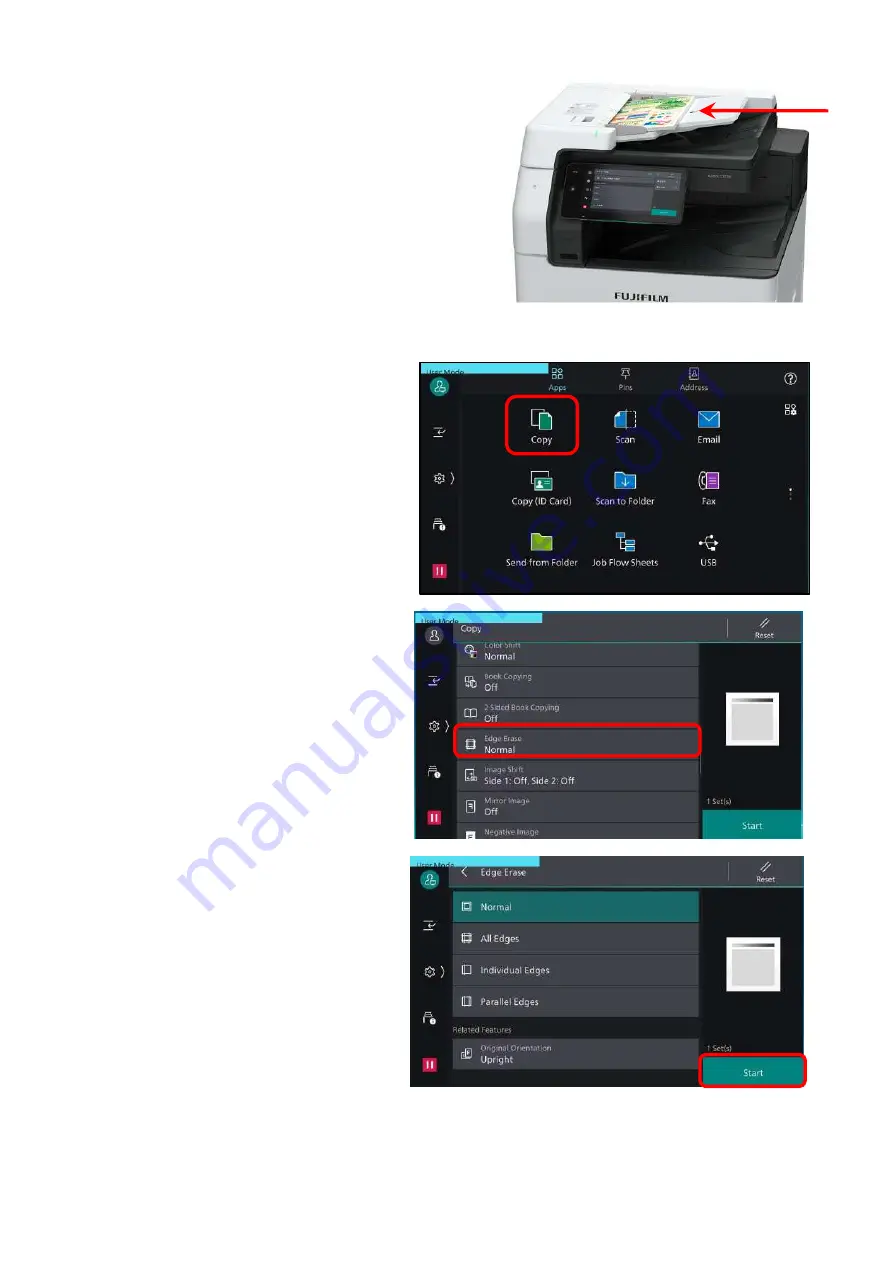
FujiFilm Apeos 2560 Скачать руководство пользователя страница 11

Copy: Edge Erase… 

This feature will erase the dark  shadow/ dirty at the 

edges of document or in the center binding part of 

the book. 

1. Load documents onto the Document Feeder  

or Platen Glass

2.  Tap on 

[Copy] 

on the Services Home screen. 

3. On the features list, scroll down to 

[Edge 

Erase]. 

4. Choose the option, and enter the value to 

erase (0-50mm)

[Normal]
[All Edges]
[Individual Edges]

[Parallel Edges]

Tap 

[Start] 

to copy.

11

Содержание Apeos 2560

Страница 1: ...Quick User Guide Quick User Guide Apeos 3560 3060 2560 Quick User Guide Quick User Guide...

Страница 2: ...ns on Copy Print Scan and Fax procedures of the machine for ease of use of the machine Quick User Guide Organization Overview 03 Copy 04 12 Reduce Enlarge 04 2 Sided Copying 05 Book Copying 06 Copy Ou...

Страница 3: ...aper Trays Tray 1 4 Tray 5 Bypass Control Panel Touch Screen Home Button displays Home screen Log In Out To enter User ID Status Lamp Fault Error Blinking with Amber LED Completed Jobs Breezing with G...

Страница 4: ...screen 3 On the features list tap on a Reduce Enlarge for A3 to A4 70 for A4 to A3 141 b Paper Supply Tray 1 4 Tray 5 bypass 4 Tap Quantity and enter number of copies 5 Tap on Start to copy Note Tap t...

Страница 5: ...n the Services Home screen 3 On the feature list tap 2 sided Choose between the option of 1 1 Sided copy a 1 sided document on one side of paper 1 2 Sided copy a 1 sided document on both sides of pape...

Страница 6: ...ce down 2 Tap Copy on the Services Home screen 3 On the features list scroll down until a Book Copying copies 2 single sided output b 2 Sided Book Copying copies 2 sided output in the same order of th...

Страница 7: ...rinted in group according to specified quantity 1 Load documents onto the Document Feeder or Platen Glass 2 Tap Copy on the Services Home screen 3 On the features list scroll down until Copy Output 4...

Страница 8: ...ts copied onto matching output paper size 1 Load documents onto the Document Feeder 2 Tap Copy on the Services Home screen 3 On the features list scroll down until Mixed Size Originals 4 Tap Mixed Siz...

Страница 9: ...Document Feeder 2 Tap Copy on the Services Home screen 3 On the features list scroll down to Pages per Side 4 Tap the options Off feature not applied 2 Pages Up 2 documents copied into 1 sheet of pap...

Страница 10: ...r 2 Tap Copy on the Services Home screen 3 On the features list scroll down to Paper Supply and choose any paper tray with landscape orientation paper e g Tray 3 4 On the features list scroll down to...

Страница 11: ...r binding part of the book 1 Load documents onto the Document Feeder or Platen Glass 2 Tap on Copy on the Services Home screen 3 On the features list scroll down to Edge Erase 4 Choose the option and...

Страница 12: ...over 2 Select Copy ID Card button on the main Services Home screen 3 Set the ID card with the side to be copied facing downward in a position at least 5mm from the top and left edge of the document gl...

Страница 13: ...Job Type Normal Print Secure Print click Setup button to enter User ID Passcode For more printing options click on other tabs Click OK on all open windows to proceed to print 13 Print 2 sided documen...

Страница 14: ...t required files to be printed Enter Print Quantity and press Start to print or Delete to delete files stored in secure print folder 4 Choose Print Delete or Print Save Or press cancel to cancel the p...

Страница 15: ...oklet Creation Bind Edge Left Top Bind Right Bottom Bind Divide Automatically Divide Custom Divide Booklet Finishing optional Feature Booklet Fold Booklet Fold And Staple For more printing options cli...

Страница 16: ...der 3 From the Basic tab select options Paper Size Output Paper Size Image Orientation 4 From the Tray Output tab select options Paper Tray Select By Trays Advance Tray Settings For more printing opti...

Страница 17: ...eset texts or select New to create new watermark 3 On the Watermark Editor Enter the name or text Set the following Angle Density Position Border Click OK to save For more print options click on other...

Страница 18: ...to select Fax Resolution Transmission Report Send Header 4 On the Fax Phonebook select New to add new recipient in individual or group Click close to save Press ok to proceed to fax To check fax jobs...

Страница 19: ...pe according to your paper type and click next to proceed 4 Select paper size tray type and set each item accordingly You may also click custom to enter custom size paper 5 Select tray 5 bypass tray t...

Страница 20: ...e Email screen tap Address Book Select the recipient s name from the contact list 2 Tap on the upper side of the screen and set desired option features 4 Select an option a Color Scanning b 2 Sided Sc...

Страница 21: ...vices Home screen 3 Tap the Address Book to select the recipient and click OK 4 Tap on the upper side of the screen and set desired features 5 Select an option a Color Scanning b 2 Sided Scanning c Fi...

Страница 22: ...an to folder button on the Services Home screen 2 From the Scan to Folder screen select a folder to save the scanned document Enter passcode if any 3 Tap on the upper side of the screen set desire fea...

Страница 23: ...the scanned document files to be printed out 1 Select Send from Folder button on the Service Home Screen 2 Select the desired folder 3 Select the file s to print and tap Print 4 Select the desired fe...

Страница 24: ...screen select scan destination Email Scan Scan to Folder Store to USB 2 Tap on the upper side of the screen to set the desire option features 3 Select any option required a Preview View the scanned im...

Страница 25: ...ation 1 Load documents onto the Document Feeder 2 Tap Fax on the Services Home screen 3 To enter fax recipient s select Numeric Keypads or Address Book Press ADD to enter more than one fax recipient n...

Страница 26: ...a transmission report when fax transmission is completed 1 Load documents onto the Document Feeder 2 Tap Fax on the Services Home screen 3 Click on and scroll to transmission report 4 Tap on to enable...

Страница 27: ...F JPEG TIFF XDW 1 Insert the USB memory device into the memory slot 2 The following screen displays upon detected USB device a Scan To USB b Print from USB 3 Tap Print from USB 4 Select the required f...

Страница 28: ...as been inserted is not displayed tap the USB icon on the home screen instead 2 Load documents on the Feeder or Platen Glass 3 The following screen displays upon USB device detected a Scan To USB b Pr...

Страница 29: ...nch the application and register the machine by tapping tap here to register on the bottom of the screen Wi Fi will auto detect and display the device name and model 3 From the main menu select the de...

Страница 30: ...ocument Paper Jam in Paper Tray Tray 1 2 3 4 and Bypass Tray 5 1 Pull out Paper from Tray 1 4 and remove jammed paper Gently push the tray in 1 Pull up the front handle of the cover and open the cover...

Страница 31: ...tray 5 bypass 2 While lifting the release handle open the upper left cover Remove the jammed paper Close cover A Paper Jam in Inside Upper Left Cover Fusing Unit A1 1 Open Cover A and pull the handle...

Страница 32: ...formation stored in the machine s memory Note The machine will prompt a message when it is time to order a new Toner Cartridge For used cartridges disposal collection please call us 1 300 88 1163 1 En...

Страница 33: ...4 5 Remove the jammed staple 1 and return the pushed up metal part back to the original position 2 6 Insert the cartridge into the original position Hold the handle and lightly press it up until you...

Страница 34: ...ade On the Machine Panel tap icon Select Device Status supplies The status of consumables is shown as OK Replace Soon Order Now or Replace Now For toner the amount is shown in percentage 0 to 100 Scro...

Страница 35: ...replaced soon Approx 40 pages Replace toner cartridge with a new one Black Toner K Cartridge needs to be replaced Machine will stop replace toner cartridge with a new one Consumables Part Number Produ...

Страница 36: ...The All Jobs screen displays the current or pending jobs Select a job to view the status of the job a Completed successful b Completed with error unsuccessful 3 Click on the job log to display the det...

Страница 37: ...s done to close fax number window and confirm the entry then tap OK to continue and register the number Option 2 add email address 1 Repeat step 1 and 2 in option 1 2 Enter recipient name and tap emai...

Страница 38: ...Check out FUJIFILM Business Innovation website fujifilm com fbmy 38 Support Download Drivers Self help...

Страница 39: ...er and key in the below address https service fb fujifilm com direct_app An e mail notification with the personalized URL will be sent via e mail For Green Report kindly Self Register your account 30...

Страница 40: ...he Online Application form to Continue Your application will be processed Thank you Click on the URL and you will be redirected to the following link Proceed with the application by accepting the Lega...

Страница 41: ...Notes...

Страница 42: ...Notes...

Страница 43: ...Notes...

Страница 44: ...peos B3560 3060 2560 Copyright Reserved 2022 by Customer Training Department FUJIFILM Business Innovation Asia Pacific Pte Ltd Printed in Malaysia For Service Supplies Enquiries Nationwide Toll Free 1...

Отзывы: