background image

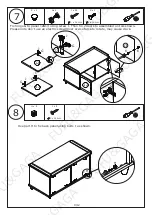
Attach the assembled component to panel 1 

using screw D and wooden dowel C as shown.

3

D x 6

4

7/12

6  x 30 mm

C x 6

6  x 30 mm

C x 6

4  x 35mm

D x 6

4 x 35 mm

1

D

D

D

D

C

C

C

C

C

C

D

C

D

C

2

3

5

4

2

3

D

D

D

D

D

D

C

C

C

C

C

C

D

D

Connect panel 3,4,5 to panel 2  using screw D 

and wooden dowel C as shown.

FUFU&GAGA

FUFU&GAGA

FUFU&GAGA

FUFU&GAGA

FUFU&GAGA

FUFU&GAGA

FUFU&GAGA

FUFU&GAGA

FUFU&GAGA

Содержание KF330038

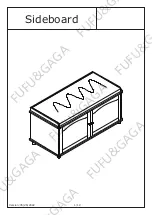
Страница 1: ...on 05 26 2022 1 12 Sideboard F U F U G A G A A G A F U G A G A F U F U G A G A F U F U G A G A F U F U G F U F U G F U F U G A G A A G A F U G A G A F U F U G A G A F U F U G A G A F U F U G F U F U G...

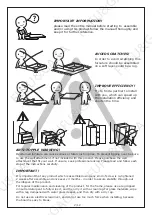
Страница 2: ...y with a dry rag Do not use an electric screwdriver and do not use too much force when installing because the board is easy to break IMPORTANT Overturned furniture can cause serious or fatal crush inj...

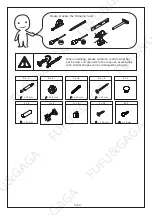
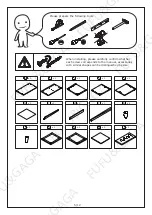
Страница 3: ...ar shapes can be distinguished by size Please prepare the following tools 3 12 A x 6 B x 6 15 x 9 mm C x 18 D x 14 F x 8 K x 2 J x 32 4 x 35 mm 7 x 35 mm E x 2 H x 8 3 x 14 mm 6 x 30 mm G x 4 4 x 16 m...

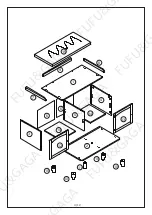
Страница 4: ...4 12 1 2 3 4 5 6 6 7 8 9 10 10 10 10 11 12 13 14 14 15 A G A F U F U G A G A A G A F U G A G A F U F U G A G A F U F U G A G A F U F U G F U F U G F U...

Страница 5: ...l accessories with similar shapes can be distinguished by size Please prepare the following tools x 1 1 x 1 2 x 1 3 x 1 4 x 1 5 x 2 6 x 1 7 x 1 8 x 1 9 x 4 10 x 1 11 x 1 12 x 1 13 x 2 14 x 1 15 A G A...

Страница 6: ...Fix quickfit screw A to panel 1 as shown Please note don t use an electric screwdriver or use force to rotate may cause crack Connect panel 7 8 to panel 9 using screw D as shown A G A F U F U G A G A...

Страница 7: ...12 6 x 30mm C x 6 6 x 30mm C x 6 4 x 35mm D x 6 4 x 35 mm 1 D D D D C C C C C C D C D C 2 3 5 4 2 3 D D D D D D C C C C C C D D Connect panel 3 4 5 to panel 2 using screw D and wooden dowel C as shown...

Страница 8: ...B 180 1 4 Fix leg 10 and 11 to panel 11 as shown Slide panel 6 to available slot in 3 4 Attach the 2 assembled components using wooden dowel C turn cam locks B clockwise to tighten as shown A G A F U...

Страница 9: ...Fix hinge G to panel 12 13 using screw J Then fix 2 doors to assembled un i t as shown Please note don t use an electric screwdriver or use force to rotate may cause crack Use part H to fix back panel...

Страница 10: ...2 10 5 x 20 mm F x 8 F F F F 14 14 Insert dowel pin F to panel 3 4 put panel 14 as shown Put pad 15 on top 15 A G A F U F U G A G A A G A F U G A G A F U F U G A G A F U F U G A G A F U F U G F U F U...

Страница 11: ...t o t c t t t c c Type of Warranty Claim t t Scope of responsibility o t o o t t t o t t The Warranty Relates to All Bought in The Us and Covers The Following Areas t c t o t c WARRANTY A G A F U F U...

Страница 12: ...D YOUR MIND AND NEED TO RETURN YOU ITEM PLEASE FOLLOW THE BELOW INSTRUCTIONS DEFECTIVE ITEMS DAMAGED ITEMS RETURNS A G A F U F U G A G A A G A F U G A G A F U F U G A G A F U F U G A G A F U F U G F U...

Отзывы: