background image

18/20

23

Mx2

Lx2

Nx10

M

L

M

L

N-1

N-2

N-2

N-1

N-2

N-1

N-2

x10

N-2

N-1

N-2

N-1

N-2

N-1

N-2

N-1

N-2

N-1

N-2

N-1

N-1

N-2

N-1

N-2

M

L

17

17

13

 1

4

Ø3x16mm

Ø4x14mm

Содержание KF020245-01

Страница 1: ...Version 06 07 2022 1 20 wardrobe...

Страница 2: ...with a rag dampened with water glass cleaner and then dry with a dry rag Do not use an electric screwdriver and do not use too much force when installing because the board is easy to break IMPORTANT O...

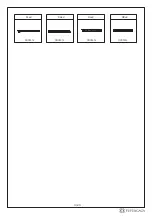
Страница 3: ...Dx21 Ex21 Fx18 Gx4 Hx11 Jx4 Kx6 Lx2 Mx2 Nx10 Qx2 Px8 Please prepare the following tools When installing please carefully confirm whether each screw corresponds to the manual accessories with similar...

Страница 4: ...4 20 DLx2 DRx2 DL DR CLx2 CRx2 CL CR 300mm 300mm 300mm 300mm...

Страница 5: ...10 11 5 20 15 13 15 17 17 1 2 3 6 5 4 7 8 9 9 12 14 16 18 19 20 21 22 23 24 25 22 23 24 25 27 26...

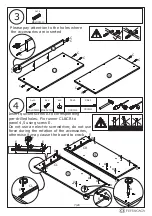
Страница 6: ...E E E H H H 8 Please pay attention to the holes where the accessories are inserted C 21 A A C C C C C C C D B Turn 7 8 21 21 III II I Do not use an electric screwdriver do not use force during the rot...

Страница 7: ...e accessories otherwise it may cause the board to crack A E E E E E E Please pay attention to the holes where the accessories are inserted 5 4 11 12 C C C C C C C C C C C C C C 6x35mm 3x12mm 6x30mm C...

Страница 8: ...1 10 11 12 8 7 21 10 11 12 8 5 7 III II I III II I 15x10mm 15x10mm K Attach panel 4 to the assembled components and turn cam locks B clockwise to tighten as shown Attach panel 6 to the aseembled compo...

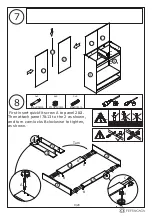
Страница 9: ...C C C C C C B B B B B B C C Bx6 Cx8 4 5 17 17 17 17 18 2 3 2 3 7 13 6x30mm 15x10mm 6x35mm B C C First insert quickfit screw A to panel 2 3 Then attach panel 7 13 to the 2 as shown and turn cam locks...

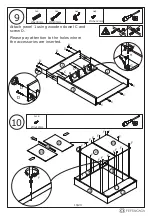
Страница 10: ...o the holes where the accessories are inserted F F F F F F F F F F F F F F F F F F F 1 3 2 7 C C C C D H G H G H G H G 1 3 2 13 13 15 15 15 15 16 H H G D C C C C C D D D D D D 6x30mm 4x35mm 3 5x12mm 3...

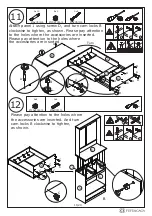
Страница 11: ...I C C C C C C C C III II I C Cx8 B C 4 5 6 7 B A 6x35mm 15x10mm 4x35mm 15x10mm 6x30mm B C Attach panel 1 using screw D and turn cam locks B clockwise to tighten as shown Please pay attention to the ho...

Страница 12: ...12 20 13 14 Rx12 Hx8 Jx2 P P P P P P P P P 4 4 Turn R R Rx4 J R R J J J Rx4 5 9 9 19 19 J R R R R R R J 3 5x14mm Fix hinges J to panel 19 then attach the door using screw R...

Страница 13: ...urn 4 A A A A Do not use an electric screwdriver do not use force during the rotation of the accessories otherwise it may cause the board to crack R R J R R J J Rx4 Rx4 5 19 26 26 24 23 20 20 J R R R...

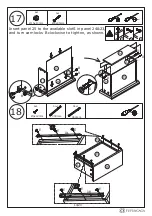
Страница 14: ...E E E DR E E E 18 Ex6 DLx1 DRx1 D L D R 26 26 25 25 25 24 24 22 24 23 23 23 III II I D 15x10mm 4x35mm 3x12mm 300mm 300mm D D B Insert panel 25 to the available slotS in panel 24 23 and turn cam locks...

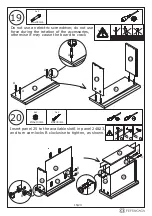
Страница 15: ...orce during the rotation of the accessories otherwise it may cause the board to crack 27 27 24 23 III II I A 15x10mm 4x35mm 6x35mm B B B B D D 27 25 25 24 24 22 23 23 D D D B Insert panel 25 to the av...

Страница 16: ...16 20 21 Ex6 DLx1 DRx1 D L D R DL E E E DR E E E 27 25 24 23 3x12mm 300mm 300mm...

Страница 17: ...17 20 22 DL CL 24 27 5 26 23 23...

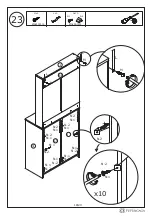
Страница 18: ...18 20 23 Mx2 Lx2 Nx10 M L M L N 1 N 2 N 2 N 1 N 2 N 1 N 2 x10 N 2 N 1 N 2 N 1 N 2 N 1 N 2 N 1 N 2 N 1 N 2 N 1 N 1 N 2 N 1 N 2 M L 17 17 13 1 4 3x16mm 4x14mm...

Страница 19: ...19 20 24 Dx2 Qx2 4x35mm D WALL D WALL Q D...

Страница 20: ...If there is misalignment after you install adjust the screw to the best condition 20 20 25...

Страница 21: ...or health reasons For other reasons if the furniture needs to be returned it must be cleaned and dried and operated within 30 days of receipt Type of Warranty Claim Failure to follow the furniture ins...

Страница 22: ...eive an order with obvious shipping damage from the retailer then we suggest the delivery is refused If the delivery has been accepted and then shipping damage is found please follow the specific inst...

Отзывы: