

5.1
INSERTING THE BATTERIES
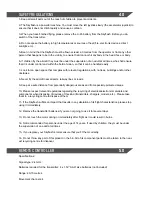
To insert the batteries in the transmitter, remove the battery compartment cover and insert 4 “AA” size
1.5v batteries (not included) / paying special attention to their polarity to ensure that the transmitter oper
-
ates correctly. You may need to use a screwdriver to open the rear cover.
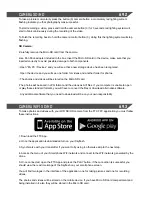
5.2
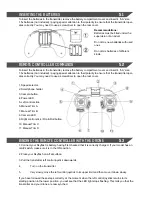
REMOTE CONTROLLER COMMANDS
To insert the batteries in the transmitter, remove the battery compartment cover and insert 4 “AA” size
1.5v batteries (not included) / paying special attention to their polarity to ensure that the transmitter oper
-
ates correctly. You may need to use a screwdriver to open the rear cover.
Recommendations:
Batteries must be fitted under the
supervision of an adult.
Do not mix new batteries with used
ones.
Do not mix batteries of different
kinds.
1. Speed selector.
2. Smartphone holder.
3. Camera button.
4. Power LED.
5. Left control stick.
6. Manual Trim A.
7. Manual Trim B.
8. Camera LED.
9. Right control stick / Flip & Roll button.
10. Manual Trim C
11. Manual Trim D.
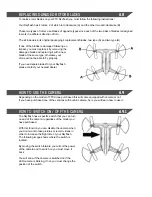
5.3
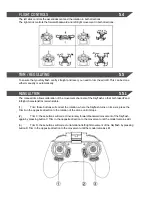
BINDING THE REMOTE CONTROLLER WITH THE DRONE
1. Connect your Skyflash’s battery, having first checked that it is correctly charged. If your model has an
on/off switch, make sure it is in the ON position.
2. Place your Skyflash on a flat surface.
3. Pull the transmitter left control joystick downwards.
4.
Turn on the transmitter.
5.
Very slowly, move the left control joystick to its upper limit and then move it down slowly.
If you have followed these steps correctly, at the moment when the left control joystick returns to its
starting position in the lower position, you will see that the LED light stops flashing. This tells you that the
transmitter and your drone are now synched.
Содержание Skyflash
Страница 1: ...RACING DRONE HIGH PERFORMANCE USER MANUAL...