background image

PAG. 26

rev 1.0

ENGLISH

INSTALLATION

4.3. TP SCAN

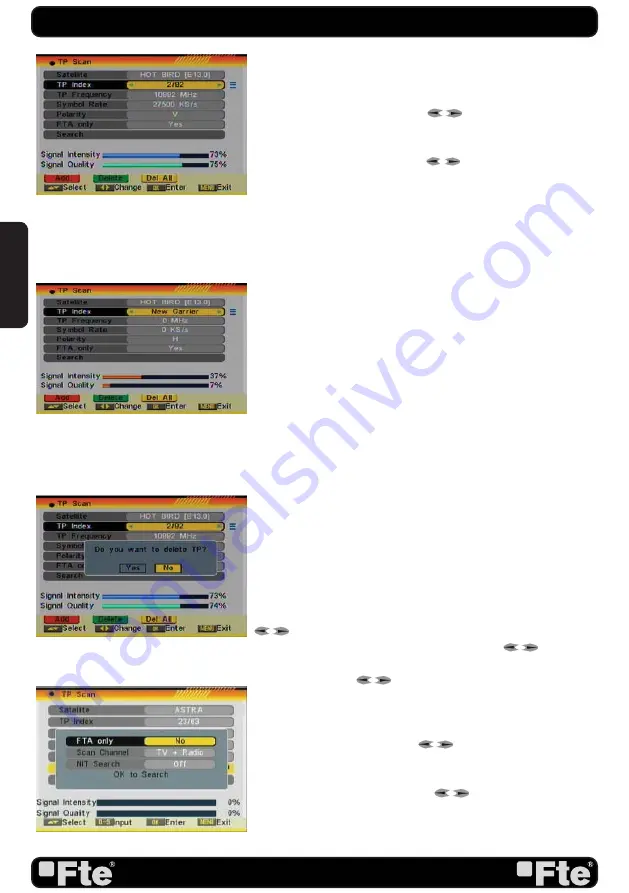
When you enter “TP Scan” menu a window like the one beside 
will be displayed (OSD 46):
1. On “Satellite” item, press [

] to select the satellite 

you want to scan or press [OK] to open the satellite list for 
selection.
2. On “TP Index” item use [

] to select the desired 

transponder. 
If any of the TP of the list have tuned and stored channels into 
the receiver, the following two options “Frequency” and “Symbol 
Rate” will not be able to be edited.
It means that the parameters cannot be modifi ed by error 
neither loosing the stored channels when any value of the data 
base is changed.
In case of any value, for example the Symbol Rate of a TP, 
has been modifi ed  by the provider and the receiver has these 
channels tuned, the TP must be deleted (it will delete all the 
channels of this TP), create it again with the correct data, and 
to carry out a new search of the TP.
In this item you can also add, delete or delete all TP.
- Press [Red] button to add a new TP (OSD 47). You have to 

set the parameters of “TP Frequency” and “Symbol Rate” for 
this new transponder. Therefore use the number buttons of 
the RCU. The available range are “3000~13450 MHz” and 
“1000~45000KS/s”.

- Press [Green] button to delete the current TP. A safety ques-

tion will be displayed for confi rmation to delete the current 
transponder or not (OSD 48). If you select “Yes”, the current 
transponder will be deleted and the total number of transpon-
ders will be reduced. 

- Press [Yellow] button to delete all TP. A safety question will be 

displayed for confi rmation to delete all transponders or not. If 
you select “Yes”, all transponders will be deleted.

3. For transponders you also can use number buttons to modify 
the parameters of “TP Frequency” and “Symbol Rate” or [

] to change the value directly. “Polarity” and “Scan Mode” 

are used for setting scans conditions. Press [

] to select 

a different mode. 
4. Polarity: Press [

] to switch between “Auto / H / V”.

5. Search channels of the TP: Selecting this option, a new 
window appears, where you can confi gure the following 
parameters (OSD 49): 
- On “FTA Only” item, press [

] to select scanning of all 

channels or just scanning of free channels. If you select “Yes” it 
will scan free channels only.
- On “Scan Channel” item, press [

] to select the scanning 

range from TV + Radio Channels, only TV channels or only 
Radio channels.
- Search NIT: If you select this option as “Off”, the receiver 

OSD 46

OSD 47

OSD 48

OSD 49

Содержание MAX S122

Страница 1: ...MAX S122...

Страница 2: ...re cleaning it or working on the connections Do not install the receiver close to strong heat sources and ensure a good aeration if you plan to install the receiver in a small cabinet Before you start...

Страница 3: ...le 2 DISEqC switches Example 3 Combined with terrestrial Example 4 Motorized system CONNECTION TO THE 230V MAINS This receiver works at 12 24VDC to connect it to 230 VAC use power adaptor included ins...

Страница 4: ...set the preferred audio language for those channels using If a channel offers the same audio language as the First Audio you set the system will play this audio language as default If the channel doe...

Страница 5: ...e options of DiSEqC1 1 switches Positioner Press to select between None DiSEqC1 2 USALS Polarity Press to switch between Auto H V Once the LNB is configured press Exit to save the chan ges and go to t...

Страница 6: ...canning of all channels or just scanning of free channels If you select Yes it will scan free channels only 3 On Scan Channel item press to select the scanning range from TV Radio Channels only TV cha...

Страница 7: ...If GMT Usage is On the offset respect GMT has to be configured depending on your region or country Use the keys to choose the offset Remember that the offset values are between 12 00 and 12 00 3 Summ...

Страница 8: ...annel list and settings This option makes a backup of the channel list and it will allow restoring the channel list even thought after a factory default QUICK INSTALLATION GUIDE Single Search Once the...

Страница 9: ...ser can lock the access to the menu and change the password of the receiver LNB Power Turns on or off the LNB power QUICK INSTALLATION GUIDE Information Shows all the technical information for the sel...

Страница 10: ...i Pictures 15 2 6 CH CH 15 2 7 TV RADIO 15 2 8 Vol Vol 16 2 9 Exit 16 2 10 Menu 16 2 11 Recall 16 2 12 Channel List 16 2 13 EPG 17 2 14 List 17 2 15 Favourites 17 2 16 Audio Track Mode 17 2 17 Informa...

Страница 11: ...st 27 4 5 Satellite Guide 27 5 System Setup 5 1 Language 28 5 2 TV System 29 5 3 Time Timer Setting 29 5 3 1 Timer 29 5 3 2 Local Time setting 30 5 3 3 Sleep Timer 31 5 4 OSD Setting 31 5 5 Parental L...

Страница 12: ...re cleaning it or working on the connections Do not install the receiver close to strong heat sources and ensure a good aeration if you plan to install the receiver in a small cabinet Before you start...

Страница 13: ...olling the main functions of the receiver and provide the same functionality as the remote control ones 1 2 REAR PANEL DESCRIPTION 1 2 3 4 5 1 IF IN Satellite input 2 S PDIF Coaxial output for digital...

Страница 14: ...remote control unit Q My STB is running in TV mode but the TV screen shows nothing except one ball and No Signal A That means the channel you selected has no signal This can be caused by several reas...

Страница 15: ...Press the Mute button again to restore the sound 2 4 CHANNEL NUMBER In TV mode you can enter the channel number directly with your remote control unit and confirm the number with the OK button to cha...

Страница 16: ...list 4 Once the desired channel is selected press OK to change and display the marked channel Expanded Channel List OSD 5 You can use keys to navigate this list In this view you can get more informat...

Страница 17: ...inish time and date of this event 4 To close the EPG menu press Exit 2 14 LIST In TV mode press List button to access directly to the TV Channel List menu or to the Radio Channel List menu 2 15 FAVOUR...

Страница 18: ...he sequence in the related Favourite Group list 2 19 ZOOM 1 Press Zoom button in TV mode to zoom the image Image can be augmented x16 times OSD 13 2 Press Exit to exit this function 2 20 SUBTITLES In...

Страница 19: ...eview window 2 You can enter directly the number of the desired channel with the remote control The selection will select that channel but it will not be previewed until you confirm with OK button 3 P...

Страница 20: ...hannels 3 1 4 EDIT 1 After pressing the Yellow button a window for entering the password will open The default password is 0000 2 You can Delete Skip Lock and Edit the channel OSD 21 3 Press Exit to l...

Страница 21: ...Create Press Green button to open the Create window OSD 27 Press OK button on the Satellite item to display the satelli te list You can select the satellite for which you want to crea te a new channel...

Страница 22: ...of you choice Press OK again to confirm 3 3 2 CHANNEL PLAY TYPE Press OK to enter Channel Play Type menu OSD 32 1 Here you can select the playing channels as Free Scrambled or All 2 If you select Free...

Страница 23: ...e 1 Enter the password The default password is 0000 2 After entering the password correct a safety question will show up where you have to confirm first OSD 36 3 Select Yes to delete all channels or N...

Страница 24: ...enu next options can be modified LNB Type Press to switch among Standard User and Universal mode If you select Standard or User the frequency of the LNB can be changed Pressing OK the frequencies will...

Страница 25: ...h menu a window like the one beside will open OSD 43 1 On Satellite item press OK to open the satellite list OSD 44 Then press to move the highlight and press OK to mark unmark and EXIT to finish the...

Страница 26: ...e the number buttons of the RCU The available range are 3000 13450 MHz and 1000 45000KS s Press Green button to delete the current TP A safety ques tion will be displayed for confirmation to delete th...

Страница 27: ...ted the satellite select Save option and confirm with OK If you prefer to exit without saving the changes select Exit and press OK 4 After pressing Yellow button you will be asked Are you sure to dele...

Страница 28: ...for those channels using If a channel offers the same audio language as the First Audio you set the system will play this audio language as default If the channel does not offer this audio language th...

Страница 29: ...TV System menu With this model 4 3 16 9 switching is not allowed With this model RGB output is not allowed 5 3 TIME TIMER SETTING When you enter Time Local Time Setting or Sleep Timer a menu with thr...

Страница 30: ...to close it 6 Press Exit to leave the Timer menu 5 3 2 LOCAL TIME SETTING When you select Local Time Setting and press OK then you will see a window like the one beside OSD 63 1 GMT Usage This item i...

Страница 31: ...O means no transparency function 5 Load OSD Setting Default If you want to reset your OSD settings to the default settings then select this item and press OK 6 Press Exit button to leave the OSD Setti...

Страница 32: ...s 0000 5 Press Exit to leave the Parental Lock menu 5 6 LNB POWER Here you can set the power output to the LNB OSD 68 If your receiver is connected to the LNB directly then you need to set the LNB Pow...

Страница 33: ...ters as you can see at OSD 72 1 Language press to select the language that will appear on the menus see point 5 1 2 First Audio Some channels offer more than one audio language This function allows yo...

Страница 34: ...ses the length of the snake If the snake runs against a wall or against itself then it dies Press OK to Pause Play the game Press Exit to quit the game and return to the Game menu 6 3 3 OTHELLO 1 Mark...

Страница 35: ...formation about software upgrade please visit http www ftemaximal com 6 5 2 UPGRADE BY SATELLITE This function can upgrade the software of your receiver through data sent by a satellite At the moment...

Страница 36: ...SD 78 3 Press OK again and you will see the message Ready to Download OSD 79 4 In the PC application set the Baud Rate to 115200 and start the download procedure Caution The new download channels will...

Страница 37: ...S 204 188 8 ALL DVB rates DVB S recommendation INPUT SIGNAL Frequency Input level Channel bandwidth Input socked 950MHz 2150MHz 65dBm 25dBm 36MHz F type connector LNB CONTROL Power supply Polarized co...

Страница 38: ...PAG 38 rev 1 0 ENGLISH WE FTE MAXIMAL DECLARE THAT THE PRODUCTS MAX S122 IS IN CONFORMITY WITH FOLLOWING DIRECTIVES LOW VOLTAGE DIRECTIVE 2006 95 EC EMC DIRECTIVE 2004 108 EC CONFORMITY DECLARATION...

Отзывы: