background image

FSN1986 - 11/2017

3

5

4

1

2

32 - English

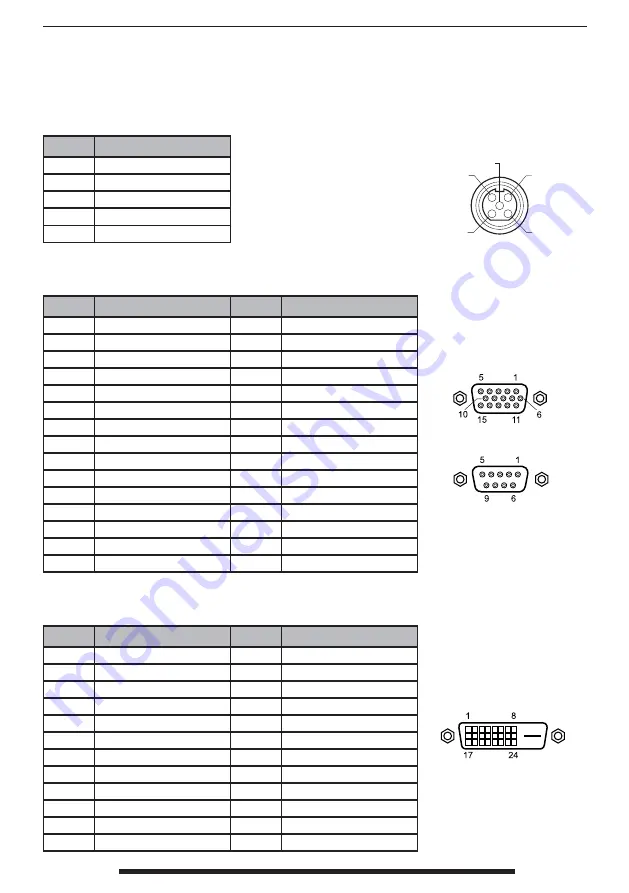
DC Input

Pin No. 

Assignment 

1 Ground 

2

Ground

3

+24V (DC)

4

F.G. (ground)

5

+24V (DC)

VGA & Debug Port Interface Connector

Pin No. 

Assignment 

Pin No. 

Assignment 

1 RED  

1

-

2

GREEN

 2

TXD (Monitor -> PC)

3

BLUE

 3

RXD (PC -> Monitor)

4

GND

 4

-

5

DDC 5V / Check Cable

 5

GND

6

GND-RED

 6

-

7

GND-GREEN  

7

-

8

GND-BLUE  

8

-

9

-


9

-

10

GND-SYNC

11

GND

12

DDC DATA

13

HORIZONTAL SYNC

14

VERITICAL SYNC

15

DDC CLOCK

DVI Input / output interface connector

Pin No. 

Assignment 

Pin No. 

Assignment 

T.M.D.S. Data 2-

13

-

T.M.D.S. Data 2+

14 

+5V Power

T.M.D.S. Data 2/4 Shield

15 

GND   

-

16 

Hot Plug Detect

5 -

17 

T.M.D.S.Data 

0-

6

 DDC Clock

18

T.M.D.S. Data 0+

 DDC Data 

19

T.M.D.S. Data 0 Shield

8 -

20

-

 T.M.D.S. Data 1- 

21

-

10

T.M.D.S. Data 1+ 

22

T.M.D.S. Clock Shield

11

T.M.D.S. Data 1 Shield

23

T.M.D.S. Clock+

12

-

24

T.M.D.S. Clock-

Signal Connector Pin Assignments

Содержание FS-L3202D

Страница 1: ...Medical Display FS P2404D P2604D User s Guide Before connecting operating or adjusting this product please read this instruction booklet carefully and completely ...

Страница 2: ...n 10 Parts 14 Connectors Power Management 15 Mechanical Drawing 16 Controls 18 On Screen Display OSD 19 OSD System Overview 26 Standard Signal Tables 31 Signal Connector Pin Assignments 32 General Specification 34 Cleaning Instructions 36 The specifications and information in this document are subject to change without notice ...

Страница 3: ...tance We have implemented methods to fine tune the properties of FSN displays Distinct color space settings have been calibrated to well known surgical color preferences providing the user with the ideal surgical visualization system Features include t Rapid signal detection robust mode tables t Artifact free HD images t Fanless sterile field compatible t Calibrated to clinical color t Image pan z...

Страница 4: ...urrent lndicates equipotential earth ground Indicates protective earth ground Indicates top bottom direction DC Power control switch Fragile Do not get wet Maximum Stacking Consult the operating instruc tions Indicates the manufacturer Indicates the manufacturing date Authorized representative in the European community Korea Certification Humidity limitation Serial Number Atmospheric pressure limi...

Страница 5: ...oved according to the CCC regulations China RoHS labels This symbol indicates that the waste of electronic equipment must not be disposed as unsorted municipal waste and must be collected separately Please contact the manufacturer or other authorized disposal company to decommission your equipment Language English Note A printed copy of the manual in English is provided with the product Users with...

Страница 6: ...s or smells coming from it unplug it immediately and contact an authorized dealer or service center 9 Please contact the manufacturer if the set should be installed in an inaccessible area Warning Do not touch input or output connectors and the patient simultaneously Warning This medical LCD monitor is intended for connection to input output signals and other connectors that comply with relevant I...

Страница 7: ... it away from heaters stoves fireplaces and sources of heat 6 Don t place your medical LCD Monitor on an unstable stand Medical LCD monitor may mal function or fall 7 This medical LCD monitor should not topple over when tilted at a 5 angle in any position during NORMAL USE excluding transport 8 In the position specified for transport medical LCD monitor shall not overbalance when tilted at a 10 de...

Страница 8: ...assification UL safety Compliance This medical LCD monitor is U L Classified WITH RESPECT TO ELECTRIC SHOCK FIRE AND ME CHANICAL HAZARDS ONLY IN ACCORDANCE WITH UL 60601 1 CAN CSA C22 2 NO 601 1 EEC Safety Compliance This medical LCD monitor unit meets the requirements of EN 60601 1 so as to conform to the Medical Device Directive 93 42 EEC general safety information Use 120V rating 5 15P type plu...

Страница 9: ...er to see if agent is compatible Do not allow liquid to enter the display Servicing Do not attempt to service the medical LCD monitor yourself as opening or removing covers may expose you to dangerous voltages or other hazards and will void the warranty Refer all servicing to qualified service personnel Unplug the medical LCD monitor from its power source and refer servicing to qualified personnel...

Страница 10: ...ference 3 Plug the monitor into an outlet on a different electrical circuit than that to which the subject of interference is connected 4 Consult the dealer or an experienced radio TV technician for help NOTICES TO USER This device complies with part 15 of the FCC Rules Operation is subject to the following two conditions 1 this device may not cause harmful interference and 2 this device must acce...

Страница 11: ... The customer or the user of the medical LCD monitor should assure that it is used in such an environment Immunity test IEC 60601 Test level Compliance level Electromagnetic environment guidance Electrostatic discharge ESD IEC 61000 4 2 6 kV contact 8 kV air 6 kV contact 8 kV air Floors should be wood concrete or ceramic tile If floors are covered with synthetic material the relative humidity shou...

Страница 12: ... 95 dip in UT for 5 sec 5 UT 95 dip in UT for 0 5 cycle 40 UT 60 dip in UT for 5 cycle 70 UT 30 dip in UT for 25 cycle 5 UT 95 dip in UT for 5 sec Main power quality should be that of a typical commercial or hospital environment If the user of monitor requires continued operation during power mains interruptions it is recommended that monitor be powered from an uninterruptible power supply or a ba...

Страница 13: ...ance according to frequency of transmitter m 150kHz to 80MHz ൌ ǡͷ ܸଵ ൨ ξܲ 80MHz to 800MHz ൌ ǡͷ ܧ ଵ ൨ ξܲ 800MHz to 2 5GHz ൌ ܧ ଵ ൨ ξܲ V1 3Vrms E1 3V m E1 3V m 0 01 0 116 0 116 0 2333 0 1 0 368 0 3687 0 7378 1 1 166 1 1660 0 2333 10 3 687 3 6872 0 7375 100 11 660 11 6600 23 333 For transmitters rated at a maximum output power not listed above the recommended separation dis tance d in meters m can be ...

Страница 14: ...ual AC DC Adaptor FS P2404D BM120S24F02 FS P2604D ATM160T P240 6 23ft 1 9m AC Power Cord 6ft 1 8 m US UK EU China Hospital Grade DVI D Cable 6ft 1 8m BNC Cable 6ft 1 8m DC Cable Terminal Male female available for purchase D SUB Cable 6ft 1 8m available for purchase Screw BH M4 x 14 ...

Страница 15: ...o the monitor when horizontal and vertical sync return State Normal Operation DPMS standby DPMS suspend Power off OSD button Power off DC switch Horizontal Sync Active Inactive Active Inactive Inactive Vertical Sync Active Active Inactive Inactive Inactive Video Active Blanked Blanked Blanked Blanked Power Indicator Off Blue Flashing 1 sec interval Blue Flashing 1 sec interval Blue Off Power Consu...

Страница 16: ...FSN1986 11 2017 575 4 mm 22 66 in 82 3 23 392 15 43 35 7 1 41 171 5 6 75 100 3 94 4 M4 VESA MOUNT HOLES 100 3 94 16 English Mechanical Product Drawing 24 FS P2404D Dimension ...

Страница 17: ...FSN1986 11 2017 640 mm 25 20 in 78 3 07 402 15 83 31 7 1 25 171 2 6 74 100 3 94 100 3 94 8 M4 VESA MOUNT HOLES 200 7 87 English 17 Mechanical Product Drawing 26 FS P2604D Dimension ...

Страница 18: ...re in Picture function Select from PIP PBP1 PBP2 Press to turn power on off to the display s front LCD screen If this icon is not illumi nated then the power switch on the back of the display has been turned off Press to show the input selection menu and to change the display signal source Input choices DVI1 DVI2 DSUB Ana log SDI YPbPr RGBS S Video C Video Press 1 second for DSUB Analog auto adjus...

Страница 19: ...low 1 Enter the Input Source Select Menu To activate press the input button 2 Pick a Video Source to Display After entering the OSD use the UP and DOWN buttons on the front of the display monitor to navigate to the desired input video source type 3 Activate the Input Source After using the UP and DOWN buttons to navigate to the desired input video source type press the button to display the active...

Страница 20: ...close the OSD menu press the menu button to exit from the main menu or a sub menu 2 Pick a Main Menu Category After entering the OSD use the UP and DOWN buttons on the front of the display monitor to navigate to a main menu category The ADJUST menu controls brightness contrast and more The COLOR SETTING menu controls preset or customized color settings The IMAGE menu controls horizontal vertical p...

Страница 21: ...ange 0 100 3 V POSITION Adjusts the vertical position of the displayed source image Range 0 100 4 GAMMA Adjusts GAMMA value BYPASS 1 8 2 0 2 2 2 4 2 6 PACS V0 V1 V2 5 SHARPNESS Sets the sharpness of image Softest Soft Normal Sharp Sharpest 6 OVER SCAN Adjusts the displayed size 0 8 7 ZOOM PAN Enlarges the image moves images left and right 8 FREEZE Keeps the image still 9 DYNAMIC RANGE Select a vid...

Страница 22: ...of image Softest Soft Normal Sharp Sharpest 4 OVER SCAN Adjusts the displayed size 0 8 5 ZOOM PAN Enlarges the image moves images left and right 6 FREEZE Keeps the image still 7 DYNAMIC RANGE Select a video range 0 255 or 16 235 Submenus under the SETUP menu 1 LANGUAGE Changes the OSD language 9 language 2 TRANSPARENCY Adjusts the OSD back ground from white opaque to half translucent 3 OSD POSITIO...

Страница 23: ...position of the displayed source image Range 0 100 3 V POSITION Adjusts the vertical position of the displayed source image Range 0 100 4 GAMMA Adjusts GAMMA value BYPASS 1 8 2 0 2 2 2 4 2 6 PACS V0 V1 V2 5 SHARPNESS Sets the sharpness of image Softest Soft Normal Sharp Sharpest 6 OVER SCAN Adjusts the displayed size 0 8 7 ZOOM PAN Enlarges the image moves images left and right 8 FREEZE Keeps the ...

Страница 24: ...SITION Adjusts the vertical position of the displayed source image Range 0 100 4 GAMMA Adjusts GAMMA value BYPASS 1 8 2 0 2 2 2 4 2 6 PACS V0 V1 V2 5 SHARPNESS Sets the sharpness of image Softest Soft Normal Sharp Sharpest 6 OVER SCAN Adjusts the displayed size 0 8 7 ZOOM PAN Enlarges the image moves images left and right 8 FREEZE Keeps the image still 9 DYNAMIC RANGE Select a video range 0 255 or...

Страница 25: ... 2 2 2 4 2 6 PACS V0 V1 V2 3 SHARPNESS Sets the sharpness of image Softest Soft Normal Sharp Sharpest 4 OVER SCAN Adjusts the displayed size 0 8 5 ZOOM PAN Enlarges the image moves images left and right 6 FREEZE Keeps the image still 7 DYNAMIC RANGE Select a video range 0 255 or 16 235 Submenus under the SETUP menu 1 LANGUAGE Changes the OSD language 9 language 2 TRANSPARENCY Adjusts the OSD back ...

Страница 26: ...play incorrectly or picture noise may be present PHASE Do not adjust This setting will adjust automatically after auto adjustment When frequency value is wrong picture noise may be present AUTO ADJUST Fits to the most appropriate screen on the D SUB Analog signal SHARPNESS Adjusts the sharpness of a video image SATURATION Changes the color tone COLOR Changes the richness of color COLOR MODE C1 Cus...

Страница 27: ...J K L M N O P Q R S T B C D E F G H I J K L M N O P Q R S T B C D E F G H I J K L M N O P Q R S T B C D E F G H I J K L M N O P Q R S T B C D E F G H I J K L M N O P Q R S T B C D E F G H I J K L M N O P Q R S T B C D E F G H I J K L M N O P Q R S T B C D E F G H I J K L M N O P Q R S T B C D E F G H I J K L M N O P Q R S T B C D E F G H I J K L M N O P Q R S T B C D E F G H I J K L M N O P Q R S ...

Страница 28: ...s the image PAN left right up down The maximum ZOOM size is ten times as large as the original FREEZE Freezes the main image Does not freeze secondary image in PIP mode LANGUAGE Changes the OSD to one of 9 languages ENGLISH GERMAN FRENCH SPANISH ITALIAN JAPANESE CHINESE TURKISH KOREAN OSD TRANSPARENCY Adjusts the transparency of the OSD menu box OSD POSITION Changes the on screen position of the O...

Страница 29: ...onnected input sources Does not affect the sub window when in PIP mode PIP LAYOUT Changes the sub window layout OFF PIP PBP1 PBP2 Picture in Picture PIP Main Sub window doesn t change aspect ratio Picture by Picture 1 PBP1 Main Sub window doesn t change aspect ratio Picture by Picture 2 PBP2 Main Sub window H V display 1 1 size PIP INPUT Selects the PIP source input The following table shows PIP m...

Страница 30: ...reen Display OSD System Overview continued Submenu Descriptions Submenu Function Description PIP SWAP Swap main window and sub window contents in PIP PBP1 PBP2 Picture in picture PIP Picture by Picture 1 PBP1 Picture by Picture 2 PBP2 ...

Страница 31: ... 85Hz 53 674 85 061 56 250 1024 x 768 60Hz 48 363 60 004 65 000 1024 x 768 70Hz 56 476 70 069 75 000 1024 x 768 75Hz 60 023 75 029 78 750 1024 x 768 85Hz 68 677 84 997 94 500 1152 x 864 60Hz 54 348 60 053 80 000 1152 x 864 75Hz 67 500 75 000 108 000 1280 x 720 60Hz 45 000 60 000 74 250 1280 x 960 60Hz 60 000 60 000 108 000 1280 x 960 85Hz 85 938 85 002 148 500 1280 x 1024 60Hz 63 974 60 013 108 50...

Страница 32: ...E 8 9 9 10 GND SYNC 11 GND 12 DDC DATA 13 HORIZONTAL SYNC 14 VERITICAL SYNC 15 DDC CLOCK DVI Input output interface connector Pin No Assignment Pin No Assignment 1 T M D S Data 2 13 2 T M D S Data 2 14 5V Power 3 T M D S Data 2 4 Shield 15 GND 4 16 Hot Plug Detect 5 17 T M D S Data 0 6 DDC Clock 18 T M D S Data 0 7 DDC Data 19 T M D S Data 0 Shield 8 20 9 T M D S Data 1 21 10 T M D S Data 1 22 T M...

Страница 33: ...e connector Pin No Description RGBS Description YPbPr 1 RED Pr 2 GREEN Y 3 BLUE Pb 4 H Sync C Sync No Connection 5 V Sync No Connection 6 GND GND C Video interface connector Pin No Description 1 Composite 2 GND GPIO Pin No Assignment 1 P S Swap 2 PIP PBP1 PBP2 Select 3 Record lndicator 4 Ground Equipotential earth terminal This should be connected to other equipment s earth terminal Signal Connect...

Страница 34: ... cd m2 Power Consumption Maximum Max 55W Standby Mode Max 0 5W Control Key Front Side INPUT PIP MENU POWER Input Signal Video 1 x DVI D 1 1 x DVI D 2 optional 1 x VGA D sub 1 x SD HD 3G SDI BNC 1 x C Video BNC 1 x S Video Y C 2 x BNC 1 x Component RGBS YPbPr 5 x BNC Output Signal Video 1 x DVI D 1 x SD HD 3G SDI BNC Power Supply AC DC Adaptor AC 100 240V DC 24V 5A Mounting Hole VESA standard 100mm...

Страница 35: ...Consumption Maximum Max 65W Standby Mode Max 0 5W Control Key Front Side INPUT PIP MENU POWER Input Signal Video 1 x DVI D 1 1 x DVI D 2 optional 1 x VGA D sub 1 x SD HD 3G SDI BNC 1 x C Video BNC 1 x S Video Y C 2 x BNC 1 x Component RGBS YPbPr 5 x BNC Output Signal Video 1 x DVI D 1 x SD HD 3G SDI BNC Power Supply AC DC Adaptor AC 100 240V DC 24V 6 6A Mounting Hole VESA standard 100mm X 100mm 20...

Страница 36: ...nics Instead apply the liquid to the cleaning cloth t PMMPX ZPVS IPTQJUBM QSPUPDPM GPS UIF IBOEMJOH PG CMPPE BOE CPEZ øVJET t 5IF EJTQMBZ JT OPU EJTJOGFDUFE PS QBDLFE JO TUFSJMF FOWJSPONFOU t PMMPX ZPVS IPTQJUBM QSPUPDPM JO DBTF UIF EJTQMBZ OFFET UP CF EJTJOGFDUFE QSJPS UP JOTUBMMBUJPO Front Filter Proceed as follows 1 Remove dust with a dry lint free non abrasive soft cotton cloth 2 Remove finger...

Страница 37: ...XJUI B SFDPHOJ FE DMFBOJOH QSPE uct for medical equipment t 3FQFBU XJUI XBUFS POMZ t 8JQF ESZ XJUI B ESZ DMPUI The cabinet has been tested for resistance to the following products t 7JSFY 3FBEZ UP VTF JTJOGFDUBOU MFBOFS t JTUZ MFBS FNPO JTJOGFDUBOU t JTUZ VMUJ 1VSQPTF JTJOGFDUBOU MFBOFS t JTUZ VMUJ 1VSQPTF JTJOGFDUBOU MFBOFS t FQ FBWZ EVUZ HMBTT BMM TVSGBDF DMFBOFS t MFBS 4DSFFO t 4DSFFO 5 5 POUBL...

Страница 38: ...FSN1986 11 2017 38 English Notes ...

Страница 39: ......

Страница 40: ...eatherhead Road Chessington Surrey KT9 2NY UK Tel 44 0 208 546 1047 FORESEESON KOREA 404B Pangyoinnovalley B 253 Pangyo ro Bundang gu Seongnam si Gyeonggi do Korea 463 400 Tel 82 31 8018 0780 Fax 82 31 8018 0786 FORESEESON Shanghai Medical Equipment Co Ltd Room 307 3F No 56 461 Hongcao Road Caohejing Development District Xuhui Shanghai 200233 Tel 86 21 6113 4188 FORESEESON CUSTOM DISPLAYS INC 2210...

Отзывы: