background image

FSI Calibration Guide   

Using CR100 / ColourSpace / BoxIO

© 2022 Flanders Scientific, Inc.

4

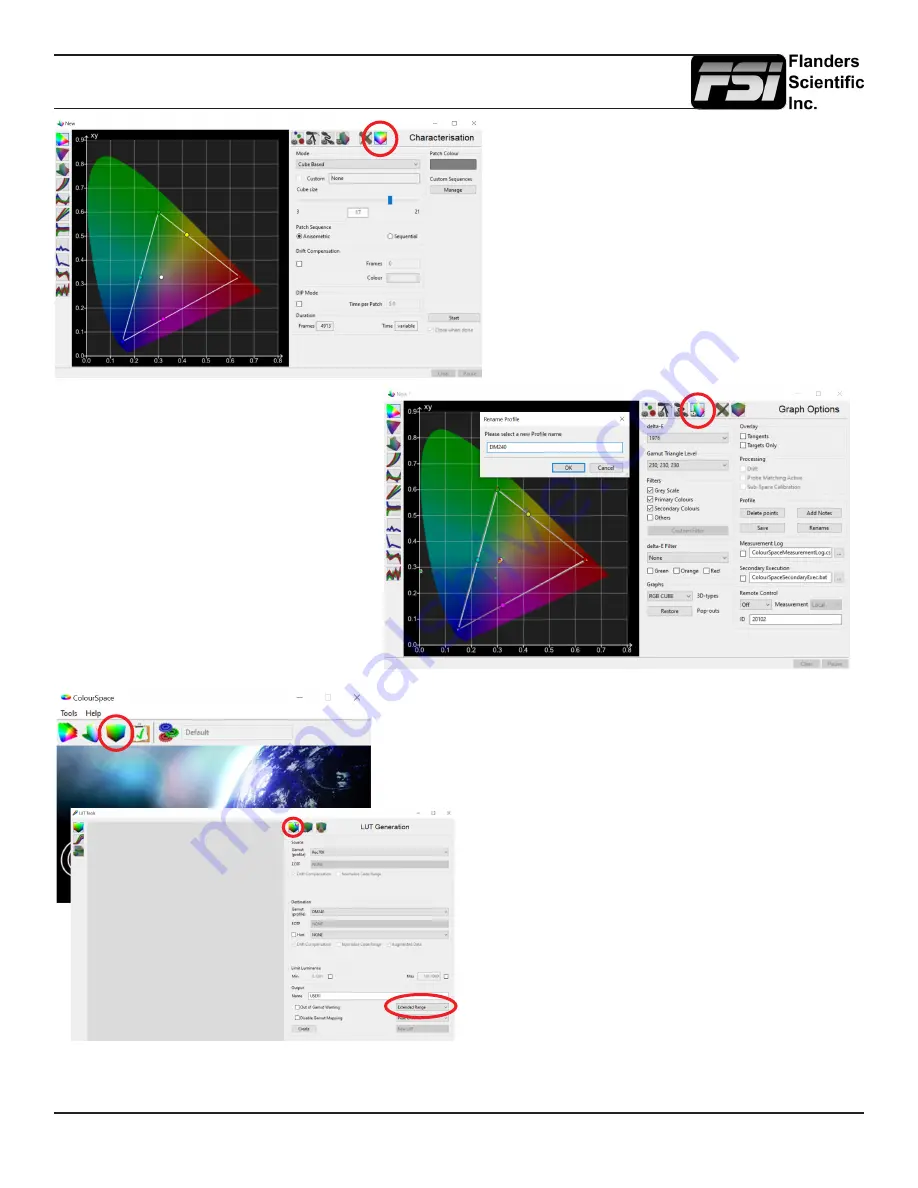
From  the  LUT  Generation  tab  select  your  target 

color  space  from  the  Gamut  (profile)  drop-down 

menu in the Source area. 

In the Destination area select the calibration profile 

you just saved. 

In the Output area confirm Extended Range is se-

lected then enter your desired LUT name (User1, 

User2, or User3) in the NAME field. Please note on 

monitors running firmware 2.0.0-2282 or later the 

user positions are the only valid selections. Saving 

to other memory slots is not supported.

Then, click Create to generate your calibration LUT.

Once  the  profile  is  saved,  open  a  LUT Tools 

window in ColourSpace.

Once  your  profile  completes,  click 

on the graph options tab then select 

Rename  to  give  the  profile  an  easy 

to identify name, then press save to 

save the completed profile.

Click on the Display Characterization icon, 

then select a desired profiling mode. Grey 

Ramp RGB Large (quick) or Cube Based 

Cube Size 17 (slow) are the suggested pro-

filing modes. Generally speaking larger pro-

files will yield better results. If short on time, 

we would suggest you use Grey Ramp RGB 

Large. See the appendix for more details.

Ensuring that the CR100 probe is positioned 

at the center of the monitor, press the Start 

button to begin profiling.

Содержание AM Series

Страница 1: ...M CM DM Series Monitors Using CR100 ColourSpace BoxIO Flanders Scientific Inc 6215 Shiloh Crossing Suite G Alpharetta GA 30005 Phone 1 678 835 4934 Fax 1 678 804 1882 E mail Support FlandersScientific com www FlandersScientific com ...

Страница 2: ...Management LUT Bypass 3D LUT Start ColourSpace and click the profiling icon From the profiling window select the Settings tab and set Patch Scale to Extended Now select the Hardware Options tab From the Hardware drop down menu select FSI BoxIO Enter the IP address of the BoxIO into the Network Address field then click connect Below the connect button you will see a drop down menu labeled Calibrati...

Страница 3: ...We suggest setting extra delay to at least 0 5 sec onds as a setting of 0 seconds will cause read errors Next ensuring that grey is still being displayed on your monitor and the probe is positioned in front of the screen click on Probe Calibration to establish sync for your CR100 and press OK Plug the CR100 into the computer and aim it towards the middle of the monitor Click on the Manual Measure ...

Страница 4: ...t supported Then click Create to generate your calibration LUT Once the profile is saved open a LUT Tools window in ColourSpace Once your profile completes click on the graph options tab then select Rename to give the profile an easy to identify name then press save to save the completed profile Click on the Display Characterization icon then select a desired profiling mode Grey Ramp RGB Large qui...

Страница 5: ...When the LUT update is complete set LUT Bypass back to None on the monitor Then select your corresponding LUT position User1 User2 User3 from the Color Space Selec tion in the Color Management Display Alignment menu to activate your LUT Next click on the Space Management icon Expand the Working LUTs section and select the LUT that was just saved Select FSI from the drop down menu on the left and 3...

Страница 6: ... response For both of these reasons it is advisable to calibrate to a target of 2 4 gamma when calibrating an OLED with black at 0 nits so that noise or junk readings are not being factored into your calibration s EOTF Once calibration is complete you can use the bright knob key on the monitor to adjust your black level higher if desired When calibrated to a target of 2 4 with black at 0 the brigh...

Страница 7: ...250 OLED and does not apply to any other models The calibration process remains largely the same as the standard 3D LUT procedure with one important additional step The rest of the calibration procedure then continues per the standard 3D LUT calibration instructions Appendix 2 Calibration of DM250 running Firmware 2 0 0 2282 or later 1 When creating the 3D LUT you will want to set the Max Luminanc...

Отзывы: