background image

15

2

3 4

3

5

6 7

8

9

10

11

12

13

14

14

15

15

16

17 1819 20

21 22

23

24

25

26

27

29

28

30

31

32

33

36

37

38

39

40

41

42 43 44

45

46

35

34

1

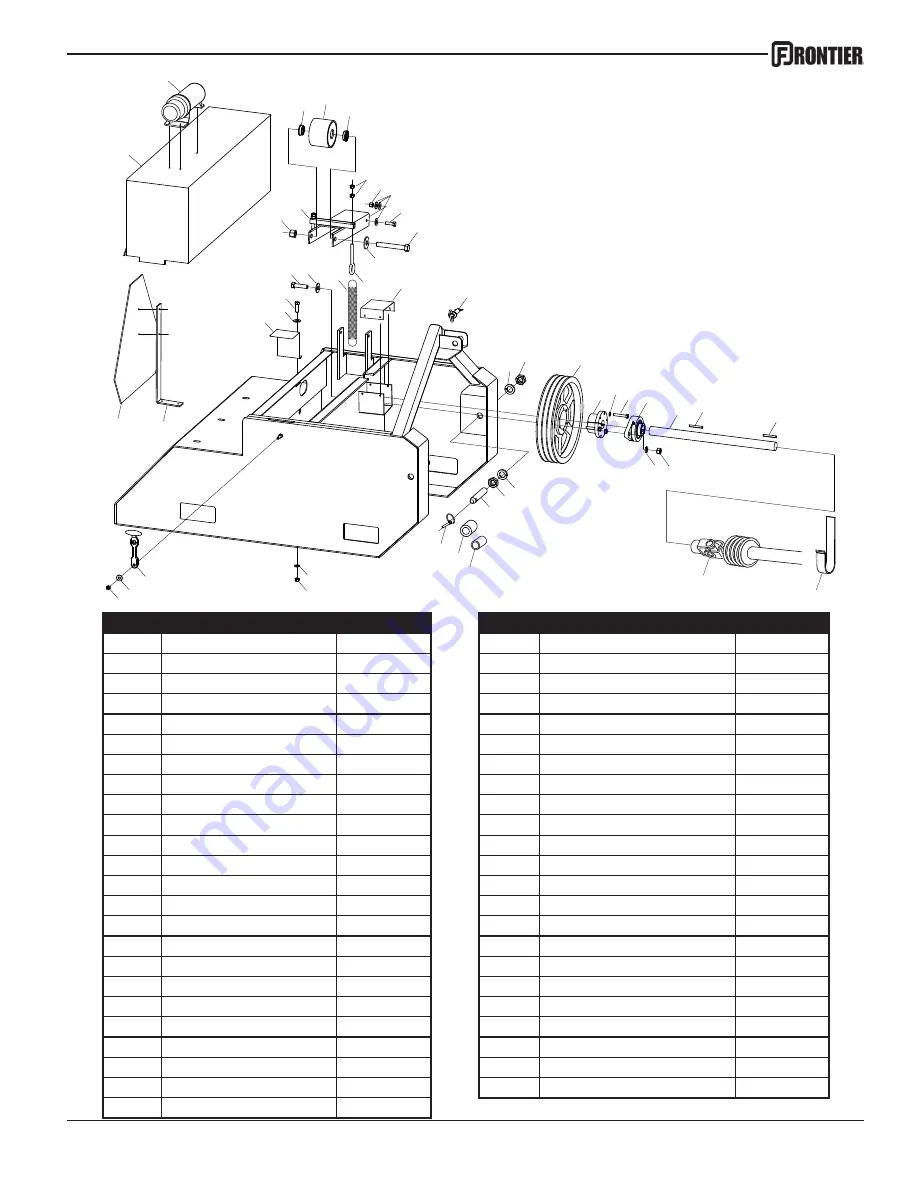
Ref#

Description

Part#

Ref#

Description

Part#

1

Belt Shield

5PQ902025

24

Nut, 1/2

5PQ000940

2

Owner’s Manual Canister

5PQ503050

25

Lock Washer, 1/2

5PQ000840

2a

Operator’s/Parts Manual

5PQ990102

26

Complete PTO Shaft

5PQ900139

3

Insert Bearing

5PQ900150

27

PTO Shaft Cradle

5PQ900862

4

Idler Roller

5PQ902023

28

Lift Arm Pin w/ Nut & Washer

5PQ900110

5

Nut, 3/8

5PQ000915

29

Quick Hitch Bushing, 1” OD

5PQ903145

6

Locknut, 3/8

5PQ003000

30

Quick Hitch Bushing, 1.25” OD

5PQ903146

7

Flatwasher, 3/8

5PQ001035

31

Lynch Pin

5PQ500219

8

Bolt, 3/8 x 1-1/4

5PQ000275

32

Lock Washer, 3/8

5PQ000820

9

Bolt, 5/8 x 4-1/2

5PQ000645

33

Nut, 3/8

5PQ000915

10

Flatwasher, 5/8

5PQ001075

34

Rubber T-Handle

5PQ400092

11

Eye Bolt, 3/8 x 3-1/4

5PQ902001

35

Flatwasher, 5/16

5PQ001030

12

PTO Guard

5PQ900857

36

Nut, 5/16

5PQ000910

13

Hitch Pin

5PQ903143

37

SMV Triangle

5PQ507166

14

Lock Washer, 7/8

N/A

38

SMV Mounting Bracket

5PQ900861

15

Jam Nut, 7/8

N/A

39

Jack Shaft Shield

5PQ900019

16

Pulley, 12” 3-Groove

5PQ900113

40

Flatwasher, 3/8

5PQ001035

17

Pulley Bushing w/ Bolts

5PQ900115

41

Bolt, 3/8 x 1 

5PQ000270

18

Lock Washer, 5/16

N/A

42

Bolt, 1/2 x 2

5PQ000452

19

Bolt, 5/16 x 2

N/A

43

Flatwasher, 1/2

5PQ001055

20

Flange Bearing, 1-1/4

5PQ900112

44

Tension Spring

5PQ900162

21

Jack Shaft

5PQ900041

45

Locknut, 5/8

5PQ000972

22

Key, 3/8 x 3/8 x 2

5PQ400857

46

Idler Arm

5PQ902024

23

Key, 1/4 x 1/4 x 2 

5PQ400587

WC1105 Base Assembly

Содержание wc1105

Страница 1: ...WOOD CHIPPER O P E R A T O R S M A N U A L WC1105 5PQ990102 8 08 2012...

Страница 2: ......

Страница 3: ...o we welcome any suggestions or ideas for improvement Please note that it is within our rights to make changes or improvements to our equipment without updating the equipment that was manufactured bef...

Страница 4: ...s 6 Inspection and Set up 7 Operation 8 Startup 8 Chipping Tips 8 Chip Chute Adjustments 9 Deflector 9 Maintenance Service 10 BeltTension 10 ReplacingtheBelts 10 Knives 11 Anvil 11 Lubrication 12 Bear...

Страница 5: ...uesting service For your convenience a space has been provided inside the front cover of this manual to record the se rial number model number purchase date and dealer name Specifications INTRODUCTION...

Страница 6: ...atch a branch that is feeding into the chipper DO NOT stand directly in front of the infeed hopper when loading material into the hopper always load from the side of the hopper This will not allow any...

Страница 7: ...ipment Do not install any adapter device between the tractor and the primary implement PTO drive shaft that will allow a 1000 rpm tractor shaft to power a 540 rpm implement at speeds higher than 540 r...

Страница 8: ...to insure safe and proper use of the machine and should be heeded at all times If at any time there are damaged and or faded decals contact your dealer for replacements immediately Below is an illustr...

Страница 9: ...instructions on adjusting the anvil depth Check the chip chute locking device to make sure it locks the chute securely into position when the handle is in the locked position This adjustment is also...

Страница 10: ...nd set the parking brake then turn the tractor engine off Connect the 3 pt hitch linkages to the chipper and secure them with safety snap pins Adjust the top link so that the chipper sits level Connec...

Страница 11: ...ntly rotates a full 360 degrees Rotate it to the desired position and lock the handle Be sure the handle is locked before transporting the chipper Deflector The chip deflector easily adjusts to regula...

Страница 12: ...pper uses 3 BX 58 belts Remove the idler springs to release the tension on the belts Remove the bolts that attach the front bearing and loosen the set screws in this bearing Slide the bearing out far...

Страница 13: ...edge should be 45 degrees It is good to keep an extra set of knives on hand to use while the other set is being sharpened Anvil The depth of your anvil will also affect the performance of your chippe...

Страница 14: ...dirt off of the fitting before greasing Figure 9 Figure 10 Figure 11 Figure 12 Figures 11 12 show the rotor shaft bearings These should also be greased lightly every 8 hours When greasing a sealed bea...

Страница 15: ...y John Deere according to the terms of the Agricultural Commercial Consumer Equipment Warranty Statement Carefully read the warranty statement on the back of your original purchase order for details o...

Страница 16: ...14 Illustrated Parts Breakdowns...

Страница 17: ...3 8 x 1 1 4 5PQ000275 32 Lock Washer 3 8 5PQ000820 9 Bolt 5 8 x 4 1 2 5PQ000645 33 Nut 3 8 5PQ000915 10 Flatwasher 5 8 5PQ001075 34 Rubber T Handle 5PQ400092 11 Eye Bolt 3 8 x 3 1 4 5PQ902001 35 Flat...

Страница 18: ...4 13 1415 16 17 18 20 21 22 23 24 25 26 28 27 29 3031 32 33 34 35 3637 43 19 11 10 9 8 8 45 38 39 40 41 42 44 49 50 51 52 57 58 59 56 60 72 61 62 71 63 64 65 66 67 68 69 70 55 53 54 53 46 47 47 48 48...

Страница 19: ...8 5PQ000915 18 Chute Retainer 5PQ902020 54 Lock Washer 3 8 5PQ000820 19 Steel Locknut 1 2 5PQ900144 55 Anvil Adjuster 5PQ900023 20 Steel Locknut 3 8 5PQ900134 56 Anvil 5PQ900014 21 Chute Clamp 5PQ902...

Страница 20: ...104 4 Warning cruch pinch hazard 5PQ903105 5 Warning thrown objects 5PQ903106 6 Warning do not place hands 5PQ903100 7 Decal Red Retroreflective 5PQ903112 8 Danger do not remove sheilds 5PQ903101 9 Da...

Страница 21: ...19 NOTES...

Страница 22: ...20...

Страница 23: ......

Страница 24: ......

Отзывы: