background image

8

IMPORTANT SAFETY INSTRUCTIONS

Save these instructions for future reference 

IMPORTANT INSTRUCTIONS FOR SERVICE 
AND MAINTENANCE

Do not repair or replace any part of the appliance 
unless specifically recommended in the manuals. 
All other servicing should be done only by a 
qualified technician. This reduces the risk of 
personal injury and damage to the appliance.

Always contact your dealer, distributor, service 
agent, or manufacturer about problems or condi-
tions you do not understand. 

Ask your dealer to recommend a qualified techni-
cian and an authorized repair service. Know how 
to disconnect the power to the appliance at the 
circuit breaker or fuse box in case of an emer-
gency.

Remove the oven door from any unused oven if it 
is to be stored or discarded.

Do not touch a hot oven light bulb with a damp 
cloth. Doing so could cause the bulb to break. 
Handle halogen lights (if equipped) with paper 
towels or soft gloves. Disconnect the appliance or 
shut off the power to the appliance before 
removing and replacing the bulb.

Important Safety Notice -

 The California Safe 

Drinking Water and Toxic Enforcement Act 
requires the governor of California to publish a list 
of substances known to cause cancer, birth 
defects, or other reproductive harms, and 
requires businesses to warn customers of 
potential exposures to such substances.

Important:

 This appliance has been tested and 

found to comply with the limits for a class B digital 
device, pursuant to Part 18 of the FCC rules 
(United States) and ICES-001 (Canada). These 
limits are designed to provide reasonable protec-
tion against harmful interference in a residential 
installation. This unit uses and can radiate radio 
frequency energy and, if not installed and used in 
accordance with the instructions, may cause 
harmful interference to radio communications. 
However there is no guarantee that interference 
will not occur in a particular installation. If this unit 
does cause harmful interference to radio or televi-
sion reception, which can be determined by 
turning the unit off and on, the user is encouraged 
to try to correct the interference by one or more of 
the following measures:

Reorient or relocate the receiving antennae.

Increase distance between unit and receiver.

Connect the unit into an outlet or a circuit 
different from that to which the receiver is 
connected.

Содержание LFIF3054TDA

Страница 1: ...th Induction Cooktop A11103103 Rev F July 2017 TABLE OF CONTENTS Product Record and Registration 2 Important Safety Instructions 3 Cooking Recommendations 9 Before Setting Surface Controls 12 Setting Surface Controls 16 Before Setting Oven Controls 19 Setting Oven Controls 20 Care and Cleaning 29 Before You Call 34 Warranty 38 ...

Страница 2: ...ation Serial plate location open lower oven drawer some models or storage drawer some models PRODUCT RECORD AND REGISTRATION Thank you for choosing Frigidaire Important This Use and Care Guide is part of our commit ment to customer satisfaction and product quality throughout the service life of your new appliance We view your purchase as the beginning of a relationship To ensure our ability to con...

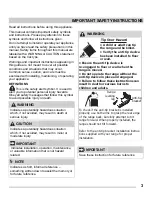
Страница 3: ...a potentially hazardous situation which if not avoided may result in minor or moderate injury Indicates installation operation maintenance or valuable information that is not hazard related Indicates a short informal reference something written down to assist the memory or for future reference WARNING CAUTION IMPORTANT NOTE Save these instruction for future reference WARNING Tip Over Hazard A chil...

Страница 4: ...e ANSI Z223 1 NPFA No 54 latest edition and National Electrical Code NFPA No 70 latest edition and local electrical code requirements In Canada install in accordance with CAN CGA B149 1 and CAN CGA B149 2 and CSA Standard C22 1 Canadian Electrical code Part 1 latest editions and local electrical code requirements Install only per installation instructions provided in the litera ture package for th...

Страница 5: ...open over door may cause the appliance to tip resulting in serious burns or other injury An open drawer when hot may cause burns Stepping leaning or sitting on the door or drawers of this appliance can result in serious injuries and also cause damage to the appli ance Never cover any slots holes or passages in the oven bottom or cover an entire oven rack with any materials such as aluminum foil or...

Страница 6: ...king and greasy spills that may ignite A pan that has boiled dry could be damaged and may damage the cooktop When you are flaming foods under a ventilating hood turn on the fan Wear proper apparel Loose fitting or hanging garments should never be worn while using the appliance Do not let clothing or other flammable materials contact hot surfaces Do not touch surface burners or elements areas near ...

Страница 7: ...this area when the oven is on may cause severe burns Do not place plastic or heat sensitive items on or near the oven vent These items can melt or ignite Placement of oven racks Always place oven racks in desired location while oven is cool If rack must be moved while oven is hot do not let potholder contact hot burner or element in oven Use potholders and grasp the rack with both hands to reposit...

Страница 8: ...ornia Safe Drinking Water and Toxic Enforcement Act requires the governor of California to publish a list of substances known to cause cancer birth defects or other reproductive harms and requires businesses to warn customers of potential exposures to such substances Important This appliance has been tested and found to comply with the limits for a class B digital device pursuant to Part 18 of the...

Страница 9: ...keware cooks hotter than shiny bakeware Reduce the cooking temperature by 25 F 13 14 C when using dark bakeware Glass bakeware Glass bakeware cooks hotter than shiny bakeware Glass is convenient as the same piece of bakeware can be used for cooking serving and storing food Reduce the cooking temperature by 25 F 13 14 C when using glass bakeware Insulated bakeware Insulated bakeware cooks cooler th...

Страница 10: ... Reduce amount of baking soda or baking powder in recipe Reduce rising time or punch down dough and allow it to rise twice Cooking Results Small adjustments may fix a problem with food not being as done as you like or more done than you like Result Recommendation Food too light Use the middle to maximum cook time recommended on packaging or recipe Food too dark Use the minimum cook time recommende...

Страница 11: ...ith a broil pan insert designed to drain the fat from the food help avoid spatter and reduce smoking The broiler pan will catch grease spills and the insert helps prevent grease splatters If a broiler pan and insert are not supplied with this appliance they may be purchased from Frigid aire com Cooking Tips ...

Страница 12: ...ntional cooktop so it uses less electricity Preparation Before using your cooktop for the first time apply a ceramic cooktop cleaning cream available in most hardware grocery and department stores to the ceramic surface Clean and buff with a clean paper towel Cooktop cleaning creams leave a protective finish on the glass that will make cleaning easier when the cooktop is soiled from cooking and he...

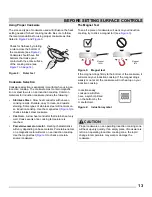
Страница 13: ...depending on base material Porcelain enamel on a magnetic metal will work on an induction cooktop Use the magnet test Figure 3 to check porcelain enamel cookware The Magnet Test To see if a piece of cookware will work on your induction cooktop try to stick a magnet to it see Figure 3 If the magnet clings firmly to the bottom of the cookware it will work on your induction cooktop If the magnet clin...

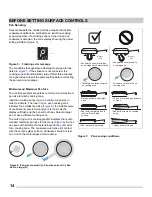
Страница 14: ...able piece of cookware is centered properly but is too small the display will flash and the pan will not heat Select a larger pan or use a different cooking zone The outer ring on the cooktop graphic indicates the recom mended maximum pan size for that zone Figure 6 Do not use pans with bottoms that extend beyond the outer circle for a cooking zone The cookware must make full contact with the cera...

Страница 15: ...can become hot from contact with hot cookware Burns may occur if a cooking zone or the surrounding area is touched before it has cooled to a safe temperature Do not place flammable items such as plastic salt and pepper shakers spoon holders or plastic wrapping on top of the range when it is in use Heat radiating from cookware could cause these items to melt or ignite Potholders towels or wooden sp...

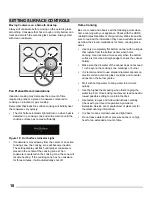
Страница 16: ...ivating a cooking zone ESEC Error Indicator Message E An error message will be displayed flashing E Figure 12 at power up or after a power failure if any of the surface settings were left in the ON positions If a power failure should occur set all of the four surface controls to the OFF position This will reset the surface controls Be sure to reset the clock Once the surface controls have been set...

Страница 17: ...he cooking zone will automatically change to the High H setting The size and type of utensil used and the amount and type of food being cooked will influence the setting needed for best cooking results The Hot Surface indicator light will turn on when heat is detected in a cook zone The light will remain on until the heated surface area has cooled sufficiently Figure 17 Induction cooking zone cont...

Страница 18: ...ing points when home canning with your appliance Check with the USDA United States Department of Agriculture Web site and be sure to read all the information they have available as well as follow their recommendations for home canning proce dures Use only a completely flat bottom canner with no ridges that radiate from the bottom center when home canning Heat is spread more evenly when the bottom ...

Страница 19: ...before using Figure 19 Oven vent Protective Liners Do not use aluminum foil or any other material or liners to line the oven bottom walls racks or any other part of the range Doing so will alter the heat distribution produce poor baking results and possibly cause permanent damage to the oven interior Improper installation of these liners may result in risk of electric shock or fire During self cle...

Страница 20: ... time and setting or adjusting the clock and minute timer 10 Timer on off Use to set or cancel the minute timer The minute timer does not start or stop any cooking function Timer on off is used to set the continuous bake function 11 Bake Time Enters the length of baking time desired 12 OFF Use to clear any feature except the time of day and minute timer 13 Start Time Use to delay the start of cook...

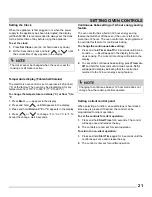
Страница 21: ... oven is left on for more than 12 hours The oven control can be programmed to override this feature for continuous baking To change the continuous bake setting 1 Press and hold Timer on off for 6 seconds until a tone sounds hr will appear in the display for contin uous cooking The current time of day will return to the display 2 To cancel the continuous bake setting press Timer on off and hold for...

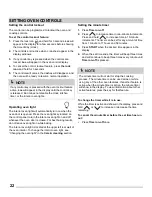
Страница 22: ...t see Changing the oven light in the Care cleaning section Setting the minute timer 1 Press Timer on off 2 Press to increase time in one minute increments Press and hold to increase time in 10 minute increments The timer can be set for any amount of time from 1 minute to 11 hours and 59 minutes 3 Press START when the desired time appears in the display 4 When the set time ends the timer will beep ...

Страница 23: ... oven racks place racks in positions 3 and 5 See Figure 22 position cookware as shown in Figure 21 When baking cakes using two oven racks allow at least 2 inches 5 cm of space between cookware for proper air circulation To set Bake 1 Press Bake appears in the display 2 Within 5 seconds press or The display will show 350 F 177 C The temperature can then be adjusted in 5 F 1 C increments 3 When a ke...

Страница 24: ...d start time and to shut off automatically 1 Be sure that the clock displays the correct time of day 2 Place food in the oven 3 Press Bake appears in the display Within 5 seconds press or The display will show 350 F 177 C The temperature can then be adjusted in 5 F 1 C increments 4 Press Bake Time 0 00 will appear in the display 5 Press or until desired baking time appears 6 Press Start Time The t...

Страница 25: ...oiler pan and insert 6 Place the broiler pan and insert on the oven rack Broil with the oven door open to broil stop position Figure 24 7 Broil on one side until food is browned Turn and broil food on other side 8 When broiling is finished press OFF Should an oven fire occur close the oven door and turn the oven off If the fire continues use a fire extinguisher Do not put water or flour on the fir...

Страница 26: ... 8 00 6 00 170 F 77ºC Well Fish 5 HI 550 F 13 00 170 F 77ºC Well Shrimp 4 HI 550 F 5 00 170 F 77ºC Well Hamburger 1 thick 6 HI 550 F 6 00 5 00 135 F 57 C Rare Hamburger 1 thick 6 HI 550 F 9 00 7 00 145ºF 63ºC Medium Hamburger 1 thick 5 HI 550 F 10 00 8 00 170 F 77ºC Well The U S Department of Agriculture states Rare fresh beef is popular but you should know that cooking it to only 140 F 60 C means...

Страница 27: ...n cavity and bottom Do not clean oven door gasket Figure 26 Avoid leaning or resting on the oven door glass while cleaning cavity Notes Opening the oven door during the steam clean cycle prevents the water from reaching the temperature needed to clean For best results clean oven immediately after the cycle is complete Steam clean works best for soils on the oven bottom A non abrasive scouring pad ...

Страница 28: ...set for Celsius adjustments made will be in 1 C increments with each press of arrow keys To adjust oven temperature 1 Press Bake 2 Set the temperature to 550 F 287 C by pressing and holding 3 Within 3 seconds press and hold Bake until numeric digit s appear Release Bake key The display now indicates the amount of degrees offset between the original factory temperature setting and the current tempe...

Страница 29: ...f water on the control panel excess water on the control area may cause damage to the appliance Do not use other liquid cleaners abrasive cleaners scouring pads or paper towels they will damage the finish Stainless Steel Using a soft cloth clean with mild dish detergent and water or a 50 50 solution of vinegar and water Rinse with clean water dry with a soft clean cloth Do not use cleaners contain...

Страница 30: ...essential for a good seal Do not rub damage or remove this gasket Manual clean oven interior The oven interior is porcelain coated and safe to clean using oven cleaners Always follow manufacturer s instructions for cleaners After cleaning remove any oven cleaner or the porcelain may become damaged during future heating Do not spray oven cleaner on any electrical controls or switches Do not spray o...

Страница 31: ...light to moderate soil Apply a few drops of cooktop cleaning cream directly to the cooktop Use a clean paper towel to clean the entire cooktop surface Make sure the cooktop is cleaned thoroughly leaving no residue Do not use the towel you use to clean the cooktop for any other purpose For heavy burned on soil Apply a few drops of cooktop cleaning cream directly to the soiled area Rub the soiled ar...

Страница 32: ...ving the wire to the side of the glass shield The tension from the wire holds the glass shield in place 3 Pull the shield straight out Do not twist or turn 4 Replace the bulb with a new appliance bulb 5 Replace the glass oven light shield Replace wire holder 6 Turn the power back on again at the main source or plug the appliance back in 7 Be sure to reset the time of day on the clock Never cover a...

Страница 33: ...roller pins located on each side of the oven door frame See Figure 34 and Figure 35 The hook of the hinge arms must be fully seated onto the roller pins 3 Fully open the oven door horizontal with floor See Figure 32 4 Push the door hinge locks up towards and into the oven frame on both left and right oven door hinges to the locked position See Figure 33 5 Close the oven door The door is heavy For ...

Страница 34: ...er than recom mended Cakes not done in center Oven too hot Incorrect pan size Pan not centered in oven Glass cookware slow heat conductor Set oven temperature 25 F 13 C lower than recom mended Use pan size suggested in recipe Use proper rack position and place pan so there are at least 2 5 1 cm of space on all sides of pan Reduce temperature and increase cook time or use shiny bakeware Cakes not l...

Страница 35: ...ing Incorrect setting Follow the Setting Broil instructions on page 25 Meat too close to the broil element or burner Reposition the broil pan to provide proper clearance between the meat and broil element or burner Remove excess fat from meat Cut remaining fatty edges to prevent curling but do not cut into lean Grease build up on oven surfaces Regular cleaning is necessary when broiling frequently...

Страница 36: ...e in the cooking zone is too hot or not hot enough Incorrect surface control setting Adjust power level setting Cooking zone does not heat cookware Be sure the correct surface control is turned on for the element needed Incorrect cookware used See Cooking Recommendations on page 9 Cookware is the wrong size or incorrectly positioned in the cooking zone See Pan Sensing on page 14 Cooking zone does ...

Страница 37: ...nte nance on page 31 Brown streaks or specks on cooktop surface Boil overs are cooked onto the surface When cooktop is cool use a razor blade scraper to remove soil For more information see Cooktop Maintenance on page 31 Appliance is not level Be sure the floor is level strong and stable enough to adequately support the range If the floor is sagging or sloping contact a carpenter to correct the si...

Страница 38: ......

Страница 39: ......

Страница 40: ...ersons other than authorized service companies or external causes such as abuse misuse inadequate power supply accidents fires or acts of God CUSTOMER S SOLE AND EXCLUSIVE REMEDY UNDER THIS LIMITED WARRANTY SHALL BE PRODUCT REPAIR OR REPLACEMENT AS PROVIDED HEREIN CLAIMS BASED ON IMPLIED WARRANTIES INCLUDING WARRANTIES OF MERCHANTABILITY OR FITNESS FOR A PARTICULAR PURPOSE ARE LIMITED TO ONE YEAR ...

Отзывы: