background image

PREPARATION

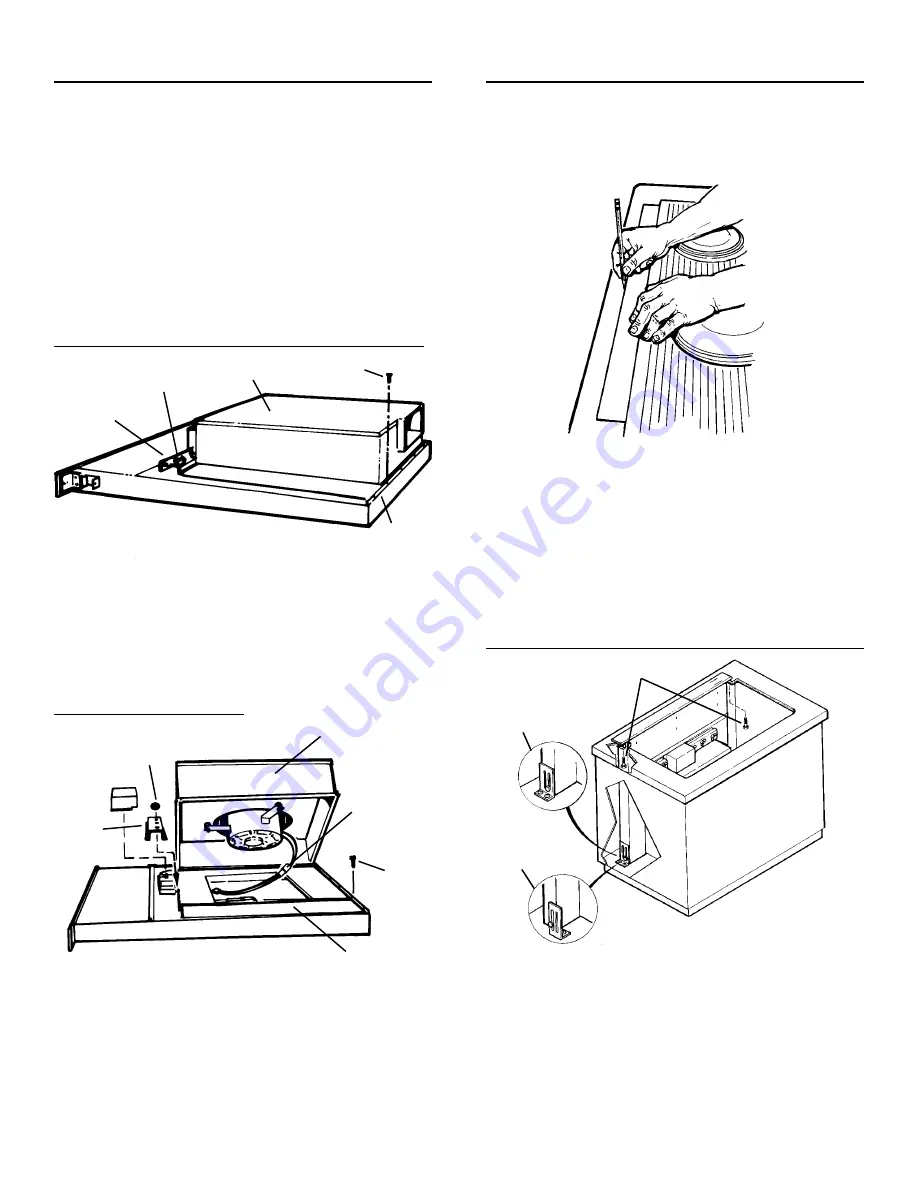
CHANGING BLOWER DISCHARGE (Optional)

The blower is shipped with its discharge facing DOWN. Follow
these steps ONLY if:

the position of the blower discharge needs to be moved so
ductwork does not interfere with floor joists, plumbing or
wiring below.

it is necessary to rotate the blower discharge to the RIGHT
or LEFT.

CUT COUNTERTOP OPENING

1. Lay out and cut the cooktop cut-out far enough FORWARD

so downdraft will fit behind it.

2. Set cooktop in place and slide it as far forward as possible.

Center and square it with edges of countertop.

3. Place the plastic template against the back flange of the

cooktop and center it. Trace around template to mark the
downdraft opening.

4. Remove cooktop from countertop.

5. Cut downdraft opening. Be careful not to chip edges of

countertop.

MOUNT THE UNIT

Place the unit on its back on a table or work surface.

DOWN DISCHARGE - MOVING BLOWER LEFT OR RIGHT

1. Set downdraft into opening. Extend leveling brackets to floor

of cabinet so downdraft sits straight. (Note: Leveling brackets
can be removed and re-attached in other positions. Bottom
flange may have to face inward in tight cabinet installations.)

2. Secure the downdraft to the countertop as follows: Hold the

downdraft against the back of countertop cut-out and tighten-
ing the 2 mounting screws (one on each end of unit) on
underside of countertop. Use a wood shim between screw
and underside of granite countertops.

3. Screw leveling brackets to bottom of cabinet. Tighten screws

holding leveling bracket to unit on each side.

LEVELING BRACKET -
FLANGE FACING IN

LEVELING BRACKET -
FLANGE FACING OUT

MOUNTING SCREWS

1.

Remove the 4 nuts and 2 clamp channels.

2. Carefully lift blower and disconnect motor plug if necessary.

Reposition blower and RECONNECT MOTOR PLUG.

3. Use supplied cover plate to close open space (if any).

4. Replace clamp channels and use nuts to secure the blower

in its new position.

5. Use sheet metal screws through bottom flange to secure

bottom of blower.

COVER PLATE

CLAMP
CHANNEL

NUT

BLOWER

MOTOR
PLUG

SHEET
METAL
SCREW

LEFT OR RIGHT DISCHARGE

CLAMP

CHANNEL

NUTS

SHEET
METAL
SCREW

BOTTOM
FLANGE

BLOWER

1.

Loosen the 4 nuts and 2 clamp channels.

2. Slide blower to desired position.

3. Use supplied cover plate to close open space (if any).

4. Tighten nuts to secure top of blower and use sheet metal

screws through bottom flange to secure bottom of blower.

3

Содержание HV2730B

Страница 1: ... to prevent backdrafting manufacturer s guideline and safety standards such as those published by the National Fire Protection Association NFPA and the American Society for Heating Refrigeration and Air Conditioning Engineers ASHRAE and the local code authorities 5 When cutting or drilling into wall or ceiling do not damage electrical wiring and other hidden utilities 6 Do not use this unit with a...

Страница 2: ...T OF STRAIGHT DUCT EQUALS 2 FT OF STRAIGHT DUCT TAKE MEASUREMENTS 1 Refer to the cooktop installation instructions for dimensions of cooktop countertop cut out and cabinet requirements The Model 2730 will fit in most 30 wide cabinets and the Model 2736 will fit in most 36 wide cabinets However it is recommended that oversized cabinets be used for easier installation 2 Cooktop depth can vary greatl...

Страница 3: ...m flange may have to face inward in tight cabinet installations 2 Secure the downdraft to the countertop as follows Hold the downdraft against the back of countertop cut out and tighten ing the 2 mounting screws one on each end of unit on underside of countertop Use a wood shim between screw and underside of granite countertops 3 Screw leveling brackets to bottom of cabinet Tighten screws holding ...

Страница 4: ...power cord into the outlet WIRING DIAGRAM INSTALL COOKTOP 1 Align the cooktop with the downdraft and fasten cooktop in place Note Accurate alignment of cooktop and downdraft is necessary to ensure that there is no interference when air vent is raised and lowered There should be a gap of 1 32 1 16 between the back of the cooktop and the front of the downdraft cover ADJUSTMENT The downdraft is facto...

Страница 5: ...NOB WARNING Always disconnect electric power supply before cleaning unit Use a mild detergent suitable for painted surfaces DO NOT USE ABRASIVE CLOTH STEEL WOOL PADS OR SCOURING POWDERS Vacuum blower to clean Do not immerse blower in water Wash the 2 aluminum grease filters in a mild detergent solution or a dishwasher Remove them from the air vent by grasping the tab at the top of each filter Note...

Страница 6: ...of incidental or consequential damages so this limitation or exclusion may not apply to you 2 Service calls which do not involve malfunction or defects in workmanship or material or for appliances not in ordinary household use The consumer shall pay for such service calls 3 Damages caused by services performed by persons other than authorized Frigidaire servicers use of parts other than Frigidaire...

Отзывы: