
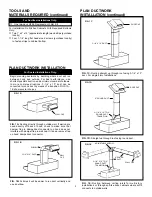


FIG. 4
3"
3"
WIDTH OF RANGE
HOOD
CUT STRIPS TO FIT
DUCT
OPENINGS*
CENTER
LINE
ELECTRICAL
WIRING
OPENING
* FOR DUCTED INSTALLATIONS ONLY.
PREPARE THE
INSTALLATION LOCATION
NOTE
IF DISTANCE BETWEEN WALL AND FRONT OF CABINET
FACE FRAME IS MORE THAN 12”, THERE WILL BE A
GAP BETWEEN BACK OF HOOD AND WALL. THIS IS
NORMAL. TOP FRONT EDGE OF HOOD SHOULD BE
FLUSH WITH FRONT OF CABINET FACE FRAME. OMIT
STEP 1 IF HOOD WILL BE INSTALLED UNDER CABINETS
WITH FLUSH BOTTOM.
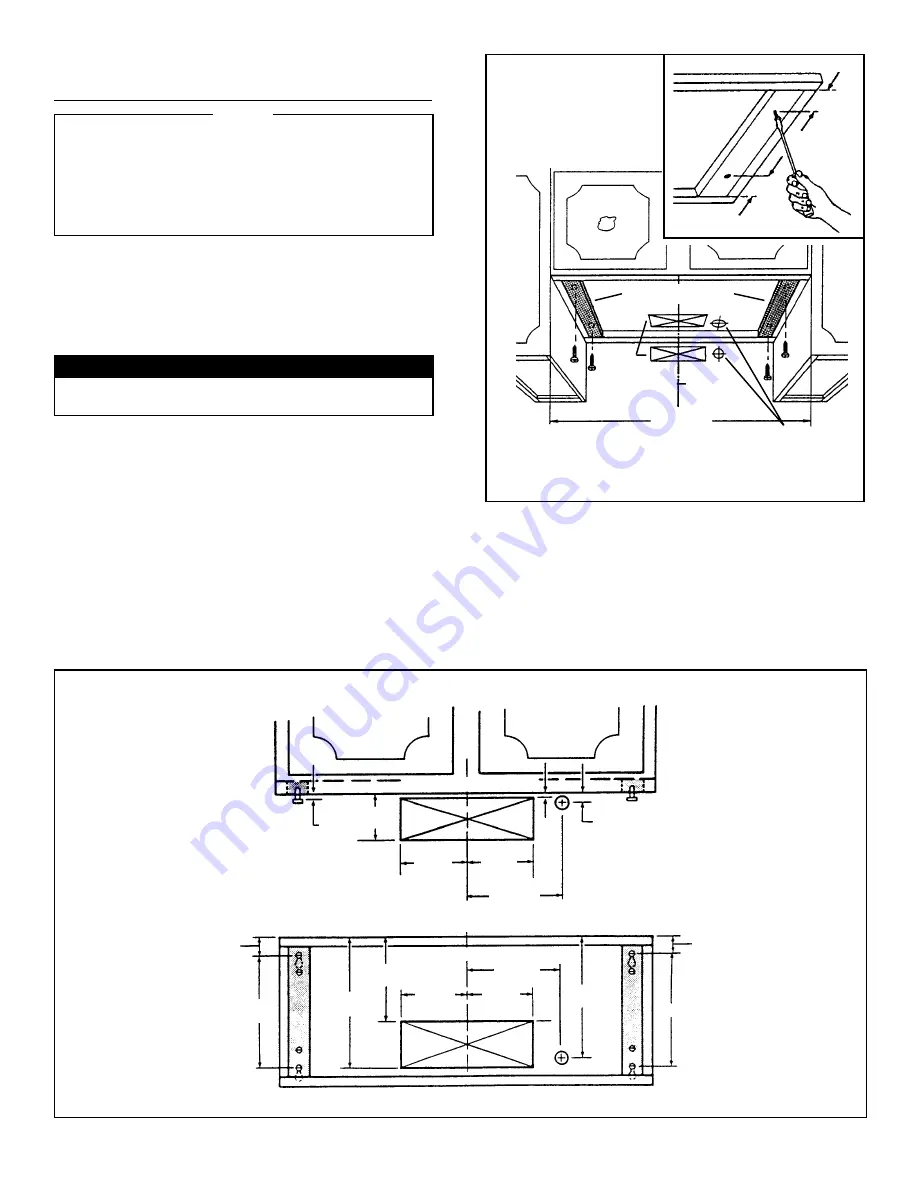
1. For Cabinets With Recessed Bottoms ONLY: (FIG. 4)
Install wood filler strips on each side of recessed area under
cabinet. Use two 1” x 2” strips cut to length (use thicker
strips if necessary). Fasten strips with wood screws about
3” in from each end.
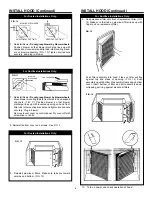
2. Measure and mark the following: (FIG. 5)
a.)
electrical wiring opening
For Ducted Installations Only:
b.)
duct opening
3. Cut duct opening in wall or cabinet bottom.
4. Drill 1-1/4” electrical wiring opening in wall cabinet bottom.
5. Hold hood up against cabinet bottom and trace keyhole
slots onto cabinet bottom or filler strips. For larger hoods:
Two ¼" dia. holes are provided for secure mounting. They
are located in top of hood approx. 8” each side of center.
Add filler strips for these as necessary. Avoid blocking hood’s
vertical electrical knockout.
6. Screw four 7/8” wood screws from parts bag into exact
center of narrow end of keyhole slots marked on cabinet
bottom. Allow 3/8” of screws to project, so hood can be
fitted into place later.
7. Run electric wiring through hole drilled in wall or cabinet.
Provide 6” leads and install proper connector for type of
wire used.
4
3/8"
3–7/8"
FRONT OF CABINET
6–1/4"
6–1/4"
7–1/2"
3/4"
FIG. 5
BACK WALL
1–1/2"
1–1/2"
9–7/8"
7–1/2"
CABINET BOTTOM
6–1/4"
6–1/4"
6-7/8"
10-5/8"
HORIZONTAL DUCT OPENING
VERTICAL DUCT OPENING
9"
9"
1/8"