background image

21

To set Broil

1. Arrange the oven rack while oven is still cool.

2. Press 

. " 

— — 

"will appear in display.

3. Press and hold the

or

 until the desired broil

setting level appears in the display. Press the

for 

HI

broil or the

for 

LO

 broil. Most foods may be broiled

at the 

HI

 broil setting. Select the 

LO

 broil setting to

avoid excess browning or drying of foods that should be

cooked to the well-done stage.

4.

For optimum results, preheat oven for 5 minutes

before adding food.

5. Place the insert on broil pan (if equipped), then place

food on broil pan insert (if equipped - See Fig. 2).

6. Place broiler pan and insert on oven rack.

7.

Keep the oven door open

 to the broil stop position

when broiling (See Fig. 3).

8. Broil food on one side until desired browness is

obtained. Turn food and broil on other side.

9. When finished broiling remove food and press 

.

SETTING OVEN CONTROLS

Use the broil feature to cook meats that require direct

exposure to radiant heat for optimum browing results.

When broiling always remember to arrange the oven

racks while oven is still cool. Position the rack as

suggested in the 

broil settings table 

(See Figs. 1 & 4).

Setting broil

Suggested broil settings table

Food

Rack position

Setting

Cook time in minutes

1st side

2nd side

Doneness

Steak 1” thick

5th or 7th*

Hi

6

4

Medium

Steak 1” thick

6th or 7th*

Hi

7

5

Medium-well

Steak 1” thick

6th or 7th*

Hi

8

7

Well

Pork chops 3/4” thick

6th

Hi

8

6

Well

Chicken-bone in

5th

Lo

20

10

Well

Chicken-boneless

6th

Lo

8

6

Well

Fish

6th

Hi

13

n/a

Well

Shrimp

5th

Hi

5

n/a

Well

Hamburger 1” thick

7th*

Hi

9

7

Medium

Hamburger 1” thick

6th

Hi

10

8

Well

Insert

Broil pan

Fig. 1

Fig. 4

Fig. 2

NOTE

Always pull the oven rack out to the stop position before

turning or removing the food.

*Use the off-set rack if you choose to use oven rack position 7.

CAUTION

The broiler pan and the insert (some models) allows

grease to drain and be kept away from the high heat of

the broiler. 

DO NOT

 use the pan without the insert. 

DO

NOT 

cover the insert with foil; the exposed grease could

ignite. 

DO NOT

 use the broil pan without the insert or

cover the insert with 

aluminum foil

. The exposed fat

could ignite. To insure the best results when broiling

ONLY use Electrolux Home Products, Inc. approved broil

pan & insert.

WARNING

Should an oven fire occur, close the oven door and turn

the oven OFF. If the fire continues, use a fire

extinguisher. 

DO NOT

 put water or flour on the fire. Flour

may be explosive.

Fig. 3

7
6
5
4

3

2

1

Содержание FGEF3030PF

Страница 1: ...3 Rev E Jan 2012 Important Safety Instructions 3 5 Features at a Glance 6 Before Setting Oven Controls 7 8 Before Setting Surface Controls 9 10 Setting Surface Controls Ceramic cook top 11 14 Oven Control Functions 330 330i 15 Setting Oven Controls 16 22 Self Cleaning 23 24 Care Cleaning 25 28 Before You Call 29 31 Major Appliance Warranty back cover ...

Страница 2: ...s bake or 12 Hour Energy Saving features 16 Changing oven temperature display F or C 16 Setting silent control feature 16 Setting oven lockout feature 17 Setting minute timer 17 Setting bake 18 Setting timed bake and delayed timed bake 18 19 Setting Quick Bake some models 20 Setting broil 21 Adjusting oven temperature 22 Operating oven light 22 Self Cleaning 23 24 Care Cleaning 25 28 Cleaning reco...

Страница 3: ... in serious injuries and also cause damage to the appliance DO NOT allow children to climb or play around the range The weight of a child on an open oven door may cause the range to tip resulting in serious burns or other injury WARNING indicates a potentially hazardous situation which if not avoided may result in death or serious injury WARNING IMPORTANT CAUTION indicates a potentially hazardous ...

Страница 4: ... items on or near the oven vent These items could melt or ignite Placement of interior oven racks Always place oven racks in desired location while oven is cool If rack must be moved while oven is hot use extreme caution Use potholders and grasp the rack with both hands to reposition Do not let potholders contact the hot heating elements in the oven Remove all utensils from the rack before moving ...

Страница 5: ...keep all parts free of grease that could catch fire Pay particular attention to the area around each surface element Do not allow grease to accumulate Kitchen cleaners and aerosols Always follow the manufacturer s recommended directions for use Be aware that excess residue from cleaners and aerosols may ignite causing damage and injury Cleanventilatinghoodsfrequently Greaseshould not be allowed to...

Страница 6: ...m fan some models 16 Adjustable interior oven rack s Effortless Oven Rack system not shown some models 17 Large 1 piece oven door handle 18 Full width oven door with window 19 Storage drawer with large 1 piece door handle some models or lower cover panel some models 20 Easy to clean upswept cooktop 21 Ceramic smoothtop elements styles and color will vary by model 22 6 single radiant element some m...
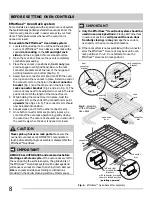
Страница 7: ...k some models may be used for most cooking needs The Effortless Oven Rack some models is described later in this section The offset oven rack some models is designed to place the base of the rack about 1 2 of a rack position lower than normal This rack design provides several additional possible positions between the standard postions To maximize oven cooking space place the bottom oven rack some ...

Страница 8: ...the connector arm in place twist the connector arm so the ends of the connector arm point upwards See Figs 4 5 The connector arm should now be locked into position 6 Repeat steps 4 and 5 for the other connector arm 7 Once both connector arms are properly in place be sure to test the oven rack operation by gently closing the oven door The oven rack should move in and out of the oven freely when the...

Страница 9: ... the pans and cookware in the oven for even heat to reach around the cookware See Fig 1 Fig 1 Element ON hot surface indicator lights Your appliance is equipped with two different types of radiant surface control indicator lights that will glow on the backguard the Element On indicator light and the Hot Surface indicator lights See Fig 2 The Element ON indicator lights are located on the control p...

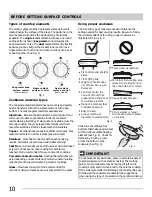
Страница 10: ...ktops Porcelain enamel on metal Heating characteristics will vary depending on base material Porcelain enamel coating must be smooth to avoid scratching ceramic cooktops Glass Slow heat conductor Not recommended for ceramic cooktop surfaces because it may scratch the glass Using proper cookware The size and type of cookware used will influence the setting needed for best cooking results Be sure to...

Страница 11: ...o a boil pan broiling Medium high 7 8 Continuearapidboil fry deepfatfry Medium 5 6 Maintain a slow boil thicken sauces and gravies or steam vegetables Medium Low 2 4 Keep foods cooking poach stew Low LO 1 Keep warm melt simmer CAUTION SETTING SURFACE CONTROLS Fig 1 IMPORTANT Donotallowaluminumfoil orANYmaterialthatcan melttomakecontactwiththeceramicglasscooktop If these items melt on the cooktop t...

Страница 12: ...d A glowing red surface heating area extending beyond the bottom edge of the cookware indicates the cookware is too small for the surface heating area NOTES IMPORTANT Donotallowaluminumfoil orANYmaterialthatcan melttomakecontactwiththeceramicglasscooktop If these items melt on the cooktop they will damage the ceramic cooktop The size and type of utensil used and the amount and type of food being c...

Страница 13: ...edium Soups cream MED Medium Stews MED Medium Vegetables MED Medium Fried Foods HI High Hot Beverages HI High Soups liquid HI High Fig 2 med Fig 1 with approximate setting for medium shown IMPORTANT Donotallowaluminumfoil orANYmaterialthatcan melttomakecontactwiththeceramicglasscooktop If these items melt on the cooktop they will damage the ceramic cooktop Setting the keep warm control 1 Push in e...

Страница 14: ...c glass cooktops Start with hot tap water to bring water to boil more quickly Use the highest heat seating when first bringing the water to a boil Once boiling is achieved reduce heat to lowest possible setting to maintain that boil IMPORTANT NEVER place or straddle a cooking utensil over 2 different surface cooking areas at the same time This may cause the ceramic cooktop to fracture IMPORTANT Do...

Страница 15: ...mer The minute timer does not start or stop cooking Also Timer On Off pad is used to set the continuous bake function Oven light pad Use to turn the interior oven light ON or OFF Quick Bake pad activates the Quick Bake feature Up and down arrow pads Use with the feature or function pads to set oven temperature bake time start time clean time when programming an automatic start time setting or adju...

Страница 16: ...eep once This will block the controls from sounding when a pad is pressed To return the sound press and hold again for 7 seconds until the control beeps once Changing between continuous bake setting or 12 Hour Energy Saving feature The oven control has a built in 12 Hour Energy Saving feature that will shut off the oven if the control is left on for more than 11 hours and 59 minutes The oven can b...

Страница 17: ...dels with Quick Bake 1 Press and hold for 3 seconds Loc will appear in display the Door Locked indicator light will flash and the motor driven door lock will begin to close automatically Allow about 15 seconds for the oven door to lock Once the oven door is locked the current time of day will appear in the display 2 To cancel the ovenlockout feature press and hold for 3 seconds The control will un...

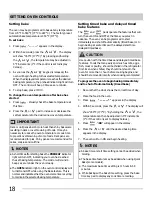
Страница 18: ... correct time of day 2 Place the food in the oven 3 Press appears in the display 4 Within 5 seconds press the or The display will show 350 F 177 C By holding the or the temperature can then be adjusted in 5 F increments 1 C if the control is set to display Celsius 5 Press 00 will appear in the display 6 Press the or until the desired baking time appears in the display 7 The oven will turn ON and b...

Страница 19: ... appear in the display 8 Press the or until the desired start time appears in the display 9 Once the controls are set the control calculates the time when baking will stop in order to start at the time you have set 10 The oven will turn ON at the delayed start time and begin heating Use caution with the timed bake and delayed timed bake features Foods that can easily spoil such as milk eggs fish m...

Страница 20: ...ing Preheating is not necessary when roasting foods using QuickBake Since Quick Bake cooks food faster reduce the cook time by 25 from the recommended cook time of your recipe Check the food at this time If necessary increase cook time until the desired doneness is obtained Do not cover foods when dry roasting this will prevent the air from circulating around the food Fig 1 6 1 2 3 4 5 7 Setting Q...

Страница 21: ... 4 Setting broil Suggested broil settings table Food Rack position Setting Cook time in minutes 1st side 2nd side Doneness Steak 1 thick 5th or 7th Hi 6 4 Medium Steak 1 thick 6th or 7th Hi 7 5 Medium well Steak 1 thick 6th or 7th Hi 8 7 Well Pork chops 3 4 thick 6th Hi 8 6 Well Chicken bone in 5th Lo 20 10 Well Chicken boneless 6th Lo 8 6 Well Fish 6th Hi 13 n a Well Shrimp 5th Hi 5 n a Well Hamb...

Страница 22: ...til the 2 digit display appears Release keypad The display now indicates the amount of degrees offset between the original factory temperature setting and the current temperature setting If the oven control has the original factory calibration the display will read 0 4 The temperature can now be adjusted up or down 35 F 19 C in 5 F increments by pressing and holding the or keypad Adjust until the ...

Страница 23: ...en frame the door liner outside the oven door gasket and the small area at the front center of the oven bottom These areas See Fig 1 heat sufficiently to burn soil on Clean using soap and water before starting self clean Remove any excessive spillovers Any spills on the oven bottom should be wiped up and removed before starting self clean To clean use hot soapy water and a cloth Large spillovers c...

Страница 24: ...elf clean cycle has completed 1 The time of day will appear in the display window and the Clean and LOCK light will continue to glow 2 Once the oven has cooled down for about 1 HOUR and the LOCK light has turned off the oven door can be opened 6 CLn will appear in the display during the self clean cycle and the LOCK light will glow until the self cleaning cycle is complete or cancelled and the ove...

Страница 25: ...s containing any abrasive chlorides chlorines or ammonia It is recommended to use mild dish soap and water or a 50 50 solution of water and vinegar Porcelainenamelparts Remove excessive spillovers from oven cavity bottom before starting self clean Clean any soils from oven frame and door liner outside the oven door gasket For very important prepartion information be sure to read all the instructio...

Страница 26: ...non abrasive cloth or no scratch cleaning pad This will make cleaning easier when soiled from cooking The special cooktop cleaning cream leaves a protective finish on the glass to help prevent scratches and abrasions Sliding aluminum or copper clad bottom pans on the cooktop can cause metal markings on the cooktop surface These marks should be removed immediately after the cooktop has cooled using...

Страница 27: ...ppliance bulb 4 Replace glass shield over bulb and snap wire holder into place 5 Turn power back on again at the main source or plug the range back in 6 The clock will then need to be reset To reset see Setting the Clock and Minute Timer in this Use Care Manual DO NOT use the following on the cooktop wire holder glass shield The interior oven light is located at the rear of the oven interior back ...

Страница 28: ...es of oven door along the door sides Do not use the oven door handle 2 Holding the oven door at the same angle as the removal position See Fig 3 carefully line up and insert both door hinge arms between the pins located on each side of the oven door frame See Fig 4 3 With both door hinge arms in place open the oven door horizontal with floor See Fig 1 4 Push the door hinge locks up towards and int...

Страница 29: ...rtion of appliance does not operate Allow oven to preheat to the set temperature before placing food in oven Make sure the proper oven rack position is used Center food in the oven and space pans to allow air to circulate Try adjusting the recipe s recommended temperature or baking time If you feel the oven is too hot or cool see Adjusting oven temperature in Setting Oven Controls section Be sure ...

Страница 30: ...nts of grease left on the oven bottom Wipe up excessive spillovers before starting oven If flames or excessive smoke are present see Broiling in the Setting Oven Controls section for additional recommendations Self cleaning cycle does not work Oven control not set properly for self clean Follow the instructions provided in the Self Cleaning section of this manual Self clean cycle was interrupted R...

Страница 31: ... such as salt or sand between cooktop and utensils can cause scratches Be sure cooktop surface and bottoms of utensils are clean before usage Small scratches do not affect cooking and will become less visible with time Cleaning materials not recommended for ceramic glass cooktop have been used See CooktopCleaning and CooktopMaintenance in theCare and Cleaning section of this Use Care Guide Cookwar...

Страница 32: ...es performed by unauthorized service companies use of parts other than genuine Electrolux parts or parts obtained from persons other than authorized service companies or external causes such as abuse misuse inadequate power supply accidents fires or acts of God CUSTOMER S SOLE AND EXCLUSIVE REMEDY UNDER THIS LIMITED WARRANTY SHALL BE PRODUCT REPAIR OR REPLACEMENT AS PROVIDED HEREIN CLAIMS BASED ON...

Отзывы: