Frigidaire FEF316BSF Скачать руководство пользователя страница 32

32

Cooktop Cleaning and Maintenance

Prior to using your cooktop for the first time, apply some of the cooktop cleaning cream supplied with your new range.
Buff with a non-abrasive cloth or pad (such as a 3M Scotch-Brite® Blue Multi-Purpose No Scratch Scrub Sponge). This
will make cleaning easier when soiled from cooking. The special cooktop cleaning cream leaves a protective finish on
the glass to help prevent scratches and abrasions.

Consistent and proper cleaning is essential to maintaining your ceramic glass cooktop.

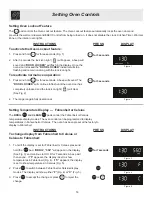
Sliding aluminum or copper clad bottom pans on the cooktop can
cause metal markings on the cooktop surface. These marks
should be removed immediately after the cooktop has cooled
using the cooktop cleaning cream. Metal marks can become
permanent if not removed prior to future use.

Cookware (cast iron, metal, ceramic or glass) with rough bottoms
can mark or scratch the cooktop surface. Do not slide anything
metal or glass
 across the cooktop. Do not use your cooktop as a
cutting board or work surface in the kitchen.  Do not cook foods
directly on the cooktop surface without a pan. Do not drop heavy
or hard objects on the glass cooktop, they may cause it to crack.

Cleaning Recommendations for the Ceramic Glass Cooktop

If soils remain, carefully scrape soils with a metal razor blade
scraper, holding scraper at a 30 degree angle to the surface. Remove
loosened soils with cooktop cleaner and buff surface clean.

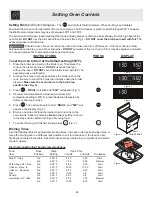
Plastic or foods with a high sugar content:

These types of soils need be removed immediately if spilled or
melted onto the ceramic cooktop surface. Permanent damage (such
as pitting of the cooktop surface) may occur if not removed
immediately.  After turning the surface elements OFF, use a razor
blade scraper or a metal spatula with a mitt and scrape the soil from
the hot surface (as illustrated). Allow the cooktop to cool, and use
the same method for heavy or burned on soils.

For light to moderate soil:

Apply a few drops of the cooktop cleaning cream (cleaner must be recommended for Ceramic cooktops) directly to
the cooktop. Use a paper towel or a 3M Scotch-Brite® Blue Multi-Purpose No Scratch Scrub Sponge to clean the entire
cooktop surface. Make sure the cooktop is cleaned thoroughly, leaving no residue.

For heavy,  burned on soil:

Apply a few drops of the cooktop cleaning cream (cleaner must be recommended for Ceramic cooktops) directly to
the soiled area. Rub the soiled area using a 3M Scotch-Brite® Blue Multi-Purpose No Scratch Scrub Sponge, applying
pressure as needed. Once the sponge has been used on the cooktop, do not use the sponge for any other purpose.

Care & Cleaning

 DO NOT use a cooktop cleaner on a hot cooktop. The fumes can be hazardous to your health, and can

chemically damage the ceramic-glass surface.

 Before cleaning the cooktop, be sure the controls are turned to OFF and the cooktop is COOL.

Содержание FEF316BSF

Страница 1: ......

Страница 2: ...You for choosing our product We hope you consider us for future purchases PLEASE CAREFULLY READ AND SAVE THESE INSTRUCTIONS This Use Care Manual provides specific operating instructions for your model Use your range only as instructed in this manual These instructions are not meant to cover every possible condition and situation that may occur Common sense and caution must be practiced when instal...

Страница 3: ... be seriously injured Never Use Your Appliance for Warming or Heating the Room Storage in or on Appliance Flammable materials should not be stored in an oven warmer drawer near surface units or in the storage drawer This includes paper plastic and cloth items such as cookbooks plasticware and towels as well as flammable liquids Do not store explosives such as aerosol cans on or near the range Do N...

Страница 4: ...rfaces in this area when the oven is operating may cause severe burns Also do not place plastic or heat sensitive items on or near the oven vent These items could melt or ignite Placement of Oven Racks Always place oven racks in desired location while oven is cool If rack must be moved while oven is hot use extreme caution Use potholders and grasp the rack with both hands to reposition Do not let ...

Страница 5: ...5 Features At A Glance Note The features of your range will vary according to model ...

Страница 6: ...Note The features of your range will vary according to model 6 Features At A Glance ...

Страница 7: ...ktop cleaning in the Care Cleaning section and Before You Call checklist sections of this Use and Care Manual NOTE Radiant elements have a limiter that allows the element to cycle on and off even at the HI setting This helps to prevent damage to the ceramic smooth top Cycling at the HI setting is normal and can occur if the cookware is too small for the radiant element or if the cookware bottom is...

Страница 8: ...or the dual radiant element These settings work the same way as normal knob setting indicators work except the settings are displayed in digital windows Figures 1 thru 4 The available ESEC Display Settings The ESEC control provides various heat levels from Hi Fig 2 to Lo Fig 4 and OFF Fig 1 The settings from Hi to 3 0 decrease in increments of 5 The settings from 3 0 to Lo Simmer settings decrease...

Страница 9: ...re 5 Right Rear Element Figure 6 Left Rear Element 1 Place correctly sized cookware on the radiant surface element 2 Push in and turn the surface control knob in either direction to the desired setting using the ESEC digital display window for the desired setting Fig 4 Turn do not push the knob to adjust the setting if desired Start most cooking operations on a higher setting and then turn to a lo...

Страница 10: ...at The symbol shown in Figure 4 indicates that both inner and outer coils will heat You may switch from either coil setting at any time during cooking Figure 2 The Bridge Surface Radiant Element The cooktop is equipped with a BRIDGE surface element located at the left front and middle See Fig 10 positions The Bridge can be used when cooking with rectangular like a griddle or oval shaped cookware F...

Страница 11: ...e HE message will appear in the display after turning the control knob to OFF if the cooktop is still hot and will remain on until the radiant heating surface area has cooled sufficiently The BRIDGE element may also be used in combination with the left rear single element Because these elements have 2 different controls one element can be used to cook while the other element may be used to keep fo...

Страница 12: ...o set the control push in and turn the knob The On indicator light will come on See Fig 1 and 2 The temperatures are approximate and are designated by HI MED and LO However the control can be set at any position between HI and LO for different levels of heating Fig 1 2 When done turn the control to OFF The Warming Zone Hot surface indicator light will remain on until the Warming Zone cools to a mo...

Страница 13: ... Use the 6th rack position Roasting Shelf for roasting large food items only Oven Vent Location The oven vent is located below the backguard When the oven is on hot air is released through the vents This venting is necessary for proper air circulation in the oven and good baking results Before Setting Oven Controls If using 1 rack place in center of oven If using multiple racks stagger cookware as...

Страница 14: ...rawer control 1 Turn the knob to select the desired temperature setting 2 For best results preheat the drawer before adding food An empty drawer will preheat in approximately 15 minutes 3 When done turn the control to OFF Warming Drawer Temperature Selection Recommended Warming Drawer food settings are shown in Figure 3 If a particular food is not listed start with the MED setting If more crispnes...

Страница 15: ...h Oven Light OVEN LOCKOUT Used to disable all oven features See page 18 OVEN LIGHT Used to turn the oven light on and off See page 34 BAKE TIME Used to enter the length of the baking time PREHEAT Used to bring the oven temperature up before placing food See page 20 CONVECTION ROAST Used to select the Convection Roast feature See page 25 Minimum and Maximum Control Pad Settings All of the features ...

Страница 16: ...between 12 or 24 hour time of day display 1 Press and hold for 6 seconds Fig 3 While holding the pad down the current time of day will remain and CLO will disappear from the display Fig 4 CONTINUE holding the pad until the a beep is heard 2 The display will show either 12 00 Fig 5 or 24 00 Fig 6 3 Press to switch between the 12 and 24 hour time of day display The display will show either 12 00 Fig...

Страница 17: ... reject the change INSTRUCTIONS PRESS DISPLAY Setting Kitchen Timer The KITCHEN TIMER pad controls the Kitchen Timer feature The Kitchen Timer serves as an extra timer in the kitchen that will beep when the set time has run out It does not start or stop cooking The Kitchen Timer feature can be used during any of the other oven control functions Refer to the Minimum and Maximum Control Pad Settings...

Страница 18: ...Fig 2 2 The range is again fully operational INSTRUCTIONS PRESS DISPLAY for 7seconds Setting Temperature Display Fahrenheit or Celsius The BROIL and CLEAN pads control the Fahrenheit or Celsius temperature display modes The oven control can be programmed to display temperatures in Fahrenheit or Celsius The oven has been preset at the factory to display in Fahrenheit or INSTRUCTIONS PRESS DISPLAY S...

Страница 19: ... from normal sound operation to silent control operation 1 To tell if your range is set for normal or silent operation press and hold for 7 seconds DELAY will appear and flash in the display Fig 1 If SP appears Fig 2 the control will operate with normal sounds and beeps If appears Fig 3 the control is in the silent operation mode 2 Press to switch between normal sound operation and silent operatio...

Страница 20: ...n is preheating example changing from 350 to 425 F If it is necessary to change the preheat temperature while the oven is preheating to the original temperature 1 While preheating press and BAKE will appear in the display Fig 5 2 Enter the new preheat temperature Press 425 and BAKE will appear in the display Fig 6 3 Press PRE and BAKE will appear in the display as the oven heats to 425 F Fig 7 A b...

Страница 21: ...play 4 Press BAKE and 350 will appear in the display See Fig 3 Note A beep will sound once the oven temperature reaches 350 F Pressing will cancel the Bake feature at any time To change the Bake Temperature example changing from 350 to 425 F 1 After the oven has already been set to bake at 350 F and the oven temperature needs to be changed to 425 F press Fig 4 and will show in the display 2 Press ...

Страница 22: ...in the display 5 Press BAKE and 350 will be displayed See Fig 3 6 Press TIMED will flash BAKE 0 00 and 350 will appear in the display Fig 4 7 Enter the desired baking time by pressing TIMED will flash and BAKE 50 and 350 will appear in the display Fig 5 Note Baking time can be set for any amount of time between 1 minute to 11 hours and 59 minutes 8 Press Both the TIMED and BAKE icons will remain o...

Страница 23: ... Press Enter the desired stop time using the number pads Fig 7 10 Press When Delayed Time Bake starts the set oven temperature will disappear TIMED DELAY BAKE and the current time of time of day will appear in the display Fig 8 Note Once Delayed Time Bake has started press to display the bake time remaining Once Delayed Time Bake has started baking a beep will sound when the oven temperature reach...

Страница 24: ...n to broil BROIL and 550 will appear in the display Fig 2 6 Broil on one side until food is browned turn and cook on the second side Season and serve Note Always pull the rack out to the stop position before turning or removing food 7 To cancel broiling or if finished broiling press Fig 3 Electric Range Broiling Table Recommendations Food Rack Temp Cook Time Item Position Setting 1stside 2ndside D...

Страница 25: ... Convection Roasting Instructions When using the Convection Roast pad use the broiler pan and insert along with the roasting rack The broiler pan will catch grease spills and the insert will help prevent grease spatters The roasting rack will allow the heat to circulate around the meat To prevent food from contacting the broil element and to prevent grease spattering DO NOT use the roasting rack w...

Страница 26: ...ses a fan to circulate the oven s heat evenly and continuously within the oven See Figure 1 This improved heat distribution allows for fast even cooking and browning results It also gives better baking results when using two 2 or three 3 racks at the same time Breads and pastries brown more evenly Most foods cooked in a standard oven will cook faster and more evenly with Convection Bake Figure 1 A...

Страница 27: ...oled then remove the racks and rub their sides with wax paper or a cloth containing a small amount of baby or salad oil this will make the racks glide easier back into their positions 4 Remove any excess spill overs in the oven cavity before starting the self cleaning cycle To clean use hot soapy water and a cloth Large spill overs can cause heavy smoke or fire when subjected to high temperatures ...

Страница 28: ... 00 will show in the display Fig 1 The control will automatically clean for a 3 hour period default self cleaning cycle time Note If a 2 or 4 hour clean time is desired press for 2 hour or press for a 4 hour clean time Set the cleaning time based on the amount of soil you have light medium or heavy See above 3 Press The DOOR LOCKED icon will flash CLEAN icon and the letters CLn will remain on in t...

Страница 29: ...ress for a 4 hour clean time Set the cleaning time based on the amount of soil you have light medium or heavy See page 28 3 Press The DOOR LOCKED icon will flash CLEAN icon and the letters CLn will remain on in the display Fig 2 4 Press Fig 3 Enter the desired stop time using the number pads Fig 4 5 Press The CLn icon will turn off DELAY DOOR LOCKED and CLEAN icons will remain on 6 As soon as the ...

Страница 30: ...perature change and the display will return to the time of day Fig 3 Press to reject the change if necessary To adjust the oven temperature lower 1 Press for 6 seconds Fig 4 2 To decrease the temperature use the number pads to enter the desired change Example 30 F and then press Fig 5 The temperature may be decreased as much as 35 F 3 Press to accept the temperature change and the display will ret...

Страница 31: ...ners from the surface as bluish stains may occur during heating that cannot be removed Gentle scouring with a soapy scouring pad will remove most spots Rinse with a 1 1 solution of clear water and ammonia If necessary cover difficult spots with an ammonia soaked paper towel for 30 to 40 minutes Rinse with clean water and a damp cloth and then scrub with a soap filled scouring pad Rinse and wipe dr...

Страница 32: ... scraper at a 30 degree angle to the surface Remove loosened soils with cooktop cleaner and buff surface clean Plastic or foods with a high sugar content These types of soils need be removed immediately if spilled or melted onto the ceramic cooktop surface Permanent damage such as pitting of the cooktop surface may occur if not removed immediately After turning the surface elements OFF use a razor...

Страница 33: ...til the door stops Do not force the door to close any further The placement of these screws should keep door open in about a 45 degree position 5 Grasp oven door firmly on both sides and slide door up and off hinges at the same angle See Fig 3 6 To clean oven door follow the instructions provided in the Cleaning Chart at the beginning of the Care Cleaning section See Door Liner To Replace Oven Doo...

Страница 34: ... on the right glide lever 5 Pull the drawer away from the range To Replace Warming Drawer 1 Replace shield on the right glide of the drawer body 2 Pull the bearing glides to the front of the chassis glide See Figure 2 3 Align the glide on each side of the drawer with the glide slots on the range 4 Push the drawer into the range until levers click approximately 2 Pull the drawer open again to seat ...

Страница 35: ... sure the oven controls are set correctly for the desired function See the Setting Oven Controls section or Entire Appliance Does Not Operate in this Before You Call checklist The clock must be set with the time of day in order to operate the oven Make sure electrical cord plug is plugged tightly into outlet Service wiring is not complete Contact a Servicer for assistance Electrical power outage C...

Страница 36: ...ood in the oven Try adjusting the recipe s recommended temperature or baking time If you feel the oven is cooking too hot or cool see Adjusting the Oven Temperature in this Use Care Manual Controls are not set properly Follow instructions in the Self Cleaning section The Self Clean feature will not operate whenever a radiant surface element is on Self cleaning cycle was interrupted Stop time must ...

Страница 37: ...cook times and adjust as needed Recommended reduction in cook times based on brands of food items tested Cook times may vary with your specific brand of food item Foods for CONVECTION ROAST pad Decrease normal cook time by Meats 15 30 Poultry unstuffed 20 30 Begin with the maximum reduction in cook times and adjust as needed Recommended reduction in cook times based on brands of food items tested ...

Страница 38: ...38 Notes ...

Страница 39: ...39 Notes ...

Страница 40: ...or limitation of incidental or consequential damages so this limitation or exclusion may not apply to you 2 Service calls which do not involve malfunction or defects in workmanship or material or for appliances not in ordinary household use The consumer shall pay for such service calls 3 Damages caused by services performed by servicers other than Electrolux Home Products North America or its auth...

Отзывы: