background image

9

Cleaning the Pump and Spray Arm

Outside

—Occasionally wash with a mild

nonabrasive detergent and water. Rinse and dry.

Inside

—The inside of the dishwasher is self-

cleaning with normal use.

If hard water causes lime deposit buildup, clean
using the following instructions:
1. After dishwasher begins to fill, open door and

pour 2 cups of white vinegar into dishwasher.
Do not add dishes or detergent.

2. Run through any full wash cycle.

If it is felt that further interior cleaning is needed,
general household spray cleansers are
recommended. Follow manufacturer's directions.

ImportantThe dishwasher motor is
permanently lubricated at the factory and does
not need to be oiled.

Care and Cleaning

Burn Hazard

Allow heating element to cool
before cleaning the interior.
Failure to do so can result in
burns.

Factors Affecting
Performance

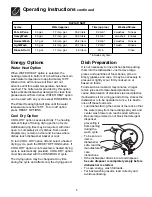
Water Pressure

Water pressure should be between 15 and 120
pounds per square inch. Low water pressure
occurs most often during periods of high water
consumption, such as when laundry or showers
are being done. To determine if you have enough
water pressure, put a 2 quart container under fully
opened hot water faucet nearest the dishwasher. It
should fill in less than 14 seconds. Be sure all
other faucets are turned off during test.

Water Temperature

Hot water is needed for best dishwashing and
drying results. Water entering dishwasher
should be at least 120°F (49°C) to give
satisfactory results.

To check water temperature entering
dishwasher:

• Turn on hot water faucet nearest dishwasher

for several minutes to clear cool water from
pipes.

• Hold a candy or meat thermometer in stream

of water to check the temperature.

• If temperature is below 120°F (49°C), have a

qualified person raise the hot water heater
thermostat setting.

Important: Before starting a cycle, run hot
water to clear cool water from pipe.

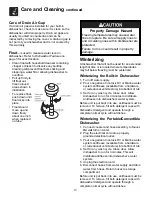
Pump Opening

Spray
Arm

1. Remove tower base by turning counterclock-

wise.

2. Remove locknut and spray arm.
3. Clean out spray arm holes.
4. Clean in and around pump openings.
5. Replace spray arm and securely tighten lock-

nut. Spray arm should rotate freely.

6. Replace tower base.

Tower

Your dishwasher will
flush away all normal
food soils. However,
objects (bones, fruit
pits, etc.) may collect
in openings and
should be removed
periodically
to avoid clogging
drain system.

Heating Element

(caution)

Содержание FDR251RJS0

Страница 1: ...ase escribir a la dirección que se incluye a continuación Solicite la P N 154384701 Spanish Use Care Manual Electrolux Home Products North America P O Box 212378 Augusta GA 30917 Consumer Services Warranty Service 15 Solutions to Common Dishwashing Problems 13 14 Changing Color Panels 12 Care and Cleaning 9 10 Factors Affecting Performance 9 Dishwasher Dispenser and Detergents 8 Preparing and Load...

Страница 2: ...ed dishwasher safe or the equivalent Check with manufacturer for recommendations if not marked Items that are not dishwasher safe may melt and create a potential fire hazard If the dishwasher drains into a food disposer make sure disposer is completely empty before running dishwasher Disconnect electrical power to dishwasher before servicing Repairs should be done by a qualified technician Do not ...

Страница 3: ... drain Next the dishwasher fills with water to a level even with the heating element This water is constantly pumped through the rotating spray arm and center wash tower and sprayed onto the dishes Soiled water is pumped out and replaced with clean water during a cycle The number of water fills depends upon the cycle being used Leveling Legs Heating Element page 9 Normal Water Fill Level Float pag...

Страница 4: ... For pots pans casseroles and dinnerware with dried on or baked on soils 1 Add detergent to both cups Close lid on covered cup 2 Press POTS PANS HEAVY WASH button 3 Select desired energy Options 4 Turn dial to POTS PANS 5 To start firmly close door Heavy Wash For heavily soiled dishes and silverware 1 Add detergent to both cups Close lid on covered cup 2 Press POTS PANS HEAVY WASH button 3 Select ...

Страница 5: ...ycle Chart Cycles Water approx Time approx Washes Rinses Pots Pans 2 washes 5 rinses 9 3 gal 35 2 liters 7 7 imp gal 90 min HeavyWash 84 min 2 washes 4 rinses 8 0 gal 30 3 liters 6 7 imp gal NormalWash 78 min 2 washes 3 rinses 6 7 gal 25 4 liters 5 6 imp gal Light Wash 72 min 1 wash 3 rinses 4 4 imp gal 5 3 gal 20 1 liters Rinse Hold 9 min 1 rinse 1 1 imp gal 4 9 liters 1 3 gal Dish Preparation It...

Страница 6: ...t the sides and not across the front so they do not block the detergent dispenser preventing it from opening Preparing and Loading Dishes Loading the Top Rack Glasses and cups Place glasses and cups against outside pins at an angle Cups with a concave bottom will collect water Small plates and saucers Place dishes between middle two rows of pins Plasticware Load plasticware in the top rack to avoi...

Страница 7: ...n door and add dish 4 Firmly close door to latch and resume cycle Preparing and Loading Dishes continued Loading the Silverware Basket Load sharp items with handles up Be sure items do not protrude through the holes in the basket and stop the rotation of the spray arm Load silverware so items are mixed in each section to prevent nesting Water spray cannot effectively reach nested items ...

Страница 8: ...anent etching on glassware Your local water company water softener company or county extension agent can tell you the water hardness in your area More detergent may be needed if the phosphorus content is 8 7 or less The phosphorus content is shown on the detergent label Adjustable setting Dispenser Opening Dispenser Cap Rinse Aid Rinse aid greatly improves drying and reduces water spots and filmin...

Страница 9: ...ou have enough water pressure put a 2 quart container under fully opened hot water faucet nearest the dishwasher It should fill in less than 14 seconds Be sure all other faucets are turned off during test Water Temperature Hot water is needed for best dishwashing and drying results Water entering dishwasher should be at least 120 F 49 C to give satisfactory results To check water temperature enter...

Страница 10: ...s located where temperatures may fall below freezing must be winterized Winterizing the Built in Dishwasher 1 Turn off water supply 2 Pour one gallon of nontoxic RV or Marine water system antifreeze available from a hardware or recreational vehicle store into bottom of tub 3 Set for any wash cycle Close door Allow dishwasher to run for 3 minutes to distribute antifreeze into dishwasher s water sys...

Страница 11: ... snaps into place release collar 5 Slowly turn on hot water all the way 6 Plug power cord into grounded outlet Disconnecting the Portable Convertible Dishwasher 1 When cycle has finished turn off hot water 2 Press red button on coupler to release water pressure 3 Press down on collar to release coupler 4 Empty remaining water from coupler and return it to compartment 5 Unplug power cord and return...

Страница 12: ...rim strip from one side of access panel Loosen but do not remove screws from trim strip on remaining side 3 Slide insert panels out of frame Position color panel of choice to outside and replace panel in frame 4 Be sure edges of insert panels are under trim strips on opposite side Press strips tightly against panels before securing screws Replace trim strips Installing Reversible Door and Access P...

Страница 13: ...ave water pressure checked by a plumber Use less detergent and make sure water temperature is not higher than 150 F 66 C Underload to assure thorough rinsing Use the COOL DRY Option Chipped dishes and glasses can result from rough handling and improper loading Do not put glasses in direct contact with other items Place glasses securely against pins Crazing of older china and pottery happens when i...

Страница 14: ...easpoons 10 ml cream of tartar per quart 1 L of water for 1 2 hour Scour with soap filled steel wool pad rinse and dry Knife handles become loose when the cement is exposed to very hot water Test wash a single knife for several weeks Damaged knives should be professionally re cemented Troubleshooting Noise problems It is normal to hear swishing and pulsating sounds These sounds mean that water is ...

Страница 15: ...ou specific legal rights You may also have other rights that vary from state to state Service under this warranty must be obtained by contacting Electrolux Home Products North America This warranty only applies in the 50 states of the U S A and Puerto Rico and Canada Product features or specifications as described or illustrated are subject to change without notice All warranties are made by Elect...

Страница 16: ...16 Notes ...
Отзывы: