background image

Important
Safety Information  . .

2–8

Grounding 
Instructions  . . . . . . . .

9

Operating 
Instructions   . . . . .

12–31

Features  . . . . . .

10, 32–34

Care and 
Cleaning   . . . . . . . .

35–39

Troubleshooting   . .

40–41

Consumer
Services

Warranty & Service

 . .

42–44

CGLMV168

CPLMV168

GLMV168

PLMV168

Getting Started  . . . . .

11

READ AND SAVE THESE INSTRUCTIONS

P/N 316137207 Rev. A

04-01 JR

Over-the-Range

Microwave Oven

49-401431v03  4/26/01  2:44 PM  Page 1

Содержание CGLMV168

Страница 1: ... Instructions 12 31 Features 10 32 34 Care and Cleaning 35 39 Troubleshooting 40 41 Consumer Services Warranty Service 42 44 CGLMV168 CPLMV168 GLMV168 PLMV168 Getting Started 11 READ AND SAVE THESE INSTRUCTIONS P N 316137207 Rev A 04 01 JR Over the Range Microwave Oven ...

Страница 2: ...ze the risk of fire or explosion or to prevent property damage personal injury or loss of life 2 Before you call for service there are a few things you can do to help us serve you better Read this manual It contains instructions to help you use and maintain your microwave properly If you received a damaged oven immediately contact the dealer or builder that sold you the oven Save time and money Ch...

Страница 3: ...ange oven was designed for use over ranges no wider than 36 91 cm It may be installed over both gas and electric cooking equipment Do not operate this appliance if it has a damaged power cord or plug if it is not working properly or if it has been damaged or dropped Do not cover or block any openings on the appliance Use this appliance only for its intended use as described in this manual Do not u...

Страница 4: ...sed by children To reduce the risk of fire in the oven cavity Do not overcook food Carefully attend appliance if paper plastic or other combustible materials are placed inside the oven while cooking Remove wire twist ties and metal handles from paper or plastic containers before placing them in the oven Do not use the oven for storage purposes Do not leave paper products cooking utensils or food i...

Страница 5: ...ts such as whole eggs and sealed containers for example closed jars will explode and should not be heated in this microwave oven Such use of the microwave oven could result in injury Do not boil eggs in a microwave oven Pressure will build up inside egg yolk and will cause it to burst possibly resulting in injury Operating the microwave with no food inside for more than a minute or two may cause d...

Страница 6: ... is opened pressure can build up This can cause the container to burst possibly resulting in injury Hot foods and steam can cause burns Be careful when opening any containers of hot food including popcorn bags cooking pouches and boxes To prevent possible injury direct steam away from hands and face Do not overcook potatoes They could dehydrate and catch fire causing damage to your oven Cook meat ...

Страница 7: ...products Recycled paper towels napkins and waxed paper can contain metal flecks which may cause arcing or ignite Paper products containing nylon or nylon filaments should be avoided as they may also ignite Do not use the microwave to dry newspapers Not all plastic wrap is suitable for use in microwave ovens Check the package for proper use Paper towels waxed paper and plastic wrap can be used to c...

Страница 8: ...fan will operate automatically under certain conditions see Automatic Fan feature Take care to prevent the starting and spreading of accidental cooking fires while the exhaust fan is in use Clean the underside of the microwave often Do not allow grease to build up on the microwave or the fan filters In the event of a grease fire on the surface units below the microwave oven smother a flaming pan o...

Страница 9: ...nd prong from the power cord Do not use an adapter plug with this appliance Do not use an extension cord with this appliance If the power cord is too short have a qualified electrician or service technician install an outlet near the appliance For best operation plug this appliance into its own electrical outlet to prevent flickering of lights blowing of fuse or tripping of circuit breaker Groundi...

Страница 10: ...tacle before the oven will Temp Cook or Roast 7 Touch Control Panel You must set the clock before using the microwave 8 Cooktop Lights 9 Grease Filters 10 Removable Turntable Turntable and support must be in place when using the oven The turntable may be removed for cleaning 11 Convenience Guide NOTE Rating plate oven vent s and oven light are located on the inside walls of the microwave oven Mode...

Страница 11: ...er Option Popcorn Starts immediately more less time Veggie Starts immediately more less time Fresh Vegetables Press once more less time Frozen Vegetables Press twice more less time Canned Vegetables Press three times more less time on some models Reheat Starts immediately more less time Beverage Starts immediately Baked Potato Starts immediately more less time Ground Meats Starts immediately more ...

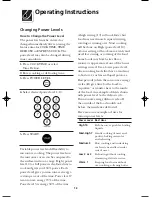
Страница 12: ...ng over Most cooking will be done on High power level 10 A lower setting will cook more evenly and need less stirring or rotating of the food Some foods may have better flavor texture or appearance if one of the lower settings is used Use a lower power level when cooking foods that have a tendency to boil over such as scalloped potatoes Rest periods when the microwave energy cycles off give time f...

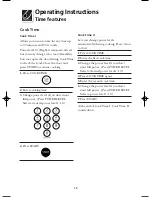
Страница 13: ... power Press POWER LEVEL Select a desired power level 1 10 4 Press START Cook Time II Lets you change power levels automatically during cooking Here s how to do it 1 Press COOK TIME 2 Enter the first cook time 3 Change the power level if you don t want full power Press POWER LEVEL Select a desired power level 1 10 4 Press COOK TIME again 5 Enter the second cook time 6 Change the power level if you...

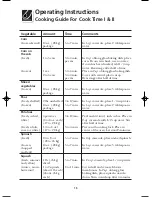
Страница 14: ... 68 kg fresh spears 1 bunch 9 to 13 min In 2 qt oblong glass baking dish place 11 4 to 11 2 lbs 1 4 cup water 57 to 68 kg frozen 10 oz 28 kg 5 to 7 min chopped package frozen spears 10 oz 28 kg 5 to 7 min In 1 qt casserole place 3 tablespoons package water Cabbage fresh 1 medium head 8 to 11 min In 11 2 or 2 qt casserole place 1 4 cup about 2 lbs water about 90 kg wedges 7 to 10 min In 2 or 3 qt c...

Страница 15: ...le place 2 tablespoons package water Potatoes fresh cubed 4 potatoes 9 to 12 min Peel and cut into 1 inch cubes Place in white 6 to 8 oz each 2 qt casserole with 1 2 cup water Stir 17 to 28 kg after half of time fresh whole 1 6 to 8 oz 3 to 4 min Pierce with cooking fork Place in sweet or white 17 to 28 kg center of the oven Let stand 5 minutes Spinach fresh 10 to 16 oz 5 to 7 min In 2 qt casserol...

Страница 16: ...es of foil A dull thumping noise may be heard during defrosting This sound is normal when the oven is not operating at High power Defrosting Tips Foods frozen in paper or plastic can be defrosted in the package Tightly closed packages should be slit pierced or vented AFTER food has partially defrosted Plastic storage containers should be at least partially uncovered Family size prepackaged frozen ...

Страница 17: ...rm areas with foil When finished separate pieces and let stand to complete defrosting Poultry Chicken broiler fryer 15 to 19 min Place wrapped chicken in dish Unwrap cut up 21 2 to 3 lbs and turn over after half the time When 1 13 to 1 36 kg finished separate pieces and microwave 2 to 4 minutes more if necessary Let stand to finish defrosting Chicken whole 17 to 21 min Place wrapped chicken in dis...

Страница 18: ... example press the 2 pad for 2 minutes of cooking time The power level can be changed as time is counting down Press POWER LEVEL and enter 1 10 You can use this feature two ways It will add 30 seconds to the time counting down each time the pad is pressed It can be used as a quick way to set 30 seconds of cooking time Express Cook 18 Operating Instructions Time Features ...

Страница 19: ...f food is stated in pounds and ounces the ounces must be converted to tenths 1 of a pound Weight of Weight of Enter Food Food in Food in Weight Ounces Kilograms tenths of a pound 1 2 03 07 1 3 08 2 4 5 11 14 3 6 7 17 20 4 8 22 5 9 10 25 28 6 11 31 7 12 13 34 36 8 14 15 39 42 9 16 45 1 0 17 18 48 50 1 1 19 53 1 2 20 21 56 59 1 3 22 23 62 64 1 4 24 67 1 5 25 26 70 73 1 6 27 76 1 7 28 29 78 81 1 8 30...

Страница 20: ...he cable end is inserted all the way into the oven wall receptacle Insert the probe into the center of the food Make sure the handle does not touch the food or the top or sides of the oven Do not leave the probe in the oven if it s not inserted in food If it touches the oven wall it may damage the oven Cooking Tips Do not twist drop or bend the probe Be sure frozen food has been completely defrost...

Страница 21: ...mer Simmer Press COOK ROAST TEMP 4 times See the Simmer Guide for specific directions How to Use the Probe and Set the Temperature Yourself 1 Insert the temperature probe in the center of a casserole and attach it securely in the oven wall outlet 2 Press COOK ROAST TEMP once 3 Enter the desired food temperature 4 Change power level if you don t want full power Press POWER LEVEL Select a power leve...

Страница 22: ...nd attach it securely in the oven wall 2 Roast Medium Press COOK ROAST TEMP twice Roast Well Press COOK ROAST TEMP 3 times 3 Press START 4 The microwave signals when it s time to turn the roast over After you turn the roast close the door and press START NOTE The oven continues to cook after the signal whether or not roast is turned over Preparing Meats for Roasting Place a tender beef roast in a ...

Страница 23: ...r after 3 hours 23 How to Use the Probe to Simmer The Simmer feature heats food to 180 F 82 C and holds it at that temperature up to 12 hours or until you remove it and press CLEAR OFF 1 Insert the temperature probe into the food resting it on the side of the dish Attach it securely in the oven wall 2 Press COOK ROAST TEMP 4 times to select Simmer 3 Press START If you need to stir the food restart...

Страница 24: ... use microwave safe containers and cover them with lids or vented plastic wrap Never use tight sealing plastic containers they can prevent steam from escaping and cause food to overcook Be sure the outside of the cooking containers and the inside of the microwave oven are dry before placing food in the oven Beads of moisture turning into steam can mislead the sensor Humidity Sensor Dry off dishes ...

Страница 25: ...overcooks consistently you can add or subtract 20 30 seconds to the automatic popping time To add time After pressing POPCORN press 9 immediately after the oven starts for an extra 20 seconds Press 9 again to add another 10 seconds total 30 seconds additional time To subtract time After pressing POPCORN press 1 immediately after the oven starts for 20 seconds less cooking time Press 1 again to red...

Страница 26: ...erature If food is not hot enough use Cook Time to reheat for more time Reheated foods may have wide variations in temperature Some areas may be extremely hot How to Change the Automatic Settings To reduce time by 10 Press 1 after the feature pad To add 10 to cooking time Press 9 after the feature pad Some Foods Not Recommended For Use With Reheat It is best to use Cook Time for these foods Bread ...

Страница 27: ...od in the oven Press the food pad For vegetables press the VEGGIE pad once for fresh vegetables twice for frozen vegetables or three times for canned vegetables The oven starts immediately 2 The oven signals when steam is sensed and time remaining is counting down Turn or stir the food if necessary Do not open the oven door until time is counting down If the door is opened close it and press START...

Страница 28: ... time of day while microwaving 1 Press CLOCK 2 Enter time of day 3 Select AM or PM 4 Press START or CLOCK Scroll Speed The scroll speed of the display can be changed Press and hold the AM PM pad about 3 seconds to bring up the display Select 1 5 for slow to fast scroll speed Display On Off To turn the clock display off press and hold 0 for about three seconds To redisplay the clock repeat Start Pa...

Страница 29: ...art at the delayed time The time of day may be displayed by pressing CLOCK Surface Light Press SURFACE LIGHT once for bright light twice for the night light or three times to turn the light off Timer On Off Timer On Off operates as a minute timer and can be used at any time even when the oven is operating 1 Press TIMER ON OFF 2 Enter time you want to count down 3 Press TIMER ON OFF to start When t...

Страница 30: ...der is set To clear the Reminder before it occurs press REMIND then 0 The REM indicator will no longer be lit Child Lock Out You may lock the control panel to prevent the microwave from being accidentally started or used by children To lock or unlock the controls press and hold CLEAR OFF for about three seconds When the control panel is locked an L will be displayed to the extreme right Turntable ...

Страница 31: ... The fan will automatically turn off when the internal parts are cool It may stay on for 30 minutes or more after the cooktop and microwave controls are turned off Auto Night Light You can set the night light to turn on and off automatically at any time you want 1 Press AUTO NIGHT LIGHT 2 Enter the time you want the light to turn on Select AM or PM 3 Press AUTO NIGHT LIGHT again and enter the time...

Страница 32: ... level reheating Microwaving with the Shelf Uneven results Feature Information Two Position Shelf Make sure the shelf is positioned properly inside the microwave to prevent damage to the oven from arcing Do not use a microwave browning dish on the shelf The shelf could overheat Do not use the oven with the shelf on the microwave floor This could damage the microwave Use pot holders when handling t...

Страница 33: ...s or To reheat 2 dishes on the lower level 1 Multiply reheat time by 11 2 2 Switch places after 1 2 the time Shelf and Reheating Switch places after 1 2 time Switch places after 1 2 time Feature Information Two Position Shelf ...

Страница 34: ...lastic wrap or covering with wax paper allows excess steam to escape Shielding In a regular oven you shield chicken breasts or baked foods to prevent over browning When microwaving you use small strips of foil to shield thin parts such as the tips of wings and legs on poultry which would cook before larger parts Standing Time When you cook with regular ovens foods such as roasts or cakes are allow...

Страница 35: ...n any part of your microwave Removable Turntable and Turntable Support To prevent breakage do not place the turntable into water just after cooking Wash it carefully in warm sudsy water or in the dishwasher The turntable and support can be broken if dropped Remember do not operate the oven without the turntable and support in place Temperature Probe Clean immediately after using To clean wipe with...

Страница 36: ...e To clean stainless steel surfaces use a hot damp cloth with a mild detergent suitable for stainless steel surfaces Use a clean hot damp cloth to remove soap Dry with a dry clean cloth If food soil remains try a general kitchen cleaner such as Fantastik Simple Green or Formula 409 For hard to clean soil use a standard stainless steel cleaner such as Bon Ami or Cameo Apply cleaner with a damp spon...

Страница 37: ... by gently turning 4 Replace the screw Connect electrical power to the oven Replace the burned out bulb with a 40 watt incandescent bulb WB36X10003 available from your Frigidaire supplier 1 To replace the oven light first disconnect the power at the main fuse or circuit breaker panel or pull the plug 2 Remove the top grille by taking out the 2 screws that hold it in place 3 Next remove the screw l...

Страница 38: ... once a month or as needed To remove slide it to the rear using the tab Pull it down and out To clean the grease filter soak it and then swish it around in hot water and detergent Don t use ammonia or ammonia products because they will darken the metal Light brushing can be used to remove embedded dirt Rinse shake and let it dry before replacing To replace slide the filter in the frame slot on the...

Страница 39: ...Remove Charcoal Filter To remove the charcoal filter disconnect power at the main fuse or circuit breaker panel or pull the plug Remove the top grille by removing the 2 screws that hold it in place Slide the filter towards the front of the oven and remove it To Install Charcoal Filter To install a new filter remove plastic and other outer wrapping from the new filter Insert the filter into the top...

Страница 40: ...t warm This is normal Food amount is too large for Sensor Reheat Sensor Reheat is for single servings of recommended foods Use Cook Time for large amounts of food LOCKED appears in the display The control has been locked Press and hold CLEAR OFF for about 3 seconds to unlock the control Oven will not start A fuse in your home may be blown or the circuit breaker tripped Replace fuse or reset circui...

Страница 41: ...ve tried to turn the turntable on when the probe is in use The turntable will not operate when the probe is in use You have tried to change the power level when it is not allowed Many of the oven s features are preset and cannot be changed Things That Are Normal Steam or vapor escaping from around the door Light reflection around door or outer case Dimming oven light and change in the blower sound...

Страница 42: ...s from original purchase date Time periods listed above THROUGH OUR AUTHORIZED SERVICERS WE WILL Pay all costs for repairing or replacing any parts of this appliance which prove to be defective in materials or workmanship Repair or replace any part of the microwave oven which proves to be defective in materials or workmanship Provide a replacement for any magnetron tube which proves to be defectiv...

Страница 43: ...escent tubes on models with these features EXCLUSIONS This warranty does not cover the following 1 CONSEQUENTIAL OR INCIDENTAL DAMAGES SUCH AS PROPERTY DAMAGE AND INCIDENTAL EXPENSES RESULTING FROM ANY BREACH OF THIS WRITTEN OR ANY IMPLIED WARRANTY Note Some states do not allow the exclusion or limitation of incidental or consequential damages so this limitation or exclusion may not apply to you 2...

Страница 44: ...oducts This warranty only applies in the 50 states of the U S A Puerto Rico and Canada Product features or specifications as described or illustrated are subject to change without notice All warranties are made by Electrolux Home Products North America a division of White Consolidated Industries Inc In Canada your appliance is warranted by WCI Canada Inc 44 164D3370P138 49 40143 1 CGLMV168 CPLMV16...

Отзывы: