background image

12

To Clean the Recessed and Contoured Well Areas of the Cooktop -

 If a spill occurs on or in the recessed or contoured

areas, blot up spill with an absorbent cloth. Rinse with a clean, damp cloth and wipe dry.

To Clean the Surface Burner Grates, Caps & Surface Burner Drip Pans

 (some models)

 -

 Use a soap-filled scouring

pad or a mild abrasive cleanser to clean the surface burner caps and surface burner drip pans (if equipped).

Please Note: THE COOKTOP IS NOT REMOVABLE.

 Do not attempt to remove or lift the cooktop.

General Care & Cleaning

 Any additions, changes or conversions

required in order for this appliance to satisfactorily meet the
application needs must be made by an authorized

Electrolux

 Distributor or Qualified Agency.

Cleaning the Cooktop

The cooktop is designed to make cleaning easier.  Since the four burners are sealed, cleanups are easy when spillovers
are cleaned up immediately. To clean, wipe with a clean, damp cloth and wipe dry. 

DO NOT 

attempt to clean the cooktop

when the cooktop or burner heads are still hot. The contoured well areas and burner drip pans (some models) should be
routinely cleaned. Keeping the burner head ports and slots clean will prevent improper ignition and an uneven flame. Refer
to the following sections for further instructions.

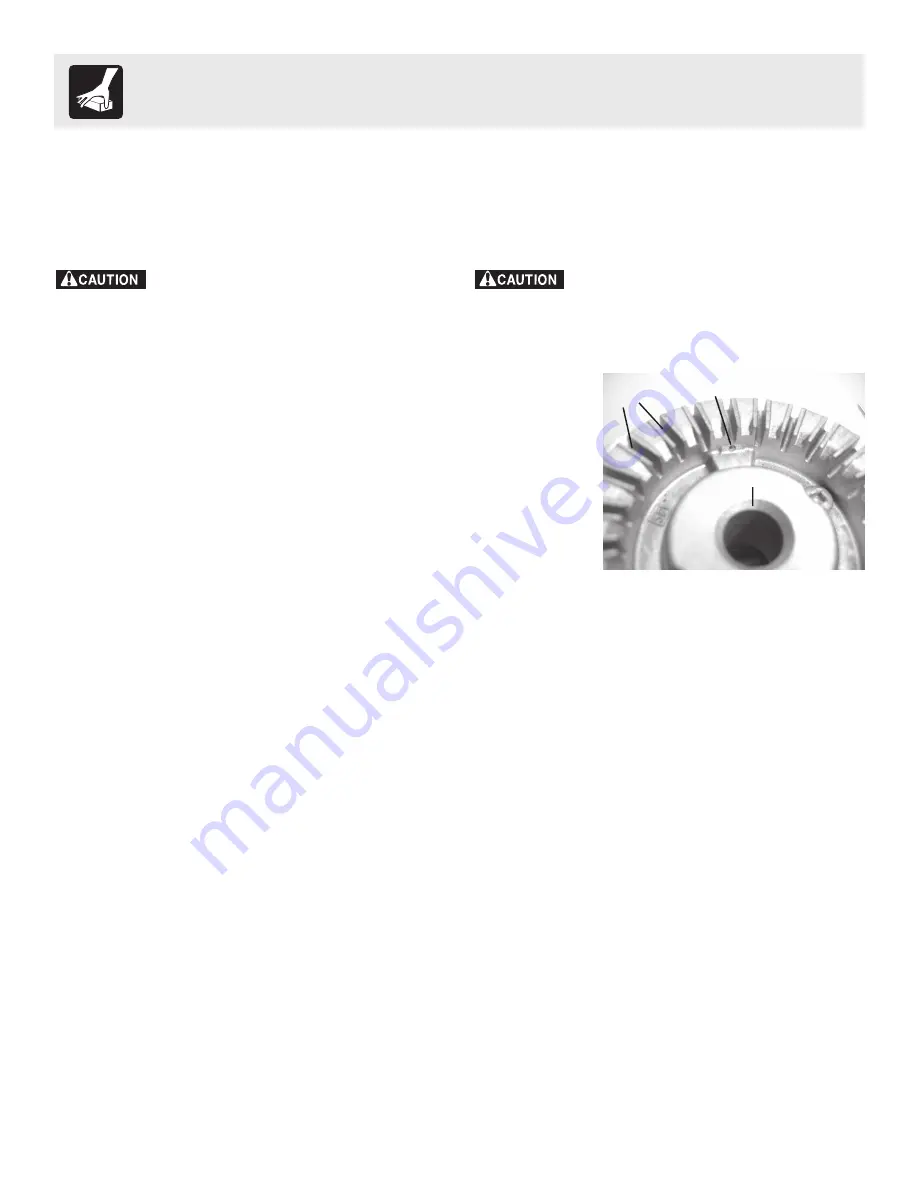
To clean the burner head ignition ports -

 Each burner head has a small

ignition port located as illustrated. Should you experience ignition problems it
may be that this port hole is partially blocked with soil. With the burner head in
place, use a small wire gauge needle or the end of a paper clip to clear the
ignition port.

To Clean the Surface Burner Heads

 - For proper gas flow it may be necessary

to clean the burner head and slots. To clean, first use a clean DAMP cloth to
soak up any spills. Remove any food from between the burner slots using a small
non-abrasive brush like a toothbrush and afterwards wipe up using a damp cloth.
For stubborn soils located in the slots, use a small-gauge wire or needle to clean
the slots.

Please Note: 

The surface burner heads are secured to the cooktop and must be

cleaned in place on the cooktop.

ignition port

slots

orifice port

Cooktop Burner Head


DO NOT 

attempt to clean the cooktop when

the cooktop or burner heads are still hot. Touching hot
cooktop areas, burner grates and burner caps can cause
burns.

For proper flow of gas and ignition of the burner —

 DO NOT ALLOW SPILLS, FOOD, CLEANING AGENTS OR ANY

OTHER MATERIAL TO ENTER THE GAS ORIFICE HOLDER OPENING. ALWAYS

 keep the surface burner cap and

surface burner head in place whenever a surface burner is in use.

Содержание 316417139

Страница 1: ...rface Controls 5 Before Setting Oven Controls 6 Oven Control Functions 6 7 Setting Oven Controls 8 9 Adjusting Your Oven Temperature some models 10 General Care Cleaning 11 13 Before You Call Solutions to Common Problems 14 Warranty Back Page Visit the Frigidaire Web Site at http www frigidaire com Questions or for Service Call 1 800 944 9044 U S 1 800 668 4606 Canada ...

Страница 2: ...t be plugged into an electrical outlet that is correctly polarizedandproperlygrounded If a 2 prong wall receptacle is the only available outlet it is the personal responsibility of the consumer to have it replaced with a properly grounded 3 prong wall receptacle installed by a qualified electrician Seethe INSTALLATION INSTRUCTIONS packaged with this appliance for complete installation grounding in...

Страница 3: ...rsrepairservice Knowhowtodisconnect the power to the range at the circuit breaker or fuse box in case of an emergency User servicing Do not repair or replace any part of the appliance unless specifically recommended in the manuals All other servicing should be done only by a qualified technician This may reduce the risk of personal injury and damage to the range Never modify or alter the construct...

Страница 4: ...hat burner has lit Then adjust theflamesoitdoesnotextendbeyondtheedgeoftheutensil Utensil Handles Should Be Turned Inward and Not Extend Over Adjacent Surface Burners To reduce the riskofburns ignitionofflammablematerials andspillagedue to unintentional contact with the utensil the handle of the utensil should be positioned so that it is turned inward and does not extend over adjacent surface burn...

Страница 5: ... medium weight metal or aluminum cookware with lids Settings may vary when using other types of cookware The color of the flame is the key to proper burner adjustment A good flame is clear blue nearly invisible in a well lighted room Each cone of flame should be steady sharp Adjust or clean burner if flame is yellow orange Setting Surface Controls Your range may be equipped with different sized su...

Страница 6: ...his vent This venting is necessary for proper air circulation in the oven and good baking results DO NOT BLOCK THE OVEN VENT Arranging Oven Racks ALWAYS ARRANGE OVEN RACKS WHEN THE OVEN IS COOL PRIOR TO OPERATING THE OVEN Always use oven mitts when using the oven Recomended Rack Positions for Broiling Baking Roasting Food Broiling meats chicken or fish Cookies cakes pies biscuits muffins Frozen pi...

Страница 7: ...ange you may have requested To Set the Clock When the range is first plugged in or when the power supply to the range has been interrupted the display will flash 12 00 1 Press 2 Within 5 seconds press and hold the or until the correct time of day appears in the display To Set the Minute Timer 1 Press 2 Press the to increase the time in one minute increments Press and hold the to increase the time ...

Страница 8: ...r The display will show 350 F By pressing and holding the or the temperature can then be adjusted in 5 F increments 3 When the or is released the oven will begin heating to the selected temperature When the displayed temperature reaches the desired baking temperature the control will beep once 4 To cancel the baking function press To Change the Oven Temperature after Baking has Started 1 Press and...

Страница 9: ...e Fig 1 3 Position rack before setting control while range is cool 4 Position rack by tilting front of rack up pulling rack out from locating holes in rear of broiler drawer Reposition back of rack in the desired locating holes allow front of rack to slide down into the corresponding slots in front of broiler drawer See Fig 2 NOTE For medium rare meats position the rack closer to the burner upper ...

Страница 10: ...5 F Youmayalsoadjusttheoventemperaturedownwardin5 Fincrementswitheachpressofthe keypad total adjustmentrangeof 35 35 35 35 35to 35 35 35 35 35F Note Yourovencontrolwasfactorysetinthe Fahrenheit F TemperatureDisplayMode To change for Celsius C see Changing the Temperature Display Mode in the Oven Control Functions section of this Use Care Manual 3 If no other key pad is pressed after 5 seconds the ...

Страница 11: ...ollowing the cleaner s recommendations Rinse with clean water let dry After cleaning the racks rub the sides of the racks with wax paper or a cloth containing a small amount of salad oil this will make the racks glide easier into the oven rack positions Use soap water to thoroughly clean the top sides front of the oven door Rinse well You may use a glass cleaner on the outside glass of the oven do...

Страница 12: ...on and an uneven flame Refer to the following sections for further instructions To clean the burner head ignition ports Each burner head has a small ignition port located as illustrated Should you experience ignition problems it may be that this port hole is partially blocked with soil With the burner head in place use a small wire gauge needle or the end of a paper clip to clear the ignition port...

Страница 13: ...the hinge arm one into each hinge See B Fig 2 4 Close oven door until the door stops Do not force the door to close any further The placement of these screws should keep door open in about a 45 degreeposition 5 Grasp oven door firmly on both sides and slide door up and off hinges at the same angle See Fig 3 6 To clean oven door follow the instructions provided in the Cleaning Chart at the beginnin...

Страница 14: ...n is used Center food in the oven space pans to allow air to circulate Allow the oven to preheat to the set temperature before placing food in the oven Try adjusting the recipe s recommended temperature or baking time Surface Burners do not light 1 Surface Control knob was not completely turned to LITE Push in turn the Surface Control knob to LITE until burner ignites and then turn control knob to...

Страница 15: ...15 Notes ...

Страница 16: ...vice companies or external causes such as abuse misuse inadequate power supply accidents fires or acts of God DISCLAIMER OF IMPLIED WARRANTIES LIMITATION OF REMEDIES CUSTOMER S SOLE AND EXCLUSIVE REMEDY UNDER THIS LIMITED WARRANTY SHALL BE PRODUCT REPAIR OR REPLACEMENTAS PROVIDED HEREIN CLAIMS BASED ON IMPLIED WARRANTIES INCLUDING WARRANTIES OF MERCHANTABILITY OR FITNESS FOR A PARTICULAR PURPOSE A...

Отзывы: