background image

22

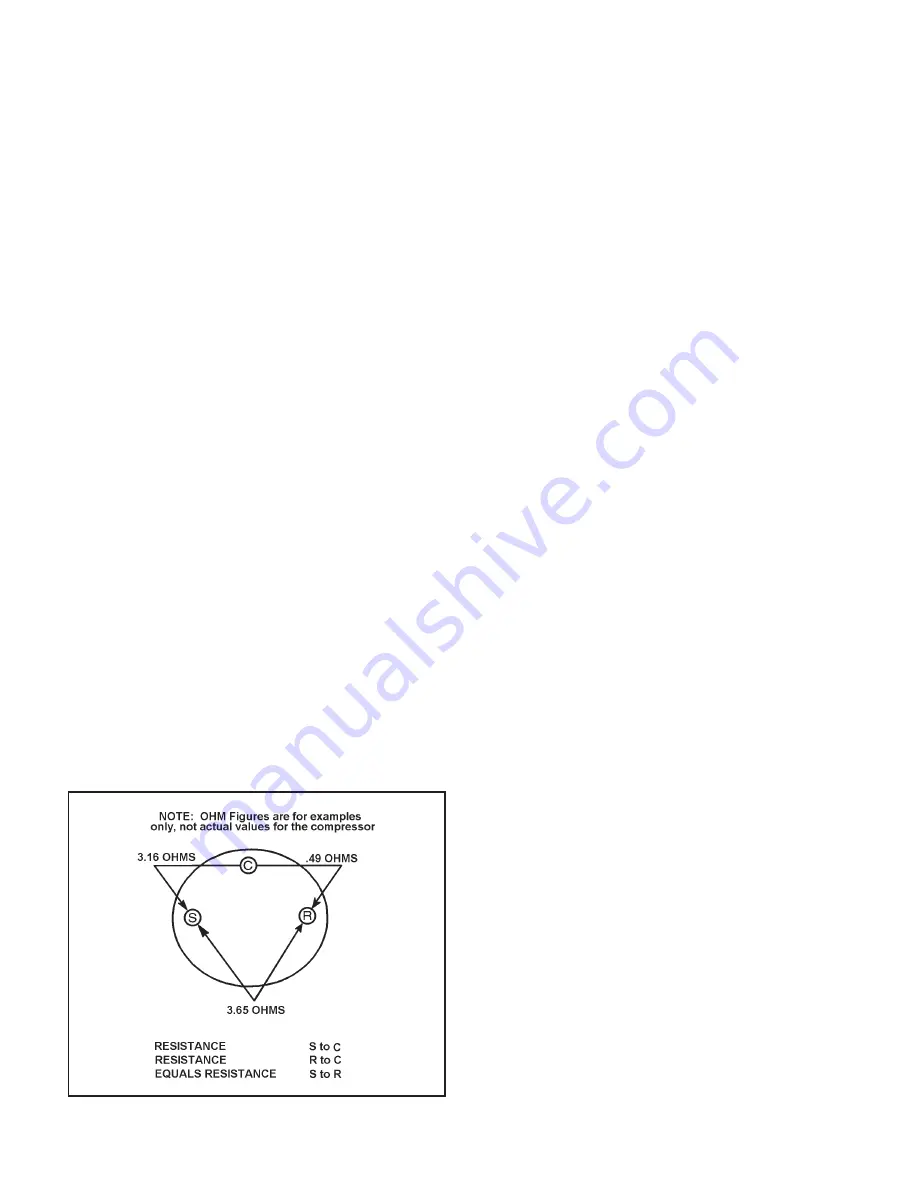
Single Phase Resistance Test

Remove the leads from the compressor terminals and set the 
ohmmeter on the lowest scale (R x 1).

Touch the leads of the ohmmeter from terminals common to 
start ("C" to "S"). Next, touch the leads of the ohmmeter from 
terminals common to run ("C" to "R").

Add values "C" to "S" and "C" to "R" together and check resis-
tance from start to run terminals ("S" to "R"). Resistance "S" 
to "R" should equal the total of "C" to "S" and "C" to "R."

In a single phase PSC compressor motor, the highest value 
will be from the start to the run connections (“S” to "R"). The 
next highest resistance is from the start to the common con-
nections ("S" to "C"). The lowest resistance is from the run to 
common. ("C" to "R") Before replacing a compressor, check 
to be sure it is defective.

Check the complete electrical system to the compressor and 
compressor internal electrical system, check to be certain that 
compressor is not out on internal overload.

Complete evaluation of the system must be made whenever 
you suspect the compressor is defective.  If the compressor 
has been operating for sometime, a careful


examination must 

be made to determine why the compressor failed.

Many compressor failures are caused by the following condi-
tions.

1. Improper 

air 

fl ow over the evaporator.

2.  Overcharged refrigerant system causing liquid to be re-

turned to the compressor.

3.  Restricted refrigerant system.

4.  Lack of lubrication.

5.  Liquid refrigerant returning to compressor causing oil to 

be washed out of bearings.

6.  Noncondensables such as air and moisture in the system. 

Moisture is extremely de structive to a refrigerant system.

Recommended Procedure for 
Compressor Replacement

NOTE: Be sure power source is off, then disconnect all 
wiring from the compressor.

1.  Be certain to perform all necessary electrical and refrigera-

tion tests to be sure the compressor is actually defective 
before replacing .

2.  Recover all refrigerant from the system though the process 

tubes. 

PROPER HANDLING OF RECOVERED RE-

FRIGERANT ACCORDING TO EPA REGULATIONS IS 
REQUIRED. 

 Do not use gauge manifold for this purpose 

if there has been a burnout.  You will contaminate your 
manifold and hoses. Use a Schrader valve adapter and 
copper tubing for burnout failures.

3.  After all refrigerant has been recovered, disconnect suction 

and discharge lines from the compressor and remove com-
pressor.  Be certain to have both suction and discharge 
process tubes open to atmosphere.

4. 

Carefully pour a small amount of oil from the suction stub 
of the defective compressor into a clean container.

5. 

Using an acid test kit (one shot or conven tional kit), test 
the oil for acid content according to the instructions with 
the kit.

6. 

If any evidence of a burnout is found, no matter how 
slight, the system will need to be cleaned up following 
proper procedures.

7. 

Install the replacement compressor.

8. 

Pressurize with a combination of R-22 and nitrogen and 
leak test all connections with an electronic or Halide 
leak detector. Recover refrigerant and repair any leaks 
found.

Repeat Step 8 to insure no more leaks are present.

9. 

Evacuate the system with a good vacuum pump capable 
of a fi nal vacuum of 300 microns or less. The system 
should be evacuated through both liquid line and suction 
line gauge ports. While the unit is being evacuated, seal 
all openings on the defective compressor. Compressor 
manufacturers will void warranties on units received not 
properly sealed. Do not distort the manufacturers tube 
connections.

10.  Recharge the system with the correct amount of refriger-

ant. The proper refrigerant charge will be found on the unit 
rating plate. The use of an accurate measuring device, 
such as a charging cylinder, electronic scales or similar 
device is necessary.

Содержание V(E

Страница 1: ... H A12K25 V E H A12K34 V E H A12K50 V E H A18K25 V E H A18K34 V E H A18K25 V E H A24K25 V E H A24K34 V E H A24K50 V E H A24K75 V E H A24K10 V E H A24K00 Service Manual Single Package Vertical Air Conditioning System A H Suffix Models A SERIES Digits vary with model ...

Страница 2: ...ged Refrigerant Systems 17 Overcharged Refrigerant Systems 18 Restricted Refrigerant Systems 18 Capillary Tube Systems 19 Reversing Valve Description Operation 19 Electrical Circuit And Coil 19 Testing Coil 19 Checking Reversing Valves 20 Touch Testing Heating Cooling Cycle 20 Procedure For Changing Reversing Valve 20 Compressor Checks 21 Locked Rotor Voltage Test 21 Single Phase Connections 21 De...

Страница 3: ... the unit you are servicing so you can be certain of a proper diagnosis and repair See Unit Identification The information contained in this manual is intended for use by a qualified service technician who is familiar with the safety procedures required in installation and repair and who is equipped with the proper tools and test instruments Installation or repairs made by unqualified persons can res...

Страница 4: ...00 No electric heat 25 2 5 KW 34 3 4 KW 50 5 0 KW 75 7 5 KW 10 10 KW NOMINAL CAPACITY A Series Btu h 09 9 000 12 12 000 18 18 000 24 24 000 ENGINEERING CODE OPTIONS RT Standard Remote Operation SP Seacoast Protected VOLTAGE K 208 230V 1Ph 60Hz DESIGN SERIES A 32 and 47 Cabinet E Cooling with or without electric heat H Heat Pump SERIES V Vertical Series MODEL NUMBER V E A 24 K 50 RT A Model Identifi...

Страница 5: ... Max ESP 3 3 3 3 3 3 3 3 P H Y S I C A L D A T A Dimensions W x D x H 23 x 23 x 32 23 x 23 x 32 23 x 23 x 32 23 x 23 x 47 23 x 23 x 32 23 x 23 x 32 23 x 23 x 32 23 x 23 x 47 Net Weight Lbs 114 124 144 167 114 125 144 167 Shipping Weight Lbs 125 135 155 180 125 135 155 180 R 22 Charge 25 29 42 68 5 23 5 27 42 63 5 VEA VHA09 12 VE VHA09 VE VHA12 Heater Watts 2500 2050 3400 2780 5000 4090 2500 2050 3...

Страница 6: ... L 3 7 4 5 7 9 10 2 3 7 4 5 7 9 10 2 Indoor Motor HP 1 4 1 4 1 4 1 4 1 4 1 4 1 4 1 4 Indoor Motor A 1 2 1 2 1 4 2 1 2 1 2 1 4 2 Outdoor Motor HP N A N A N A 1 4 N A N A N A 1 4 Outdoor Motor A N A N A N A 2 N A N A N A 2 A I R F L O W D A T A Indoor CFM 300 350 550 750 300 375 550 750 Vent CFM 60 60 60 80 60 60 60 80 Max ESP 3 3 3 3 3 3 3 3 P H Y S I C A L D A T A Dimensions W x D x H 23x23x32 23x...

Страница 7: ...IN Ckt Amps A 15 20 30 15 20 30 15 20 30 Power Connection POWER CORD POWER CORD POWER CORD WITH OPTION TO HARD WIRE Refrigerant R 22 R 22 R 22 R 22 R 22 R 22 R 22 R 22 R 22 Unit Width in 23 125 23 125 23 125 23 125 23 125 23 125 23 125 23 125 23 125 Unit Depth in 23 125 23 125 23 125 23 125 23 125 23 125 23 125 23 125 23 125 Unit Height in 32 25 32 25 32 25 32 25 32 25 32 25 32 25 32 25 32 25 Ship...

Страница 8: ...a WARM high pressure liquid It next will pass through the refrigerant drier if so equipped It is the function of the driertotrapanymoisturepresentinthesystem contaminants and LARGE particulate matter The liquid refrigerant next enters the metering device The metering device is a capillary tube The purpose of the metering device is to meter i e control or measure the quantity of refrigerant enterin...

Страница 9: ...ly Electrical Supply WARNING Electrical shock hazard Turn OFF electric power at fuse box or service panel before making any electrical connections and ensure a proper ground connection is made before connecting line voltage All electrical connections and wiring MUST be installed by a qualified electrician and conform to the National Electrical Code and all local codes which have jurisdiction Failur...

Страница 10: ... is the best choice Mercury bulb type thermostats MUST be level to control temperature accurately to the desired set point Electronic digital type thermostats SHOULD be level for aesthetics Thermostat Location Measuring Current Draw In order to accomplish this the heat output from the anticipator must be the same regardless of the current flowing through it Consequently some thermostats have an adj...

Страница 11: ...LOW WIRE NUT RED 7 5 KW 10 KW 5 KW 2 5 KW 3 4 KW HEATER BLACK SEE NOTE 6 PRESSURE WHITE RELAY HEAT RELAY HEAT RELAY HEAT RELAY HEAT BLACK BLACK BLACK BLACK BLACK BLACK BLACK BLACK BLACK RED RED RED RED RED RED RED RED 2 5KW 3 4KW 5 KW 2 5KW 3 4KW 5 KW 7 5KW 10KW 7 5KW 10KW RED BROWN YELLOW WHITE RED UP EAR THERMOSTAT CONNECTIONS TERM BOARD SHOWN BELOW TRANSFORMER FOR 208 VOLT MODELS ONLY MOVE THE ...

Страница 12: ... Wiring Diagrams G H Suffix NOTE THE DIAGRAM ABOVE ILLUSTRATES THE TYPICAL THERMOSTAT WIRING AND 208 VOLT TRANSFORMER WIRING SEE THE UNIT CONTROL PANEL FOR THE ACTUAL UNIT WIRING DIAGRAM AND SCHEMATIC COM 208V 240V RT1 THERMOSTAT FRONT ...

Страница 13: ...13 Typical Electrical Thermostat Wiring Diagrams A E Suffix FOR 208 VOLT MODELS ONLY MOVE THE WHITE WIRE AS SHOWN BELOW ...

Страница 14: ... the G thermostat terminal to the Fan Relay turning on the indoor blower motor Heating Electric When using electric heaters select the blower speed that provides adequate airflow across the elements to prevent overheating and cycling on limit and or premature failure CHECK THE EXTERNAL STATIC PRESSURE and then consult the AIR FLOW DATA to determine the ACTUAL air flow delivered for the factory selec...

Страница 15: ...vious example but having a WET coil you must use a correction factor of 94 i e 500 x 94 470 CFM to allow for the resistance internal of the condensate on the coil It is important to use the proper procedure to check external Static Pressure and determine actual airflow Since in the case of the VERT I PAK the condensate will cause a reduction in measured External Static Pressure for the given airflow...

Страница 16: ... properly diagnosing these systems An overcharged unit will at times return liquid refrigerant slugging back to the suction side of the compressor eventually causing a mechanical failure within the compressor This mechanical failure can manifest itself as valve failure bearing failure and or other mechanical failure The specific type of failure will be influenced by the amount of liquid being return...

Страница 17: ... be repaired before charging the unit To check for an undercharged system turn the unit on allow the compressor to run long enough to establish working pressures in the system 15 to 20 minutes During the cooling cycle you can listen carefully at the exit of the metering device into the evaporator an intermittent hissing and gurgling sound indicates a low refrigerant charge Intermittent frosting an...

Страница 18: ...e other With a complete restriction there will be no sound at the metering device entrance An amperage check of the compressor with a partial restriction may show normal current when compared to the unit specification With a complete restriction the current drawn may be considerably less than normal as the compressor is running in a deep vacuum no load Much of the area of the condenser will be rela...

Страница 19: ...ns and closes ports for the small capillary tubes to the main valve to cause it to shift NOTE System operating pressures must be near normal before valve can shift 3 Switch the unit to the heating mode and observe the gauge readings after a few minutes running time If the system pressure is lower than normal the heating capillary is restricted 4 If the operating pressures are lower than normal in ...

Страница 20: ...arge Sluggish or sticky reversing valves can sometimes be remedied by reversing the valve several time with the airflow restricted to increase system pressure To raise head pressure during the cooling season the airflow through the outdoor coil can be restricted During heating the indoor air can be restricted by blocking the return air Dented or damaged valve body or capillary tubes can prevent the ...

Страница 21: ...it and read the running amperage on the meter If the compressor does not start the reading will indicate the locked rotor amperage L R A External Overload Some compressors are equipped with an external overload whichsensesbothmotoramperageandwindingtemperature High motor temperature or amperage heats the overload causing it to open breaking the common circuit within the compressor Heat generated w...

Страница 22: ...taintoperformallnecessaryelectricalandrefrigera tion tests to be sure the compressor is actually defective before replacing 2 Recoverallrefrigerantfromthesystemthoughtheprocess tubes PROPER HANDLING OF RECOVERED RE FRIGERANT ACCORDING TO EPA REGULATIONS IS REQUIRED Do not use gauge manifold for this purpose if there has been a burnout You will contaminate your manifold and hoses Use a Schrader val...

Страница 23: ...e fuse ruining the capacitor A 20 000 ohm 2 watt resistor can be used to discharge capacitors safely Remove wires from capacitor and place resistor across terminals When checking a dual capacitor with a capacitor analyzer or ohmmeter both sides must be tested Capacitor Check With Capacitor Analyzer The capacitor analyzer will show whether the capacitor is open or shorted It will tell whether the c...

Страница 24: ... It is possible under certain conditions for the unit to cycle between compressor and electric heat operation Electric Heat Switch Check Out The switch may be checked out with an ohmmeter Remove and label the three wires from the switch Terminal 2 is common and the contacts make to Terminal 3 on temperature rise and to Terminal 1 on temperature fall With the control set in the emergency heat posit...

Страница 25: ...2 VEA12K34RTA 80004911 30 VEA12K34RTB 80004911 30 VEA12K34RTE 80004911 30 VEA12K34RTG 80004920 32 VEA12K34RTH 80004920 32 VEA12K50RTA 80004911 30 VEA12K50RTB 80004911 30 VEA12K50RTE 80004911 30 VEA12K50RTG 80004920 32 VEA12K50RTH 80004920 32 VEA18K00RTA 80004910 28 VEA18K00RTB 80004910 28 VEA18K00RTC 80004910 28 VEA18K00RTD 80004910 28 VEA18K00RTE 80004910 28 VEA18K00RTG 80004919 31 VEA18K00RTH 80...

Страница 26: ...K34RTA 80004912 29 VHA12K34RTB 80004912 29 VHA12K34RTE 80004912 29 VHA12K34RTG 80004921 33 VHA12K34RTH 80004921 33 VHA12K50RTA 80004912 29 VHA12K50RTB 80004912 29 VHA12K50RTE 80004912 29 VHA12K50RTG 80004921 33 VHA12K50RTH 80004921 33 VHA18K25RTA 80004912 29 VHA18K25RTB 80004912 29 VHA18K25RTC 80004912 29 VHA18K25RTD 80004912 29 VHA18K25RTE 80004912 29 VHA18K25RTG 80004921 33 VHA18K25RTH 80004921 ...

Страница 27: ...27 A D Suffi x only ...

Страница 28: ...28 A D Suffi x only ...

Страница 29: ...29 A D Suffi x only ...

Страница 30: ...30 ...

Страница 31: ...31 ...

Страница 32: ...32 ...

Страница 33: ...33 ...

Страница 34: ...34 ...

Страница 35: ...35 ...

Страница 36: ...36 ...

Страница 37: ...37 ...

Страница 38: ...38 ...

Страница 39: ...es Fan Motor operate now Problem indicated in Control wiring and or Room Thermostat 24Volts at Coil Terminals of Blower Relay Problem indicated in Control Wiring and or Room Thermostat Problems indicated in Blower Relay Yes Yes Yes Yes Yes Yes Yes Yes Yes No No No No No No No No O K O K O K No Is Line Voltage present at Motor Leads Check Fan Speed Switch on models so equipped or Blower Relay on la...

Страница 40: ...r Control Wiring Does indoor blower now operate Problem indicated in Control wiring and or Room Thermostat 24Volts at Coil Terminals of Blower Relay Problem indicated in Control Wiring and or Room Thermostat Problems indicated in Blower Relay Yes Yes Yes Yes Yes Yes Yes Yes Yes No No No No No No No No O K O K O K No Is Line Voltage present at Motor Leads Check Fan Speed Switch on models so equippe...

Страница 41: ...rcharged Restriction Fully Seated Fully Seated Undercharged Overcharged Undercharged Non Condensables air in System Moisture in System Defective Compressor Defective Compressor Low Suction Pressure High Suction Pressure Low Head Pressure High Head Pressure Low Air Flow Across Outdoor Ambient Too High Refrigerant System Outdoor Ambient Too High Outdoor Coil for Operation in Heating Restriction For ...

Страница 42: ...ES ELECTRICAL TROUBLESHOOTING CHART HEAT PUMP Reversing Valve Stuck YES Replace Solenoid Coil Is the Solenoid Coil Good Is Line Voltage Present at Solenoid Valve Is Selector Switch set for Heat SYSTEM COOLS WHEN HEATING IS DESIRED HEAT PUMP ...

Страница 43: ...43 ...

Страница 44: ...tory Certified Parts FRIEDRICH AIR CONDITIONING CO Post Office Box 1540 San Antonio Texas 78295 1540 4200 N Pan Am Expressway San Antonio Texas 78218 5212 210 357 4400 FAX 210 357 4480 www friedrich com Printed in the U S A ...

Отзывы: