Freenove Raspberry Pi 2 Model B Скачать руководство пользователя страница 95


Need support?  

 [email protected] 


93 

Chapter 4 Robot Dog 

 www.freenove.com 

1.


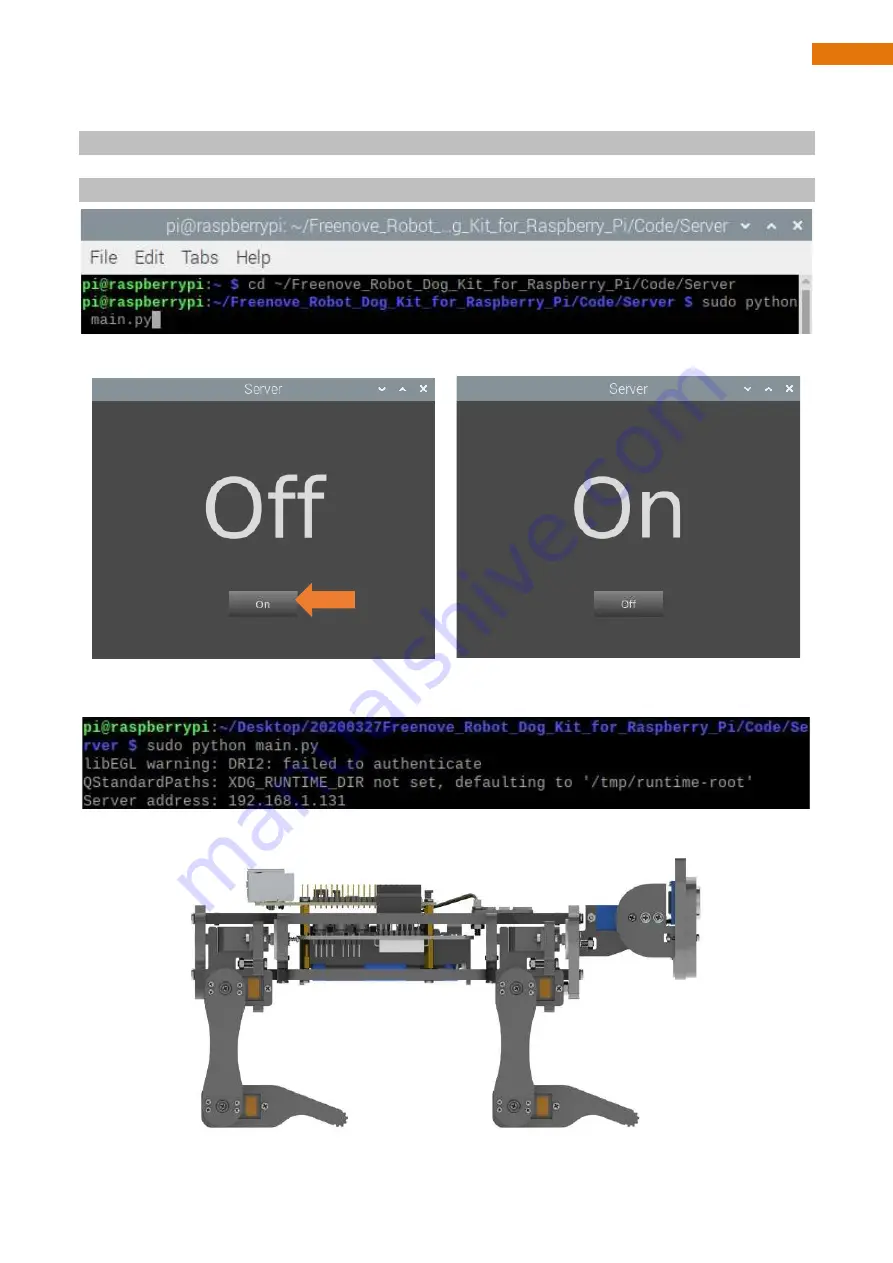
Use cd command to enter directory where main.py is located: 

cd ~/Freenove_Robot_Dog_Kit_for_Raspberry_Pi/Code/Server 

2.


Run main.py: 

sudo python main.py 


The interface is as below: 

Click “On” to open the server. The result is show as below:


You will see your server address (Raspberry Pi IP), Which is the LAN IP address of your Raspberry Pi. In the 

next chapter, you will need to enter this IP address to connect the Raspberry Pi client with the server.  


The robot will start from this posture. We define it as 

Relax mode

. It will also be referenced later. 


Содержание Raspberry Pi 2 Model B

Страница 1: ...years old This product should be used only when there is adult supervision present as young children lack necessary judgment regarding safety and the consequences of product misuse This product contains small parts and parts which are sharp This product contains electrically conductive parts Use caution with electrically conductive parts near or around power supplies batteries and powered live cir...

Страница 2: ...nd Specialized Tools Product Development and Customization Services You can find more about Freenove and get our latest news and updates through our website http www freenove com Copyright All the files materials and instructional guides provided are released under Creative Commons Attribution NonCommercial ShareAlike 3 0 Unported License A copy of this license can be found in the folder containin...

Страница 3: ...amera 45 Step 3 Run the Installation Program 49 Chapter 2 Assemble Robot 50 Step 1 Install Disk Servo Arms 50 Step 2 Install Body Bracket 53 Step 3 Install Shield 54 Step 4 Install MPU6050 55 Step 5 Install LED module 55 Step 6 Install Raspberry Pi 57 Step 7 Install Connector 58 Step 8 Install Servo to Acrylic Board 60 Step 9 Run Servo Program Necessary 63 Step 10 Assemble Legs to Body 66 Step 11 ...

Страница 4: ...Need support support freenove com 2 List www freenove com List If you have any concerns please feel free to contact us at support freenove com Robot Shield for Raspberry Pi Top Bottom ...

Страница 5: ...Need support support freenove com 3 List www freenove com Machinery Parts Note You may receive M1 4 4 or M1 4 5 Both are suitable ...

Страница 6: ...Need support support freenove com 4 List www freenove com Transmission Parts ES08MA Ⅱservo package x12 S90 servo package x1 Acrylic Parts ...

Страница 7: ...ronic Parts LED module Camera HC SR04 ultrasonic module Connector Jumper wire F F 4 for ultrasonic module 10cm 3Pin LED cable same direction 25cm 15Pin camera cable reversed direction Tools Cross screwdriver 3mm x1 Cross screwdriver 2mm x1 Cable tidy x80cm Red ball ...

Страница 8: ...t NOT Contained Parts Two 18650 lithium batteries without protected board The continuous discharge current 10A It is not easy to find proper batteries on Amazon Search 18650 3 7V high drain on eBay or other websites Raspberry Pi Recommended model Raspberry 4B 3B 3A 3B x1 ...

Страница 9: ...ponents required for making the robot dog And all of them are packaged individually There are detailed instructions for assembly and configuration in this book If you encounter any problems please feel free to contact us for quick and free technical support support freenove com This book can help enthusiasts with little technical knowledge to make a robot dog If you are very interested in Raspberr...

Страница 10: ... be run in command line mode and desktop system mode Additionally it is easy to operate just like Arduino and you can even directly operate the GPIO of CPU So far at this writing Raspberry Pi has advanced to its fourth generation product offering Version changes are accompanied by increases in upgrades in hardware and capabilities The A type and B type versions of the first generation products hav...

Страница 11: ...port freenove com 9 Preface www freenove com Practicality picture of Raspberry Pi 3 Model B Model diagram of Raspberry Pi 3 Model B Practicality picture of Raspberry Pi 3 Model B Model diagram of Raspberry Pi 3 Model B ...

Страница 12: ...ort freenove com 10 Preface www freenove com Practicality picture of Raspberry Pi 2 Model B Model diagram of Raspberry Pi 2 Model B Practicality picture of Raspberry Pi 1 Model B Model diagram of Raspberry Pi 1 Model B ...

Страница 13: ...ort freenove com 11 Preface www freenove com Practicality picture of Raspberry Pi 3 Model A Model diagram of Raspberry Pi 3 Model A Practicality picture of Raspberry Pi 1 Model A Model diagram of Raspberry Pi 1 Model A ...

Страница 14: ...ort support freenove com 12 Preface www freenove com Practicality picture of Raspberry Pi Zero W Model diagram of Raspberry Pi Zero W Practicality picture of Raspberry Pi Zero Model diagram of Raspberry Pi Zero ...

Страница 15: ... interface diagram of RPi 3B 3B 2B 1B are shown below GPIO Connector Display Connector Power Connector HDMI Connector Camera Connector Ethernet Connector GPIO Connector Display Connector Power Connector MINI HDMI Connector x2 Camera Connector Ethernet Connector USB Connector x4 Audio Connector USB Connector Audio Connector ...

Страница 16: ...diagram of RPi 3A A is shown below Hardware interface diagram of RPi Zero Zero W is shown below GPIO Connector Power Connector HDMI Connector Camera Connector USB Connector GPIO Connector Display Connector Power Connector HDMI Connector Camera Connector Audio Connector USB Connector ...

Страница 17: ...bering WiringPi GPIO Numbering BCM GPIO Numbering The Raspberry Pi CPU uses Broadcom BCM processing chips BCM2835 BCM2836 or BCM2837 GPIO pin numbers are assigned by the processing chip manufacturer and are how the computer recognizes each pin The pin numbers themselves do not make sense or have meaning as they are only a form of identification Since their numeric values and physical locations hav...

Страница 18: ... from pin 1 at the top left nearest to the SD card This is physical numbering as shown below WiringPi GPIO Numbering Different from the previous two types of GPIO serial numbers RPi GPIO serial number of the WiringPi are numbered according to the BCM chip use in RPi For more details please refer to https projects drogon net raspberry pi wiringpi pins ...

Страница 19: ...ed support support freenove com 17 Preface www freenove com You can also use the following command to view their correlation gpio readall For more details about wiringPi please refer to http wiringpi com ...

Страница 20: ...rd Reader x1 This robot also supports the following versions of the Raspberry Pi but additional accessories need to be prepared by yourself Raspberry Additional accessories Raspberry Pi Zero W Camera cable 25cm for zero w 15 Pin 1 0mm Pitch to 22 Pin 0 5mm https www amazon com dp B076Q595HJ Raspberry Pi Zero 1 3 wireless network adapter Camera cable 25cm for zero w 15 Pin 1 0mm Pitch to 22 Pin 0 5...

Страница 21: ...berry Pi Zero W 1 2A Limited by PSU board and connector ratings only 150mA Raspberry Pi Zero 1 2A Limited by PSU board and connector ratings only 100mA For more details please refer to https www raspberrypi org help faqs powerReqs In addition RPi also needs an Ethernet network cable used to connect it to a WAN Wide Area Network All these components are necessary for any of your projects to work Am...

Страница 22: ...ferent But they all aim to convert the interfaces to Raspberry Pi standards Item Pi Zero Pi Zero W Pi A Pi 3A Pi B 2B Pi 3B 3B 4B Monitor Yes Yes Yes Yes Yes Yes Mouse Yes Yes Yes Yes Yes Yes Keyboard Yes Yes Yes Yes Yes Yes Micro HDMI to HDMI cable Yes Yes No No No No Micro USB to USB A OTG cable Yes Yes No No No No USB HUB Yes Yes Yes Yes No No USB transferring to Ethernet interface select one f...

Страница 23: ...pplication Download system manually Optional After installing the Imager Tool in the link above You can also download the system manually first Visit https www raspberrypi org downloads Visit RPi official website https www RaspberryPi org click Downloads and choose to download Raspberry Pi OS Raspberry Pi OS supported by RPI is an operating system based on Linux which contains a number of contents...

Страница 24: ...y Pi Preparation www freenove com And then the zip file is downloaded Write System to Micro SD Card First insert your Micro SD card into card reader and connect it to USB port of PC Then open imager tool Choose system that you just downloaded in Use custom ...

Страница 25: ...Need support support freenove com 23 Chapter 0 Raspberry Pi Preparation www freenove com Choose the SD card Then click WRITE ...

Страница 26: ...ort attach your mouse and keyboard through the USB ports attach a network cable to the network card port and finally connect your power supply making sure that it meets the specifications required by your RPi Module Version Your RPi should start power up Later after setup you will need to enter your user name and password to login The default user name pi password raspberry After login you should ...

Страница 27: ...o you need to open it first After write system create a folder named ssh under generated boot disk of Micro SD Card then the SSH connection will be opened Windows OS Remote Desktop The windows built in application remote desktop corresponds to the Raspberry Pi xrdp service Download the tool software Putty Its official address http www putty org Or download it here http www chiark greenend org uk s...

Страница 28: ...pport support freenove com 26 Chapter 0 Raspberry Pi Preparation www freenove com There will appear a security warning at first login Just click YES Step1 enter the IP address Step2 Select SSH Step3 Click OPEN ...

Страница 29: ...l be a login interface RPi default user name pi the password raspberry When you enter the password there will be no display on the screen This is normal After the correct input press Enter to confirm Then enter the command line of RPi which means that you have successfully login to RPi command line mode ...

Страница 30: ...t to use built in Remote Desktop Connection under Windows you need install xrdp service on Raspberry Pi Next install a xrdp service an open source remote desktop protocol xrdp server for RPi Type the following command then press enter to confirm sudo apt get install xrdp Later the installation starts ...

Страница 31: ...support freenove com 29 Chapter 0 Raspberry Pi Preparation www freenove com Enter Y press key Enter to confirm After the installation is completed you can use Windows remote desktop applications to login to your RPi ...

Страница 32: ... Windows remote desktop Use WIN R or search function open the remote desktop application mstsc exe under Windows enter the IP address of RPi and then click Connect Later there will be xrdp login screen Enter the user name and password of RPi RPi default user name pi password raspberry and click OK ...

Страница 33: ...fully used the remote desktop login to RPi Raspberry Pi 4B 3B 3B integrates a Wi Fi adaptor You can use it to connect to your Wi Fi Then you can use the wireless remote desktop to control your RPi This will be helpful for the following operation Raspberry Pi of other models can use wireless remote desktop through accessing an external USB wireless card ...

Страница 34: ...e password is raspberry by default case sensitive You may need to type yes during the process When you see pi raspberrypi you have logged in Pi successfully Then you can skip to next section You can also use the IP address to log in Pi Enter router client to inquiry IP address named raspberry pi For example I have inquired to my RPi IP address and it is 192 168 1 131 Open the terminal and type fol...

Страница 35: ...Need support support freenove com 33 Chapter 0 Raspberry Pi Preparation www freenove com ...

Страница 36: ...ter 0 Raspberry Pi Preparation www freenove com VNC Viewer VNC Type the following command And select 5 Interfacing Options P3 VNC Yes OK Finish Here Raspberry Pi may need to be restarted and choose ok Then open VNC interface sudo raspi config ...

Страница 37: ...ps www realvnc com en connect download viewer After installation is completed open VNC Viewer And click File New Connection Then the interface is shown below Enter IP address of your Raspberry Pi and fill in a Name And click OK Then on the VNC Viewer panel double click new connection you just created and the following dialog box pops up Enter username pi and Password raspberry And click OK ...

Страница 38: ...ust a little window you can set a proper resolution ratio via steps below sudo raspi config Select 7 Advanced Options A5 Resolution proper resolution ratio set by yourself OK Finish And then reboot Raspberry Pi In addition your VNC Viewer window may zoom your Raspberry Pi desktop You can change it On your VNC View control panel click right key And select Properties Options label Scaling Then set p...

Страница 39: ...reparation www freenove com Here you have logged in to Raspberry Pi successfully by using VNC Viewer and operated proper setting Raspberry Pi 4B 3B 3B integrates a Wi Fi adaptor If you did not connect Pi to WiFi You can connect it to wirelessly control the robot ...

Страница 40: ...Introduction The shield is connected to the Raspberry Pi through the IO Port on the board The positioning holes on the board are suitable for the Raspberry Pi The features and functions are as follows S2 CTRL Type C charge port LED port MPU6050 port D2 indicator D3 indicator Battery level indicator S1 LOAD D1 indicator IO port ...

Страница 41: ...r charging It only works when S1 and S2 are turned off LED port It is used to connect LED module which is controlled by Raspberry Pi MPU6050 port It is used to connect MPU6050 which is controlled by Raspberry Pi Battery level indicator It consists of four LEDs When the battery power decreases gradually the LEDs will get dimmer gradually until it s turned off IO port It is used to connect shield wi...

Страница 42: ...p How to use the charging function 1 To use the charging function first turn off the two switches S1 and S2 D1 D2 and the power indicator are all off 2 Insert the TYPE C data cable into the TYPE C port Please use an adapter of 5V 2A or above If there is no battery in the battery holder the D3 charging indicator will blink continuously Put two batteries into the battery holder single one doesn t wo...

Страница 43: ...com 41 Chapter 0 Raspberry Pi Preparation www freenove com In the process of charging with 1A current the two positions of the shield marked in the illustration will be hot which is normal Please avoid touching them with your hands ...

Страница 44: ... use VNC viewer Step 1 Obtain the Code Start the Raspberry Pi and open the terminal You can click the terminal as shown below or press CTAL ALT T on the desktop The terminal is shown below You can view YouTube video as a reference https www youtube com watch v Lq OERj2WZM Type following command to get robot dog code and place it in user directory Pi Please execute commands below one by one in turn...

Страница 45: ...oduce several shortcuts that are very useful and commonly used in terminal 1 up and down arrow keys History commands can be quickly brought back by using up and down arrow keys which are very useful when you need to reuse certain commands When you need to type command pressing the Up key will go backwards through the command history and pressing the Down Key will go forwards through the command hi...

Страница 46: ...ll Python Libraries Required www freenove com cd D press Tab key there is no response Press Tab key again all the files folders that begin with D is listed Continue to type the character oc then press the Tab key and then Documents is typed automatically ...

Страница 47: ...Need support support freenove com 45 Chapter 1 Install Python Libraries Required www freenove com Step 2 Enable I2C and Camera Click Click ...

Страница 48: ...Need support support freenove com 46 Chapter 1 Install Python Libraries Required www freenove com Choose Enabled for Camera Choose Enabled for I2C Finally Click OK Click No Choose Enabled for VNC ...

Страница 49: ...his can speed up the response speed of the servos to make robot dog walk faster If the baud rate is 100 000 the robot walks slowly Scrolling the middle of the mouse to find dtparam i2c_arm on and add i2c_arm_baudrate 400000 Press CTRL O and then Enter to save the modified content Then press CTRL X to exit editing After the modification is completed reboot Raspberry Pi to make the change work You c...

Страница 50: ... adding the contents you need to press Ctrl O Enter Ctrl Z blacklist snd_bcm2835 2 We also need to edit config file sudo nano boot config txt Find the contents of the following two lines with Ctrl W you can search Enable audio loads snd_bcm2835 dtparam audio on Add to comment out the second line Press Ctrl O Enter Ctrl Z Enable audio loads snd_bcm2835 dtparam audio on It will take effect after res...

Страница 51: ..._Kit_for_Raspberry_Pi Code 2 Run build sh sh build sh 3 Execute following commands to enter directory of setup py cd Freenove_Robot_Dog_Kit_for_Raspberry_Pi Code 4 Run setup py sudo python setup py This program will automatically install the pca9685 rpi_ws281x PyQt5 library etc Please reboot the Raspberry Pi after the installation is completed as shown below If the installation fails please rerun ...

Страница 52: ...feel free to contact us at support freenove com It is recommended to assemble and use the robot dog according to the tutorial Otherwise there may be installation errors device damage etc Don t reverse batteries Or the board will be damaged Step 1 Install Disk Servo Arms Take out 12 disk servo arms from the servo packages Disk servo arm ...

Страница 53: ...e are 4 pairs of opposite holes on the disk servo arm and the distance between each pair is different Please use the 2 pairs of holes with longer distance M1 2 7 screws are contained in following plastic bag M1 2x7 Disk servo arm This side is attached to acrylic board Longer distance ...

Страница 54: ...Need support support freenove com 52 Chapter 2 Assemble Robot www freenove com Get following 4 parts M1 2x7 This side should be on the left Don t reverse it M1 2x7 With two holes ...

Страница 55: ...port freenove com 53 Chapter 2 Assemble Robot www freenove com Step 2 Install Body Bracket M3x12 M3 Nut Rectangular hole Head mark Head mark M3 Nut With one hole M3x12 M2 5x8 Brass standoffs M2 5x14 6 Note its position ...

Страница 56: ...Need support support freenove com 54 Chapter 2 Assemble Robot www freenove com Step 3 Install Shield Shield Brass standoffs M2 5x14 ...

Страница 57: ...upport freenove com 55 Chapter 2 Assemble Robot www freenove com Step 4 Install MPU6050 Note There are two rows of headers Plug the MPU6050 into the outer Row Step 5 Install LED module MPU6050 LED module M3x12 M3 Nut ...

Страница 58: ... 56 Chapter 2 Assemble Robot www freenove com Install the top bracket Connect shield with LED module This step will be very helpful for later assembly Rear Head Use tapes to cover the hole 3 pin cable of LED Use tapes to cover the hole ...

Страница 59: ...Need support support freenove com 57 Chapter 2 Assemble Robot www freenove com Step 6 Install Raspberry Pi Raspberry Pi M2 5x8 ...

Страница 60: ...p 7 Install Connector Install connector to connect Raspberry Pi and shield If you have any concerns please feel free to contact us via support freenove com We will offer you satisfying solution Connector Press connector to reach its end Press it till the pins protrude from the holes ...

Страница 61: ...Need support support freenove com 59 Chapter 2 Assemble Robot www freenove com Now we have assembled the main body part We will assemble leg parts later ...

Страница 62: ...Need support support freenove com 60 Chapter 2 Assemble Robot www freenove com Step 8 Install Servo to Acrylic Board Note There are four parts They are different Acrylic part Black servo M2x14 M2 Nut ...

Страница 63: ...rt support freenove com 61 Chapter 2 Assemble Robot www freenove com Assemble two sets Assemble two sets Assemble parts to the top Now you get two sets of joint parts Servo M2x14 M2 Nut M2x14 M2 Nut M3x12 M3 Nut ...

Страница 64: ...emble Robot www freenove com Assemble another two parts Note they are different from parts above Assemble another two parts Note they are different from parts above Asseble them Now you will get four parts as below Note they are different M3x12 M3 Nut ...

Страница 65: ...emble Robot www freenove com Step 9 Run Servo Program Necessary Connect All 12 black servos and 1 blue servo to servo port Randomly And install batteries Push batteries to ends Install batteries 3 7v 18650 High drain 12 black servos 1 blue servo wiring ...

Страница 66: ...steps in Chapter 1 first a Type the following command to enter servo code folder Server cd Freenove_Robot_Dog_Kit_for_Raspberry_Pi Code Server b Run Servo py sudo python Servo py After running the program all servos will keep at 90 Next we will connect the servos to disk arm Keep the power on and all servos connected during the assembly Don t disconnect servos https www youtube com watch v 7GkMYdV...

Страница 67: ...Need support support freenove com 65 Chapter 2 Assemble Robot www freenove com 3 Whether the batteries are contacted well with the battery holder ...

Страница 68: ...eed to keep the servo at 90 when connected to them to servo arms servo wires are not shown in the following content Try to install them close to 90 The angles are acceptable within 65 115 Assemble legs of one side Try to install them at 90 The angles are acceptable within 65 115 Assemble legs of the other side Close to 90 Small screw in servo package Close to 90 Small screw in servo package ...

Страница 69: ...ng Select two legs of different sides as rear legs And install them as below Then install the servo screws In this step if you did not cover tape to the holes before you can turn off Load S1 to install the screw After the screw is installed turn on the Load S1 Only one bracket is needed M3 Nut M3x12 M3x12 M3 Nut Servo screw M3 Nut Bracket M3 Screw M3 Nut ...

Страница 70: ...nd all servos connected to shield Do NOT disconnect wiring Assemble front legs and install the servo screw Assemble them In this step if you did not cover tape to the holes before you can turn off Load S1 to install the screw After the screw is installed turn on the Load S1 M3 Nut M3x12 Servo screw ...

Страница 71: ...Need support support freenove com 69 Chapter 2 Assemble Robot www freenove com M3 Nut M3x12 ...

Страница 72: ... freenove com 70 Chapter 2 Assemble Robot www freenove com Step 11 Assemble Head The servo arm and screws are included in the blue servo package Screw in servo package M2x14 M2 Nut M1 4x4 Servo arm Ultrasonic module Camera ...

Страница 73: ... Assemble Head to Body Keep the power ON and servos connected when installing arm to servo We will complete wiring in next section Shut down the Raspberry Pi first Do NOT turn on Raspberry Pi until chapter 3 Install acrylic part on the other side M2x14 M2 Nut Small screw in servo package ...

Страница 74: ...Need support support freenove com 72 Chapter 2 Assemble Robot www freenove com Step 13 Wiring Connect servos according to the numbers Note servo ports 0 1 14 are not connected to servo They are spare ...

Страница 75: ...ng of Ultrasonic module Note Do NOT connect wrongly If you connect 5V to GND it may damage the ultrasonic module Pay attention to the blue side of camera cable Note plugging and unplugging the cable requires the Raspberry Pi to be powered off otherwise the camera module may be burned ...

Страница 76: ...Need support support freenove com 74 Chapter 2 Assemble Robot www freenove com Pay attention to the blue side of camera cable ...

Страница 77: ...Need support support freenove com 75 Chapter 2 Assemble Robot www freenove com Step 14 Install Calibration Support M3x12 M3 Nut Support M3x12 ...

Страница 78: ...e the following command to enter servo code folder Server cd Freenove_Robot_Dog_Kit_for_Raspberry_Pi Code Server b Run Servo py sudo python Servo py The robot should show the following posture If it does not look like this you need to dissemble servo screws of incorrect servos Then reassemble the incorrect servo to make the robot look like posture above Servo screw ...

Страница 79: ... that the wiring of each servo is correct Please use VNC Viewer to build this robot when you use remote mode to login RPi or there will be errors Because other desktop remote doesn t support GUI Servo Execute following command to check i2c address i2cdetect y 1 As shown in the figure below the addresses 0x40 0X48 and 0X68 corresponds to the PCA9685 chip ADS7830 chip and MPU6050 module respectively...

Страница 80: ...sult After assembly in the previous chapter the robot should look as shown in picture A After servo test program is executed the robot s posture will change to A B C D gradually which indicates the servo channel works normally If the situation is not correct check the servo wiring A B C D ...

Страница 81: ...Angle 10 90 i servo setServoAngle 13 90 i time sleep 0 01 for i in range 60 servo setServoAngle 3 90 i servo setServoAngle 6 90 i servo setServoAngle 9 90 i servo setServoAngle 12 90 i time sleep 0 01 print nEnd of program except KeyboardInterrupt print nEnd of program Reference setServoAngle channel angle This function has two parameters to control the Servo of the corresponding channel to the co...

Страница 82: ... If the terminal displays the directory as below where test py is located You can directly execute the second command test py 1 If not execute the cd command cd Freenove_Robot_Dog_Kit_for_Raspberry_Pi Code Server 2 Execute test py command sudo python test py ADC Result Print voltage value of batteries per second You can press Ctrl C to end the program ...

Страница 83: ...ge is str Power V time sleep 1 print n except KeyboardInterrupt print nEnd of program Reference readAdc channel This function has one parameter for reading the ADC value of the corresponding channel For example readAdc 0 Read the ADC value of the batteries voltage The returned number ranges between 0 255 Divide the obtained value by 255 0 and then multiply by the reference voltage of 5 0V and then...

Страница 84: ...test py Ultrasonic Result Every 1s the distance between the obstacle and the ultrasonic module will be printed in and you can press Ctrl C to end the program The code is as below 1 2 3 4 5 6 7 8 9 10 from Ultrasonic import ultrasonic Ultrasonic def test_Ultrasonic try while True data ultrasonic getDistance Get the value print Obstacle distance is str data CM time sleep 1 except KeyboardInterrupt p...

Страница 85: ...directly execute the test py command 1 If not execute the cd command cd Freenove_Robot_Dog_Kit_for_Raspberry_Pi Code Server 2 Execute test py command sudo python test py Led Result The LED module will show red green blue and white in turn Then all LED are turned OFF You can end the program ahead of time by pressing ctrl c If the LED color display order is not correct open the Led py file in the cu...

Страница 86: ...rip Color 255 255 255 time sleep 1 print nWhite wipe led colorWipe led strip Color 0 0 0 turn off the light print nEnd of program except KeyboardInterrupt led colorWipe led strip Color 0 0 0 turn off the light print nEnd of program Reference colorWipe strip color wait_ms This function erases the color of one pixel at a time It has three input parameters among which strip represents the Neopixel ob...

Страница 87: ...al displays the directory as below where test py is located You can directly execute the test py command 1 If not execute the cd command cd Freenove_Robot_Dog_Kit_for_Raspberry_Pi Code Server 2 Execute test py command sudo python test py Buzzer Result The buzzer will be turned ON lasting for 3s Then the program will automatically end or you can press Ctrl C to end the program ...

Страница 88: ...buzzer Buzzer def test_Buzzer try buzzer run 1 time sleep 1 print 1S time sleep 1 print 2S time sleep 1 print 3S buzzer run 0 print nEnd of program except KeyboardInterrupt buzzer run 0 print nEnd of program Reference buzzer run cmd This function has one input parameter If the input is 1 the buzzer will be turned on If the input is 0 the buzzer will be turned off ...

Страница 89: ...ear please check the camera Wiring and check if the camera interface is enabled Note plugging and unplugging the cable requires the Raspberry Pi to be powered off otherwise the camera module may be burned Run program 1 execute the cd command cd Freenove_Robot_Dog_Kit_for_Raspberry_Pi Code Server 2 Execute test py command raspistill o image jpg Then please open and check the generated image jpg und...

Страница 90: ...me video LED ultrasonic ranging The server and client are established based on Python3 and PyQt5 They communicate via TCP IP protocol The robot can be controlled remotely within a local area network LAN Start Open client If success If success keep sending End Connect server Yes No No Yes Send command success Start Open server If success Wait command If get command Execute Command End Wait connecti...

Страница 91: ... struct pack 256s b wlan0 15 20 24 def turn_on_server self ip adress HOST self get_interface_ip Port 8000 for video transmission self server_socket socket socket self server_socket setsockopt socket SOL_SOCKET socket SO_REUSEPORT 1 self server_socket bind HOST 8000 self server_socket listen 1 Port 5000 is used for instruction sending and receiving self server_socket1 socket socket self server_sock...

Страница 92: ...nt connection The channel of port 5000 is mainly used to send and receive commands between the client and server The channel of port 8000 is used to send video data to the client turn_off_server This function is used to close TCP send_data This function is used to send commands to the client reset_serve This function is used to close TCP and restart transmission_video This function is used to tran...

Страница 93: ...g to your computer system by clicking following link https www realvnc com en connect download viewer After installation is completed open VNC Viewer And click File New Connection Then the interface is shown below Enter IP address of your Raspberry Pi and fill in a Name And click OK Then on the VNC Viewer panel double click new connection you just created and the following dialog box pops up Enter...

Страница 94: ...do raspi config Select 7 Advanced Options A5 Resolution proper resolution ratio set by yourself OK Finish And then reboot Raspberry Pi In addition your VNC Viewer window may zoom your Raspberry Pi desktop You can change it On your VNC View control panel click right key And select Properties Options label Scaling Then set proper scaling Step 2 Run commands Enter following command in the terminal Wi...

Страница 95: ...udo python main py The interface is as below Click On to open the server The result is show as below You will see your server address Raspberry Pi IP Which is the LAN IP address of your Raspberry Pi In the next chapter you will need to enter this IP address to connect the Raspberry Pi client with the server The robot will start from this posture We define it as Relax mode It will also be reference...

Страница 96: ...llowing command sudo python main py tn t means open TCP communication n means don t show interface Sever Auto Start 1 Open the terminal and execute the following two commands respectively to create a start sh file cd sudo touch start sh 2 Open start sh sudo nano start sh 3 Add the following contents to start sh file bin sh cd home pi Freenove_Robot_Dog_Kit_for_Raspberry_Pi Code Server pwd sleep 10...

Страница 97: ...op 7 Add the following content to start desktop file Desktop Entry Type Application Name start NoDisplay true Exec home pi start sh Press Ctrl O and then press Enter to save it Press Ctrl X to exit 8 Modify permissions sudo chmod x config autostart start desktop 9 Finally enter the following content to reboot Raspberry Pi sudo reboot Note To cancel auto start please delete the files start sh and s...

Страница 98: ...Need support support freenove com 96 Chapter 4 Robot Dog www freenove com ...

Страница 99: ...ocket socket socket socket AF_INET socket SOCK_STREAM print ip def turn_off_client self try self client_socket shutdown 2 self client_socket1 shutdown 2 self client_socket close self client_socket1 close except Exception as e print e def receiving_video self ip stream_bytes b try self client_socket connect ip 8000 self connection self client_socket makefile rb except print command port connect fai...

Страница 100: ...function is used to disconnect from the server receiving_video This function is used to receive video data sent from the server is_valid_image_4_bytes This function is used to check whether each frame of video data is complete Looking_for_the_ball This function is used to find the small ball in the video image send_data This function is used to send commands to the server receive_data This functio...

Страница 101: ...ssfully opened 1 You need to open the Raspberry Pi and Turn on the server 2 Enter the Raspberry Pi s IP address in the white IP edit box 3 Click Connect to connect client to the Raspberry Pi After the connection is successful you need to calibrate the robot in Calibration section After the calibration is completed the robot dog can be controlled to move You can refer to this video https youtu be l...

Страница 102: ...ent on a Windows system you need to install some software and libraries which takes some time During this process it does not need to run a server and a Raspberry Pi You can turn off the Raspberry Pi first After the installation is completed turn on the Raspberry Pi and the server Install python3 Download the installation file via the below link https www python org downloads windows Click Latest ...

Страница 103: ...Need support support freenove com 101 Chapter 4 Robot Dog www freenove com Select Add Python 3 8 to PATH And choose Customize installation Select all options and click Next ...

Страница 104: ...eed support support freenove com 102 Chapter 4 Robot Dog www freenove com Here python is installed into D disk as an example You can choose your own installation path Click Install Wait for installation ...

Страница 105: ...Need support support freenove com 103 Chapter 4 Robot Dog www freenove com Installation is successful ...

Страница 106: ...modified accordingly replace D by E Press win R and enter cmd and click ok Then enter following commands 1 Enter D disk If you put it into E it should be E D 2 Enter directory where setup_windows py is located cd D Freenove_Robot_Dog_Kit_for_Raspberry_Pi Code 3 Run setup_windows py Python setup_windows py Or double click setup_windows py to execute the installation program under following path Fre...

Страница 107: ...py command again Most installation failures are caused by a poor network You can check the network before installing Open client Press win R and enter cmd and click ok Then enter following commands 1 Enter D disk If you put it into E it should be E D 2 Enter directory where Main py is located cd D Freenove_Robot_Dog_Kit_for_Raspberry_Pi Code Client 3 Run Main py Python Main py Or double click Main...

Страница 108: ...n on the server 2 Enter the Raspberry Pi s IP address in the white IP edit box 3 Click Connect to connect client to the Raspberry Pi After the connection is successful you need to calibrate the robot in Calibration section After the calibration is completed the robot dog can be controlled to move Note when Raspberry Pi is shut down server will be closed You need open server again the next time ...

Страница 109: ...y Pi You can turn off the Raspberry Pi first After the installation is completed turn on the Raspberry Pi and run the server MacOS 10 13 comes with python2 but no python3 The programs of this robot can only run on python3 Install python3 Download installer link https www python org downloads Click Python 3 8 2 If your macOS is 11 Like 11 0 please install python 3 9 If your macOS is NOT 11 like 10 ...

Страница 110: ...Need support support freenove com 108 Chapter 4 Robot Dog www freenove com On the bottom of the page click macOS 64 bit installer to download installer Then install python Click Continue ...

Страница 111: ...Need support support freenove com 109 Chapter 4 Robot Dog www freenove com Click Continue Click Agree ...

Страница 112: ...upport support freenove com 110 Chapter 4 Robot Dog www freenove com Click Install If your computer has a password enter the password and click Install Software Now the installation is completed successfully ...

Страница 113: ...ications Install PyQt5 opencv numpy and other libraries If there is no robot dog code in your macOS you can download it via link below https github com Freenove Freenove_Robot_Dog_Kit_for_Raspberry_Pi archive master zip After downloading successfully you can find it under Downloads Open Terminal ...

Страница 114: ...cos py Installation takes some time please wait patiently If some libraries are not installed successfully it will prompt Some libraries have not been installed yet Please run python3 setup_windows py again Then you need to execute the python3 setup_windows py command again Most installation failures are caused by a poor network You can check the network before installing If you are using macOS un...

Страница 115: ...freenove com Open client After installation is completed in previous step now it is in the directory that setup_macos py is located 1 Type following command to enter where the program is located cd Client 2 Type following command to run the program python3 Main py ...

Страница 116: ...on the server 2 Enter the Raspberry Pi s IP address in the white IP edit box 3 Click Connect to connect client to the Raspberry Pi Then you need calibrate the robot in the Calibration section After the calibration is completed robot dog can be controlled to move Note when Raspberry Pi is shut down server will be closed You need open server again the next time ...

Страница 117: ...3 install opencv contrib python 3 4 6 27 sudo apt get install y libatlas base dev libjasper dev Open client Enter the following commands at the terminal 1 Use the cd command to go to the directory where Main py is located cd Freenove_Robot_Dog_Kit_for_Raspberry_Pi Code Client 2 Run Main py sudo python Main py The interface is shown below The face recognition cannot work well because it need more c...

Страница 118: ...aspberry Pi s IP address in the white IP edit box 3 Click Connect to connect client to the Raspberry Pi After the connection is successful you need to calibrate the four legs of the robot dog in Calibration section After the calibration is completed the robot dog can be controlled to move Note when Raspberry Pi is shut down server will be closed You need open server again the next time ...

Страница 119: ...1 Lay the calibration paper on a horizontal hard table 2 Install the calibration supports on the robot dog and place it on the corresponding position on the calibration paper 3 Connect client with server successfully click the Calibration button on the client then a calibration window pops up And the robot s legs will automatically put to the following position ...

Страница 120: ...8 Chapter 4 Robot Dog www freenove com 4 Calibrate the four legs to make 4 foot points fall to the corresponding positions Feel the contact force between the robot dog and the ground during calibration Future control depends on this step ...

Страница 121: ...2 There is an offset when controlling the robot dog to walk straightly which is normal It is caused by the installation error and the error of the servo itself As a result the left and right legs cannot be completely symmetrical and may differ by 1mm or 2mm As the walking distance accumulates this error is constantly superimposed Then there will be a large offset from the original position 3 If th...

Страница 122: ...robot will get into relax mode for 1 minute During this time it won t respond to any motion command You can still use the functions of LED buzzer real time video and so on b When the robot dog moves for less than3 minutes and rests for 1 minute The timer will start from 0 Then the robot can move for 3 minutes again c If the robot isn t tired and is standing when the robot does not receive motion c...

Страница 123: ...adjust the yaw and pitch angle of body The following is the corresponding operation of the buttons and keyboards Button on Client Key Action ForWard W Move BackWard S Back off Turn Left A Turn left Turn Right D Turn right Step Left Q Step Left Step Right E Step Right Connect Disconnect C On Off Connection Open Video Close Video V On Off Video ...

Страница 124: ... Open calibration interface Buzzer Noise Space On Off Buzzer Relax R Relax station LED L Open LED control interface Sonic U Measure and display distance from obstacle Balance B Open Close balance mode Face Ball Close F Face recognition and ball tracking Face ID Input images of human faces ...

Страница 125: ... seconds and a total of 30 images will be taken Try to show faces at different distances and angles during the shooting process When the face is not recognized the picture will not be recorded until the face is recognized again 5 After the 30 images are recorded you can close the window and click Face on the Right to identify the face Note Do NOT use different names when re entering images of the ...

Страница 126: ...djust Pitch angle of body Roll Adjust Roll angle of body Note If the robot work abnormally please check following contents 1 Check the battery level Low battery level will make the server shut down 2 Check if the wireless connection is disconnected 3 Check if the Raspberry Pi is stuck 4 If all three points above work well please restart server and client If there still is any abnormality please co...

Страница 127: ...t to write your own program to control the robot dog you can follow this chapter The robot dog program is based on python3 If your python is python2 by default please change to python3 If you have never learned python before you can learn some basics through the following links https python swaroopch com basics html Program First open Thonny Python IDE which is easy to use for beginners ...

Страница 128: ...Need support support freenove com 126 Chapter 4 Robot Dog www freenove com Create a new file Name it with myCode as an example and save it in Server folder of robot code folder ...

Страница 129: ...rt freenove com 127 Chapter 4 Robot Dog www freenove com Open the Server folder of the robot dog code and you can see the file you created Write the code in myCode py as below and click save after finished as shown below ...

Страница 130: ...ng py file to check directly ADS7830 py Function Description power channel Enter 0 to return the battery voltage value Buzzer py Function Description run command Enter 0 then the buzzer will not sound Enter 1 the buzzer will sound Contorl py Function Description coordinateToAngle x y z Enter the foot coordinate then return servo angle of each joint in one leg angleToCoordinate a b c Enter the leg ...

Страница 131: ... to make 7 LEDs show one color at the same time and change various colors to blink The blinking interval is wait_ms and the default value is 50ms rainbow strip wait_ms This function achieves the effect of rainbow breathing It makes 8 LEDs display same color at the same time and then change all various colors like breathing The interval is wait_ms The default value is 20ms rainbowCycle strip wait_m...

Страница 132: ...Need support support freenove com 130 Chapter 4 Robot Dog www freenove com Custom Action We have also customized some specific actions such as push up greeting etc You can run Action py to play ...

Страница 133: ...reenove in app store Relax mode a When the robot dog moves for 3 minutes in total it will feel tired the servo will get hot In order to protect the servo the robot will get into relax mode for 1 minute During this time it won t respond to motion command You can still use the functions of LED buzzer real time video and so on b When the robot dog moves for 3 minutes and then the robot rest for 1 min...

Страница 134: ...P address and click connect icon On the top of the interface there is a timer slider to indicate the time for moving or resting Raspberry Pi wlan0 IP Balance Take picture Buzze r RGB Led Connec t Set speed Control motion Height Angle of head Relax Gravity mode Attitude control Control body position Attitude control Slide one finger on the screen Distance Voltage Frame rate Time slider ...

Страница 135: ...is Kit please feel free to contact us support freenove com We will make every effort to make changes and correct errors as soon as feasibly possible and publish a revised version If you want to learn more about Arduino Raspberry Pi Smart Cars Robotics and other interesting products in science and technology please continue to visit our website We will continue to launch fun cost effective innovati...

Отзывы: