Free Spirit 831.300270 Скачать руководство пользователя страница 4

4

Congratulations for selecting the new FreeSpirit

®

GL35

exercise cycle. Cycling is one of the most effective
exercises for increasing cardiovascular fitness, building
endurance, and toning the entire body. The FreeSpirit

®

GL35 exercise cycle offers an impressive array of fea-
tures to let you enjoy this healthful exercise in the
convenience and privacy of your home. 

For your benefit, read this manual carefully before
you use the exercise cycle.

If you have questions

after reading this manual, please call our manufac-

ture’s Customer Service Department toll-free at 

1-888-936-4266

, Monday through Friday 8h00 until

18h30 eastern time (excluding holidays). To help us
assist you, please note the product model number
and serial number before calling. The model number
is 831.300270. The serial number can be found on a
decal attached to the exercise cycle (see the front
cover of this manual).

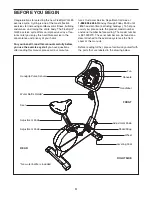
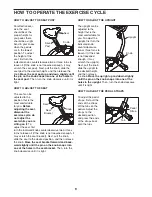
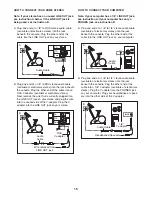
Before reading further, please familiarize yourself with
the parts that are labeled in the drawing below.

*No water bottle is included

Handgrip Pulse Sensor

REAR

FRONT

Seat 

Adjustment Knob

Pedal/Strap

Wheel

Leveling Foot

Console

Fan

Handlebar

Adjustment Knob

Water Bottle Holder*

Adjustment Knob

RIGHT SIDE

BEFORE YOU BEGIN


Содержание 831.300270

Страница 1: ...al for future reference Serial Number Decal Model No 831 300270 Serial No If you are MISSING PARTS or require INFORMATION on how to operate this product call 1 888 936 ICON 1 888 936 4266 To schedule...

Страница 2: ...IONS 3 BEFORE YOU BEGIN 4 ASSEMBLY 5 HOW TO OPERATE THE EXERCISE CYCLE 9 MAINTENANCE AND TROUBLESHOOTING 19 CONDITIONING GUIDELINES 20 PART LIST 22 EXPLODED DRAWING 23 HOW TO ORDER REPLACEMENT PARTS B...

Страница 3: ...vice Various factors including the user s move ment may affect the accuracy of heart rate readings The pulse sensor is intended only as an exercise aid in determining heart rate trends in general 11 A...

Страница 4: ...l our manufac ture s Customer Service Department toll free at 1 888 936 4266 Monday through Friday 8h00 until 18h30 eastern time excluding holidays To help us assist you please note the product model...

Страница 5: ...mbly The number in parenthesis below each drawing refers to the key number of the part from the PART LIST on page 22 The second number refers to the quantity needed for assembly Note Some small parts...

Страница 6: ...Upright 13 in the position shown connect the Upper Wire Harness 36 to the Lower Wire Harness 35 Carefully pull the upper end of the Upper Wire Harness to remove any slack from the Wire Harnesses make...

Страница 7: ...ar 51 into the Left Handlebar Connect the Handlebar Collars the Left Handlebar and the Right Handlebar with two M4 x 16mm Screws 66 Attach the Handlebar Bracket 15 to the Left and Right Handlebars 50...

Страница 8: ...kept tight ened Adjust the Left Pedal Strap 25 to the desired position and press the end of the Pedal Strap onto the tab on the Left Pedal 24 Adjust the Right Pedal Strap not shown in the same way 9 2...

Страница 9: ...urns to loosen it if the knob is not loosened enough it may scratch the seat bracket Next pull the knob slide the seat to the desired position and then release the knob Move the seat bracket forward a...

Страница 10: ...io cable available at electronics stores you can connect the exercise cycle to your home stereo portable stereo computer or VCR and play special iFIT com CD and video programs iFIT com CDs and videoca...

Страница 11: ...step 5 on page 12 To view only the distance you have pedaled or the number of calories or fat calories you have burned press the upper button on the left side of the large display until only the word...

Страница 12: ...and then your heart rate will be shown For the most accurate heart rate reading continue to hold the handgrips for about 30 seconds Note When you first hold the handgrips the large dis play will show...

Страница 13: ...tance of the pedals will automatically change if a different resistance level is programmed for the next period The target pace for the current period will be shown by the arrows in the small display...

Страница 14: ...available at electronics stores Plug the Y adapter into the PHONES jack on your CD player Plug your headphones into the other side of the Y adapter HOW TO CONNECT YOUR PORTABLE STEREO Note If your ste...

Страница 15: ...into the LINE OUT jack on your stereo HOW TO CONNECT YOUR COMPUTER Note If your computer has a 1 8 LINE OUT jack see instruction A If your computer has only a PHONES jack see instruction B A Plug one...

Страница 16: ...r end of the cable into the AUDIO OUT jack on your VCR B Plug one end of a 1 8 to RCA stereo audio cable available at electronics stores into the jack beneath the console Plug the other end of the cab...

Страница 17: ...or VCR A moment after the play button is pressed your personal trainer will begin guiding you through your workout Simply follow your personal trainer s instructions The program will function in almo...

Страница 18: ...display Go to your computer and start an internet con nection Start your Web browser if necessary and go to our Web site at www iFIT com Follow the desired links on our Web site to select a program F...

Страница 19: ...t under the front stabilizer until the rocking motion is eliminated HANDGRIP PULSE SENSOR TROUBLESHOOTING Avoid moving your hands while using the handgrip pulse sensor Excessive movement may interfere...

Страница 20: ...xercise Aerobic Exercise If your goal is to strengthen your cardiovascular sys tem your exercise must be aerobic Aerobic exer cise is activity that requires large amounts of oxygen for prolonged perio...

Страница 21: ...les Stretch With one leg in front of the other reach forward and place your hands against a wall Keep your back leg straight and your back foot flat on the floor Bend your front leg lean forward and m...

Страница 22: ...C Magnet 42 1 Left Crank Arm 43 1 Reed Switch Wire 44 1 Crank Bearing Assembly 45 2 M5 Nut 46 1 Adjustment Cable 47 1 Return Spring 48 1 Idler Arm 49 1 M8 x 14mm Button Screw 50 1 Left Handlebar 51 1...

Страница 23: ...1 69 45 45 63 11 60 29 65 65 2 31 32 39 40 40 61 61 62 68 63 63 63 22 66 43 52 52 66 66 52 51 50 35 36 12 70 28 44 15 34 33 53 10 48 26 27 57 56 5 20 4 23 65 58 28 58 8 10 10 67 67 70 28 72 66 73 7 7...

Страница 24: ...urpose intended under normal conditions and provided it receives proper care HOW LONG DOES THE COVERAGE LAST This warranty lasts for one year on all parts The warranty is extended only to the original...

Отзывы: