background image


5


Main Menu


1


4


7


2


0


5


8


Enter


Del


9


3


6


BACK


Press “Enter”


Step 2


Input “

461


on keypad


Clear Errors


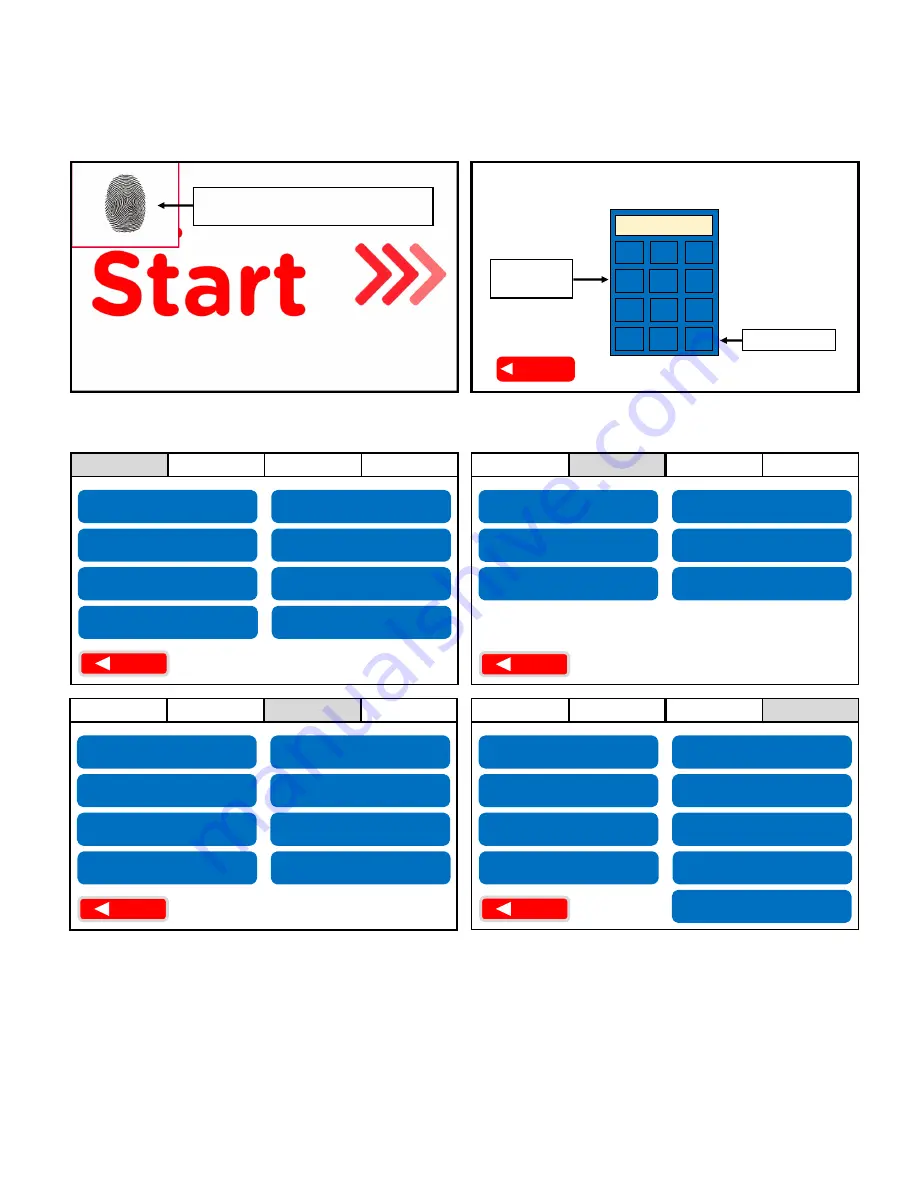
Main Menu Options


The Main Menu utilizes a 4

-

tab layout that results in a single access point.


Press and hold the top left corner 


for 10 seconds until a keypad appears 


Step 1


Access the Main Menu


Locate the lower screen and follow the instructions below to access the 

Main Menu

:


Network


Used while Troubleshooting errors from pages 6

-

13


1.


Follow Steps 1 & 2 in the “Access the Main Menu” above.


2.


Press the “Clear Errors” button on the “General” tab.


General


Service


Procedures


BACK


Network


General


Service


Procedures


Network


General


Service


Procedures


BACK


Network


General


Service


Procedures


BACK


Blender Info


Sanitize Time


Sanitize Description


LVCB Status Window


*


Reset Screen


Cleaning and Sanitizing Log


Contact f’real


Check Cell Signal


Synchronize with Server


Configure Network for 


Cellular Connection


Network Status


Restart Network


Configure Network for 


Ethernet


Raise Cupholder


Shut Down the Blender


Calibrate Cupholder


Water Purge/Boil Water


Set Time Zone


Reset Blender


Configure Languages


Activate Cleaning


and Sanitizing


Toggle Registration


Update Content


f’real Training


Gather Diagnostic Info


Set Volume


Manual Commands


Update Firmware 


from HEX File


Reinstate Customer


Install Sequence


Run Diagnostic Routine


*


   How to Reset a Blender Error Code


BACK


Содержание FRLB6

Страница 1: ...1 Rev D Model FRLB6 Service Manual...

Страница 2: ...2...

Страница 3: ...e Front Door OOPS Flippin Door is Open OOPS Something s in the Way of the Cup Holder OOPS Wrong Cup Size HEY The Product is not Cold Enough to be Blended WE RE SO SORRY The Blender Needs Water to Blen...

Страница 4: ...p Up Door to clean off any product build up around the blending chamber rim and gasket Be careful not to damage the gasket Panels Screens Daily Blender Maintenance 4 2 1 Open front door and locate the...

Страница 5: ...twork General Service Procedures Network General Service Procedures BACK Network General Service Procedures BACK Blender Info Sanitize Time Sanitize Description LVCB Status Window Reset Screen Cleanin...

Страница 6: ...Manual Electrical System Error 66 Pump Motor Peak Current Limit Exceeded TRIGGER Pump Motor current exceeds 9 5 amps 1 Access the Main Menu and press the Clear Errors button 2 Remove the left side pa...

Страница 7: ...tus Window button and locate Line Q HomeSN A If it reads HomeSN 0 and the Cup Holder is in the home position replace the Home Sensor Parts Manual Linear Motion System Error 6E Steamer Thermistor Short...

Страница 8: ...t from side to side It is the silicone nozzle situated on the ceiling of the chamber to the left of the blending shaft 5 Access the Main Menu and select the Procedures tab and press the Activate Clean...

Страница 9: ...teamer tank is receiving 120VAC by measuring at the elements on top of the heater If no voltage is present measure the VAC between the bottom post on the Thermal Cutout white wire and the main post wh...

Страница 10: ...a If no voltage is present remove the right side panel and proceed to step 5 b If 120VAC is present replace the Steamer Heater Parts Manual Water System 5 Remove the right side panel to verify the St...

Страница 11: ...lugged when replacing parts and practice caution when testing voltages A Ensure the wire harness from the Pump Motor is securely connected to the HVCB at TB9 B Ensure the White Jumper cables between t...

Страница 12: ...range proceed to the Step 3 D b If out of range replace the Chamber Thermistor Parts Manual Water System D Measure DC voltages for the Chamber Thermistors on the Pinch Guard Assembly at P2 a If there...

Страница 13: ...was requested while sanitize is in progress or hasn t completed in 24 hours TRIGGER 2 A manual sanitize stop was requested after the previous sanitize failed 1 Access the Main Menu and press the Clea...

Страница 14: ...coming off or damaged replace the Flip Up Door Parts Manual Mechanical System 2 Check the operation of the Flip Up Door Manually operate the door The Flip Up Door should have spring tension but should...

Страница 15: ...of the WPR into a large cup C Connect the Female QD back to the blender you should have good water pressure a If no water pressure is present replace the Female Quick Disconnect Parts Manual Water Sy...

Страница 16: ...F A Perform the Squeeze Test by squeezing a chocolate milkshake in the middle of the cup You should be able to squeeze a dime size dent in the cup If not the product is too cold for blending B Ensure...

Отзывы: