background image

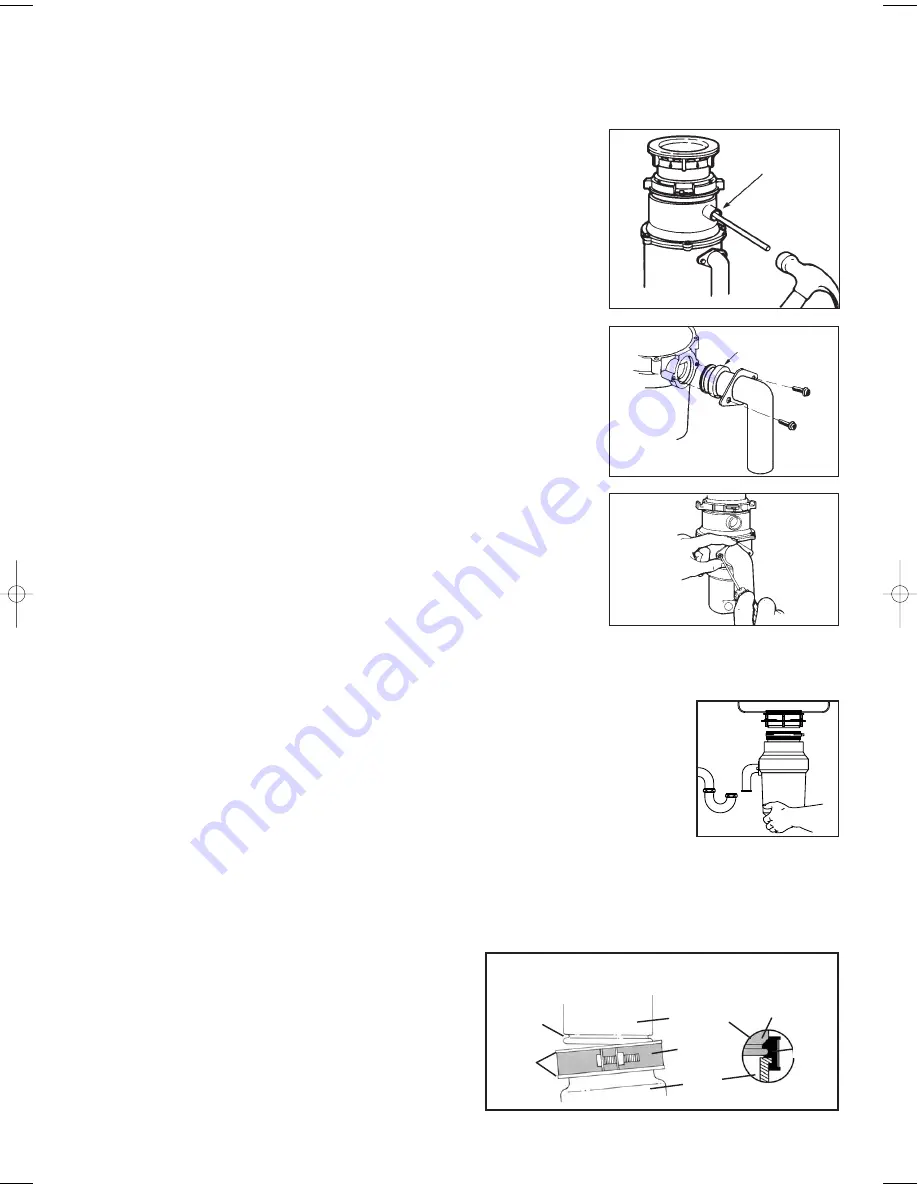
3. Overflow/Appliance Connections

4B

For overflow or dishwasher connection complete the following procedure.  

Alternatively go to step 4.

A. Using a blunt instrument (steel punch or wooden dowel), knock out entire

plug (see 3A). Do not use a screwdriver or sharp instrument.  When 

knockout plug falls into disposer, you may remove it or simply grind it up 

when the disposer is used.  This will not damage the disposer in any way,

but may take some time to grind, over the course of several uses.

B. Connect overflow or hose using hose clamp.  If hose size is different, you 

will need a stepped rubber adaptor.

KNOCK

OUT 

PLUG

3A

4. Attaching discharge elbow

RUBBER GASKET

4A

A.

Connect waste elbow to disposer (see 4A), proceed to step 5 and then 

connect bottom of elbow by tightening slip nut.

B.

Make sure all plumbing connections are tight (see 4B).

5. Connecting disposer to mount assembly

3-BOLT MOUNT (See section 3 for your mount type.)

A.

Press firmly around the Hush Cushion® to ensure 

it is engaged with the neck of the disposer.  

B.

Lubricate the top inside lip of the rubber Hush 

Cushion® with a liquid soap.

C.

Line up discharge elbow of disposer with trap 

under mounting assembly. Guide disposer up and 

engage the groove of the Hush Cushion® around 

the ridge at the bottom of the sink flange (see 5A 

& refer back to 1B). While still supporting the               

disposer, tighten the screw-clamp around Hush 

Cushion®. The disposer will now hang by itself.

D.

If you need to turn the disposer make sure the 

sink flange does not turn. It will break the seal

created when installed. Go back to steps 5A and 5B.

IMPORTANT – PLEASE READ

Do not remove clamp from

Hush Cushion® or Hush

Cushion® from hopper. Both

parts are factory installed and

installation ready.

Lubricate top angled surface of rubber Hush Cushion®

with liquid soap prior to engaging disposer to sink flange.

Fit Hush Cushion® lip into sink flange groove using a slight

rocking motion. Tighten clamp (see 5B).

5B

SINK FLANGE

CLAMP 

HUSH CUSHION®
TOP ANGLED
SURFACE

HUSH
CUSHION
®

SINK
FLANGE
GROOVE

CLAMP 

HOPPER 

5A

FR020627 OWNERS GUIDE  16/5/06  4:38 pm  Page 5

Содержание FOOD WASTE DISPOSER

Страница 1: ...e disposer and it will shred the garbage into very fine particles that are easily flushed through the sewer system without any problem For Batch Feed Operations please see Section 6 of this manual Before installing and operating this disposer 1 Make sure that the installation of this appliance is allowed by the authorities 2 Please read and follow all recommendations in this manual to ensure troub...

Страница 2: ...n of the overload protection device remains readily accessible 8 Additionally for continuous feed models Care must be taken to ensure that the supply is disconnected by switching off the electric supply or by removing the plug from the socket outlet before freeing a jammed rotor as describe in step 5 When not operating the disposer leave the stopper in place to reduce the risk of objects falling i...

Страница 3: ...o it is centred and readable as you look into your sink Push the sink flange firmly into the sink opening to make a good seal DO NOT move or rotate the sink flange once seated or the seal may be broken D Take the remaining portion of the mount assembly as it was set aside and make sure that the rubber gasket is on top of the protector ring From under the sink while holding the sink flange firmly w...

Страница 4: ... spur This spur switch should be situated conveniently above the work surface at least a metre away from the side of the sink unit away from splashes and out of reach of children The spur switch used must be a double pole type with at least 3mm contact separation in each pole 20 Amp DP switches to BS 3676 meet this requirement To help prevent accidentally leaving the disposer running a switch with...

Страница 5: ...t type A Press firmly around the Hush Cushion to ensure it is engaged with the neck of the disposer B Lubricate the top inside lip of the rubber Hush Cushion with a liquid soap C Line up discharge elbow of disposer with trap under mounting assembly Guide disposer up and engage the groove of the Hush Cushion around the ridge at the bottom of the sink flange see 5A refer back to 1B While still suppo...

Страница 6: ...es that all waste is thoroughly flushed through trap and drain E It is not recommended to use hot water while running disposer Cold water will keep food waste and fats solid so disposer can flush away particles A Remove sink stopper and turn on a medium flow of cold water see 6A B Scrape in food waste Down the drain go table scraps vegetable peelings cobs rinds pits bones and coffee grounds see 6B...

Страница 7: ...han those during grinding of bones and fruit pits These are usually caused by accidental entry of a spoon bottle cap or other foreign object To correct this remove splash guard and remove object with long handled tongs Replace splash guard UNIT DOES NOT START With splash guard removed check to see if turntable will rotate freely using a wooden utensil If turntable rotates freely replace splash gua...

Страница 8: ... disposer giving the appearance of rust DO NOT BE ALARMED the stainless steel turntables used on models indicated in section 10 will not corrode 9 Electrical information Replacing the fuse in moulded plugs The correct fuse cover must be refitted when changing the fuse Remove the fuse cover and slide the fuse out Replace it with a 13 Amp ASTA fuse approved to BS 1362 Should the fuse cover be lost o...

Отзывы: