background image

32

SI30-00004-32/C

Using the machine

4125126F/C

02/10/2003

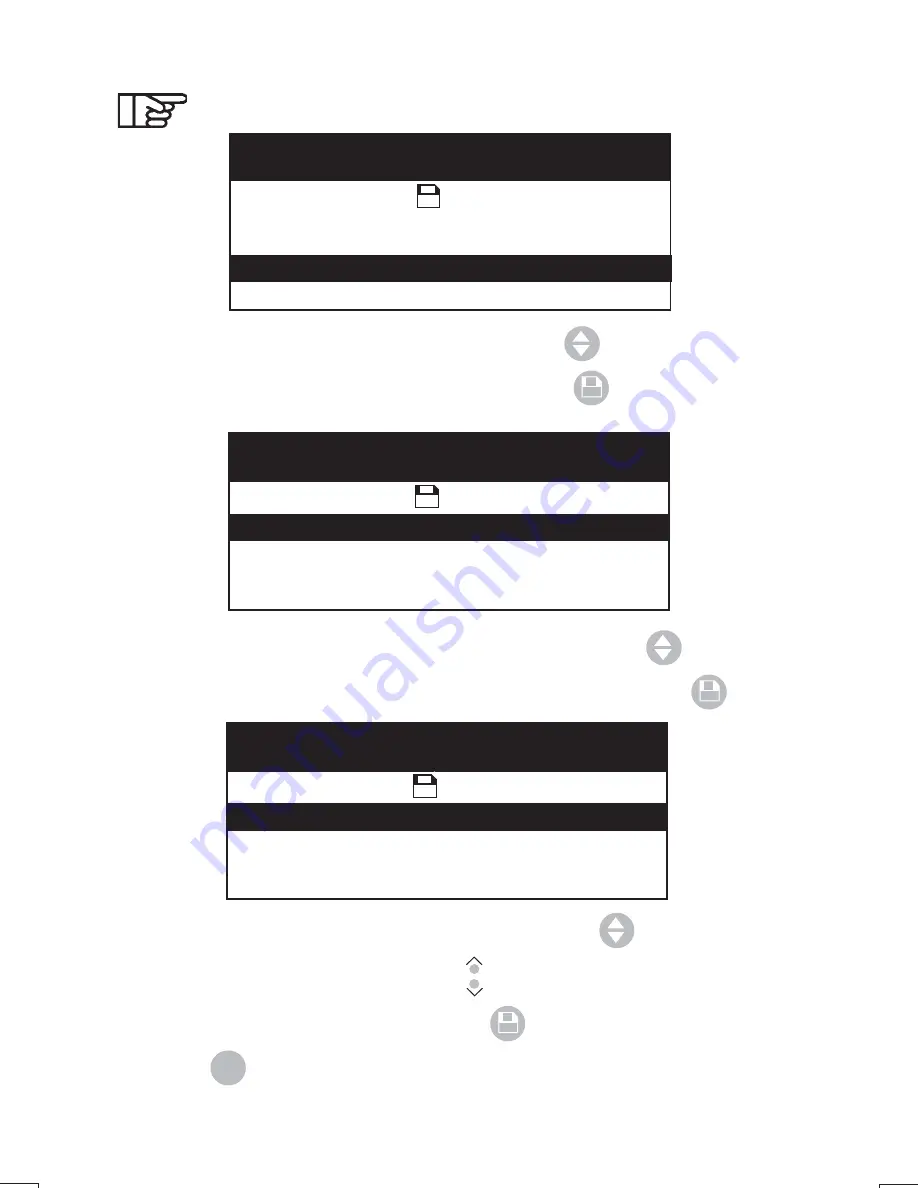
To perform these adjustments :

- Select the line "SET. ENV / DOC" using the key 

,

- Enter the manual adjustment menu using the key 

,

- Select the line you want to change, using the key 

,

- Enter the manual adjustment sub-menu using the key 

,

SELECT THE ENVELOPE FORMAT

Press        to  confirm

Set Standard envelope

:

Set Large envelope

:

Set Special envelope

:

Set Special document

:

STANDARD ENVELOPE SETUP

Press        to  confirm

Envelope height

: 114 mm

mmSet

Envelope stop position

: + 0 mm

Moistening position

: 23 mm

INITIALIZATION IN PROGRESS

MACHINE SETUP

Serial Number : 0000000000

Press        to  confirm

Language

: ENGLISH

Set

: Env. / Doc.

Double Det. Bin C

: ENABLE

- Select the line to be modified, using the key 

- Adjust the value using the keys 
- Store the adjustment by pressing 

- Press 

ESC

 to return to previous menu.

Содержание FPi 500

Страница 1: ...FOLDING AND INSERTING MACHINE USER S GUIDE...

Страница 2: ...features are Two automatic feeder trays for large format documents mainly A4 or US letter size An automatic feeder tray for small format documents small inserts or reply envelopes that are smaller in...

Страница 3: ...norm 55022 Class A INSTALLATION This equipment must be installed close to a grounded electrical AC outlet and the plug must be protected with a 16A fuse ATTENTION UNDER NO CIRCUMSTANCES SHOULD AN ATTE...

Страница 4: ...anguage 18 1 5 Filling the moistening tray 19 1 6 Double document detection tray C 20 2 USING THE MACHINE 21 2 1 User Mode 21 2 1 1 Stored job selection 22 2 1 2 Table of stored jobs 22 2 1 3 Starting...

Страница 5: ...CTION C HELP AND ADVICE 45 1 HELP GUIDE 47 1 1 Error messages 47 1 2 Symptoms and remedies 53 2 JAM CLEARING 58 2 1 Clearing the feeders tray A and B 58 2 2 Unjamming the document path 59 2 3 Unblocki...

Страница 6: ...5...

Страница 7: ...6 Symbols used Indicates necessary information Indicates potential problem area Indicates an idea or interesting point Illustration through an example...

Страница 8: ...7 SECTIONA GENERALPRESENTATION 1 MACHINE 9 2 CONTROL PANEL 10 3 OPENING THE MACHINE AND INTERNAL VIEW 11...

Страница 9: ...8 General presentation 1 2 3 4 5 7 12 13 6 8 17 10 9 11 16 15 14 15...

Страница 10: ...t or reply envelope feeder 7 Catchtray 8 Opening handle of the machine 9 Paper side guide locking levers 10 Locking levers for trays A and B 11 Locking mechanism for envelope guides 12 Power supply so...

Страница 11: ...10 General presentation 2 CONTROL PANEL Display panel Control keys Selection key Save to memory key Cancellation key Start and stop key...

Страница 12: ...General presentation 11 3 OPENING THE MACHINE AND INTERNAL VIEW Squeeze the handle on the front Lift the lid of the machine upwards Opening the machine...

Страница 13: ...12 General presentation Envelope exit roller E Shutter 7 Moistening tray Opening handle of the machine Internal view of the machine...

Страница 14: ...ob 24 2 1 5 Locking and unlocking a job 28 2 1 6 Counter 29 2 2 Advanced Functions 30 2 2 1 Changing the language 31 2 2 2 Settings for envelope formats and special do cuments 31 2 2 3 Double document...

Страница 15: ...14...

Страница 16: ...NSTALLATION AND START UP 1 1 Installing the machine Uponreceivingthemachine checkthecontentaccordingto the list below Base 2 rear guides for envelope tray Document feeders Trays A and B 1 power cord F...

Страница 17: ...ocument feeder by insertingits2plasticlugsintotheir respectiveslit locatedonthebase ofthemachine 2 Holdthefeedertowardsyou plug the connector to the A B feeder socket then replace the feeder properly...

Страница 18: ...ber START STOP Validate number ESC exit Press to confirm Code 0000000000 INITIALIZATION IN PROGRESS INITIALIZATION IN PROGRESS Total number of cycles 1234567 press ESC during initialization to change...

Страница 19: ...by pressing the key Scroll until you have reached the desired language and select it using the keys Complete the operation by saving the changes with Or by cancelling the changes with ESC 5 Once your...

Страница 20: ...the envelope flap so that it can be sealed This screen appears each time the machine is started up and remains active for several seconds INITIALIZATION IN PROGRESS CHECK WATER LEVEL Refill water 2 Re...

Страница 21: ...ct the language 2 Set the sizes for specific documents envelopes or paper 3 Validate or unvalidate the Tray C double detection INITIALIZATION IN PROGRESS MACHINE SETUP Serial Number 0000000000 Press t...

Страница 22: ...obs which can be stored in memory for later recall Fill the tray or trays concerned depending on the task to be performed see section entitled loading documents 2 1 User Mode When the user menu appear...

Страница 23: ...ault document format is A4 210x297mm The machine defines automatically the folding parameters to fit the size of the envelope chosen A pre stored job will certainly suit your needs If not please consu...

Страница 24: ...Job 6 AUTO A C C5 SEAL Trays A and B function alternately andtrayCfunctions simultaneouslywithwhichever tray is operational Job 7 MANUAL A C6 5 DL SEAL Tray A functions alone in manual AutoStart mode...

Страница 25: ...n it is not necessary to press the START S T O P key Tray A starts automatically when inserting a sheet of paper 2 1 4 Modifying a job Jobs already in the memory can be modified Select the line Job nu...

Страница 26: ...C TraysAandBenabletheinsertionoflargeformatdocuments of the A4 type that are to be folded They accept documents measuring from 177 mm to 356 mm Auto Automatic operating mode starts after pressing the...

Страница 27: ...key Select the desired format using the keys C6 5 DL Closed C6 5 DL Open C5 Closed C5 Open Envelope formats available Press to select format or START to process a job or to select line to modify Coun...

Страница 28: ...ce Onceyouhavethecorrectsetting startthecyclebypressingthe START S T O P key once The key moves it upwards in the window Place the document in tray A face up with the address at the top right Mr P Rob...

Страница 29: ...e settings using the key ESC Keep this key pressed Save to memory using the key A key shaped icon will appear next to the number of the amended job Only the job in progress can be amended the one with...

Страница 30: ...anditcanbereturnedtozero Itindicatesthetotalnumberofcyclesperformedonalljobs inclusive since it was last returned to zero To return a job meter to zero Select the line Counter using the key Return it...

Страница 31: ...headvancedfunctionsmode During initialization press the key ESC The following screen will appear INITIALIZATION IN PROGRESS MACHINE SETUP Serial Number 0000000000 Press to confirm Language ENGLISH Set...

Страница 32: ...ESC to return to the user menu 2 2 2 Settings for envelope formats and special do cuments Thismenuallowsadjustmentfor format size and position of the envelopes position for moistening the glue on the...

Страница 33: ...envelope Set Large envelope Set Special envelope Set Special document STANDARD ENVELOPE SETUP Press to confirm Envelope height 114 mmmmSet Envelope stop position 0 mm Moistening position 23 mm INITIA...

Страница 34: ...ldedleafletscorrectly Ifthesettingsareincorrect theenvelope may not be sealed correctly Set too high Set too low Correctingthemoisteningposition This setting makes it possible to adjust the area to be...

Страница 35: ...gs Size 152 mm to 165 mm manually adjustable 152 159 162 and 165 mm Position correction 7 mm to 8 mm manually adjustable in 1 mm increments Moistening position 13 mm to 45 mm manually adjustable in 1...

Страница 36: ...mmto45mm manuallyadjustable in1mmincrements Size 177 mm to 356 mm manually adjustable in 1 mm increments Manual adjustment of special envelopes Manual adjustment of special documents SPECIAL ENVELOPE...

Страница 37: ...ESC mode 2 3 Other Advanced functions 2 3 1 Double document detection activation deactivation for trays A and B INITIALIZATION IN PROGRESS MACHINE SETUP Serial Number 0000000000 Press to confirm Langu...

Страница 38: ...in user mode Press the ESC key and keep it pressed Press the key The following screen will appear Exit this screen using the ESC key to return to user mode Single fold C fold Double parallel fold INF...

Страница 39: ...containing the address must always face the user When both feeders feed simultaneously 2 documents the address document must be in tray A Tray A Lever in released position Guide for Trays A and B in l...

Страница 40: ...urled documents Some laser printers curl the paper excessively We recommend flattening the printed paper manually before inserting it into the machine If the job consists of a single document tray A a...

Страница 41: ...documents in manual mode tray A Beforeselectingmanualmode removeanydocumentpreviously loaded in tray A Check and adjust the lateral guides if necessary Insert a document or a set of docu ments manual...

Страница 42: ...st the rear guide to the size of the envelopes Guide adjusted for small envelopes Guide adjusted for large envelopes locked position forward unlocked position backward 2 Unlock the lever backward to t...

Страница 43: ...towards the back of the machine 5 Adjust the lateral guides to the size of the envelopes without squeezing them 6 Lock the lever forward in position Itisnotnecessarytoadjusttheguideseachtimeenvelopes...

Страница 44: ...apart 2 Take the stack of small inserts or reply envelopes and jog it on a flat surface 3 Tip the pressure pad back ward and holding it there insert the stack of small inserts or reply envelopes in th...

Страница 45: ...44 Loading documents 4 Releasethepressurepad and bring the guides together against the small inserts or reply envelopes without squeezing them...

Страница 46: ...2 Unjamming the document path 59 2 3 Unblocking path of small inserts tray C 59 2 4 Clearing the envelope tray 60 3 CLEANING 61 3 1 Cleaning the rollers 61 3 1 1 Internal rollers 62 3 1 2 Envelope Tr...

Страница 47: ...46...

Страница 48: ...oout of the tray document is outside the specification or distorted Paper overload Open the machine remove paper and envelopes from areas 1to8oropenshutter7 then close the ma chine to return to the me...

Страница 49: ...AND THEN ON AGAIN A B Feeder Socket disconnected Switch off the ma chine reconnect the socket and switch on Open the machine removethedocuments and envelopes from areas1to8andcloseit again OPEN THE M...

Страница 50: ...ted Adjust the rear guide oftheenvelopetray tray E accordingtothesize of the envelopes Openthemachineand checkthattheenvelope path is clear CHECK THE ENVELOPE PATH Envelope jammed in the machine Opent...

Страница 51: ...tray s A B or C CHECK THAT DO CUMENTS ARE MOVING CORRECTLY OUT OF TRAYS A B Document jammed in entry A and or B preventing the cycle from running its course Open the entry of the tray using the lever...

Страница 52: ...PATH OF TRAY C Documentoutsidethe specification or distorted Paper overload Apply the clearing proceduredescribedin the chapter Clearing small insert path tray C CHECK THAT DO CUMENTS ARE MOVING CORR...

Страница 53: ...to run through its normal cycle Open the machine remove the docu ments if any are jammed inside and close the machine again JOB DEFECT Er3 Minor defect it has become impossible to use this job Select...

Страница 54: ...ction and folding rollers if necessary seechapter Cleaning the rollers CAUSES 1 Inadequatemoistening 2 Wrong job selection 3 Document smallinsert non compliant or incompati ble 4 Jobnon compliantwith...

Страница 55: ...re keys stuck REMEDY 1 Check to see whether a key is stuck Rate slowdown and irregular functioning CAUSES 1 Side guides too tight against the paper 2 Documents or small inserts wrong size or not strai...

Страница 56: ...ed in the window CAUSE 1 Fold in wrong place REMEDY 1 Adjust the height of the address in your job Shifted ocuments in trays A and B CAUSES 1 Dirty selection rollers 2 Tray A or B lateral guides too t...

Страница 57: ...s 4 Worn moistening brushes 5 Envelope out of specification 6 Poor quality envelope 7 Wrong moistening settings REMEDIES 1 Fill the moistening tray see InstallationandStart up 2 Select SEAL in the lin...

Страница 58: ...of small insertpath 10 Unspecified error 2 See Specifications 3 See Specifications 4 See Section Cleaning the rollers 5 See Section Loading the documents 6 See specifications 7 Position the envelopes...

Страница 59: ...orward andunplugtheconnector Take out the feeder from the base Removethejammed documentthroughthe lower part of the feeder Afterunjamming placethe feeder back on the base and pluginthefeederconnector...

Страница 60: ...jammed documents turn blue flywheel D or roller E Pinch the opening control located at the back of tray C it will then tip backward In the back part of the base squeeze the two plates together and ra...

Страница 61: ...following procedure Openthemachine takeoutthejammedenvelope s throughthe internalpaperpath Ifsomeenvelopesarestilljammed closethemachine remove the envelope stack and take out the last envelope squeez...

Страница 62: ...ert and envelopetrays Reduced risk of paper jams Preserves the roller material To ensure optimal working of the machine we recommend to clean all rollers at the same time This operation will take appr...

Страница 63: ...g 3 1 1 Internal rollers Openthemachine Use a cleaning product recommended by your reseller and apply it with a lint free cloth Wipeeachrubberrollerwhileturningitmanually Rollers to be cleaned Close t...

Страница 64: ...with a lint free cloth Wipeeachrubberrollerwhileturningitmanually 3 1 3 Tray C Rollers Useacleaningproductrecommendedbyyourre sellerandapply itwithalint freecloth Therollersidentifiedbyayellowarrow re...

Страница 65: ...e strip impregnated with the cleaning product at the bottom Whileholdingthesheetwithyourhand pressthestartkey severaltimes sothattherollerscanrubagainstthesheet Then release the sheet so it can engage...

Страница 66: ...hin trickle of water 5 If these brushes are worn replace them with new ones 6 Put back the brushes in the tray 7 Fill the tray with water and make sure brushes are properly impregnated 8 Insert the mo...

Страница 67: ...66...

Страница 68: ...90 g m to 120 g m Inautomaticmode 90 g m to 150 g m2 In manual mode tray A Printed matter listing paper photocopies offset 70 g m to 120 g m in automatic and manual mode Capacity of trays Standard pap...

Страница 69: ...Inautomaticmode Printed matter listing paper photocopies offset 80 g m to 90 g m2 in automatic and manual mode The insert should always be positioned behind the main document so that it cannot be see...

Страница 70: ...g paper Photocopy paper 80 g m to 120 g m2 Offset paper Bristol board coated paper 80 g m to 250 g m2 Coated paper pre folded 90 g m to 170 g m2 Reply envelope 70 g m to 90 g m2 With or without window...

Страница 71: ...to 165 mm Folding and insertion capacity Single fold Up to 5 sheets 70 to 80 g m2 Up to 3 sheets 86 to 120 g m2 Double parallel fold Up to 3 sheets 70 to 85 g m2 Up to 2 sheets 86 to 120 g m2 Inserti...

Страница 72: ...4125126F C 02 10 2003...

Отзывы: